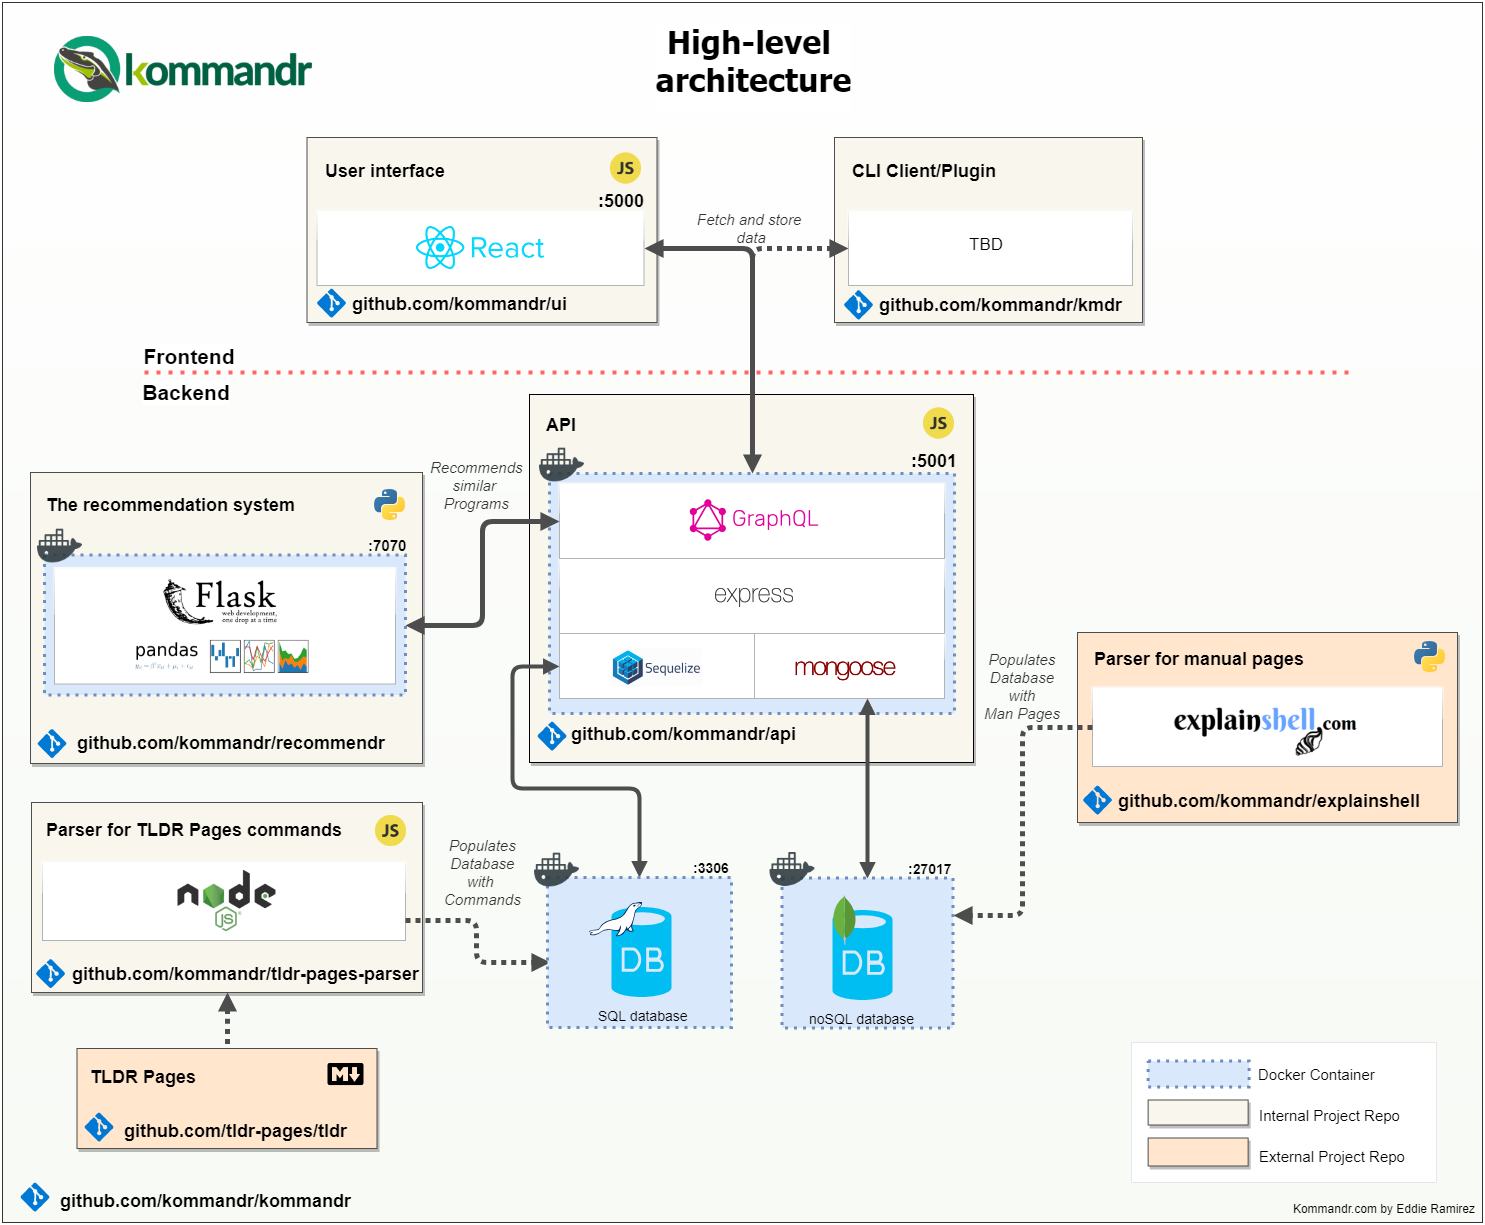
Kommandr has a simple yet ambitious charter: be a social application that enables users to discover, learn about, save, and share commands.
Things you can do with the Kommandr MVP:
- Search for commands by free typing what you want to do, or entering a command you want to learn about.
- Discover alternative commands/programs to complete a task by using the recommendation tool
- Filter search results by program or operating system (OS).
- Access manual pages that explain how to use a program
The installation process is segmented in four steps:
- Cloning this repo
- Docker images and containers
- The backend and the database
- The UI
- docker and docker-compose
- npm
- git client
Download the source code of this repository to your computer. This repo only contains high-level configuration for deployment with docker-compose
$ git clone git@github.com:kommandr/kommandr.git
$ cd kommandr
This repo depends on 3 repositories:
- ui: the facing part of the project that lets user to fetch and store information
- api: the application that sits on the server and manages connection to two databases and responds to API calls via GraphQL
- recommendr: the recommendation system that suggests similar programs that perform a similar task.
- tldr-pages-parser: a set of scripts built on JS that reads Markdown files from TL;DR Pages project and transforms them into objects that can be later used programmatically
- kmdr.sh: the command-line client that lets you use Kommandr from the terminal.
$ git submodule update --init
This will download the projects after registering their names and urls into the .git/config.
Kommandr uses Docker containers for development and production environments. While not all of the projects are containerized, both the database layer and recommendation system are always put into containers for development and production environments. More details can be found inside of the compose files docker-compose.dev.yml and docker-compose.prod.yml
It's recommended to keep at least three terminal windows open as you work on kommandr.
- Terminal Window #1: building and running docker containers
- Terminal Window #2: starting the dev server for the API
- Terminal Window #3: starting the dev server for the UI
$ cd kommandr
$ docker-compose -f docker-compose.dev.yml up --build
Building recommendr
Step 1/8 : FROM ubuntu:latest
 ---> 113a43faa138
Step 2/8 : RUN apt-get update -y
 ---> Using cache
 ---> 3efadd7982e7
Step 3/8 : RUN apt-get install -y python-pip python-dev build-essential
 ---> Using cache
 ---> 74d04b610c4c
Step 4/8 : WORKDIR /ml_kmdr
 ---> Using cache
 ---> c0c8731c7637
Step 5/8 : COPY . .
 ---> Using cache
 ---> 7c4259e46ed1
Step 6/8 : RUN pip install -r requirements.txt
 ---> Using cache
 ---> 7222d9509cd3
Step 7/8 : ENTRYPOINT ["python"]
 ---> Using cache
 ---> b472ddb3550d
Step 8/8 : CMD ["ml_api.py"]
 ---> Using cache
 ---> 54a684cafdea
Successfully built 54a684cafdea
Successfully tagged kommandr_recommendr:latest
Starting kommandr-api-sql     ... done
Starting kommandr-api-mongodb ... done
Starting kommandr-recommendr  ... done
...
Keep in mind that this process can take a long time to complete.
This part explains the most important steps to get the API up & running. If you are looking for details then visit the project's README
The API is not containerized for development as changes would require to constantly build the images wasting our precious time.
$ cd src/api
$ npm install
$ npm install -g sequelize-cli
Create the configuration files for the database and edit as appropiate
$ cd config/
$ cp config.json.example config.json
$ cp db.mongo.json.example db.mongo.json
$ cp db.sql.json.example db.sql.json
$ ./databases.sh restore --all
$ ./databases.sh restore --sql
$ ./databases.sh restore --mongo
$ npm start

> kommandr-api@1.0.0 start C:\Users\Eddie\github\kommandr\src\api
> nodemon --exec npm run babel-node -- ./src/index.js

[nodemon] 1.17.5
[nodemon] to restart at any time, enter `rs`
[nodemon] watching: *.*
[nodemon] starting `npm run babel-node ./src/index.js`

> kommandr-api@1.0.0 babel-node C:\Users\Eddie\github\kommandr\src\api
> babel-node --presets=latest "./src/index.js"

Starting server in development mode
Listening on http://localhost:5001/
Connected to MongoDB
The UI and the API are not containerized and are run locally.
$ cd src/ui
$ npm install
$ npm start

> kommandr@0.1.0 start C:\Users\Eddie\github\kommandr\src\frontend\ui
> node scripts/start.js --env=development

The app is running at:

  http://localhost:5000/

Note that the development build is not optimized.
To create a production build, use npm run build.
Compiled successfully!
Pending...
Pending...
Pending...
