OWASP Juice Shop Laboratory includes a short setup guide for OWASP Juice Shop and some information and guides for the step-by-step resolution of the challenges on the platform with focus on the standard awareness document OWASP Top Ten
Some info about the OWASP Foundation, the OWASP Top Ten and the Juice Shop project
![]()
The Open Web Application Security Project® (OWASP) is a nonprofit foundation that works to improve the security of software. Through community-led open-source software projects, hundreds of local chapters worldwide, tens of thousands of members, and leading educational and training conferences, the OWASP Foundation is the source for developers and technologists to secure the web.
The OWASP Top Ten is a standard awareness document for developers and web application security. It represents a broad consensus about the most critical security risks to web applications. Globally recognized by developers as the first step towards more secure coding. Companies should adopt this document and start the process of ensuring that their web applications minimize these risks. Using the OWASP Top 10 is perhaps the most effective first step towards changing the software development culture within your organization into one that produces more secure code.
![]()
OWASP Juice Shop is probably the most modern and sophisticated insecure web application! It can be used in security trainings, awareness demos, CTFs and as a guinea pig for security tools! Juice Shop encompasses vulnerabilities from the entire OWASP Top Ten along with many other security flaws found in real-world applications!

For a detailed introduction, full list of features and architecture overview please visit the official project page: https://owasp-juice.shop
In this laboratory we use a small Linux distribution called Alpine Linux.
Feel free to use the Operating System you prefer, as the core of the laboratory is Juice Shop which will be installed via Docker or node.js
As mentioned Juice Shop is the core of the laboratory, it is possible to install it in many other ways:
You can find some less common installation variations in the Running OWASP Juice Shop documentation.
Visit the official github repository for more details on installation and more
-
Download and Install VirtualBox
-
Download and Install also the VirtualBox VM VirtualBox Extension Pack
-
Create a new virtual machine with at least 512 MB of RAM and 3 GB of disk space.
More information on how to install Alpine Linux on a virtual machine can be found here
It is recommended to raise both the RAM and disk space specifications if the host machine resources allow it -
Optional tweaks:
- Settings -> General -> Description: fell free to use this banner to remember the username and password chosen
- Settings -> System -> Processor(s): if the host machine resources allow it, raise to 2 CPU
- Settings -> System -> Motherboard -> Boot Order: disallow Floppy and move it to the bottom of the list
-
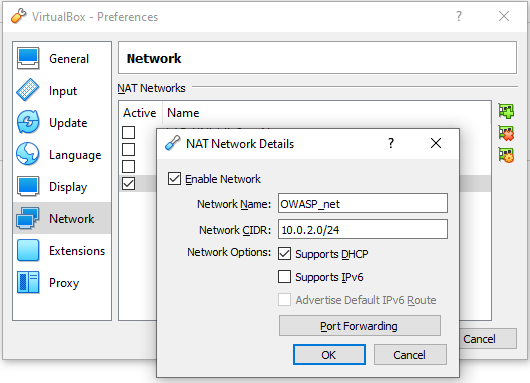
To reach the machine is necessary to set a dedicated network for the laboratory:
- On VirtualBox go to:
File -> Preferences -> Network -> Add and activate a new NAT network as shown in the picture:
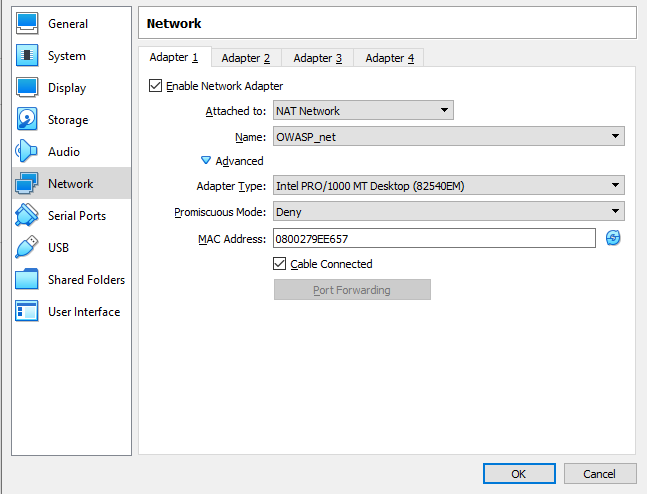
- On the virtual machine settings go to:
Settings -> Network -> then set up a network adapter as shown in the figure:
- On VirtualBox go to:


![]()
Small. Simple. Secure.
Alpine Linux is a security-oriented, lightweight Linux distribution based on musl libc, OpenRC and busybox.
Visit the official wiki if you have any doubts or problems.
A full guide on how to install Alpine Linux can be found here
-
Download the virtual version selecting the proper architecture
-
Mount the iso to the virtual machine and start it
-
Login with root username and check if the network interface is up:
ip aIf a network interface is in "state DOWN", run the following command to bring it up:
ip link set <interface name> up -
Install Alpine in System Disk Mode:
-
Run the "setup-alpine" script with:
setup-alpine -
The setup-alpine script offers the following configuration options:
The bracketed options represent example configuration choices- Select keyboard layout: [it]
- Enter system hostname: [alpine-owasp]
- inizialize the available interface: [eth0]
- Ip address: [dhcp]
- Manual review: [no]
- New password: [Pa$$w0rd]
- Wich timezone are you in?: [Europe/Rome]
- HTTP/FTP proxy URL? [none]
- Wich NTP client to run? [chrony]
- Enter mirror number (1-73) or URL to add [70] (alpinelinux.mirror.garr.it)
- Setup a user? [no]
- Which ssh server? [openssh]
- Allow root ssh login? [yes]
- Which disk(s) would you like to use? [sda]
- How would you like to use it? [sys]
- WARNING: Erase the above disk(s) and continue? [yes]
-
if the "setup-alpine" script has finished configuring the "sys" disk mode, the system should be ready to reboot right away, so type:
poweroff -
Now remove the initial installation media from the boot drive, or detach it from the port it's connected to, then restart the machine.
-
The installation script installs only the base operating system. No applications e.g. web server, mail server, desktop environment, or web browser are installed, and root is the only user.
-
It is recommended to interact with the system via SSH, you can simple reach this machine with another virtual machine of your choice with a network adapter attached to the NAT Network named OWASP_net, as shown in the figure. So first get the IP address of the machine, you can do this in two ways:
-
during the booting process the dhcp client is started so in the output, on the screen, you can see a line with the following information:
udhcpc: lease of 10.0.2.X obtained from 10.0.2.Y, lease time 600the 10.0.2.X is the IP address needed to connect via SSH.
-
...or you can use nmap to find the right ip address to connect, on a system running on the same network simply running:
nmap -sn 10.0.2.0/24
-
-
Now you can connect to the system with:
ssh root@10.0.2.Xand enter your password. -
If you wish, you can customize your system with a custom banner, fell free to use this banner. It's possible to change the "message of the day" by editing the
/etc/motdfile with the one provided:-
To get the banner, it's possible to use a tool called wget, a computer program that retrieves content from web servers:
wget https://raw.githubusercontent.com/edi-marc/juice-shop_lab/main/assets/banners/vm_motd.txt -O /etc/motd
-
-
-
Install Docker:
![]()
Docker is an open platform for developing, shipping, and running applications. It enables you to separate your applications from your infrastructure so you can deliver software quickly. With Docker, you can manage your infrastructure in the same ways you manage your applications. Docker provides the ability to package and run an application in a loosely isolated environment called a container.
-
You can familiarize with the package manager provided in Alpine called apk (Alpine Package Keeper) from this wiki:
-
First we need to add the "Community Respositories" to the package manager, so open with a text editor the
/etc/apk/repositoriesfile. For doing this you can use Vi, find and use some "Vi cheat sheet" to learn how to use this tool. The commands that we need are:-
vi /etc/apk/repositoriesTo open with Vi the file. -
Press
iTo insert. -
Modify the line of the community repositories deleting the comment
#like this:http://alpinelinux.mirror.garr.it/vX.YY/community -
Type
:wqTo save and quit OR:q!To quit without saving. -
Now update the index of available packages with
apk update -
When finished upgrade the currently installed packages with
apk upgrade
-
-
-
Now It's time to install Docker. It's needed only two commands for doing that, but if you wish, you can use this wiki to customize your installation at your need:
apk add dockerTo install the docker package.rc-update add docker bootTo start the Docker daemon at boot.
At this point the Virtual Machine is correctly set, and the docker setup is finished, so it's time to install Juice Shop, the core of the laboratory, via Docker. A simple shell script is available to do this, to get it on the machine run these commands:
- Download the script:
cd && wget https://raw.githubusercontent.com/edi-marc/juice-shop_lab/main/assets/scripts/rebuild_juice_shop.sh
- Make the script executable and prevent it from being accidentally modified:
chmod 0500 rebuild_juice_shop.sh
- Reboot the system:
reboot
- Run it!
./rebuild_juice_shop.sh
The script:

The provided script can be used both for the first installation, but also to update Juice Shop to the latest version or if, in case of errors, to rebuild the Juice Shop instance from scratch.
The script performs several tasks:
- Download the latest docker image of Juice Shop;
- Remove previous container, if any and start a new one;
- Displays current images and containers;
Now that everything is set up correctly, connect to the virtual machine port 3000 to explore "OWASP Juice Shop":
http://10.0.2.X:3000
Enjoy!