- ES2015 Syntax
- What is React
- Pros vs Cons
- Preparing the Environment
- Environment description
- My first component
- Thinking in components
- Props and States
- Event handling
- Modules
- Real example
- Flux vs MVC
- Modules
- Gulp
- CSS Preprocessors
- Unit tests
- Functional programming
- Object Oriented Programming
All the examples shown here are written using the new ES6/ES2015 syntax, if you need more info about this, please visit ES6/ES2015
ReactJS is a Javascript library created by facebook. It is used to create UI components for a web application. A calendar, a slider, a countdown timer, all these examples can be done via ReactJS.
All technologies have pros and cons, react is not an exception, so you must know what are they:
- Pros
- It is just a library, not a framework, so it is easier to learn than other Javascript approaches.
- Fixing bugs is easier than you would think.
- It can be easily integrated with other libraries such as jQuery, Bootstrap, Moment, Lodash, etc.
- You do not need to handle DOM manipulations in your code, ReactJS does the heavy lift for you.
- Cons
- It requires a deeper Javascript understanding.
- The ReactJS ecosystem is not as easy to install as jQuery.
- It can be haunting at first sight.
- It is need to compile ReactJS applications.
- You must use the command line tool.
For this tutorial, and for most use cases, I recommend you Atom, which is the text editor created by github staff, to download it you can visit https://atom.io/
Also, we will do all these examples in google chrome and react developer tools extension, you can found it right here Chrome React developer tools
To use react, the first thing we will do is download nodeJS, the link to download it is right here NodeJS
Then we need to install node in our PC, if you have done that already, please take the terminal prompt to check it:
$ node --version
$ v5.3.0
This should appear in response to your command, the version number might be a little different, but that is fine. The next step is to create all the environment we will use, so to prepare it, please download this script to create all the necessary dependencies: LINK (this script has to be run within unix terminal like OSX or linux)
NOTE This script only works within Linux and OSX environments, if you need this script can be run under windows, please download GIT for windows from https://git-scm.com/downloads . This will create a mini "unix" environment to work with GIT and some unix commands
we can run this code just typing in terminal(after decompressing the file and moving ourselves into the directory folder)
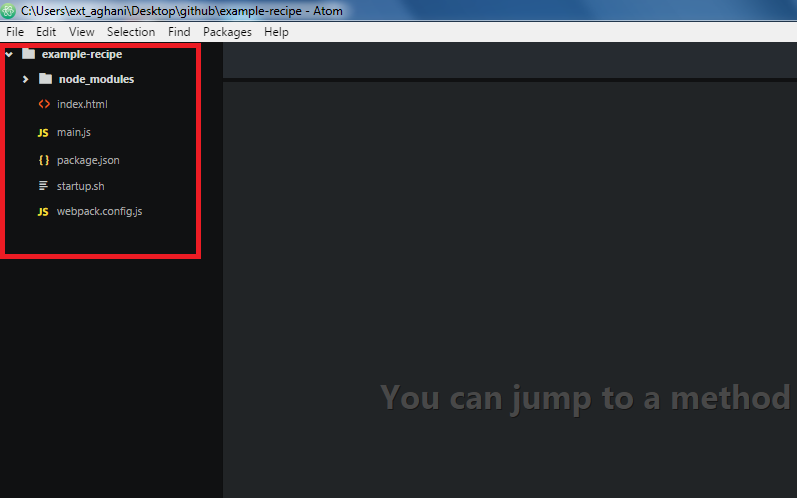
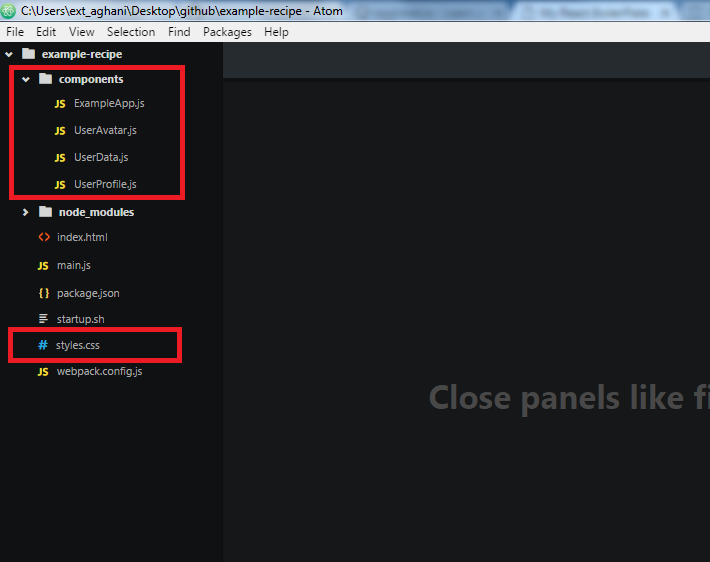
$ sh startup.shThis will download all the project dependencies needed by this tutorial. Once finished, the project structure will be similar to this
To work with ReactJS is not as easy as jQuery, because we need some tools to do some special things, each of these tools will be described below:
- Babel It is a compiling tool that allow us to use latest features of Javascript and compiles it to proper ES5 code.
- Webpack / Browserify These tools are module bundlers, they allow us to split our code in many files, keeping our code tidy. Then they will join all these files and compress in just 1 file.
- JSX JSX is a special syntax that help us to create HTML markup inside Javascript code.
- Gulp This is a tool that allow us to automate repetitive tasks such as compressing images, CSS preprocessing, linting code, etc.
Before creating our first React component we should run our development server. To do that, we must run the following command
$ npm run startThis will start our services to work with, then we can view our server in http://localhost:3000
Then, we will replace the content inside main.js
console.log('this is my 1st file');for this one
//react library to create react component
import React from 'react';

//react library that render our react components somewhere in DOM tree
import ReactDOM from 'react-dom';
This allow us import React and ReactDOM modules to use them in our app, what means modules and similar is explained in module section later.
Then, we can create our first react component in this way
class ExampleApp extends React.Component {

}
The only function needed inside this component is the render method, which is responsible to declare HTML markup and return it. With this in mind we can create some HTML markup.
render(){
  //Yup, this is weird, however we can create HTML markup directly in Javascript code
  //this is called JSX syntax and it differs a little with HTML(but no too much)
  return <div>This is my first React Component</div>;
}
As you can see, we can define HTML markup inside Javascript code. Do not worry, Babel(our transpiler) will transform this HTML into traditional code ;).
To attach this component in our DOM we need this line to achieve this
/*
  - the first sent argument, is our react component we want to render in DOM.
  - the second one, is the HTML node which will be our host element to render the React component.
*/
ReactDOM.render(<ExampleApp />, document.getElementById('example'));
Finally, our first example should be similar to this
import React from 'react';
import ReactDOM from 'react-dom';

class ExampleApp extends React.Component {
  render() {
    return <div>This is my first react component</div>;
  }
}

ReactDOM.render(<ExampleApp />, document.getElementById('example'));
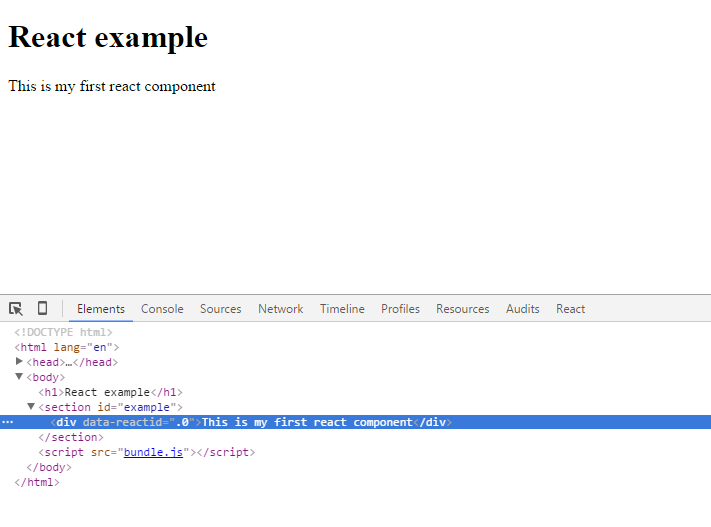
This is our first React component, this should look like this in your screen
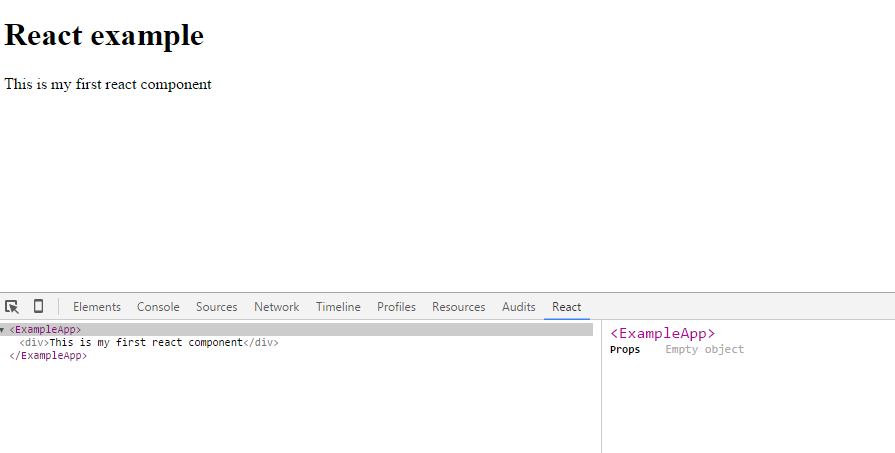
If you have installed react developer tools, you should see these properties in that tab
If you noticed in HTML example, an important thing to highlight is the following code
<div data-reactid=".0">This is my first react component</div>The data-reactid=.0 attribute is for internal use, ReactJS uses it to identify this element as a react component. This one must be a read-only attribute to us.
One of main purposes of ReactJS is to split HTML into many reusable components. So for the next exercise, we will follow this principle.
We will create an user profile and we need this requirements to accomplish.
- User Name
- User Role
- User Salary
- User Avatar
- User Biography
We could do this just writing one React component, but as mentioned before, we should split all this HTML code into multiple React components. So let's start
First, we will create an user profile component
//this is our draft to begin to work with
class UserProfile extends React.Component {
  render(){
    return (
      <article className="UserProfile">
        <h3>User Profile</h3>
        <div>
          <div className="UserProfile-container">
            our avatar will be here
          </div>
          <div className="UserProfile-container">
            user data will be here
          </div>
        </div>
        <div>description will be here</div>
      </article>
    );
  }
}
With this, our component will have all the necessary stuff to accomplish our requirements. If you notice here, to assign CSS classes to a React component, you should assign them in className attribute. This is because class keyword is a reserved word in Javascript.
The next step is create an user avatar component
class UserAvatar extends React.Component {
  render() {
    return <img src="https://dl.dropboxusercontent.com/u/18850435/kermit-the-frog.jpg" />;
  }
}
Also, we need another component to keep our data, this will be named UserData.
class UserData extends React.Component {
  render() {
    return (
      <table>
        <tbody>
          <tr>
            <th>Name</th>
            <td>Kermit the frog</td>
          </tr>
          <tr>
            <th>Role</th>
            <td>CEO</td>
          </tr>
          <tr>
            <th>Salary</th>
            <td>$ 250,000 USD per year</td>
          </tr>
        </tbody>
      </table>
    );
  }
}
Now, we can replace placeholder mocks in our first user profile component
class UserProfile extends React.Component {
  render(){
    return (
      <article className="UserProfile">
        <h3>User Profile</h3>
        <div>
          <div className="UserProfile-container">
            {/* this is where we are putting the UserAvatar component we have just created */}
            <UserAvatar />
          </div>
          <div className="UserProfile-container">
            {/* this is where we are putting the UserData component we have just created */}
            <UserData />
          </div>
        </div>
        <div>This is kermit, our CEO of ....</div>
      </article>
    );
  }
}
The, we can refactor the former code inside ExampleApp Component with this unique component
class ExampleApp extends React.Component {
  render() {
    return <UserProfile />;
  }
}
Finally, our complete example for the code is going to be similar to this
import React from 'react';
import ReactDOM from 'react-dom';

class UserAvatar extends React.Component {
  render() {
    return <img src="https://dl.dropboxusercontent.com/u/18850435/kermit-the-frog.jpg" />;
  }
}

class UserData extends React.Component {
  render() {
    return (
      <table>
        <tbody>
          <tr>
            <th>Name</th>
            <td>Kermit the frog</td>
          </tr>
          <tr>
            <th>Role</th>
            <td>CEO</td>
          </tr>
          <tr>
            <th>Salary</th>
            <td>$ 250,000 USD per year</td>
          </tr>
        </tbody>
      </table>
    );
  }
}

class UserProfile extends React.Component {
  render(){
    return (
      <article className="UserProfile">
        <h3>User Profile</h3>
        <div>
          <div className="UserProfile-container">
            <UserAvatar />
          </div>
          <div className="UserProfile-container">
            <UserData />
          </div>
        </div>
        <div>This is kermit, our CEO of ....</div>
      </article>
    );
  }
}

class ExampleApp extends React.Component {
  render() {
    return <UserProfile />;
  }
}

ReactDOM.render(<ExampleApp />, document.getElementById('example'));
If you want to know, obviously we can add some styles to these components, we are going to use SuitCSS style guides to create our CSS code. If you want to know more about SuitCSS please follow this link http://suitcss.github.io
.UserProfile{
  width: 50%;
  margin: auto;
}

.UserProfile-avatar{

}

.UserProfile-container{
  display: inline-block;
  vertical-align: top;
}

.UserProfile-description{

}
now, save this file as styles.css under project folder. We only need to add it within index.html
<head>
  <meta charset="utf-8" />
  <meta name="viewport" content="width=device-width, initial-scale=1, maximum-scale=1, user-scalable=no" />
  <title>My React BoilerPlate</title>
  <!-- here we will add our stylesheet -->
  <link rel="stylesheet" href="/static/css/styles.css" />
</head>
Now, with the CSS created, this former example should look as below
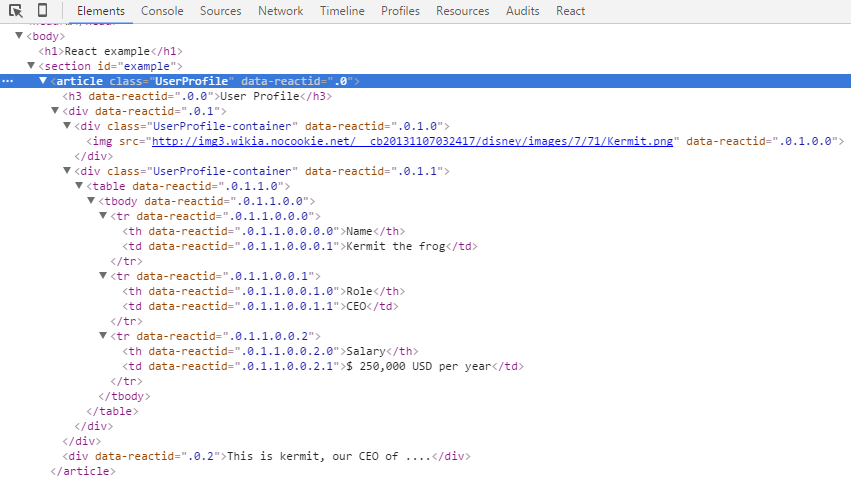
The HTML code in chrome should be similar to this too
The most important thing here, is to keep our components as small as possible. With this in mind, we can reuse them anywhere we want.
With the current implementation of our React components, they are not as reusable as we want, because we have many hardcoded values in them. However, we can refactor them to make more reusable sending to them the properties they need. These properties are know as props.
Props are attributes we can send to any React component, just like we assign HTML attributes to HTML elements.
E.g. if we want to send to our UserAvatar component some properties to work with, we can do it like this
// instead of just write this
<UserAvatar />

// we send attributes that can be used in a react component
<UserAvatar
  url="https://dl.dropboxusercontent.com/u/18850435/kermit-the-frog.jpg"
  age={21}
  hidden={false}
  suggestions={['cats', 'lemon', 'rain', 'soccer', 'beach']}
  userPreferences={{maxResults: 3, backgroundColor: '#eaeaea', autoRefresh: false}} />
NOTE I must highlight one thing, just strings can be sent between quotation marks, the other data types must be between brackets. That is because the enclosing brackets evaluate the values within them.
So, we will refactor our UserAvatar component to change our hardcoded to this
class UserAvatar extends React.Component {
  render() {
    //we can access to url property via this.props
    return <img src={this.props.url} />;
  }
}

//then we can send it the right url via url attribute
<UserAvatar url="https://dl.dropboxusercontent.com/u/18850435/kermit-the-frog.jpg" />
Also, we change all the harcoded values from React components, replacing them with our new way of passing data
class UserData extends React.Component {
  render() {
    return (
      <table>
        <tbody>
          <tr>
            <th>Name</th>
            <td>{this.props.name}</td>
          </tr>
          <tr>
            <th>Role</th>
            <td>{this.props.role}</td>
          </tr>
          <tr>
            <th>Salary</th>
            <td>$ {this.props.salary} USD per year</td>
          </tr>
        </tbody>
      </table>
    );
  }
}

class UserProfile extends React.Component {
  render(){
    return (
      <article className="UserProfile">
        <h3>User Profile</h3>
        <div>
          <div className="UserProfile-container">
            <UserAvatar url="https://dl.dropboxusercontent.com/u/18850435/kermit-the-frog.jpg" />
          </div>
          <div className="UserProfile-container">
            <UserData />
          </div>
        </div>
        <div>{this.props.description}</div>
      </article>
    );
  }
}
As you can see, the URL we want to send to React component is harcoded inside our component. To avoid this, we can keep delegating the properties we want to our parent component and so on.
After all the refactor, we can be proud of ourselves an look our code below
import React from 'react';
import ReactDOM from 'react-dom';

class UserAvatar extends React.Component {
  render() {
    return <img src={this.props.url} />;
  }
}

class UserData extends React.Component {
  render() {
    return (
      <table>
        <tbody>
          <tr>
            <th>Name</th>
            <td>{this.props.name}</td>
          </tr>
          <tr>
            <th>Role</th>
            <td>{this.props.role}</td>
          </tr>
          <tr>
            <th>Salary</th>
            <td>$ {this.props.salary} USD per year</td>
          </tr>
        </tbody>
      </table>
    );
  }
}

class UserProfile extends React.Component {
  render(){
    return (
      <article className="UserProfile">
        <h3>User Profile</h3>
        <div>
          <div className="UserProfile-container">
            <UserAvatar url={this.props.user.avatarURL} />
          </div>
          <div className="UserProfile-container">
            <UserData
              name={this.props.user.name}
              role={this.props.user.role}
              salary={this.props.user.salary} />
          </div>
        </div>
        <div>{this.props.user.description}</div>
      </article>
    );
  }
}

class ExampleApp extends React.Component {
  render() {
    return <UserProfile user={this.props.user} />;
  }
}

var user = {
  name: 'Kermit the frog',
  role: 'CEO',
  salary: '250,000',
  description: 'This is kermit, our CEO',
  avatarURL: 'https://dl.dropboxusercontent.com/u/18850435/kermit-the-frog.jpg'
};

//we have delegated all the properties to our root component
//yes, we can also retrieve all the attributes we need in a property
ReactDOM.render(<ExampleApp user={user} />, document.getElementById('example'));
With this, the parent components can share data with children components. They can send properties to children components, and these can use them as they want.
NOTE The most important thing about props is they are immutable data. This means, this properties sent by parent components their children can not modify them.
Just using properties, we always will be dependant that a parent component gives us all the properties we need. So with this in case mind we have some issues
- What happens when this component does not have a parent component(like ExampleApp) ?
- What happens when I want to keep some app state, but props are immutable ?
For these cases, we can also have other special attribute called state. As its name indicates, it can keep internal app/component state.
With this in mind, we can refactor our ExampleApp component to this one
class ExampleApp extends React.Component {
  //to create initial state data we must define a constructor method inside our react component
  constructor(props) {
    //we need to call this function to keep things working as expected
    super(props);

    //this is the state object we can keep our state for this component
    this.state = {
      user: {
        name: 'Kermit the frog',
        role: 'CEO',
        salary: '250,000',
        description: 'This is kermit, our CEO',
        avatarURL: 'https://dl.dropboxusercontent.com/u/18850435/kermit-the-frog.jpg'
      }
    };
  }

  render() {
    //instead of sending props data, we change that to use our internal state
    return <UserProfile user={this.state.user} />;
  }
}

//we delete from here user property and transfer it to internal component state
ReactDOM.render(<ExampleApp />, document.getElementById('example'));
The most important thing about state is when it changes, the component will be re rendered, to show the new data. When this happens, the parent component will be rendered again and their child as well
To make this happen, we need to call a special method called setState and must be used as below
//as an argument, we can send the new state of our app/component
this.setState(newState);
When this happens, the component will be ordered to render again. Now, to show you an example of this, we can add a little code here and there to our current codebase.
class ExampleApp extends React.Component {
  constructor(props) {
    super(props);

    this.state = {
      user: {
        name: 'Kermit the frog',
        role: 'CEO',
        salary: '250,000',
        description: 'This is kermit, our CEO',
        avatarURL: 'https://dl.dropboxusercontent.com/u/18850435/kermit-the-frog.jpg'
      }
    };

    //we simulate a state change after 3.5 secs
    setTimeout(() => {
      //to our user property we will assign him a new salary and role
      this.setState({
          user: {
              //this is part of new syntax proposal of javascript to extend objects
              //like var newObject = $.extend(olderObj, newProperties);
              ...this.state.user,
              salary: '550,000',
              role: 'president'
          }
      });
    }, 3500);
  }
With this, we can store internal state to our app, and also we can send properties to our child components.
When we want to handle some event over a React component, we can achieve that without effort. To handle events in ReactJS, they must be written in this way
//each event must be written in camelcase
<UserAvatar onClick={eventHandler} onMouseOver={anotherEventHandler} />
To add this to our former example, we can catch when some user presses avatar image, this action will display an alert which notify that action to our user.
class UserAvatar extends React.Component {
  //we create our event handler inside react component in this way
  handleClick() {
    alert('Hey you, stop clicking at me !');
  }

  render() {
    //then we add this to the HTML markup
    return <img src={this.props.url} onClick={this.handleClick} />;
  }
}
The, when our user pressed the avatar images it will activate the alert. It is important to mention here, that we can also create event that children components can receive and do something.
Following the same example above, we can also achieve that in this way(the other code will be omitted by the sake of brevity)
class UserAvatar extends React.Component {
  render() {
    //here, we receive from our props the onClick event we want to trigger
    return <img src={this.props.url} onClick={this.props.onClick} />;
  }
}

class UserProfile extends React.Component {
  render(){
    return (
      <article className="UserProfile">
        <h3>User Profile</h3>
        <div>
          <div className="UserProfile-container">
            <UserAvatar
                url={this.props.user.avatarURL}
                onClick={this.props.handleClick} />
          </div>
          <div className="UserProfile-container">
            <UserData
              name={this.props.user.name}
              role={this.props.user.role}
              salary={this.props.user.salary} />
          </div>
        </div>
        <div>{this.props.user.description}</div>
      </article>
    );
  }
}

class ExampleApp extends React.Component {
  handleClick() {
    alert('hey listen, you are click over my image!');
  }

  render() {
    return <UserProfile handleClick={this.handleClick} />;
}Each time we add new React components or new features to our codebase, our single file will be growing bigger and so on. This in some point will make our code hard to maintain and hard to make refactors and changes.
To solve this issue, with the new Javascript version, we can use modules just like other languages do. This allow us split our code to smaller pieces and keep them as reusable as they can.
Let's return to our working example
import React from 'react';
import ReactDOM from 'react-dom';

class UserAvatar extends React.Component {
  handleClick() {
    alert('Hey you, stop clicking at me !');
  }

  render() {
    return <img src={this.props.url} onClick={this.handleClick} />;
  }
}

class UserData extends React.Component {
  render() {
    return (
      <table>
        <tbody>
          <tr>
            <th>Name</th>
            <td>{this.props.name}</td>
          </tr>
          <tr>
            <th>Role</th>
            <td>{this.props.role}</td>
          </tr>
          <tr>
            <th>Salary</th>
            <td>$ {this.props.salary} USD per year</td>
          </tr>
        </tbody>
      </table>
    );
  }
}

class UserProfile extends React.Component {
  render(){
    return (
      <article className="UserProfile">
        <h3>User Profile</h3>
        <div>
          <div className="UserProfile-container">
            <UserAvatar url={this.props.user.avatarURL} />
          </div>
          <div className="UserProfile-container">
            <UserData
              name={this.props.user.name}
              role={this.props.user.role}
              salary={this.props.user.salary} />
          </div>
        </div>
        <div>{this.props.user.description}</div>
      </article>
    );
  }
}

class ExampleApp extends React.Component {
  constructor() {
    super();
    this.state = {
      user: {
        name: 'Kermit the frog',
        role: 'CEO',
        salary: '250,000',
        description: 'This is kermit, our CEO',
        avatarURL: 'https://dl.dropboxusercontent.com/u/18850435/kermit-the-frog.jpg'
      }
    };

    //we simulate a state change after 3.5 seconds
    setTimeout(()=>{
      //to our user we are going to assign him a new salary and a new role in the company
      this.setState({user:{...this.state.user, salary: '550,000', role: 'president'}});
    }, 3500);
  }

  render() {
    return <UserProfile user={this.state.user} />;
  }
}

ReactDOM.render(<ExampleApp />, document.getElementById('example'));
This we will refactor to a more modular approach. The first thing we need to do is to create a component folder. Then we will create the following files inside it.
- UserAvatar.js
- UserData.js
- UserProfile.js
- ExampleApp.js
Then we will copy our UserAvatar component in UserAvatar.js file, then we can delete the code from main.js. We need to repeat those steps with UserData and UserProfile.
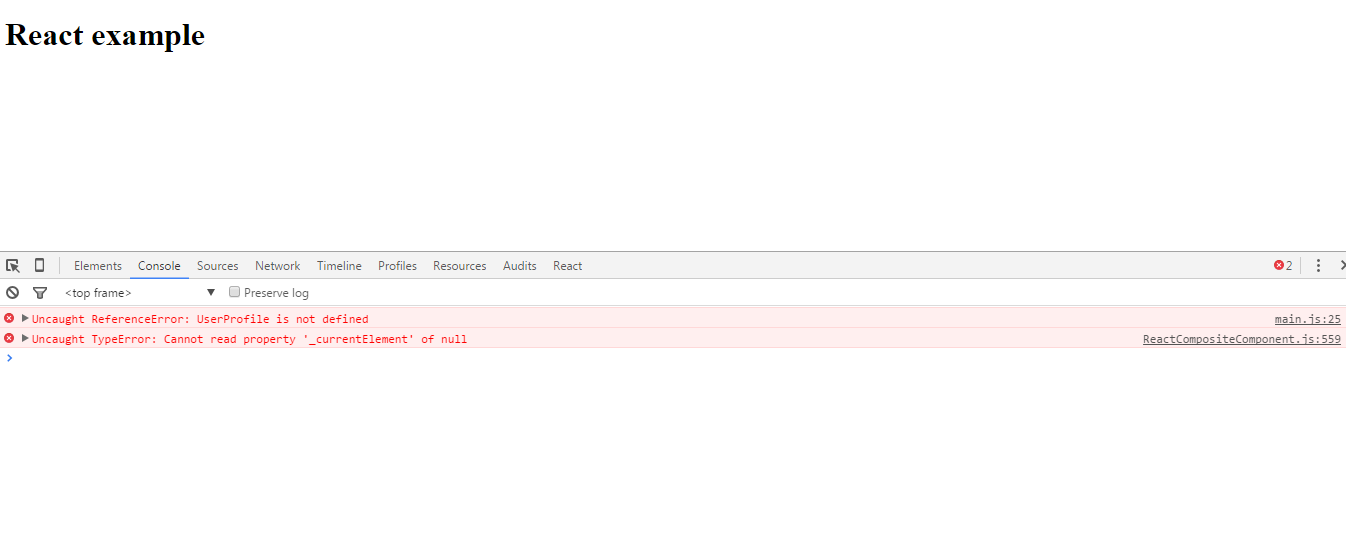
After this, if we try to run the same code, we will get the following error:
This occurs because now our app is split into multiple files and we are not importing the code properly. To make our example run as before, we need to refactor a just little bit these files.
So, we will begin with our UserAvatar.js file
class UserAvatar extends React.Component {
  handleClick() {
    alert('Hey you, stop clicking at me !');
  }

  render() {
    return <img src={this.props.url} onClick={this.handleClick} />;
  }
}

//we add this line that allow us to export this snippet of code to other modules
export default UserAvatar;
The one thing we can notice is we are adding the sentence export default UserAvatar. This is necessary to indicate that our UserAvatar component can be imported by other modules.
We do this same task inside UserProfile and UserData. Now, inside main.js code will be written like this:
import React from 'react';
import ReactDOM from 'react-dom';
// here we import our component from a module
// import ComponentName from 'relativePath';
import UserProfile from '../components/UserProfile';

class ExampleApp extends React.Component {
  constructor() {
    super();
    this.state = {
      user: {
        name: 'Kermit the frog',
        role: 'CEO',
        salary: '250,000',
        description: 'This is kermit, our CEO',
        avatarURL: 'https://dl.dropboxusercontent.com/u/18850435/kermit-the-frog.jpg'
      }
    };

    setTimeout(()=>{
      this.setState({user:{...this.state.user, salary: '550,000', role: 'president'}});
    }, 3500);
  }

  render() {
    return <UserProfile user={this.state.user} />;
  }
}

ReactDOM.render(<ExampleApp />, document.getElementById('example'));
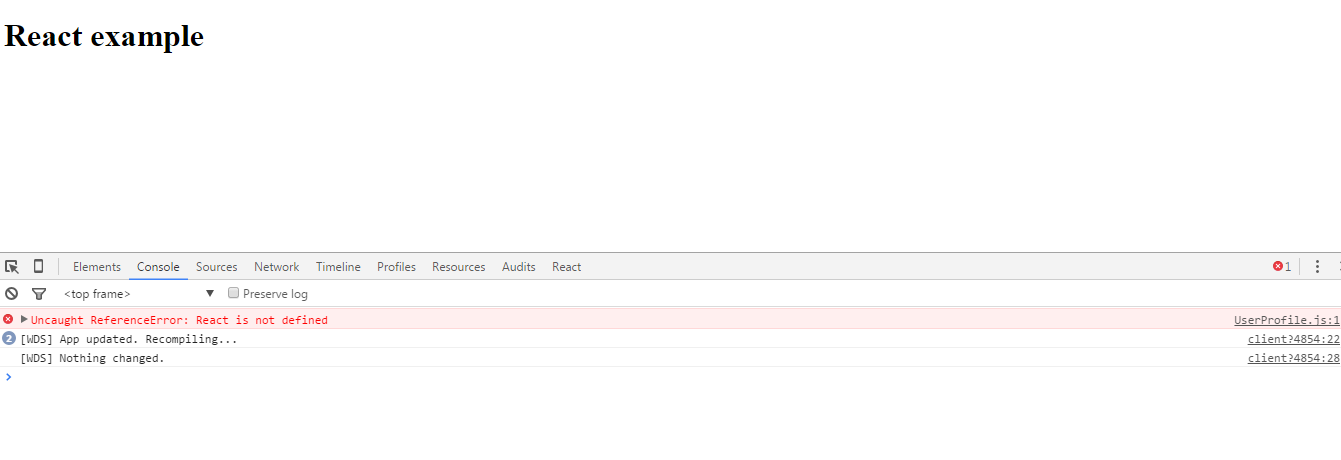
If we do this in our code, then in browser's console will output an error like this
This happens because in our module we do not have defined any dependency in it. In this case, we need to load ReactJS to use it. So, to import this dependency, we need to add just one more line to accomplish that
//this is the line we are adding to load react dependency
import React from 'react';
import UserAvatar from './UserAvatar';
import UserData from './UserData';

class UserProfile extends React.Component {
  render(){
    return (
      <article className="UserProfile">
        <h3>User Profile</h3>
        <div>
          <div className="UserProfile-container">
            <UserAvatar url={this.props.user.avatarURL} />
          </div>
          <div className="UserProfile-container">
            <UserData
              name={this.props.user.name}
              role={this.props.user.role}
              salary={this.props.user.salary} />
          </div>
        </div>
        <div>{this.props.user.description}</div>
      </article>
    );
  }
}

export default UserProfile;
Also, UserAvatar and UserData will need this same dependency, so add it in the same way as we did before.
After this, we can see how our react example will behave as before.
Now, the one task left here is to copy our ExampleApp component into ExampleApp.js. If we do this, the code in ExampleApp.js will look as below
import React from 'react';
import UserProfile from './components/UserProfile';

class ExampleApp extends React.Component {
  constructor() {
    super();
    this.state = {
      user: {
        name: 'Kermit the frog',
        role: 'CEO',
        salary: '250,000',
        description: 'This is kermit, our CEO',
        avatarURL: 'https://dl.dropboxusercontent.com/u/18850435/kermit-the-frog.jpg'
      }
    };

    setTimeout(()=>{
      this.setState({
          user: {
              ...this.state.user,
              salary: '550,000',
              role: 'president'
          }
      });
    }, 3500);
  }

  render() {
    return <UserProfile user={this.state.user} />;
  }
}

export default ExampleApp;
When we finish this task, our main.js file should be like this one
import React from 'react';
import ReactDOM from 'react-dom';
import ExampleApp from './static/js/components/ExampleApp';

ReactDOM.render(<ExampleApp />, document.getElementById('example'));
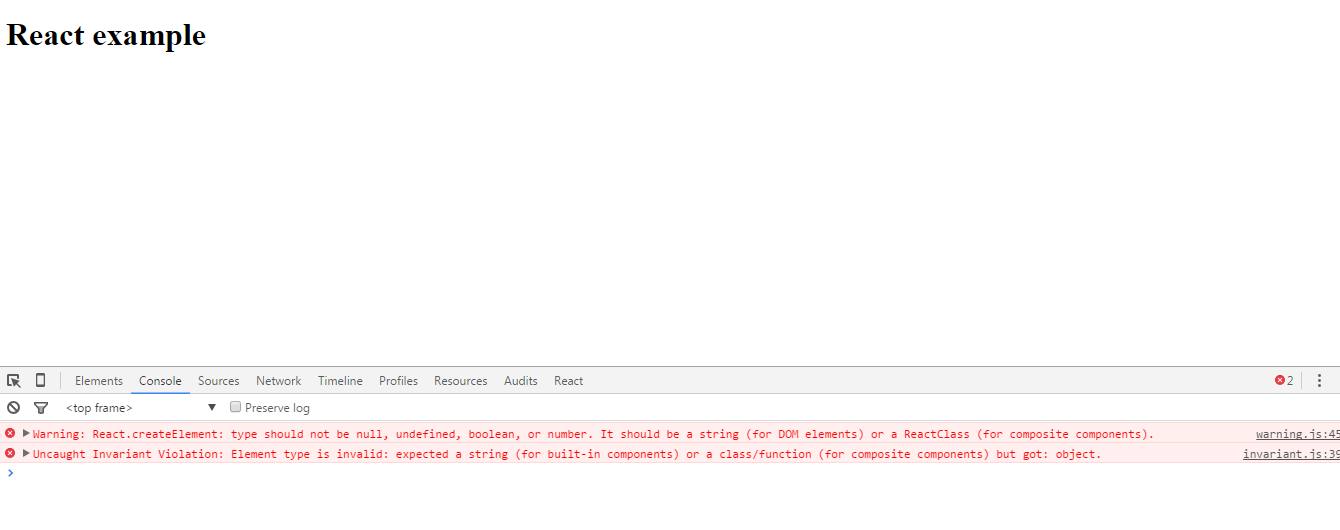
Now, this error will be displayed in our console
Please do not be afraid, this occurs because we have forgotten to change the import route of UserProfile component in ExampleApp.js, so we need to refactor it
import React from 'react';

//we change this line for next one
//import UserProfile from './components/UserProfile';
import UserProfile from './UserProfile';

class ExampleApp extends React.Component {
  constructor() {
    super();
    this.state = {
      user: {
        name: 'Kermit the frog',
        role: 'CEO',
        salary: '250,000',
        description: 'This is kermit, our CEO',
        avatarURL: 'https://dl.dropboxusercontent.com/u/18850435/kermit-the-frog.jpg'
      }
    };

    setTimeout(()=>{
      this.setState({user:{...this.state.user, salary: '550,000', role: 'president'}});
    }, 3500);
  }

  render() {
    return <UserProfile user={this.state.user} />;
  }
}

export default ExampleApp;
Finally, our entire codebase should be this
/********** UserAvatar.js **********/
import React from 'react';

class UserAvatar extends React.Component {
  handleClick() {
    alert('Hey you, stop clicking at me !');
  }

  render() {
    return <img src={this.props.url} onClick={this.handleClick} />;
  }
}

export default UserAvatar;
/********** UserAvatar.js **********/


/********** UserData.js **********/
import React from 'react';

class UserData extends React.Component {
  render() {
    return (
      <table>
        <tbody>
          <tr>
            <th>Name</th>
            <td>{this.props.name}</td>
          </tr>
          <tr>
            <th>Role</th>
            <td>{this.props.role}</td>
          </tr>
          <tr>
            <th>Salary</th>
            <td>$ {this.props.salary} USD per year</td>
          </tr>
        </tbody>
      </table>
    );
  }
}

export default UserData;
/********** UserData.js **********/


/********** UserProfile.js **********/
import React from 'react';
import UserAvatar from './UserAvatar';
import UserData from './UserData';

class UserProfile extends React.Component {
  render(){
    return (
      <article className="UserProfile">
        <h3>User Profile</h3>
        <div>
          <div className="UserProfile-container">
            <UserAvatar url={this.props.user.avatarURL} />
          </div>
          <div className="UserProfile-container">
            <UserData
              name={this.props.user.name}
              role={this.props.user.role}
              salary={this.props.user.salary} />
          </div>
        </div>
        <div>{this.props.user.description}</div>
      </article>
    );
  }
}

export default UserProfile;
/********** UserProfile.js **********/


/********** ExampleApp.js **********/
import React from 'react';
import UserProfile from '../components/UserProfile';

class ExampleApp extends React.Component {
  constructor() {
    super();
    this.state = {
      user: {
        name: 'Kermit the frog',
        role: 'CEO',
        salary: '250,000',
        description: 'This is kermit, our CEO',
        avatarURL: 'https://dl.dropboxusercontent.com/u/18850435/kermit-the-frog.jpg'
      }
    };

    setTimeout(() => {
      this.setState({
          user:{
              ...this.state.user,
              salary: '550,000',
              role: 'president'
          }
      });
    }, 3500);
  }

  render() {
    return <UserProfile user={this.state.user} />;
  }
}

export default ExampleApp;
/********** ExampleApp.js **********/


/********** main.js **********/
import React from 'react';
import ReactDOM from 'react-dom';
import ExampleApp from './static/js/apps/ExampleApp';

ReactDOM.render(<ExampleApp />, document.getElementById('example'));
/********** main.js **********/
The project structure should look similar to this picture below
Until now, we have done some basic examples to understand how ReactJS works. This time, we are going to create a real example with a real use case.
We will create a Flickr search term which allow us to find photos related to search terms(It's pretty easy to do this with all the stuff we know already).
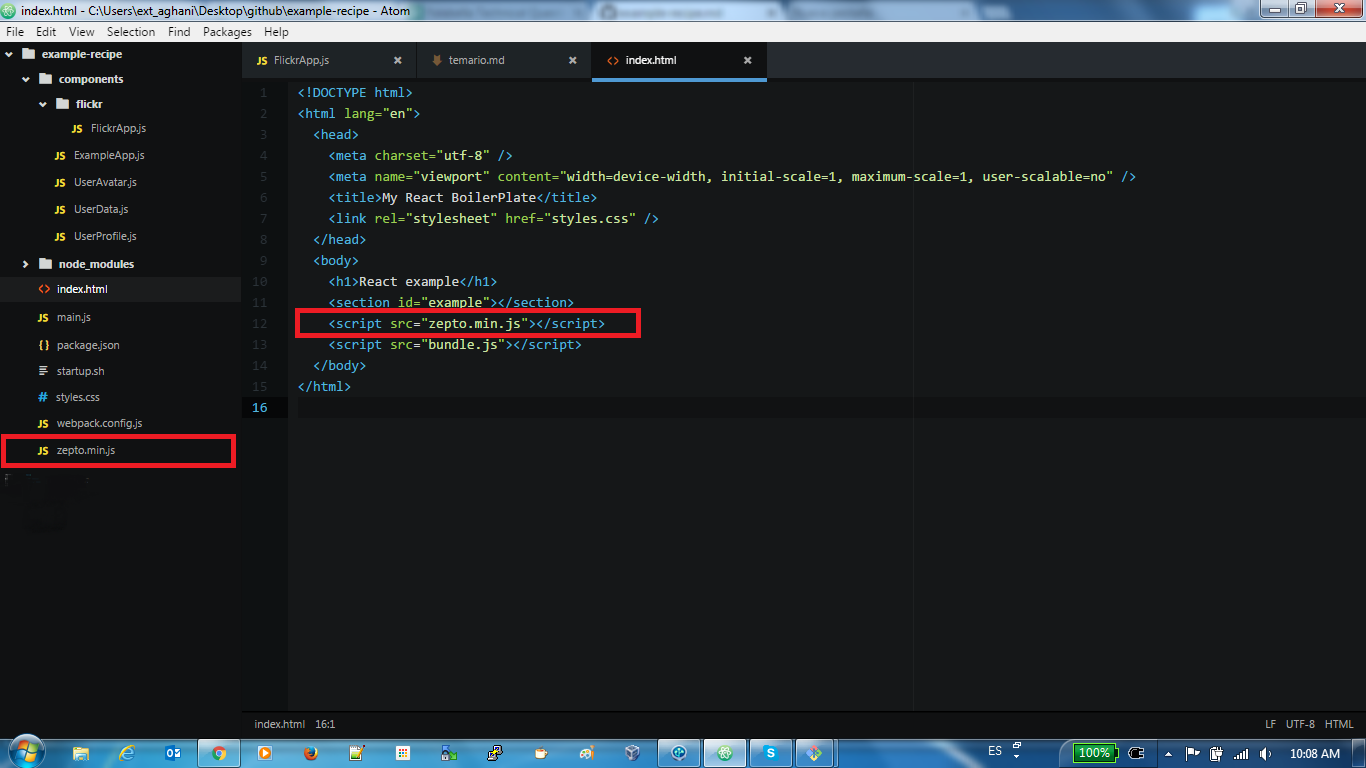
- We need to use jQuery.js or Zepto.js to manage AJAX calls
- This library has to be included in index.html
The HTML code should look as below
We will follow the main idea about create multiple React components. So, in this case we need to create several Javascript files to achieve that:
- services: we save all the logic to make AJAX calls to server side and to create correct URL.
- FlickrImage: responsible for showing the retrieved image.
- ImageGallery: component that holds a FlickImage list to show to us.
- SearchTermContainer: component with the search term input and action button to begin search.
- FlickrApp: Wrapper holding everything else.
First of all, we are going to write all the needed logic to create AJAX calls in services.js
//function that allow us to create the correct URL according to search term
const url = searchTerm => (
  `https://api.flickr.com/services/feeds/photos_public.gne?tags=${searchTerm}&format=json&&jsoncallback=?`
);

//function that allow us to make AJAX request to retrieve the info according to URL
export const findPhotosByTerm = (searchTerm, cb) => $.get(url(searchTerm), cb);
So, when we create a ajax call searching for cats, the created URL for that term should be similar to this:
https://api.flickr.com/services/feeds/photos_public.gne?tags=cat&format=json&&jsoncallback=?
After this, we will create the code for FlickrImage component
import React from 'react';

/**
 *  component for image rendering
 *  @param <string> url: needed URL to show in HTML
 **/
class FlickrImage extends React.Component {
  render() {
    return <img src={this.props.url} />;
  }
}

export default FlickrImage;
Then, we need to create an Image gallery component to wrap all our FlickImages we found with search term.
import React from 'react';
import FlickrImage from './FlickrImage';

/**
 *  wrapper component that holds all the FlickrImages
 *  @param <list<string>> photos: URL list where we will fetch images
 **/
class ImageGallery extends React.Component {
  render() {
    var photos = this.props.photos.map((photoURL, index) => <FlickrImage key={index} url={photoURL} />);
    return <div>{photos}</div>;
  }
}

export default ImageGallery;
Now, the code for SearchTermContainer component should be similar to this
import React from 'react';
import { findPhotosByTerm } from './services';

/**
 *  it holds the input for search term to search for
 *  @param <function> queryResolvedHandler: function that manage what we will do with search results
 **/
class SearchTermContainer extends React.Component {
  constructor() {
    super();
    this.onClick = this.onClick.bind(this);
  }

  onClick() {
    const searchTerm = this.refs.input.value;
    findPhotosByTerm(searchTerm, this.props.queryResolvedHandler);
  }

  render() {
    return (
      <div>
        <input ref="input" type="text" />
        <button onClick={this.onClick}>Search</button>
      </div>
    );
  }
}

export default SearchTermContainer;
The last component we need is FlickApp that contains all other components
import React from 'react';
import ReactDOM from 'react-dom';
import SearchTermContainer from './SearchTermContainer';
import ImageGallery from './ImageGallery';

/**
 *  main component that holds application state
 **/
class FlickrApp extends React.Component {
  constructor() {
    super();
    this.state = { photos: [] };
    this.handleAjaxResponse = this.handleAjaxResponse.bind(this);
  }

  handleAjaxResponse(data) {
    this.setState({ photos: data.items.map(item => item.media.m) });
  }

  render() {
    return (
      <div>
        <SearchTermContainer queryResolvedHandler={this.handleAjaxResponse} />
        <ImageGallery photos={this.state.photos} />
      </div>
    );
  }
}

export default FlickrApp;
Finally, we should get this:
As you can see, the code above is pretty simple and straightforward. This code it's just an example for doing anything that we want to do with ReactJS.
To refer this section please follow the link below
How javascript was handling namespaces and modules ?, if you want to know all of that, please visit the link below:
To check this section, please follow the link below
If you want to know a little more about what they are and why they are useful please visit the link below
Refer this section in the link below
If you want to know what is about this functional programming trendy is spreading over internet, check this link below
Objects, how they work in Javascript with the Prototypal inheritance, link below
