EDS servlet
This is a library you can use to build an External Data Services servlet for IBM FileNet Case Manager and IBM FileNet Content Navigator. It uses the Jackson libraries to do all the JSON conversions.
Getting started
If you want to use the library, you have to create a JEE project to contain the servlet handling the request. If you add support for Maven to your project then the simplest way to start is to add the dependency to the EDS servlet API to your pom-file:
<dependency>
    <groupId>com.github.ecmdeveloper</groupId>
    <artifactId>eds-servlet</artifactId>
    <version>1.0.0</version>
</dependency>
If this is not possible then you have to add the jar-file and it's dependencies manually
to the WEB-INF/lib folder of your project. The files can be found here:
These versions of Jackson are for Java 8 and higher. To support Java 6 installation the latest version of Jackson supporting Java 6, version 2.6.7, can be used.
The next step is to add a servlet to your project. This servlet must be a subclass
of the class com.ecmdeveloper.eds.servlet.AbstractEDSServlet and should include
support for the URL patterns /type/* and /types. A minimal servlet implementation
looks like this:
@WebServlet(
		description = "An example of an EDS servlet.",
		urlPatterns = { "/type/*", "/types"
		})
public class EDSExampleServlet extends AbstractEDSServlet {

	private static final long serialVersionUID = 1L;

	@Override
	public void handleRequest(ExternalDataRequest dataRequest, ExternalDataResponse dataResponse) {

		  // TODO: add your implementation code here...
	}
}
The handleRequest() method is where all the magic happens. This is where the actual implementation
of your EDS service should take place. The incoming parameter dataRequest contains information
about the request that is made, and the dataResponse object should be filled up by the implementation, describing the behavior of the different properties. You can use the getProperty() method with the symbolic name of the property to get a Property object. This object contains several methods to describe the required behavior.
A simple Case Manager example
Let's start with a simple IBM Case Manager use case. A solution has a case type Customer containing the property EDSX_Name. We want to make this property editable and
required with a default value when we create a new case and readonly after the case is created.
(This could also be done making the property "Only settable on create", but for the sake of the demo, we will try it the EDS way.)
To accomplish this we can use the following code:
if (dataRequest.getObjectType().equals("Customer") ) {
	Property name = dataRequest.getProperty("EDSX_Name");
	if ( dataRequest.getRequestMode().equals(RequestMode.initialNewObject) ) {
		name.setRequired(true);
		name.setValue("Jane/John Doe");
		name.setDisplayMode(DisplayMode.readwrite);
	} else if (dataRequest.getRequestMode().equals(RequestMode.initialExistingObject) ) {
		name.setDisplayMode(DisplayMode.readonly);
	}

	dataResponse.addProperty(name);
}
Because requests to EDS are made for different object types of the solution, you
first have to check that you are dealing with the Customer case type. Next the
property object is fetched from the dataRequest object. The RequestMode gives you
an indication of the context of the call that is being made. In the first part
the user started creating a new case, resulting in a RequestMode value of initialNewObject.
In the second block of the if-statement, the case is already created, resulting
in a RequestMode value of initialExistingObject.
Now that the context is determined, we can start to modify the Property object, making
it required and editable on create, and readonly afterwards. At
the end there is one important thing: the property must be added to the dataResponse
object, otherwise nothing happens. This is all it takes to build a simple EDS implementation.
The Javadoc of the Property object gives a good overview of all the possible customization you can perform.
See the complete class for this example here
A simple Content Navigator example
The IBM Content Navigator EDS is a little bit more involved. In this case you have to
provide an implementation for the getObjectTypeNames() method of the AbstractEDSServlet class.
This method has the following signature:
public String[] getObjectTypeNames(String repositoryId)The implementation of this method should return a string array containing all the object types you want to be handled by the service. For folders and documents this are simply the symbolic names of the classes. But the service can also be used for step processors and search templates. Check the documentation what the object type names are in this case.
In this example we will add validation to the Email class, so the implementation looks
like this, returning an array with only one element:
@Override
public String[] getObjectTypeNames(String repositoryId) {
	return new String[] {"Email"};
}
In this example we check if the From property contains a valid e-mail address. The
Internet has a lot of regular expressions to check this. In this case we choose the
version on the www.w3resource.com site. This leads to the following implementation of the handleRequest() method (for simplicity
some checks are skipped):
@Override
public void handleRequest(ExternalDataRequest dataRequest, ExternalDataResponse dataResponse) {
	Property from = dataRequest.getProperty("From");
	from.setValue("john.doe@example.com");
	from.setFormat("^\\w+([\\.-]?\\w+)*@\\w+([\\.-]?\\w+)*(\\.\\w{2,3})+$");
	from.setFormatDescription("e-mail address");
	dataResponse.addProperty(from);
}
Choice Lists
A main feature of the EDS service is the ability to dynamically add a choice list to a property. This is only possible if there is not already a property list assigned through the property template. The values of the choice list can come from different sources. In this example we will keep it simple and just use a hard coded list. To create a choice list, you have to create an object of the class ChoiceList, give it a name and assign a list of Choice values to the list:
ChoiceList choiceList = new ChoiceList();
choiceList.setDisplayName("Family members");
List<Choice> choices = new ArrayList<Choice>();

choices.add( new Choice("Peter") );
choices.add( new Choice("Lois") );
choices.add( new Choice("Meg") );
choices.add( new Choice("Chris") );
choices.add( new Choice("Stewie") );
choices.add( new Choice("Brian") );

choiceList.setChoices(choices);
To add a choice list to a property just use the setChoiceList() method to assign the
choice list to the property:
Property familyMember = dataRequest.getProperty("TST_FamilyMember");
familyMember.setChoiceList(choiceList);
A Choice value can contain either a string or an integer value (where the integer value must be associated
with a display name). In this example we create a choice lists of weekdays where the value is the number of the day:
ChoiceList choiceList = new ChoiceList();
choiceList.setDisplayName("Weekdays");
List<Choice> choices = new ArrayList<Choice>();

choices.add( new Choice("Monday", 1) );
choices.add( new Choice("Tuesday", 2) );
// You know how this ends...

choiceList.setChoices(choices);
The above works equally well for IBM Case Manager and IBM Content Navigator. However, for
IBM Content Navigator you also have the ability to create hierarchical choice list. In this case
you create a Choice object also containing a list of Choice objects. In this example
the list of family members is divided in adults and kids (did not know where to put Brian):
ChoiceList choiceList = new ChoiceList();
choiceList.setDisplayName("Family members");
List<Choice> choices = new ArrayList<Choice>();

List<Choice> adultsChoices = new ArrayList<Choice>();
adultsChoices.add( new Choice("Peter") );
adultsChoices.add( new Choice("Lois") );

Choice adults = new Choice("Adults");
adults.setChoices(adultsChoices);
choices.add( adults );

List<Choice> kidsChoices = new ArrayList<Choice>();
kidsChoices.add( new Choice("Meg") );
kidsChoices.add( new Choice("Chris") );
kidsChoices.add( new Choice("Stewie") );

Choice kids = new Choice("Kids");
kids.setChoices(kidsChoices);
choices.add( kids );

choiceList.setChoices(choices);
Debugging
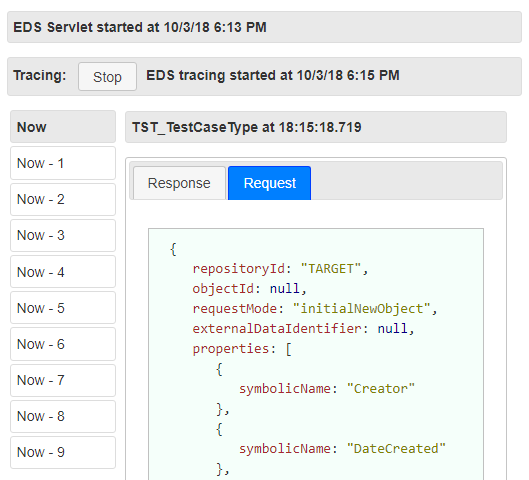
Debugging the EDS component can be very cumbersome. The client contains some optimizations and caches
some of the information provided by the EDS component. It is therefore very handy to know the different
requests made from the client and the responses provided by your implementation. To accomplish this
the servlet serves a ping page. The ping page can be enable by adding an URL pattern for the ping page. The declaration of your class extending AbstractEDSServlet class should now look like this:
@WebServlet(description = "An example of an EDS servlet.",
            urlPatterns = { "/type/*", "/types", "/ping/*"})
public class EDSExampleServlet extends AbstractEDSServlet {

	  // The rest is unchanged...
}
In the ping page you can now turn tracing on and off. If you turn tracing on then you can inspect the ten last requests made to your EDS component.
Custom Error Messages
When your EDS component throws an exception, this exception will show up in the log-files on the server. The error will also show up in the ping page if tracing is started. Out of the box the feedback to the user will be a dialog box with the following message:

This information does not convey the nature of the error to the user. You might for instance use the Java exception mechanism to tell user that some complicated validation is not met when adding a new object. This library also has support for this situation. Setting this up is a little bit more involved. This is because of the fact that the servlet specification states the an HTTP 500 response should be wrapped in an HTML page. However, the EDS infrastructure expects that the error information is served in JSON format. This can be accomplished with custom error pages.
First The declaration of your class extending AbstractEDSServlet class should also support the /error path. Therefore it is added to the urlPatterns annotation:
@WebServlet(description = "An example of an EDS servlet.",
            urlPatterns = { "/type/*", "/types", "/ping/*", "/error"})
public class EDSExampleServlet extends AbstractEDSServlet {

	  // The rest is unchanged...
}
This path should also be connected to an HTTP 500 response in your web.xml file (up to now we did not need this file):
<web-app xmlns="http://java.sun.com/xml/ns/javaee"
	      xmlns:xsi="http://www.w3.org/2001/XMLSchema-instance"
	      xsi:schemaLocation="http://java.sun.com/xml/ns/javaee
	      http://java.sun.com/xml/ns/javaee/web-app_3_0.xsd"
	      version="3.0">

	<error-page>
	  <error-code>500</error-code>
	  <location>/error</location>
	</error-page>

</web-app>
Now the AbstractEDSServlet class will make sure that your error message is served in JSON format when you throw an exeption. As an example consider the following, not very useful, code, preventing adding new objects:
if (dataRequest.getRequestMode().equals(RequestMode.finalNewObject) ) {
	throw new RuntimeException("The time is now " + (new Date()).toString() );
}
This will give the following error dialog in the IBM Case Manager interface:

and this error dialog in the IBM Content Navigator interface:

Reference
The javadoc documentation for this API can be found here.