This tutorial provides an example scenario for an automatic CI/CD chain that continuously builds, delivers, and deploys an exemplary version of ITU-MiniTwit. Conceptually, this scenario consists of two parts:
- A remote server to which we will deploy our ITU-MiniTwit application and which is provisioned on DigitalOcean using
vagrant. - A GitHub Actions workflow, which automatically tests, builds the application (in Docker images), delivers them to Docker Hub, and deploys them to the server.
Once complete, the scenario looks as depicted below:

- You need to be signed up to GitHub Education (https://education.github.com).
- You need to be signed up at DigitalOcean (https://www.digitalocean.com/).
- You can use the $100 credit provided by GitHub Education to create a new account.
- Fork this repository (https://github.com/itu-devops/itu-minitwit-ci) by clicking on the fork button on GitHub
- Clone your fork of the repository:
git clone https://github.com/<your_gh_user>/itu-minitwit-ci.git
cd itu-minitwit-ci
In this tutorial you are working with multiple secrets, i.e., SSH key pairs and access tokens.
| OBS: Remember to not push such secrets to a public repository! |
For this example, we need a remote server (VM) to which our version of ITU-MiniTwit is continuously deployed. This server VM is created once. That is, do not repeat the following steps multiple times.

To connect to the server we are going to provision, we will use RSA keys for authentication. Later, we will provide the same SSH keys to the GitHub Action workflow, so that it can automatically deploy new versions on our server. (In practice, you would use multiple key pairs, but for simplicity of this example, we use only one key pair.)
Now, create a key pair as illustrated below:
ssh-keygen -f ~/.ssh/do_ssh_key -t rsa -b 4096 -m "PEM"Hit enter two times to accept the proposed defaults.
You can call the SSH key files whatever you want, but the Vagrantfile expects the SSH keys to have that specific name.
So in case you use another name:
- adapt the
Vagrantfileaccordingly (lineprovider.ssh_key_name = "do_ssh_key") - for Step 4, you must change it the three times it is defined in
.github/workflows/continous-deployment.yml - that is, best go for the given name
do_ssh_key
Now, after generating the key pair, log into DigitalOcean and navigate to the security configuration, left under Settings -> Security (second tab).
Under SSH keys click the Add SSH Key button and register a New SSH key with the name do_ssh_key.
Paste the contents of ~/.ssh/do_ssh_key.pub into the input field.
You can receive these via: cat ~/.ssh/do_ssh_key.pub on the command line.
We assume that you have vagrant and the Vagrant DigitalOcean plugin installed, see session 3 prep. notes.
To create virtual machines at DigitalOcean with vagrant you must generate an authentication token.
If you did so already during the last exercise session, you can skip this section.
Otherwise, log into DigitalOcean in your browser, then navigate to API in the menu on the right, then click on Generate New Token.
You must give it a name, for example the name of the machine where you use the token.

The Vagrantfile expects to find your DigitalOcean token in a respective environment variable in your shell environment.
For example, you can add it to your ~/.bashrc or ~/.zshrc.
The variable must be called: called DIGITAL_OCEAN_TOKEN, the syntax for defining such an environment variable in your shell configuration file is:
export DIGITAL_OCEAN_TOKEN=<your-token>After adding the token, you must reload your shell.
Either close your current terminal and open a new one or use the source command on the shell config file you changed, e.g., source ~/.bashrc.
Now, you should be able to create the remote VM via vagrant up.
You can use the below command to ensure that vagrant will use the DigitalOcean provider:
export DOCKER_USERNAME=<your_docker_hub_username>
export DOCKER_PASSWORD=<your_docker_hub_password>
export DIGITAL_OCEAN_TOKEN=<your_digital_ocean_token>

vagrant up --provider=digital_ocean
Note down the IP of this server as we will need it in a later step. It should be displayed after the server was created.
To double check that the server VM is running correctly, you might want to connect to it.
If you need to SSH to remote server you can easily do it through vagrant with the ssh command:
vagrant sshYou can also do it 'manually' like so:
$ ssh root@<digital-ocean-machine-ip> -i <path_to/do_ssh_key>All files contained in the directory remote_files will be synced to the newly provisioned server.
Currently, this is only a deploy.sh shell script and a docker-compose.yml file.
Later, these will be used by your CI/CD chain to deploy our ITU-MiniTwit application automatically.

Register at Docker Hub in case you are not already registered there.
- To make a later step more straight forward, use a password without any special characters.
- From now on, we refer to your login ID from Docker Hub as
DOCKER_USERNAMEand your password there is calledDOCKER_PASSWORD. - It is recommended to use an access token for Docker Hub instead of your password. You can generate one at https://hub.docker.com/settings/security.
- Select
New Access Tokenand give it a description, e.g.,Access Token for Minitwit CI. - Under Access permissions, select
Read & Write
- Copy the generated token and use it as your
DOCKER_PASSWORDin the steps that are described below.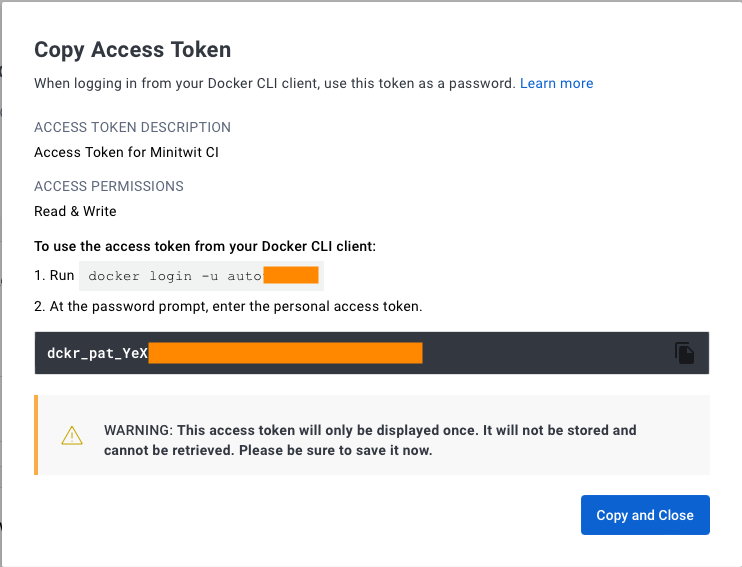
- Select


Login at Docker Hub and create three public repositories with the following names (by clicking the big blue Create Repository button in the top right).
mysqlimageminitwitimageflagtoolimage

For this scenario, we have to share the SSH key in order to be able to connect to the remote server.
Navigate to the repository settings on GitHub.
Under Security, Secrets and variables, click Actions and select New repository secret.
For this scenario you must set the following environment variables:
DOCKER_USERNAMEusername for hub.docker.comDOCKER_PASSWORDaccess token for username for hub.docker.comSSH_USERthe user as whom we will connect to the server at DigitalOcean, default isrootSSH_KEYthe private SSH key we generated earlier (not the public key, if you followed the instructions it should be located at~/.ssh/do_ssh_key)SSH_HOSTthe IP address of the server (or DNS name) we created on DigitalOcean, which you noted down earlier.

These are key-value pairs that are substitutes for their actual value when the workflow runs. They are never printed to any logs, so this is the way to add "secrets" to your workflow, like login usernames and passwords.
Now, we will setup the GitHub Action workflow.
To build ITU-MiniTwit using GitHub Actions workflows, we must add a file to the of the .github/workflows this repository called continous-deployment.yml that contains all of the commands to be executed by the workflow.
The nice thing about this being a file in our Git repository is that we can version it along with the rest of our code and keep all of our code and configuration in the same place without having to use any web GUI's - Configuration as Code!
This scenario comes with a sample continous-deployment.yml in the repository.
This workflow is divided into several stages:
-
Checkout- Clone the repository and checkout the latest commit.
-
Docker- Login to hub.docker.com
- Setup Docker
- Build the Docker images for minitwit.
If the test fails the workflow will abort and alert you that the tests are failing.
-
Deploy- The final step logs into the server and deploys the new version to our remote server by opening an SSH connection and, which remotely sets-up the environment variables (
source /root/.bash_profile), pulls the freshly built Docker images from hub.docker.com (docker-compose pull), and finally updates the running containers to the new version (docker-compose up -d).
- The final step logs into the server and deploys the new version to our remote server by opening an SSH connection and, which remotely sets-up the environment variables (
Note, that each stage is executed in a freshly provisioned VM on GitHub Actions, so no state carries over from one stage to another, unless you explicitly tell GitHub Actions to do so.
Now we are ready to trigger the workflow. If all of the above went well, a new version of ITU-MiniTwit should be build, tested, delivered, and deployed on every new commit to the repository.
To trigger the workflow, we can either push a new commit to the main branch of the repository, or we can manually trigger the workflow from the GitHub Actions tab.
Click on the Actions tab and select the continous-deployment workflow. Click on the Run workflow button and select the branch you want to deploy.

Now, we configured and setup an automatic CI/CD chain (the GitHub Actions workflow), that builds, tests, delivers our ITU-MinitTwit to Docker Hub, and that deploys it to our remote server on any commit to the repositories main branch or on manual execution (clicking the run workflow button on GitHub).
If you have error with the vagrant up command, you can try to run it with the VAGRANT_LOG=debug environment variable set to get more information about the error. For example:
VAGRANT_LOG=debug vagrant up --provider=digital_oceanThis scenario exists only due to the hard work of the TAs:
- 2020: Zander and Christoffer
- 2021: Michal
- 2023: Gianmarco
- Read the official documentation, to see what can be expressed in GitHub Action workflows.
- Once you read the above, you might want to consider a list of best practices.
- For some more details on the Docker images see the file
readme_dockerized.md