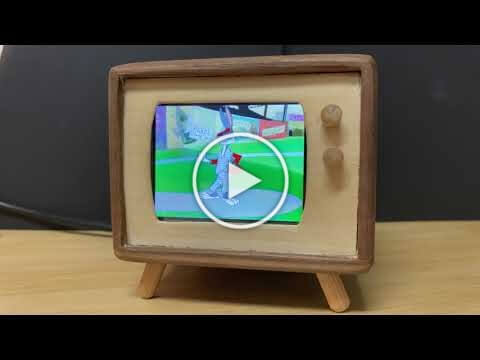
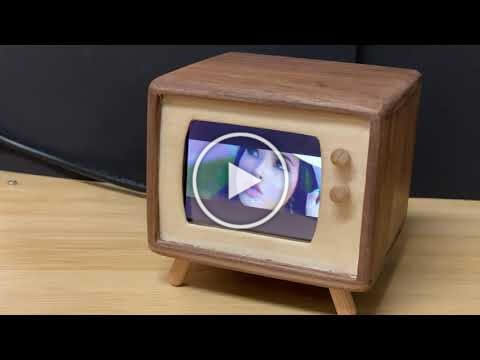
Do you remember the classic console TV's of the second half of the last century? You know, the ones that were a piece of furniture and took up a large portion of a room? Now you can build one that has that same classic look -- but only fills up a corner of your desk.
- Use Raspberry Pi Imager to install Raspberry Pi OS Lite (Bookworm) on a microSD card
- Use raspi-config to:
- Expand your filesystem
- Set your locale and keyboard options
- Set up your WiFi connection
- Select your Audio device
- Enable SSH
- Connect your display to your Raspberry Pi and configure according to the manufacturer's instructions
Installation of the program, as well as any software prerequisites, can be completed with the following two-line install script.
wget -q https://raw.githubusercontent.com/eat-sleep-code/tiny-tv/master/install-tiny-tv.sh -O ~/install-tiny-tv.sh
sudo chmod +x ~/install-tiny-tv.sh && ~/install-tiny-tv.shtiny-tv <input> [options]
tiny-tv-persist <input> [options]
tiny-tv-resume
tiny-tv-start # starts the service, if enabled
tiny-tv-stop # stops the service, if enabled
tiny-tv-update # reinstalls Tiny TV program- --input : Select the video to be played (required, can be a file name, a Youtube URL, or the word 'category')
- --saveAs : Enter the name you would like the file saved as (Used if downloading from YouTube only)
- --category : Select the category (This will set the subfolder, for example
--category cartoonswill use the/home/pi/videos/cartoonsfolder) - --maximumVideoHeight : Set the maximum height (in pixels) for downloaded videos (default: 480)
- --removeVerticalBars : Remove the vertical black bars (pillar box) from the input file. This time-intensive process will also resize the video to the maximum video height. (default: False)
- --removeHorizontalBars : Remove the horizontal black bars (letter box) from the input file. This time-intensive process will also resize the video to the maximum video height. (default: False)
- --resize : Resize the video to the maximum video height. This is a time-intensive process.
- --volume : Set the initial volume percent (default: 100, min: 0, max: 100`)
- --loop : Set whether video plays continuously in a loop (default: True)
- --shuffle : Set whether category-based playback is shuffled (default: False)
tiny-tv https://www.youtube.com/watch?v=h8NrKjJPAuw --saveAs 'Bugs Bunny.mp4' --category 'cartoons' --removeVerticalBars True The default video height is 480px. This is an ideal resolution for a true Tiny TV. If you are utilizing a more powerful Raspberry Pi and a higher resolution screen, you may alter the maximum video height.
tiny-tv https://www.youtube.com/watch?v=h8NrKjJPAuw --saveAs 'Bugs Bunny.mp4' --category 'cartoons' --maximumVideoHeight 1080tiny-tv 'Becky G - Mayores (featuring Bad Bunny).mp4' --category 'music' --volume 30Alternatively, you can type the video subfolder instead of using the category argument:
tiny-tv 'music/Becky G - Mayores (featuring Bad Bunny).mp4' --volume 10tiny-tv 'category' --category 'cartoons' --volume 50tiny-tv-persist 'category' --category 'christmas' --volume 50After the video begins playing, you may:
- Press Ctrl-A.
- Press Ctrl-D.
- Disconnect from your SSH session.
To reconnect to the existing playback, you may:
- Connect via SSH
- Type
tiny-tv-resume
If you are using a USB audio device, you may need to edit the /usr/share/alsa/alsa.conf file for audio output to function properly. Set the following values:
defaults.ctl.card 1
defaults.pcm.card 1Want to start the Tiny TV program every time you boot your Raspberry Pi? Here is how!
- Review the
AUTOSTARTCOMMANDcommand in~/tiny-tv/setup-autostart-tiny-tv.sh- If you would like to add any of aforementioned options you may do so by editing the service file.
- Run
~/tiny-tv/setup-autostart-tiny-tv.sh - Restart the Tiny TV.
Tip
If you are using a Raspberry Pi with 1GB – or less – of memory, you may wish to increase your SWAP file to match your memory size as outlined in this third-party guide.
Stay tuned for an upgraded build guide for our current version of the Tiny TV.
- 1x Raspberry Pi Zero W
- Do not purchase a Raspberry Pi Zero (non-W) – you need the wireless connectivity.
- If using the iUniker display, do not purchase a Raspberry Pi Zero WH – the headers it includes are the incorrect type and position.
- 1x Female GPIO Header
- 1x iUniker 2.8" 640x480 60fps Display
- 2x 90° Down Angle Micro USB Plug
- 1x Sabrent USB External Stereo Sound Adapter
- 1x 90° Right Angle Male Plug To Bare Open End TRS 3-Pole ⅛"/3.5㎜ Plug
- 2x Adafruit Mono 2.5W Class D Audio Amplifier - PAM8302
- 2x Dayton Audio CE Series CE32A-8 1.25" Speaker
- 1x Assorted Jumper Wires
- 1x Assorted Heat Shrink Tubing
- 1x USB extension cable
- Solder and soldering iron
Consider your case design, some case construction steps may be inserted before, in between, or after any of the steps below as appropriate. We constructed our case from hobby-grade walnut and basswood.
-
Complete the steps outlined in the Getting Started section.
-
Install the software as outlined in the Installation section.
-
Remove your micro SD card from the Raspberry Pi. The heat from soldering the adjacent GPIO header can potentially damage the SD card.
-
Solder a female GPIO header to the rear/bottom of the Raspberry Pi Zero W so that the Pi can be removed in the future.
-
Connect the display and the Raspberry Pi Zero W together.

-
Replace the micro SD card and boot up the Raspberry Pi.
-
Install the software, following the manufacturer's instructions.
cd ~/
git clone https://github.com/tianyoujian/MZDPI.git
cd MZDPI/vga
sudo chmod +x mzdpi-vga-autoinstall-online
sudo ./mzdpi-vga-autoinstall-online
sudo reboot
-
Remove your micro SD card from the Raspberry Pi.
If the header pins of your female GPIO header are too short you will need solder the power leads for the amplifiers directly to the GPIO pins:
-
Trim the end from a red jumper wire, leaving the female end intact. Solder the red wire to either Pin 2 or Pin 4 of the Raspberry Pi Zero.
-
Trim the end from a black jumper wire, leaving the female end intact. Solder the black wire to Pin 39 of the Raspberry Pi Zero.
-
Solder the header pins and speaker posts to each Audio Amplifier.
-
Create two Y jumper cables for the amplifier power and ground:
-
Trim the end from a red jumper wire, leaving the male end intact.
-
Trim the ends from two red jumper wires, leaving the female end intact.
-
Solder the two red female-ended cables to the red male-ended -- forming a Y cable with two female plugs on one end and a male plug on the other end.
-
Slide a length of heat shrink tubing over the solder joint and shrink it using either a torch on low heat or a heat gun.
-
Trim the end from a black jumper wire, leaving the male end intact.
-
Trim the ends from two black jumper wires, leaving the female end intact.
-
Solder the two black female-ended cables to the black male-ended -- forming a Y cable with two female plugs on one end and a male plug on the other end.
-
Slide a length of heat shrink tubing over the solder joint and shrink it using either a torch on low heat or a heat gun.
-

-
Attach a female plug of the black Y ground jumper cable to the GND (ground) pin of each audio amplifier board.
-
Attach a female plug of the red Y power jumper cable to the VIN (voltage in) pin of each audio amplifier board.
-
Create a Y audio distribution cable.
-
Trim the end of a red jumper wire, leaving the female end intact. Solder the wire end to the red wire of the 90° audio plug.
-
Trim the end of a white jumper wire, leaving the female end intact. Solder the wire end to the white wire of the 90° speaker plug.
-
Trim the end of two black jumper wires, leaving the female ends intact. Solder the wire ends to the ground/silver wire of the 90° speaker plug, forming a Y.
-
Slide a piece of heat shrink tubing over each individual solder joint and shrink it.
-
-
Attach the female plug of the audio red wire to the A+ pin of one audio board.
-
Attach the female plug of the audio white wire to the A+ pin of the other audio board.
-
Attach the female plug of each audio wire to the A- pin of each audio amplifier board.
-
Plug the ⅛"/3.5㎜ jack of the audio plug into the green headphone port of the USB audio adapter.
-
Plug the USB audio adapter into one of the 90° down angle micro USB cables and plug the USB cable into the center plug of the Pi Zero W.

-
Trim the end of two red jumper wires, leaving the female ends intact. Solder one red wire to the appropriate post of each speaker.
-
Trim the end of two white jumper wires, leaving the female ends intact. Solder one white wire to the appropriate post of each speaker.
-
Attach the female plug of each speaker's red wire to the + speaker post of each audio board.
-
Attach the female plug of each speaker's white wire to the - speaker post of each audio amplifier board.

-
Connect the male ends of the power Y adapters to the corresponding leads you soldered to the Raspberry Pi at the beginning of this guide.
-
Connect the second 90° down micro USB cable to USB extension cable.
-
Connect the second 90° down micro USB cable to the power outer micro USB port of the Raspberry Pi.
-
Replace the micro SD card and boot up the Raspberry Pi.
-
Connect the USB extension cable to a power source and test the device.

The case design is up to you. Below are a few images of our design for inspiration.


Finish assembling your case and put your Tiny TV to use.


- Maybe you should ask, "how tiny is it?". Our design is ridiculously small at just 3.75" x 3.75" x 3.25" (95.25mm x 95.25mm x 82.55mm). An iPhone will take up more room on your desk.
-
No, it plays sound too! As outlined above, there are two discrete audio amplifiers powering two 1.25" (32mm) speakers.
-
If you install Raspberry Pi OS desktop edition, you could use it as a ridiculously small desktop computer.