Continuous deployment text image retrieval service to Google Kubernetes Engine using CI/CD

1.1. Create Project in GCP
Gcloud CLI can be installed following this document https://cloud.google.com/sdk/docs/install#deb
Initialize the gcloud CLI
gcloud init
Y-
A pop-up to select your Google account will appear, select the one you used to register GCP, and click the button Allow.
-
Go back to your terminal, in which you typed
gcloud init, pick cloud project you using, and Enter. -
Then type Y, type the ID number corresponding to us-central1-f (in my case), then Enter.
sudo apt-get install google-cloud-cli-gke-gcloud-auth-pluginCreate your service account, and select Kubernetes Engine Admin role (Full management of Kubernetes Clusters and their Kubernetes API objects) for your service account.
Create new key as json type for your service account. Download this json file and save it in terraform directory. Update credentials in terraform/main.tf with your json directory.
Go to IAM, click on GRANT ACCESS, then add new principals, this principal is your service account created in step 1.3. Finally, select Owner role.

1.6. Using terraform to create GKE cluster.
Update your project id in terraform/variables.tf
Run the following commands to create GKE cluster:
gcloud auth application-default logincd terraform
terraform init
terraform plan
terraform apply- GKE cluster is deployed at us-central1-f with its node machine type is: n2-standard-2 (2 CPU, 8 GB RAM and costs 71$/1month).
- Unable Autopilot for the GKE cluster. When using Autopilot cluster, certain features of Standard GKE are not available, such as scraping node metrics from Prometheus service.
It can takes about 10 minutes for create successfully a GKE cluster. You can see that on GKE UI

- Go back to the GKE UI.
- Click on vertical ellipsis icon and select Connect.
You will see the popup Connect to the cluster as follows
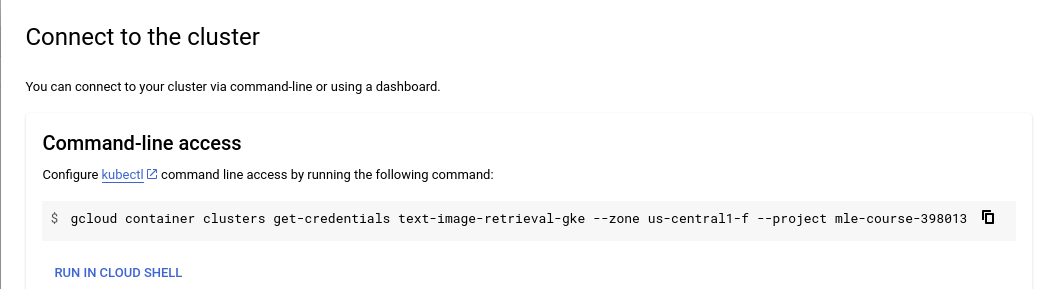
- Copy the line
gcloud container clusters get-credentials ...into your local terminal.

After run this command, the GKE cluster can be connected from local.
kubectx [YOUR_GKE_CLUSTER_ID]Using Helm chart to deploy application on GKE cluster.
cd helm_charts/nginx_ingress
kubectl create ns nginx-ingress
kubens nginx-ingress
helm upgrade --install nginx-ingress-controller .
After that, nginx ingress controller will be created in nginx-ingress namespace.
Text-image retrieval service will be deployed with NodePort type (nginx ingress will route the request to this service) and 2 replica pods that maintain by Deployment.
Each pod contains the container running the text-image retrieval application.
The requests will initially arrive at the Nginx Ingress Gateway and will subsequently be routed to the service within the model-serving namespace of the GKE cluster.
cd helm_charts/app
kubectl create ns model-serving
kubens model-serving
helm upgrade --install app --set image.repository=duong05102002/text-image-retrieval-serving --set image.tag=v1.5 .
After that, application will be deployed successfully on GKE cluster. To test the api, you can do the following steps:
- Obtain the IP address of nginx-ingress.
kubectl get ing- Add the domain name
retrieval.com(set up inhelm_charts/app/templates/app_ingress.yaml) of this IP to/etc/hosts
sudo nano /etc/hosts
[YOUR_INGRESS_IP_ADDRESS] retrieval.com
or you can utilize my Ingress IP address (valid until 27/11/2023 during the free trial period).
34.133.25.217 retrieval.com- Open web brower and type
retrieval.com/docsto access the FastAPI UI and test the API.-
For more intuitive responses, you can run
client.py(Refresh the html page to display the images.)-
Image query
$ python client.py --save_dir temp.html --image_query your_image_file
-
Top 8 products images similar with image query:

-
-
Text query
$ python client.py --save_dir temp.html --text_query your_text_query
- Top 8 products images similar with text query: crop top
- Top 8 products images similar with text query: crop top
-
-


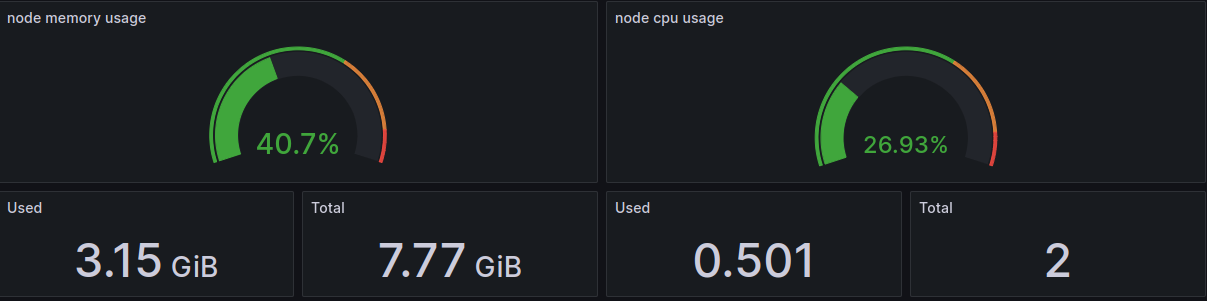
I'm using Prometheus and Grafana for monitoring the health of both Node and pods that running application.
Prometheus will scrape metrics from both Node and pods in GKE cluster. Subsequently, Grafana will display information such as CPU and RAM usage for system health monitoring, and system health alerts will be sent to Discord.
- Create Prometheus CRDs
cd helm_charts/prometheus-operator-crds
kubectl create ns monitoring
kubens monitoring
helm upgrade --install prometheus-crds .- Deploy Prometheus service (with
NodePorttype) to GKE cluster
cd helm_charts/prometheus
kubens monitoring
helm upgrade --install prometheus .
Warnings about the health of the node and the pod running the application will be alerted to Discord. In this case, the alert will be triggered and sent to Discord when there is only 10% memory available in the node.
Prometheus UI can be accessed by [YOUR_NODEIP_ADDRESS]:30001
Note:
- Open Firewall policies to modify the protocols and ports corresponding to the node
Targetsin a GKE cluster. This will be accept incoming traffic on ports that you specific. - I'm using ephemeral IP addresses for the node, and these addresses will automatically change after a 24-hour period. You can change to static IP address for more stability or permanence.
- Deploy Grafana service (with
NodePorttype) to GKE cluster
cd helm_charts/grafana
kubens monitoring
helm upgrade --install grafana .
Grafana UI can be accessed by [YOUR_NODEIP_ADDRESS]:30000 (with both user and password is admin)
Add Prometheus connector to Grafana with Prometheus server URL is: [YOUR_NODEIP_ADDRESS]:30001.
This is some PromSQL that you can use for monitoring the health of node and pod:
- RAM usage of 2 pods that running application
container_memory_usage_bytes{container='app', namespace='model-serving'}- CPU usage of 2 pods that running application
rate(container_cpu_usage_seconds_total{container='app', namespace='model-serving'}[5m]) * 100
- Node usage

Jenkins is deployed on Google Compute Engine using Ansible with a machine type is n1-standard-2.
Create your service account, and select Compute Admin role (Full control of all Compute Engine resources) for your service account.
Create new key as json type for your service account. Download this json file and save it in secret_keys directory. Update your project and service_account_file in ansible/deploy_jenkins/create_compute_instance.yaml.

Go back to your terminal, please execute the following commands to create the Compute Engine instance:
cd ansible/deploy_jenkins
ansible-playbook create_compute_instance.yaml
Go to Settings, select Metadata and add your SSH key.
Update the IP address of the newly created instance and the SSH key for connecting to the Compute Engine in the inventory file.

cd ansible/deploy_jenkins
ansible-playbook -i ../inventory deploy_jenkins.yaml
Wait a few minutes, if you see the output like this it indicates that Jenkins has been successfully installed on a Compute Engine instance.

Access the instance using the command:
ssh -i ~/.ssh/id_rsa YOUR_USERNAME@YOUR_EXTERNAL_IPCheck if jenkins container is already running ?
sudo docker ps Open web brower and type
 [YOUR_EXTERNAL_IP]:8081 for access Jenkins UI. To Unlock Jenkins, please execute the following commands:
sudo docker exec -ti jenkins bash
cat /var/jenkins_home/secrets/initialAdminPassword
Copy the password and you can access Jenkins UI.
It will take a few minutes for Jenkins to be set up successfully on their Compute Engine instance.

Create your user ID, and Jenkins will be ready :D
- Add Jenkins url to webhooks in Github repo

- Add Github credential to Jenkins (select appropriate scopes for the personal access token)

4.4.2. Add PINECONE_APIKEY for connecting to Pinecone Vector DB in the global environment varibles at Manage Jenkins/System


4.4.4. Install the Kubernetes, Docker, Docker Pineline, GCloud SDK Plugins at Manage Jenkins/Plugins
After successful installation, restart the Jenkins container in your Compute Engine instance:
sudo docker restart jenkins
Don't forget to grant permissions to the service account which is trying to connect to our cluster by the following command:
kubectl create clusterrolebinding cluster-admin-binding --clusterrole=cluster-admin --user=system:anonymous

kubectl create clusterrolebinding cluster-admin-default-binding --clusterrole=cluster-admin --user=system:serviceaccount:model-serving:default
- You can use the
Dockerfile-jenkins-k8sto build a new Docker image. After that, push this newly created image to Dockerhub. Finally replace the image reference atcontainerTemplateinJenkinsfileor you can reuse my imageduong05102002/jenkins-k8s:latest
Create model-serving namespace first in your GKE cluster
kubectl create ns model-servingThe CI/CD pipeline will consist of three stages:
- Tesing model correctness.
- Replace the new pretrained model in
app/main.py. I recommend accessing the pretrained model by downloading it from another storage, such as Google Drive or Hugging Face. - If you store the pretrained model directly in a directory and copy it to the Docker image during the application build, it may consume a significant amount of resource space (RAM) in the pod. This can result in pods not being started successfully.
- Replace the new pretrained model in
- Building the image, and pushing the image to Docker Hub.
- Finally, it will deploy the application with the latest image from DockerHub to GKE cluster.

The pipeline will take about 8 minutes. You can confirm the successful deployment of the application to the GKE cluster if you see the following output in the pipeline log:

Here is the Stage view in Jenkins pipeline:

Check whether the pods have been deployed successfully in the models-serving namespace.

Test the API
