Table of Contents
This solution customizes the project Amazon SageMaker Safe Deployment Pipeline.
The main use-case of this solution is building an end-to-end ML system that supports the entire ML lifecycle including data preparation, model training, model evaluation, model deployment, and system monitoring with a Blue/Green deployment capability, also known as a Canary deployment. Check the section System functionalities below for more detail.
- SM: SageMaker
- LD: Lambda
- CF: CloudFormation
- CW: CloudWatch
- SF: A State machine that is responsible for managing the training pipeline using AWS Step Functions
- EFS: Elastic File System
- SM endpoint: Model endpoint created by SageMaker, only can be used from an LD function
- LD endpoint: A LD function that is responsible for serving prediction service by calling SM endpoint
- API endpoint: API Gateway endpoint that links with the LD endpoint. This endpoint is public and is called by the end application (ie. mobile app, web app, etc.)
- Dev deployment: Deployment in the development stage
- Prod deployment: Deployment in the production stage
- System pipeline: A CodePipeline that has several steps including fetching source code, building CF stacks, running SF, dev deployment, and prod deployment
The system supports the following functionalities:
- Training
- Training data is saved in an S3 bucket
- Customizable docker image for pre-processing data, training model, and model evaluation
- Deployment
- Customizable docker image for serving model at SM endpoint
- Support multi-core serving at SM endpoint instance using Nginx and Gunicorn
- 2-stage deployment: dev-stage and prod-stage
- Manual approval to deploy model from dev to prod stage
- Customizable docker image for serving prediction service at LD endpoint
- LD endpoint links with EFS shared volumes to store user data
- Monitoring
- Capture request data and response data of SM endpoint
- Detect feature drift and alert
- CloudWatch dashboard to monitor system metrics
- Send alarm to admin email
- Automation
- Auto rerun system pipeline monthly, on data uploaded, on source code changed, and on feature drift detected
- Auto-scaling SM endpoint
- Canary deployment strategy with rollback on error
The architecture diagram below shows the entire MLOps pipeline at a high level. This pipeline uses the CF template pipeline.yml to build.
- CodePipeline: defines several stages to go from source code to the creation of the API endpoint.
- CodeBuild: builds artifacts like CF parameters and defines SF.
- S3: stores created artifacts and model's data.
- CloudFormation: creates resources in an infrastructure-as-code manner.
- Step Functions: orchestrates SM training and processing jobs.
- SageMaker: trains and deploys ML model.
- CodeDeploy: automates shifting traffic between two LD functions.
- API Gateway: creates an HTTPS REST API endpoint for the LD functions that invoke deployed SM endpoint.
- Key Management Service (KMS): encrypts data and artifacts.
- Secrets Manager: stores your GitHub Access Token.
- Simple Notification Service (SNS): notifies you when CodeDeploy has successfully deployed the API, and to receive alerts for retraining and drift detection (signing up for these notifications is optional).
- CloudWatch event rules: schedules the pipeline to run every month, and triggers the pipeline to run when SM Model Monitor detects the feature drift.
.
├── api
│   ├── __init__.py
│   ├── app.py
│   ├── post_traffic_hook.py
│   └── pre_traffic_hook.py
├── assets
│   ├── deploy-model-dev.yml
│   └── deploy-model-prd.yml
├── container
│   ├── Dockerfile
│   ├── Dockerfile.lambda.ecr
│   ├── build_image.sh
│   ├── push_image.sh
│   └── code
│       ├── evaluate.py
│       ├── lambda_handler.py
│       ├── nginx.conf
│       ├── predictor.py
│       ├── prepare_data.py
│       ├── requirements.txt
│       ├── serve
│       ├── train
│       ├── utils.py
│       └── wsgi.py
├── custom_resource
│   ├── __init__.py
│   ├── sagemaker-custom-resource.yml
│   ├── sagemaker_add_transform_header.py
│   ├── sagemaker_create_experiment.py
│   ├── sagemaker_query_drift.py
│   ├── sagemaker_query_evaluation.py
│   ├── sagemaker_query_training.py
│   └── sagemaker_training_job.py
├── exp_nbs
│   ├── exp-local-sm.ipynb
│   ├── exp-ml-gateway.ipynb
│   ├── exp-real-sm.ipynb
│   └── exp-step-functions.ipynb
├── model
│   ├── buildspec.yml
│   ├── requirements.txt
│   └── run_pipeline.py
├── scripts
│   ├── build.sh
│   ├── lint.sh
│   ├── rm_prj.sh
│   ├── rm_s3.sh
│   └── validate-tpl.sh
├── pipeline.yml
├── studio.yml
└── studio_nbs
    ├── dashboard.json
└── mlops.ipynbThis step creates several python scripts for steps including preparing data, training model, evaluating model, and serving model. This step is done in an SM notebook instance.
The input of this step is the training code, evaluation code, and the model serving code of an ML model. The output of this step is the two docker images that contain all of these scripts.
The 1st docker image serves as a multi-functional docker image for preparing data, training model, evaluating model, and serving model. Combining all of these scripts simplifies the development process without creating several docker images for each script which is overkilled for this sample solution. See this tutorial.
The 2nd docker image serves as the runtime environment for the LD endpoint. This docker image uses the 1st docker image as the base image. The reason why we cannot use the 1st docker image directly for the LD endpoint is that the container-based LD function requires an additional library called awslambdaric. This LD function also requires a specific entry point and a specific command to run. See this article.
Let's start by creating an SM notebook instance and clone this repository to the notebook environment.
The local environment here means the local SM notebook instance. Open exp_nbs/exp-local-sm.ipynb and run through the notebook. You might need to modify the scripts in the container/code folder.
The reason why we need to develop in the local environment first is to debug faster because running the SM processing job and SM training job takes a lot of time.
Open exp_nbs/exp-real-sm.ipynb and run through the notebook. You might need to modify the scripts in the container/code folder. This step runs similar code to the previous step.
This notebook already included the code for testing the SM endpoint.
Open exp_nbs/exp-ml-gateway.ipynb and run through the notebook. You might need to modify the script container/code/lambda_handler.py. This step runs similar code to the previous step.
This notebook already included the code for testing the LD endpoint and the API endpoint.
Open exp_nbs/exp-step-functions.ipynb and run through the notebook.
This step deploys the ML model to the production environment. We use the SM Studio project as the development environment.
The input of this step is the output of the previous step which is the docker images. The output of this step is the API endpoint consumed by the end application.
-
Prepare your LINUX environment
- Install
rsync,zip. - Install
aws-cliin your python environment. - Clone this repo to your LINUX system.
- Install
-
Update the
studio.ymlandpipeline.ymlif neededstudio.ymlcreates the SM Studio organization template and other resources.pipeline.ymlcreates the following main resources for the SM Studio project when you create a new SM Studio project.- KMS Key and KMS Alias
- S3 Bucket and S3 Bucket Policy
- SNS Topic, SNS Topic Policy, and SNS Subscription
- A CodeCommit Repository, a CodeBuild Project, and a CodePipeline
- A secured typical VPC with 2 public subnets, 2 private subnets, and an Internet Gateway
- An EFS volume
- Some Event Rules to retrain the model, schedule the CodePipeline
-
Validate the CF templates by running
bash scripts/validate-tpl.sh
-
Build the SM Studio Organization template.
bash scripts/build.sh <S3_BUCKET_NAME> <STACK_NAME> <REGION> <STUDIO_ROLE_NAME>

# Example:
# bash scripts/build.sh sagemaker-safe-deployment-tpl sagemaker-safe-deployment-tpl ap-southeast-1 AmazonSageMaker-ExecutionRole-20211022T094935
- S3_BUCKET_NAME: sagemaker-safe-deployment-tpl. This bucket stores the organization template artifacts.
- STACK_NAME: sagemaker-safe-deployment-tpl. This is the CF stack name that creates this SM Studio organization template.
- REGION: ap-southeast-1. This is your working AWS region.
- STUDIO_ROLE_NAME: AmazonSageMaker-ExecutionRole-20211022T094935. This is the SM Execution Role.
In case this step is failed, run the following command to remove the created S3 bucket or remove the created project
bash scripts/rm_s3.sh sagemaker-safe-deployment-tpl ap-southeast-1
bash scripts/rm_prj.sh <studio-project-name>Open SM Studio, create a new SM Studio project using the Organization template named SageMaker Safe Deployment template with the following information.
- Name (16 chars):
sd-test-01 - Description:
Safe deployment pipeline - Model name (10 chars):
sd-test - S3 Bucket for Dataset:
prod-test - Unique prefix to bind the components (10 chars): smsd. This prefix MUST be the same as
PREFIXinscripts/build.sh - Git Branch:
main - Email:
example@example.com - Train and build timeout:
45
This step will create a CF stack named SC-<aws-acc-id>-pp-<random-id>.
Clone this repository into the created Studio project
The system pipeline consists of several stages.
- Source stage. When a new commit is pushed to the main branch or
data-source.zipis uploaded to the pre-defined S3 folder, the system pipeline will be triggered.
-
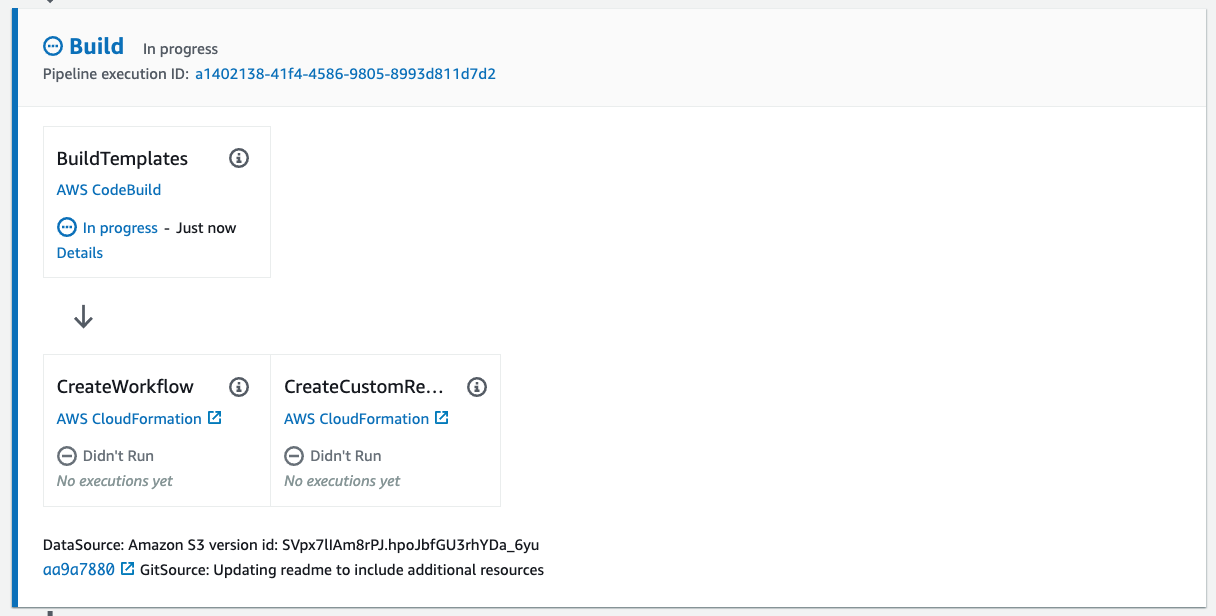
Build stage. This stage consists of two steps (see
pipeline.yml).-
Step 1: Build templates. This step runs
model/run_pipeline.ymlto do several tasks (seemodel/buildspec.yml).- Create
workflow-graph.yml: this CF stack creates the SF to prepare data, train, and evaluate the model. See Train stage below. - Create
workflow-graph.json: Parameters of the CF stackworkflow-graph.yml. - Create
sagemaker-custom-resource.json: Parameters of the CF stackcustom_resource/sagemaker-custom-resource.yml. See Step 2 below. - Create
deploy-model-dev.json: Parameters of the CF stackassets/deploy-model-dev.yml. See Dev deployment stage below. - Create
deploy-model-prd.json: Parameters of the CF stackassets/deploy-model-prd.yml. See Prod deployment stage below. - Package CF stack
workflow-graph.ymlwith its parameters. - Package CF stack
sagemaker-custom-resource.ymlwith its parameters.
- Create
-
Step 2: This step updates the
workflow-graph.ymlandsagemaker-custom-resource.ymlpackaged CF stacks. Thesagemaker-custom-resource.ymlCF stack creates the following main resources.- An LD function to prepend header to a batch transform job. See
custom_resource/sagemaker_add_transform_header.py. - An LD function to create a SageMaker experiment and trial. See
custom_resource/sagemaker_create_experiment.py. - An LD function to query evaluation job to return results. See
custom_resource/sagemaker_query_evaluation.py. - An LD function to query training job to copy artifacts to EFS. See
custom_resource/sagemaker_query_training.py. - An LD function to query processing job to return drift. See
custom_resource/sagemaker_query_drift.py.
- An LD function to prepend header to a batch transform job. See
-
-
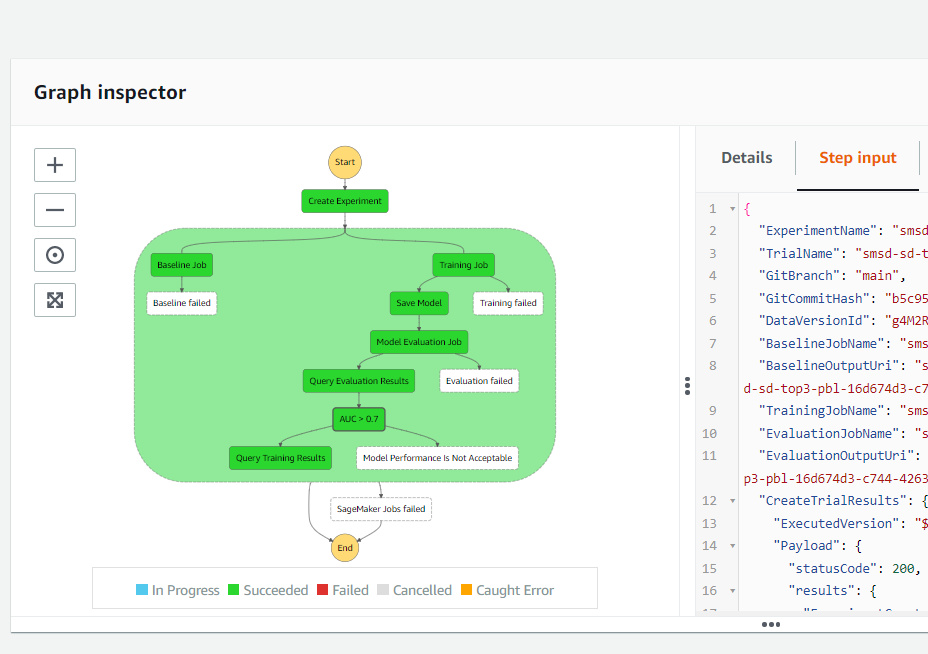
Train stage. The Build stage just creates the SF. This Train stage will run that SF that has the following steps (see
model/run_pipeline.yml).- Create a baseline for the model monitor using an SM processing job
- Train a model using an SM training job
- Save the trained model
- Query the evaluation results using the query-evaluation LD function created by
sagemaker-custom-resource.ymlCF stack - Verify if the evaluation results meet the requirements
- Query the training results using the query-training LD function created by
sagemaker-custom-resource.ymlCF stack to do some post-processes such as copying training job artifacts that need for inference to the EFS shared data volume. This LD function MUST implement theRetry step function blockbecause mounting the EFS takes time and might cause a timeout error.
Below is the steps of the defined SF.
-
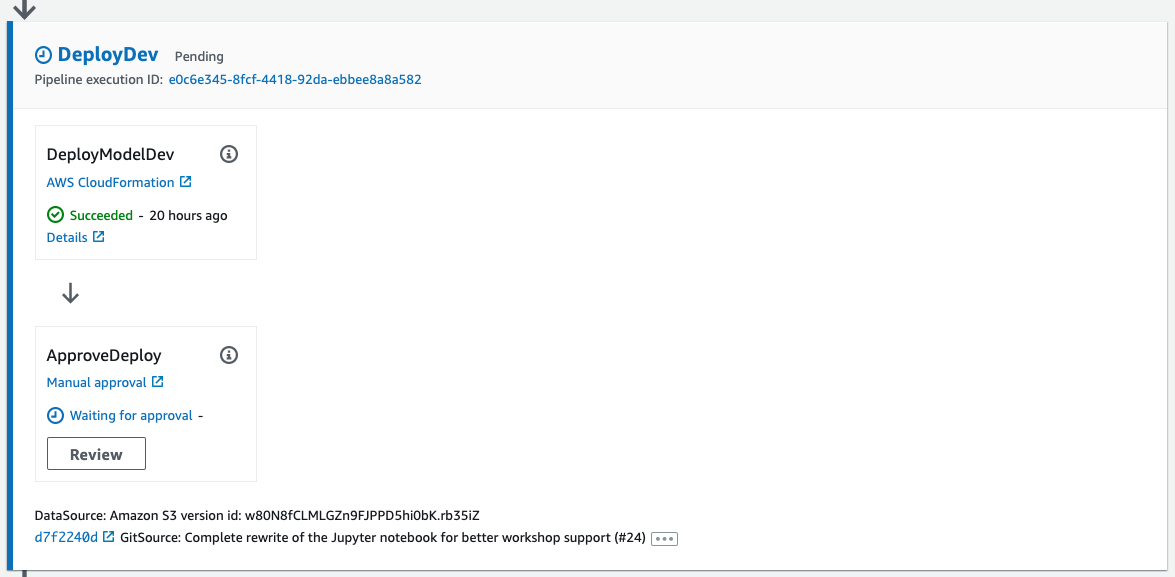
Dev deployment stage. This stage consists of two steps.
-
Step 1: Deploy Model Dev. This step updates the
deploy-model-dev.ymlCF stack. This CF stack creates the following resources.- An SM model
- An SM endpoint configuration
- An SM endpoint
-
Step 2: After the SM endpoint is deployed, this step waits for you to manually approve the changes to move to the next stage.
-
-
Prod deployment stage. This stage updates the
deploy-model-prd.ymlCF stack. This CF stack creates the following main resources.- An SM model
- An SM endpoint configuration
- An SM endpoint
- An LD function (LD endpoint). See
container/code/lambda_handler.py. This LD function supports gradual deployment. This gradual deployment creates some resources like aCodeDeploy::Application, aCodeDeploy::DeploymentGroup, and a implicit API Gateway endpoint. Read more here. - An LD function to perform checks pre-shifting traffic to LD endpoint. See
api/pre_traffic_hook.py. Read more abouthookssection for an AWS Lambda deployment here - An LD function to perform checks post-shifting traffic to LD endpoint. See
api/post_traffic_hook.py - An SM monitoring schedule to run on requests' data
- An CW alarm to track for the feature drift on requests' data
- Two CW alarms to track for the LD endpoint deployment's status
- An
ApplicationAutoScaling::ScalableTargetfor the SM endpoint - An
ApplicationAutoScaling::ScalingPolicyfor the SM endpoint - This CF stack outputs the API Gateway endpoint URL
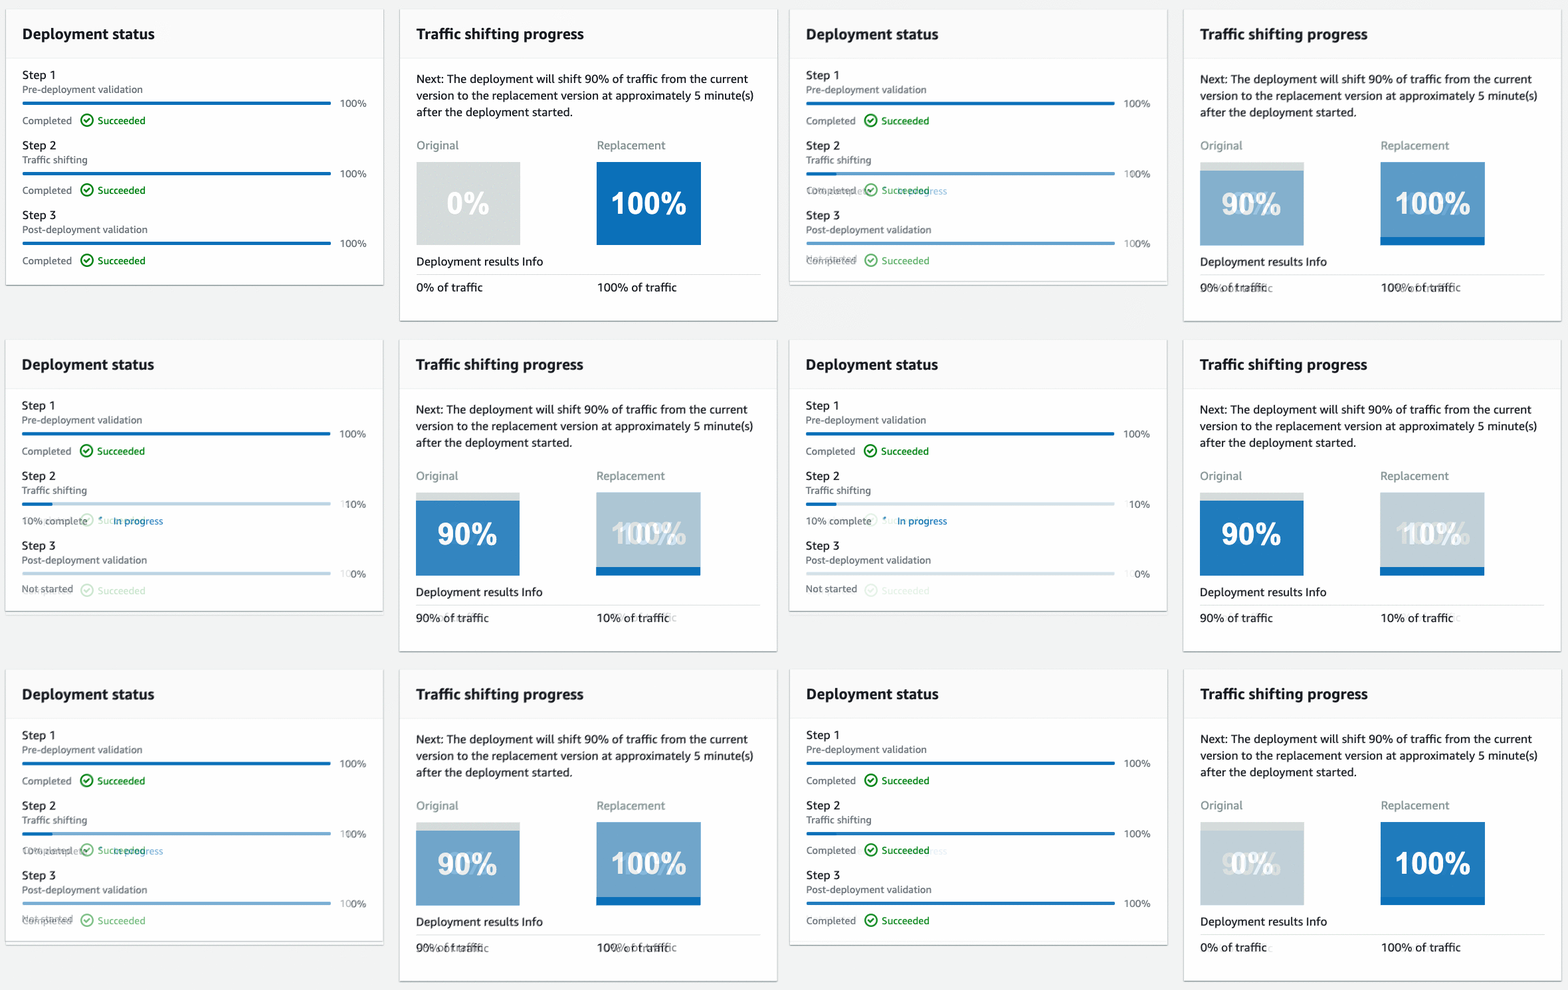
CodeDeploy will perform a canary deployment and send 10% of the traffic to the new endpoint over a 5-minute period. Below is the animation of the traffic shifting progress.
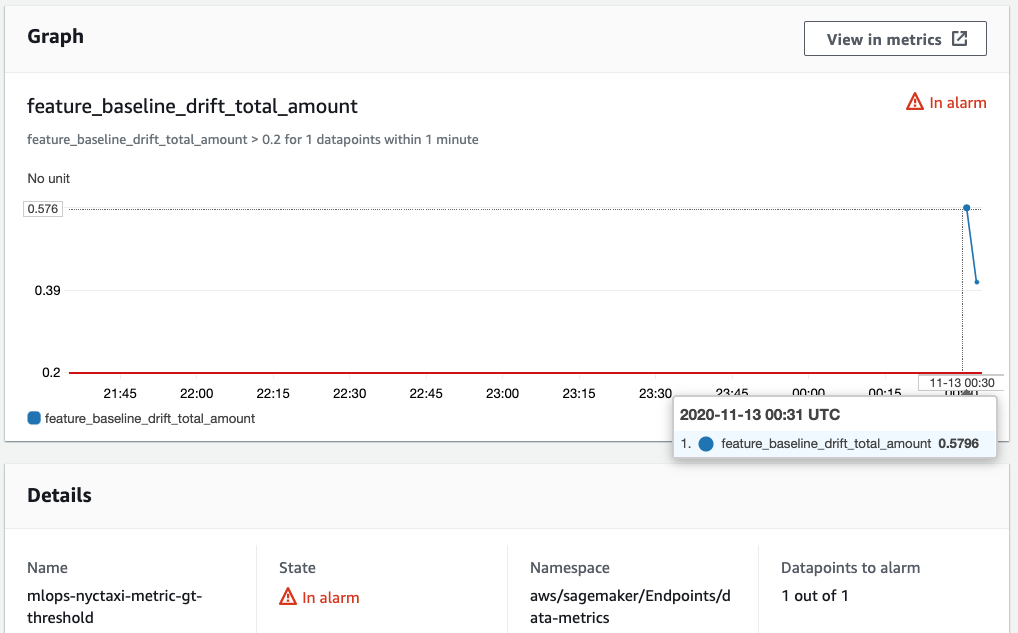
The CodePipeline instance is configured with CloudWatch Events to start the pipeline for retraining when the drift detection triggers specific metric alarms. Below is the example of the alarm when it get triggered.
Update and run studio_nbs/mlops.ipynb to initiate the system pipeline and its resources. You can run through this notebook to see how the system's resources are created.
- Full Pipeline: 55 minutes
- Source stage: Few seconds
- Build stage: 10 minutes
- Train stage: 10 minutes
- Dev Deployment stage: 10 minutes
- Prod Deployment stage: 25 minutes
- Monitoring Schedule: runs on the hour
There are two ways to test the API endpoint by using features arrays or using a binary file (formatted in base64). This depends on the way you unwrap the payload in container/code/lambda_handler.py.
This just removes the two CF stacks and their created resources to avoid extra fees. These two CF stacks are created when the System pipeline runs.
- Delete two CF stacks named
*-deploy-prdand*-deploy-devto delete the endpoints and their related resources.
-
Delete all the CF stacks one by one starting from the top one. Don't delete them all at once.
- If you accidentally deleted the role of a stack because of some reason, and you cannot delete that stack, you need to manually recreate the role with the same name and Admin permission, then delete the stack again, and delete the created role.
-
Delete all related S3 buckets
-
Delete the SM studio project
-
Delete the SM Studio project
bash scripts/rm_prj.sh <sm-studio-project-name>
The end service (web app, etc.) needs to send a request to the API endpoint in JSON format. The binary data must be formatted in a base64 string. Please refer to section Test API endpoint for more detail.
Whatever is sent to the API endpoint is forwarded to the LD endpoint. To customize the API endpoint request's format, we need to change the LD endpoint request's format.
The LD endpoint request's processing procedure is defined in the container/code/lambda_handler.py file. You need to update this file to adapt to the new request format.
Please refer to section Customize Docker images/Deploy to LD endpoint to develop, debug and test the LD endpoint before deployment.
How to customize the docker image for the data preparation, model training, model evaluation, and model serving processes?
The docker images used for training, evaluation and serving are identical. Please check the file container/Dockerfile.
How to customize the code for the data preparation, model training, model evaluation, and model serving processes?
The data preparation code is stored in the container/code/prepare_data.py file.
The training code is stored in the container/code/train file.
The evaluation code is stored in the container/code/evaluate.py file.
The serving code is stored in the container/code/predictor.py file.
Please refer to section Customize Docker images/Develop locally for more detail.
Distributed under the MIT License. See LICENSE for more information.
Tung Dao - LinkedIn
Project Link: https://github.com/dao-duc-tung/sagemaker-ml-system


