CVPR 2024
- Download code :
git clone https://github.com/dragonylee/FaceCom.git
- Create and activate a conda environment :
conda create -n FaceCom python=3.10
conda activate FaceCom
- Install dependencies using
piporconda:
-
pip3 install torch torchvision torchaudio --index-url https://download.pytorch.org/whl/cu118 -
conda install -c fvcore -c iopath -c conda-forge fvcore iopath pip install "git+https://github.com/facebookresearch/pytorch3d.git@stable" -
torch_geometric & trimesh & quad_mesh_simplify
pip install torch_geometric trimesh quad_mesh_simplifyYou will find that after the installation, there is only
quad_mesh_simplify-1.1.5.dist-infounder thesite-packagesfolder of your Python environment. Therefore, you also need to copy thequad_mesh_simplifyfolder from the GitHub repository to thesite-packagesfolder.
We trained our network using a structured hybrid 3D face dataset, which includes Facescape and HeadSpace datasets (under permissions), as well as our own dataset collected from hospitals. Due to certain reasons, the data we collected cannot be made public temporarily. Therefore, the method for training the model is not disclosed for the time being.
You can download our pre-trained model checkpoint_decoder.pt (Google Drive|百度网盘) and put it in data folder.
After downloading the pre-trained model, you need to modify the project path of the first three lines of config/config.cfg
dataset_dir = PATH_TO_THE_PROJECT\data
template_file = PATH_TO_THE_PROJECT\data\template.ply
checkpoint_dir = PATH_TO_THE_PROJECT\data
to match your own environment. If you create a new config file using the provided config.cfg, these three parameters should respectively satisfy the following conditions:
dataset_dirshould contain thenorm.ptfile (if you intend to train, it should include atrainfolder instead, with all training data placed inside thetrainfolder).template_fileshould be the path to the template file.checkpoint_dirshould be the folder containing the model parameter files.
The provided config.cfg file and the corresponding data folder can be used normally after downloading the pre-trained model described in Data.
After setting up the config file, you can thoroughly test with the scripts we provide below.
Randomly generate --number 3D face models.
python scripts/face_sample.py --config_file config/config.cfg --out_dir sample_out --number 10
NOTE that our method has some considerations and flaws to be aware of.
- The unit of the face model is in millimeters.
- The range of the facial model should preferably be smaller than the
template.plywe provide, otherwise add--dis_percent 0.8to achieve better results. - We use trimesh's ICP for rigid registration, but are unsure of its accuracy and robustness. You may perform precise rigid registration with
template.plyfirst and set--rr False.
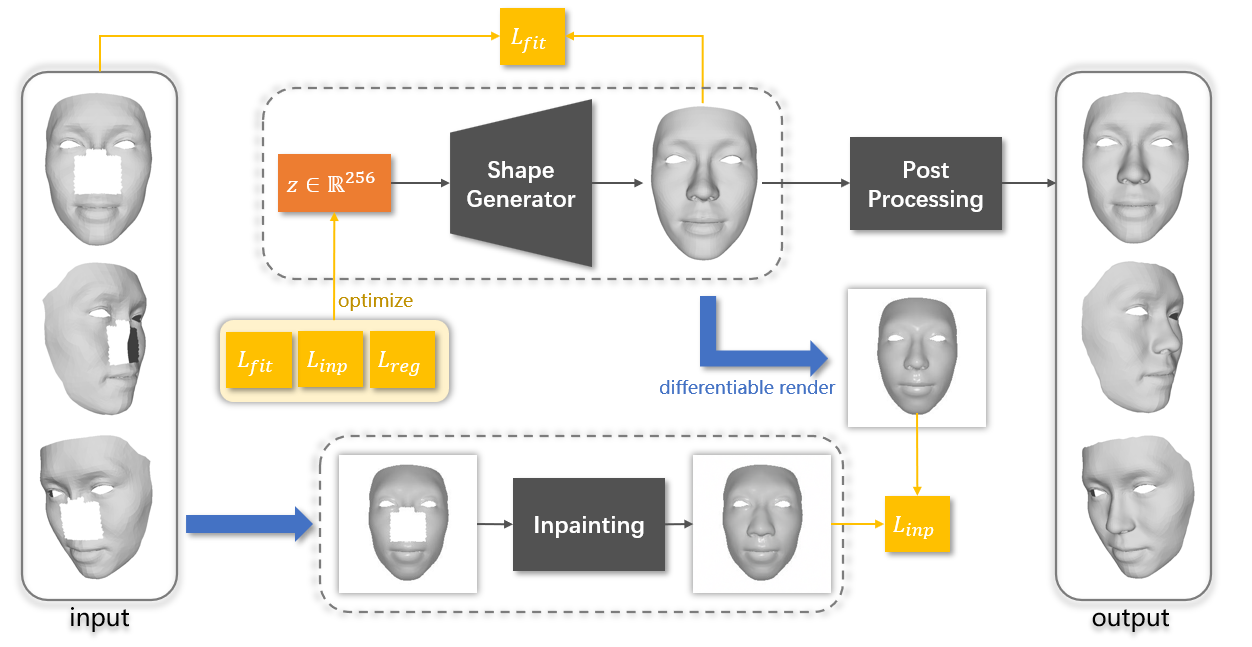
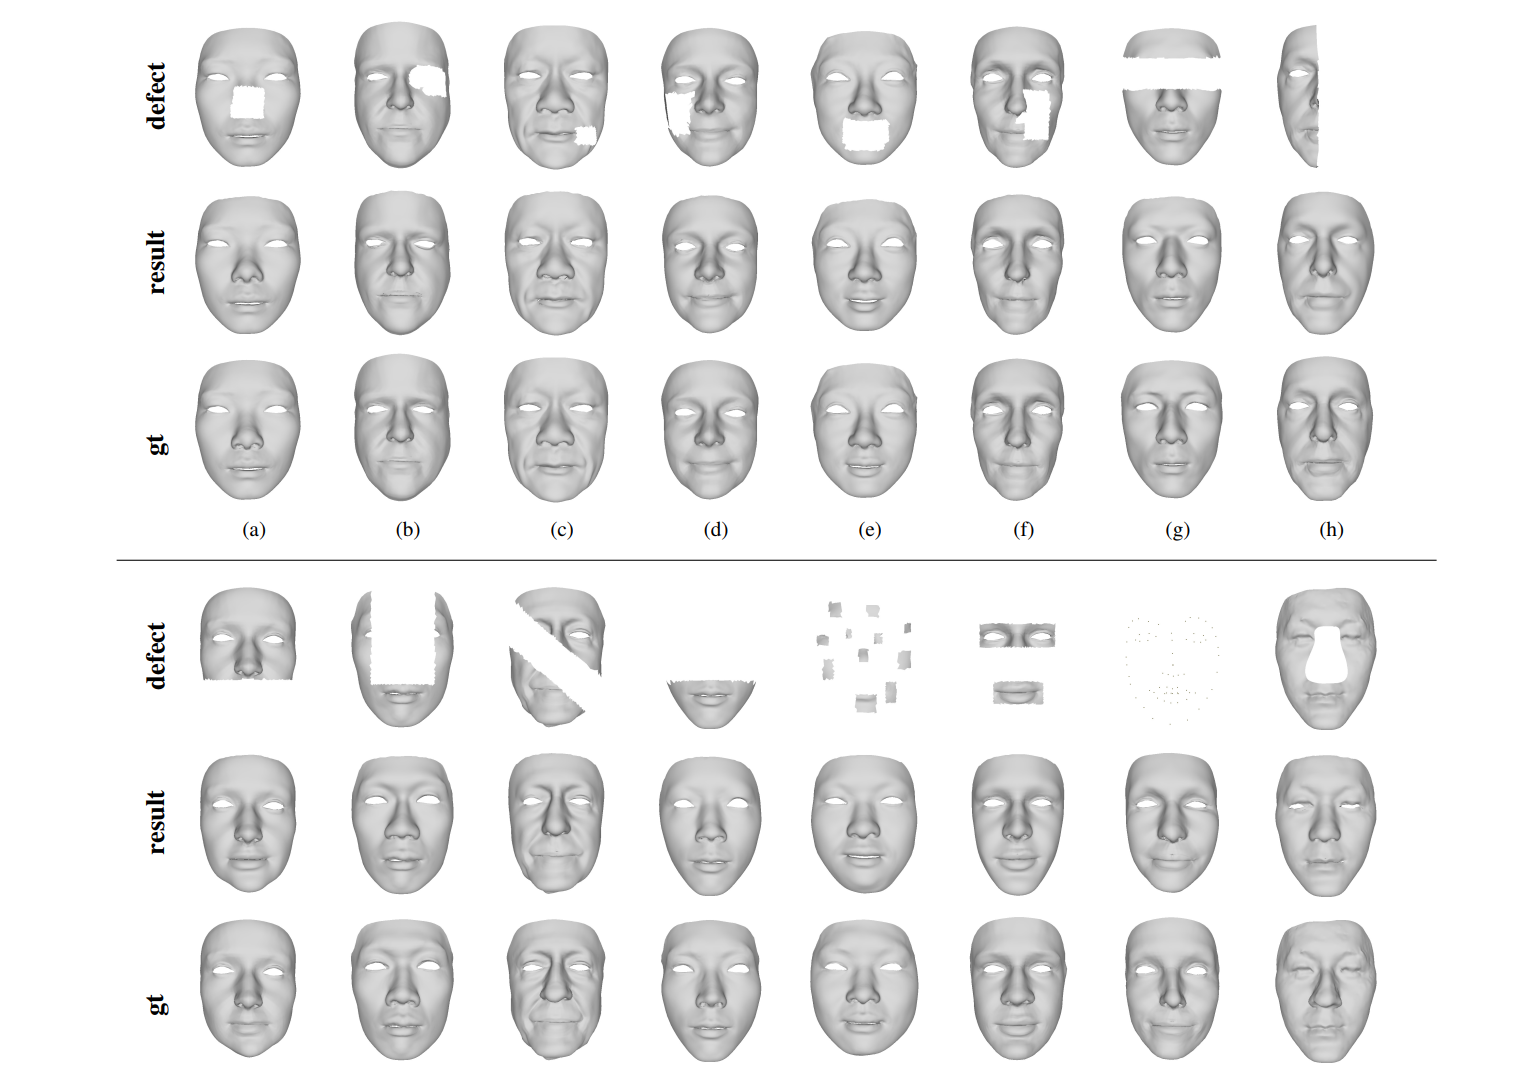
Then, you can run our script to perform shape completion on --in_file,
python scripts/face_completion.py --config_file config/config.cfg --in_file defect.ply --out_file comp.ply --rr True
where --in_file is a file that trimesh can read, with no requirements on topology. We provide defect.ply for convenience.
When the input is a complete facial model without any defects, the script in the "Facial Shape Completion" section will actually output a fitting result to the input. Since the topology of our method's output is consistent, it can also be used for non-rigid registration.
After preparing the dataset with unified topology, you can train a shape generator using the code we provided. First, determine a dataset folder path A, then create or modify the config file, changing the first three lines to
dataset_dir = A
template_file = A\template.ply
checkpoint_dir = A
You may pre-select the test data that will not be used for training, and then place the remaining training data in the train subfolder within the folder A. That is to say, before training, the directory structure of folder A should be as follows:
A/
├── train/
│   ├── training_data_1.ply
│   ├── training_data_2.ply
│   └── ...
Then you can start training using the script below:
python scripts/train.py --config_file config/config.cfg
During training, the structure of folder A will look like this, with the average of the training data generated as a template:
A/
├── train/
│   ├── training_data_1
│   ├── training_data_2
│   └── ...
└── template.ply
└── norm.pt
└── checkpoint_decoder.pt
These results are sufficient for the usage described in Usages.
If you find our work helpful, please cite us
@inproceedings{li2024facecom,
  title={FaceCom: Towards High-fidelity 3D Facial Shape Completion via Optimization and Inpainting Guidance},
  author={Li, Yinglong and Wu, Hongyu and Wang, Xiaogang and Qin, Qingzhao and Zhao, Yijiao and Wang, Yong and Hao, Aimin},
  booktitle={Proceedings of the IEEE/CVF Conference on Computer Vision and Pattern Recognition},
  pages={2177--2186},
  year={2024}
}
or
@article{li2024facecom,
  title={FaceCom: Towards High-fidelity 3D Facial Shape Completion via Optimization and Inpainting Guidance},
  author={Li, Yinglong and Wu, Hongyu and Wang, Xiaogang and Qin, Qingzhao and Zhao, Yijiao and Hao, Aimin and others},
  journal={arXiv preprint arXiv:2406.02074},
  year={2024}
}


