Dynamic DNS with Docker, Go and Bind9


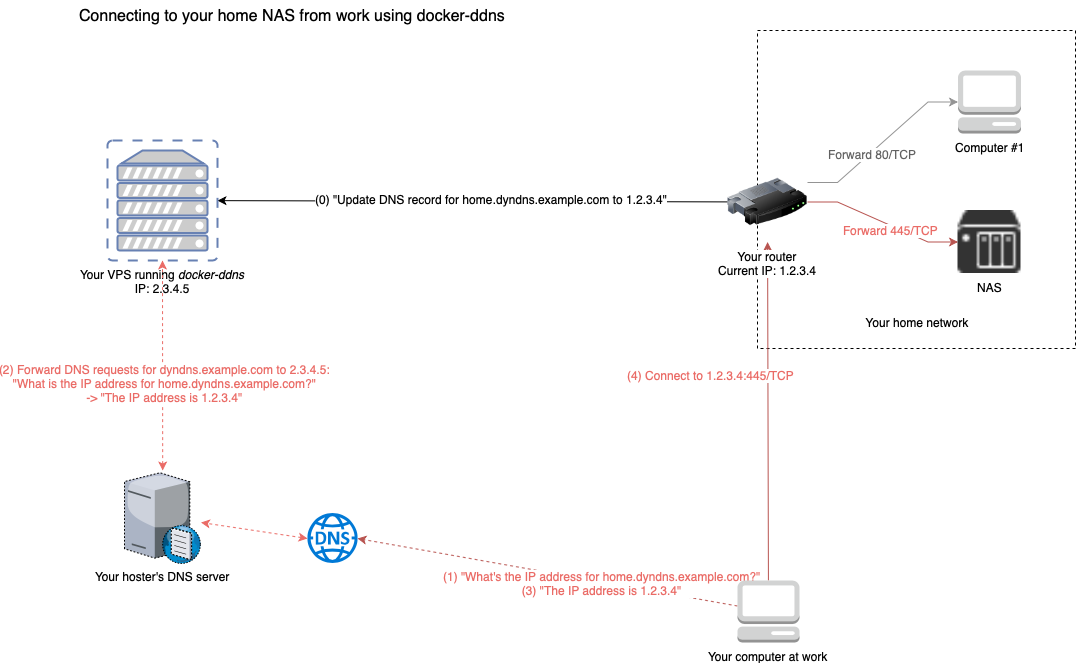
This package allows you to set up a dynamic DNS server that allows you to connect to devices at home from anywhere in the world. All you need is a cheap VPS, a domain and access to it's nameserver.
Installation
You can either take the image from DockerHub or build it on your own.
Using DockerHub
Just customize this to your needs and run:
docker run -it -d \
    -p 8080:8080 \
    -p 53:53 \
    -p 53:53/udp \
    -e SHARED_SECRET=changeme \
    -e ZONE=example.org \
    -e RECORD_TTL=3600 \
    --name=dyndns \
    davd/docker-ddns:latest
If you want to persist DNS configuration across container recreation, add -v /somefolder:/var/cache/bind. If you are experiencing any
issues updating DNS configuration using the API (NOTAUTH and SERVFAIL), make sure to add writing permissions for root (UID=0) to your
persistent storage (e.g. chmod -R a+w /somefolder).
You can also use Compose / Swarm to set up this project. For more information and an example docker-compose.yml with persistent data
storage, please refer to this file: https://github.com/dprandzioch/docker-ddns/blob/master/docker-compose.yml
Build from source / GitHub
git clone https://github.com/dprandzioch/docker-ddns
git checkout master # Make sure to build the latest stable release
cd docker-ddns
$EDITOR envfile
make deploy
Make sure to change all environment variables in envfile to match your needs. Some more information can be found here:
https://www.davd.io/build-your-own-dynamic-dns-in-5-minutes/
Exposed ports
Afterwards you have a running docker container that exposes three ports:
- 53/TCP -> DNS
- 53/UDP -> DNS
- 8080/TCP -> Management REST API
Using the API
That package features a simple REST API written in Go, that provides a simple interface, that almost any router that supports Custom DDNS providers can attach to (e.g. Fritz!Box). It is highly recommended to put a reverse proxy before the API.
It provides one single GET request, that is used as follows:
http://myhost.mydomain.tld:8080/update?secret=changeme&domain=foo&addr=1.2.3.4
Fields
secret: The shared secret set inenvfiledomain: The subdomain to your configured domain, in this example it would result infoo.example.org. Could also be multiple domains that should be redirected to the same domain separated by comma, so "foo,bar"addr: IPv4 or IPv6 address of the name record
For the DynDNS compatible fields please see Dyn's documentation here:
https://help.dyn.com/remote-access-api/perform-update/
DynDNS compatible API
This package contains a DynDNS compatible handler for convenience and for use cases where clients cannot be modified to use the JSON responses and/or URL scheme outlined above.
This has been tested with a number of routers. Just point the router to your DDNS domain for updates.
The handlers will listen on:
- /nic/update
- /v2/update
- /v3/update
The username is not validated at all so you can use anything as a username Password is the shared secret provided as an ENV variable
Examples
An example on the ddclient (Linux DDNS client) based Ubiquiti router line:
set service dns dynamic interface eth0 service dyndns host-name set service dns dynamic interface eth0 service dyndns login set service dns dynamic interface eth0 service dyndns password set service dns dynamic interface eth0 service dyndns protocol dyndns2 set service dns dynamic interface eth0 service dyndns server
Optional if you used this behind an HTTPS reverse proxy like I do:
set service dns dynamic interface eth0 service dyndns options ssl=true
This also means that DDCLIENT works out of the box and Linux based devices should work.
D-Link DIR-842:
Another router that has been tested is from the D-Link router line where you need to fill the details in on the Web Interface. The values are self-explanatory. Under the server (once you chosen Manual) you need to enter you DDNS server's hostname or IP. The protocol used by the router will be the dyndns2 by default and cannot be changed.
Accessing the REST API log
Just run
docker logs -f dyndns
DNS setup
To provide a little help... To your "real" domain, like domain.tld, you
should add a subdomain that is delegated to this DDNS server like this:
dyndns                   IN NS      ns
ns                       IN A       <put ipv4 of dns server here>
ns                       IN AAAA    <optional, put ipv6 of dns server here>
Your management API should then also be accessible through
http://ns.domain.tld:8080/update?...
If you provide foo as a domain when using the REST API, the resulting domain
will then be foo.dyndns.domain.tld.
Common pitfalls
- If you're on a systemd-based distribution, the process
systemd-resolvedmight occupy the DNS port 53. Therefore starting the container might fail. To fix this disable the DNSStubListener by addingDNSStubListener=noto/etc/systemd/resolved.confand restart the service usingsudo systemctl restart systemd-resolved.servicebut be aware of the implications... Read more here: https://www.freedesktop.org/software/systemd/man/systemd-resolved.service.html and #5