Eventuate Tram Sagas Customers and Orders
This application demonstrates how to maintain data consistency in an Java/JDBC/JPA-based microservice architecture using sagas.
The application consists of two services:
-
Order Service- creates orders -
Customer Service- manages customers
Both services are implemented using Spring Boot, JPA and the Eventuate Tram Saga framework
The Order Service uses a saga to enforce the customer’s credit limit when creating orders.
About sagas
Sagas are a mechanism for maintaining data consistency in a microservice architecture. A saga is a sequence of transactions, each of which is local to a service.
There are two main ways to coordinate sagas: orchestration and choreography. Please see example to learn about choreography-based sagas. This example uses orchestration-based sagas, where a saga (orchestration) object invokes the participants.
A saga orchestrator is a persistent object that does one of two things:
-
On startup, it sends a command message to a participant
-
When it receives a reply, it updates its state and sends a command message to the next participant.
To learn more about why you need sagas if you are using microservices:
-
the Saga pattern
-
read about sagas in my Microservice patterns book
The Create Order Saga
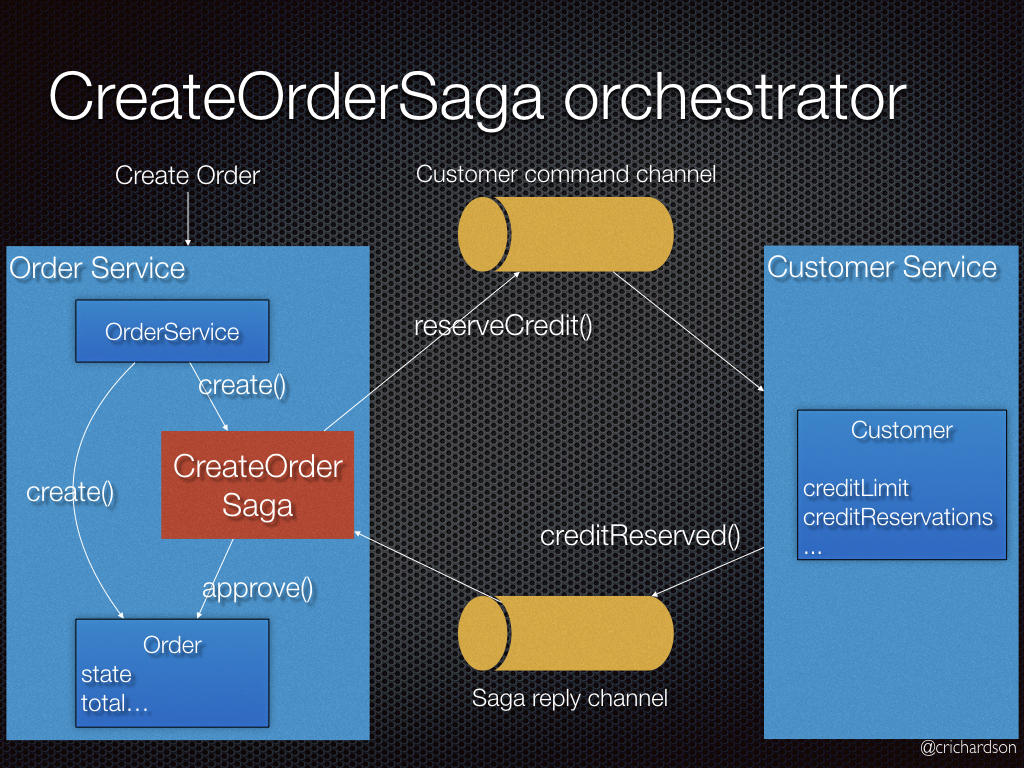
The following diagrams shows how the saga for creating an Order works:
It consists of the follow steps:
-
The
Order Servicecreates anOrderin a pending state -
The
Order Servicecreates aCreateOrderSagato coordinate the creation of the order. -
The
CreateOrderSagasends aReserveCreditcommand to theCustomerService -
The
Customer Servicereceives the command and attempts to reserve credit for thatOrder. It replies with a message indicating the outcome. -
The
CreateOrderSagareceives the reply -
It send either an
ApproveOrderor aRejectOrdercommand to theOrderService -
The
Order Servicereceives the command and changes state of the order to eitherapprovedorrejected.
Architecture
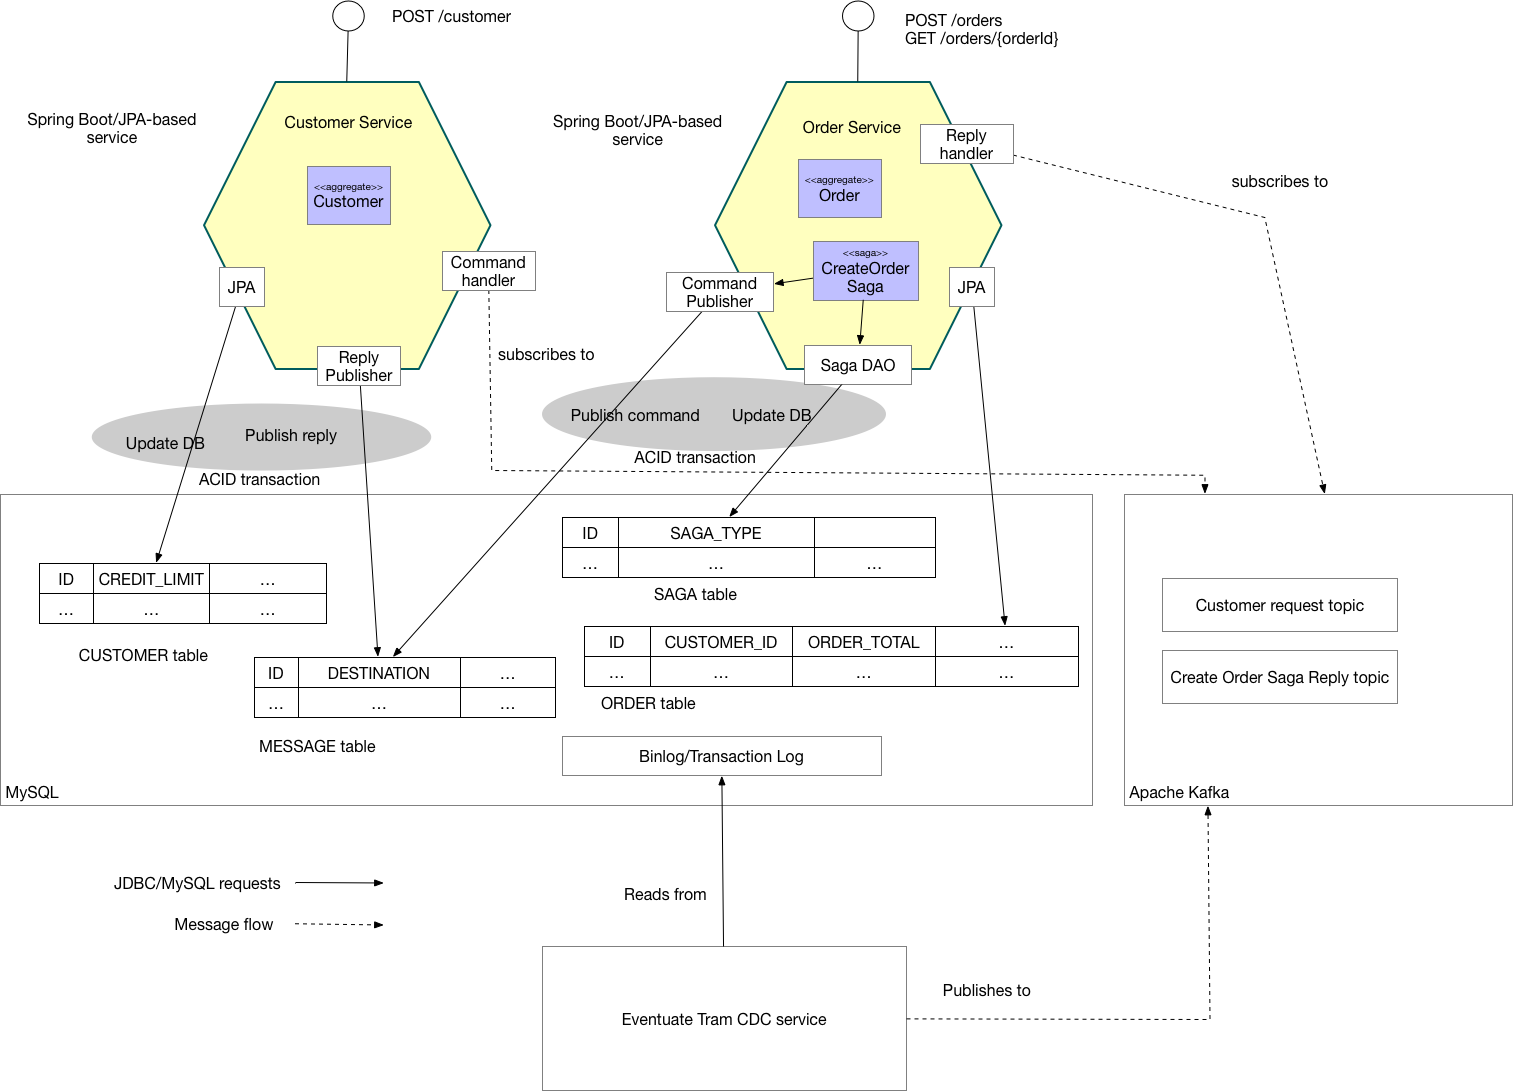
The following diagram shows the architecture of the Customers and Orders application.
The application consists of two services:
-
Customer Service- implements the REST endpoints for managing customers. The service persists theCustomerJPA entity in a MySQL/Postgres database. Using the Eventuate Tram Saga framework, it processes command messages, updates its theCustomerentity, and sends back a reply message. -
Order Service- implements a REST endpoint for managing orders. The service persists theOrderJPA entity and theCreateOrderSagain MySQL/Postgres database. Using the Eventuate Tram Saga framework, it sends command messages and processes replies.
The Eventuate Tram CDC service tracks inserts into the MESSAGE table using the MySQL binlog and publishes messages to Apache Kafka.
Building and running
Note: you do not need to install Gradle since it will be downloaded automatically. You just need to have Java 8 installed.
First, build the application
./gradlew assembleNext, launch the services using Docker Compose:
./gradlew mysqlComposeBuild
./gradlew mysqlComposeUp
Note:
If the containers aren’t accessible via localhost - e.g. you are using Docker Toolbox, you will have to use ${DOCKER_HOST_IP} instead of localhost.
See this guide to setting DOCKER_HOST_IP for more information.
You can also run the Postgres version using ./gradlew postgresComposeBuild and ./gradlew postgresComposeUp
Using the application
Once the application has started, you can use the application via the Swagger UI:
-
Order Service-http://localhost:8081/swagger-ui.html -
Customer Service-http://localhost:8082/swagger-ui.html -
API Gateway-http://localhost:8083/swagger-ui.html
You can also use curl to interact with the services.
First, let’s create a customer:
$ curl -X POST --header "Content-Type: application/json" -d '{
  "creditLimit": {
    "amount": 5
  },
  "name": "Jane Doe"
}' http://localhost:8082/customers

HTTP/1.1 200
Content-Type: application/json;charset=UTF-8

{
  "customerId": 1
}
Next, create an order:
$ curl -X POST --header "Content-Type: application/json" -d '{
  "customerId": 1,
  "orderTotal": {
    "amount": 4
  }
}' http://localhost:8081/orders

HTTP/1.1 200
Content-Type: application/json;charset=UTF-8

{
  "orderId": 1
}
Finally, check the status of the Order:
$ curl -X GET http://localhost:8081/orders/1

HTTP/1.1 200
Content-Type: application/json;charset=UTF-8

{
  "orderId": 1,
  "orderState": "APPROVED"
}
Got questions?
Don’t hesitate to create an issue or see

