Agile Trainer for Udacity SDC Simulator for Udacity Self-Driving Car Project 3: Behavioral Cloning
Project Goal: Use Behavioral Cloning to train a CNN model to drive a car in a simulator.
For Project 3, Udacity has created a car simulator based on the Unity engine that uses game physics to create a close approximation to real driving. Our task is to use the lessons we learn in the Behavioral Cloning to:
- Collect left, center and right camera images and steering angle data by driving the simulated car
- Design and create a CNN regression model architecture for learning the steering angle based on the center camera image
- Train it to drive the simulated car
- Test the trained model in the simulator in Autonomous mode.
- Repeat 1-4 until the trained model can drive the simulated car repeatedly on Track1.
- Additional challenge, on Track2.
Training in batch mode is tough! Times from step 1 to 3 could take hours, before trying on the simulator in Autonomous mode and find out:
- Data collected was not enough
- Data collected was not the right kind
- Key areas in the track were not learned correctly by the model
- Model was not design or create correctly.
This leads to a very unsatisfactory experience. The data collection, model design, training and testing cycle needs to be faster. After going through this cycle seven times, on the eighth try, I decided to do something different. The idea is that the design of the data collection, collecting/sampling, and then actual training loop is taking too long. So, to shorten it, we will try an "agile" development process, where instead of an waterfall approach, we iterate more quickly with idea, design, data gathering and training in a tighter interactive loop with feedback.
NOTE: The Agile Trainer trains on already semi-working models iteratively. You can load a pre-trained model, train it on some tough spots that it has a hard time with, save it, test it on drive.py and then load it back and train it some more. It is not intended to train a model from scatch, although you could do that too if you have the model saved before it has been trained.
While looking for a way to get the training images and steering angles out faster, I found that drive.py module was the closest fit to what we need, since it was able to communicate with the Simulator and get the images and steering angles directly. Following this reasoning, I put together an initial proof of concept. The initial version is more of a human "intervention" validator. Think of a self driving car that is in test that needs someone to hit the emergency stop if it goes in the wrong direction. But in this case, we can nudge it in the right direction, so we can see how far it can keep on going at its present training.

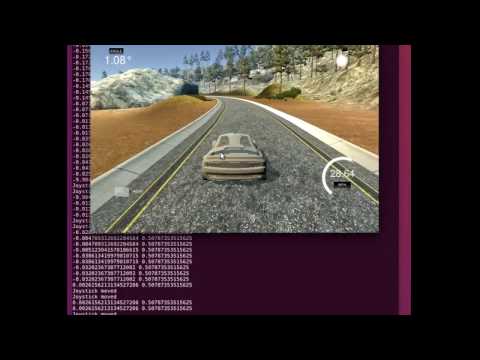
Think of it as training wheels for self-driving cars. The interface is hooked up to a modified "drive.py" that augments the steering command with the a joystick controller connected to pygame module.
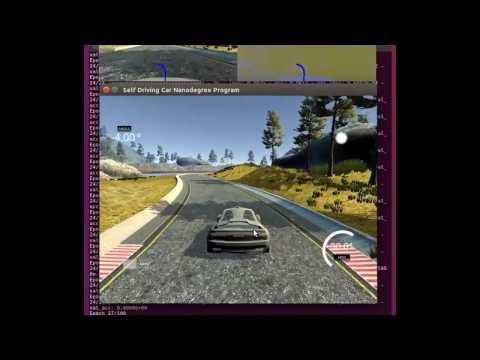
My next version is a bit more towards what I intended, an interactive trainer that the simulator feeds directly into.

Below is what a version of it looks like when running. The generic version only has one video view since I am not sure what additional preprocessing your model will need to display on a PyGame screen.

No need for data augmentation because the data is always new. The image and steering data is collected and cached and then feed randomly to the trainer using the model.fit_generator function. When we find a problem area in the course using the initial joystick interface, we launch the new trainer and then just train at that trouble spot. We can slow down at that spot and collect more samples to get it model weights corrected. Assuming that the model is good, it should be able to correct itself after that. If the model is bad, we can tell right away, and either provide more training, or go to another iteration of the model architecture design and abandon the current version. In fact, using the first interface, we can do destructive testing by nudging the car in the simulator off course and see if it can recover and recenter itself back on the course. This will let us know how robust is the model in following the course around the given track. It sort of like a "deliberate practice" (http://expertenough.com/1423/deliberate-practice) for self-driving cars, if you will.
The training tools works in place of the drive.py module that you use previously for validating your training. You still need drive.py for your final validation, but for repeated training and testing your should use these new modules. "pygameJoyDriveInterface.py" is for initial testing to see where your model's key weaknesses are. Then use "continuousTrainer.py" to correct those weaknesses by driving to those key areas and slow down to collect extra data points for your model to improve. you may need to update these tools if your images/steering angles input requires preprocessing (YUV, resize, etc.) before they are fed into your model. A stubbed preprocess function is provided to do this.
| Tool | Description | Needs Update? | Usage |
|---|---|---|---|
| PS3Controller.sh | Shell script to launch PS3/XBOX controller driver | No | sudo ./PS3Controller.sh |
| pygameJoyDriveInterface.py | Initial Prototype to interface pygame, drive.py and the model | Maybe Preprocessing? | python pygameJoyDriveInterface model.json |
| continuousTrainer.py | Continuous Trainer | Maybe Preprocessing? | python continuousTrainer.py model.json |
####WARNING: One of the most important things to do during development is to make backups (model.py, model.json and model.h5) between iterations, so you may back track to a known good version. If you have not done this yet, set up a github repository and commit often. I cannot tell you how many times this saved my ass!
1. Edit the pygameJoyDriveInterface.py and continuousTrainer.py. Update any preprocessing you require for your model.
2. Make sure you have PyGame module installed. Try either "conda install pygame" or "pip install pygame"
3. This version assumes you have a PS3 joystick. Others may work, but I have not tried it. If you get this to work on other joysticks or even keyboard, please let us know so we can update the instructions for everyone benefit! Use "PS3Controller.sh" to start up the "xboxdrv" driver for PS3. If you are using another joystick, try running the example code for joystick module at the end of the webpage here: http://www.pygame.org/docs/ref/joystick.html. If you are going to try using keyboard, make a copy of "pygameJoyDriveInterface.py" and try to get the key module working: http://www.pygame.org/docs/ref/key.html. Once you do, modify the "continuousTrainer.py" code the same way, and let us know your awesomeness!
6. Use the "pygameJoyDriveInterface.py" first and test how well your model drives itself. You can "nudge" your simulated car back on track if it starts veering off. Think of training wheels for your SDC.
$ python pygameJoyDriveInterface.py yourSavedModel.json
7. Once you identify trouble areas that you needed to intervene, run the "continuousTrainer.py" and drive to those key locations. Move Up the joystick to slow down and take as much time in those areas as possible to collect as much data points as you can. This will be fed to the trainer in real-time and the trainer will start training the model that was loaded. Wait for your model to be saved at least once before you try to run it again against either"pygameJoyDriveInterface.py", or "drive.py". Remember, your model will be evaluated against "drive.py", so make sure it works there in its final form on Track1! Use button(0), X button on the PS3, to override any data points that are bad, i.e.: You are about to crash, or go off the track.
$ python continuousTrainer.py yourSavedModel.json
8. If you experience slowness in training, you may need to adjust these values in the code for your environment, in particular if you are CPU based:
            batch_size = 20
            samples_per_epoch = int(len(X)/batch_size)
            val_size = int(samples_per_epoch/10)
            if val_size < 10:
                val_size = 10
            nb_epoch = 100
Please let us what adjustments works for you so others may know your awesomeness!
These tools are meant to be improved. Some ideas are:
- Replace/Augment joystick interface with keyboard: http://www.pygame.org/docs/ref/key.html
- Use key/joystick button to interactively launch via thread.start() function, the trainer.
- Use key/joystick motion to gather training data at key areas.
- Update trainer with multiple models for re-enforment training?
- Get a model that knows how to drive a track train a new model
All help is welcome! The AgileTrainer project is an ongoing and live project. If you'd like to add a new input device, open an issue and even submit it yourself. If you're new to open source, I'll help you get your first commit in, ping me.
AgileTrainer is released under MIT License
Accuracy in the training is not a good indicator if your model will do well on the track! Only performing well on the track is a true measure of the model's performance.
Feel free to fork this repository and make a different version! This tool is only as good as it fits your needs, so modify it!