

- Configurations
Note: Make sure you have local admin rights before you proceed with the following installations.
Following site will help you setup your mac.
-
Install iterm2 from https://www.iterm2.com/ and Install Homebrew from https://brew.sh/
-
Install software listed in file brew-leaves.txt
brew install $(< brew-leaves.txt) -
Add theme to iterm2: Oh-my-Z
sh -c "$(curl -fsSL https://raw.github.com/ohmyzsh/ohmyzsh/master/tools/install.sh)" -
Add additional plugins, themes and fonts to iterm2
You can add additional plugins in zsh at
.oh-my-zsh/custom/pluginslocationcd $ZSH/custom/plugins;git clone https://github.com/zsh-users/zsh-syntax-highlighting.git && git clone https://github.com/zsh-users/zsh-autosuggestions && git clone https://github.com/zsh-users/zsh-completions
brew tap homebrew/cask-fonts
brew install --cask font-hack-nerd-font

# powerline clone
git clone https://github.com/powerline/fonts.git --depth=1
# install
cd fonts
./install.sh
# clean-up a bit
cd ..
rm -rf fonts
-
Install powerlevel10k theme(
brew install powerlevel10k) -
Update .zshrc file
-
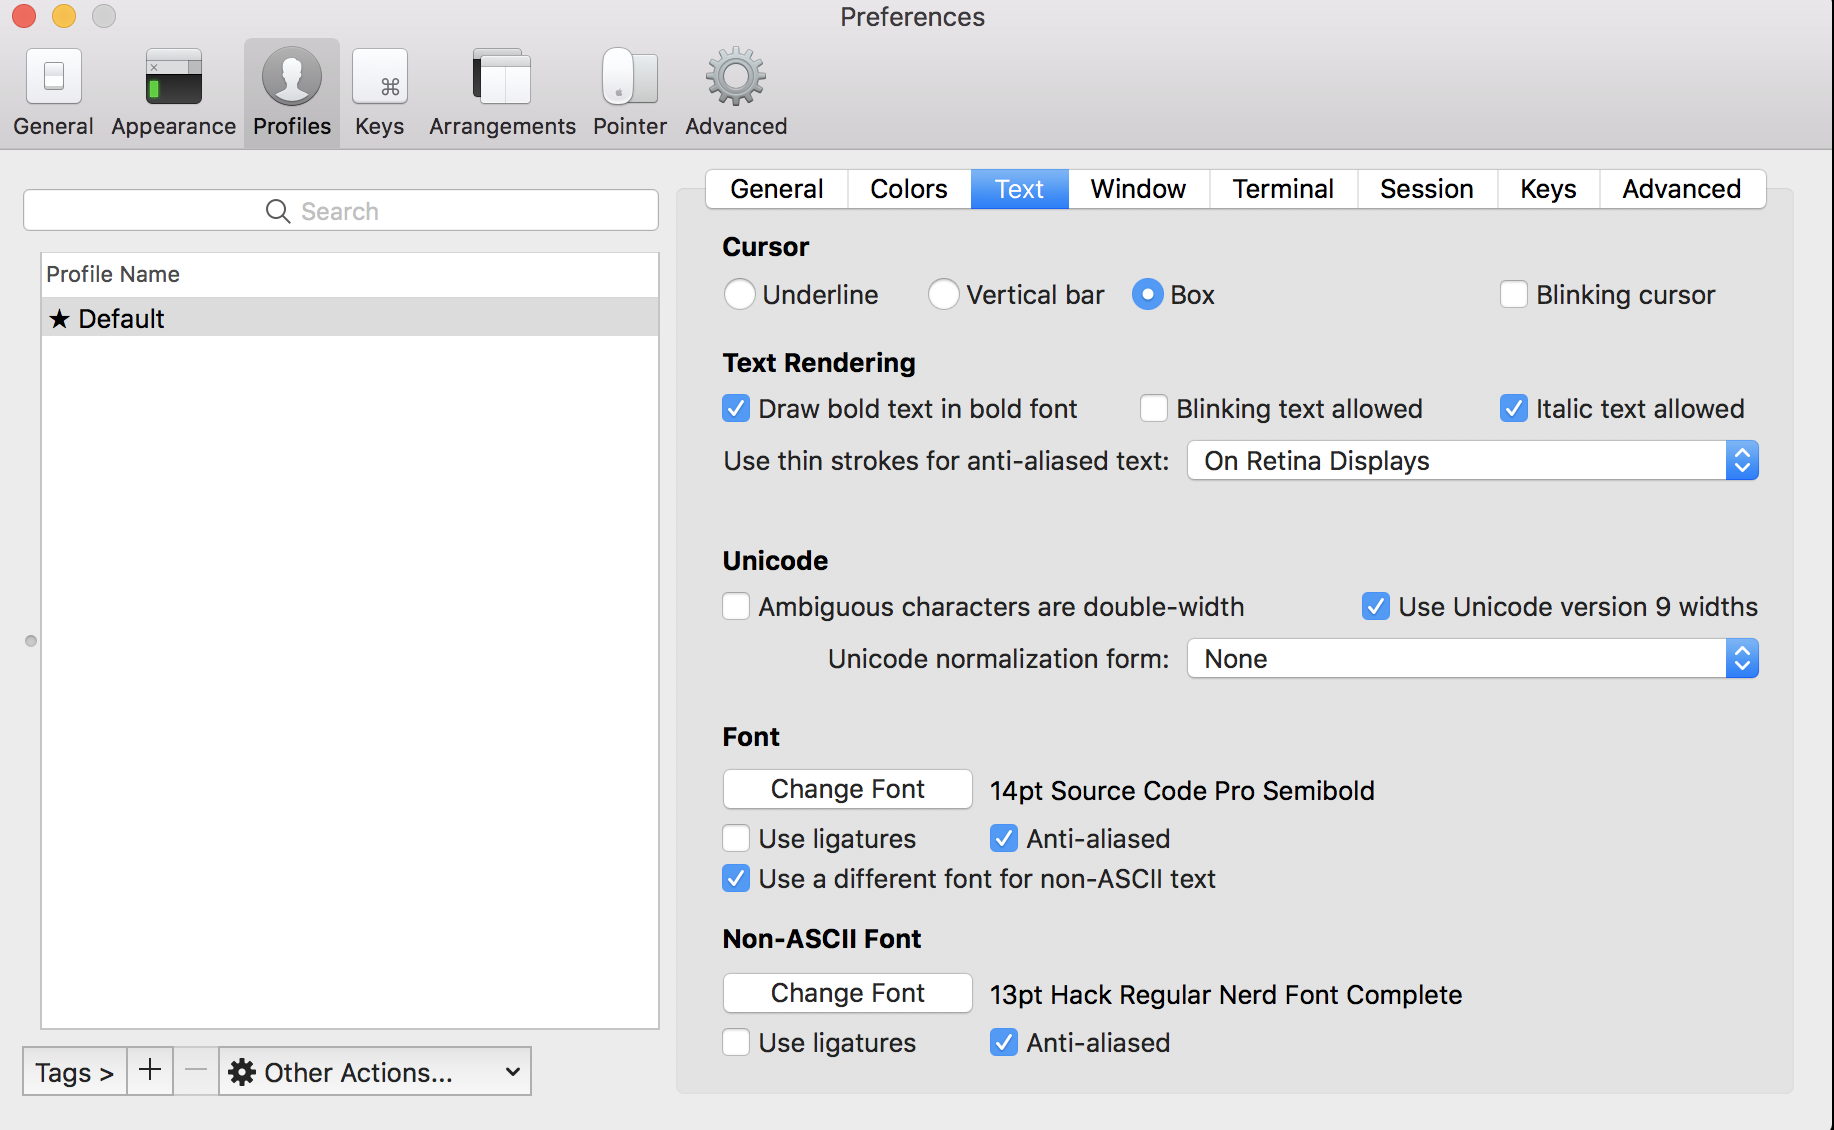
change fonts for iterm2: iTerm2 -> Preferences -> Profiles -> Text -> Font -> Change Font to hack-nerd
-
Execute
compaudit | xargs chmod g-w,o-w /usr/local/share/zsh ;compaudit | xargs chmod g-w,o-w /usr/local/share/zsh/site-functions -
change font settings as shown in image
-
Vim Customization
git clone https://github.com/amix/vimrc.git ~/.vim_runtime && sh ~/.vim_runtime/install_awesome_vimrc.sh
-
Customize iterm2 shortcut
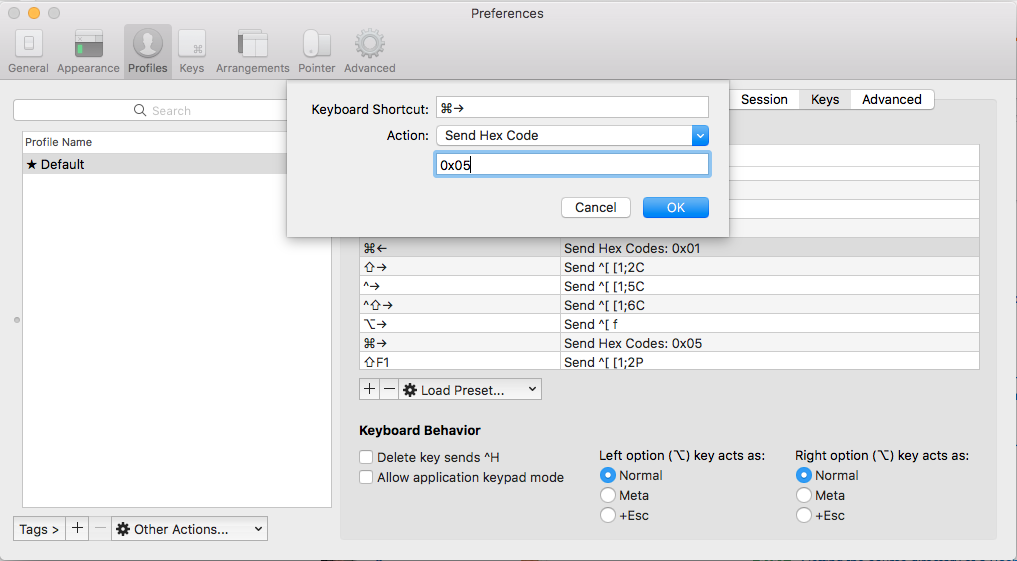
⌘← "SEND HEX CODE" 0x01
⌘→ "SEND HEX CODE" 0x05
⌥← "SEND ESC SEQ" b
⌥→ "SEND ESC SEQ" f -
Bonus: If you want terminal app to be similar to iterm2 do following settings
- terminal -> preference -> Basic theme ->Background -> change color from white to black,
- Text -> change color from black to white
- Font -> change for to Hack bold nerd font


More info:
Following are other changes require to make iterm more customizable and solutions to some problem I have encountered so far.
brew install rbenv ruby-build

# Add rbenv to bash/zsh (.bash_profile/.zshrc) so that it loads every time you open a terminal
echo 'if which rbenv > /dev/null; then eval "$(rbenv init -)"; fi' >> ~/.bash_profile
source ~/.bash_profile

echo 'if which rbenv > /dev/null; then eval "$(rbenv init - zsh)"; fi' >> ~/.zshrc
source ~/.zshrc

# If you're using Zsh
echo 'export PATH="$HOME/.gem/ruby/2.7.2/bin:$PATH"' >> ~/.zshrc
echo 'export PATH="/usr/local/opt/ruby/bin:$PATH"' >> ~/.zshrc

# If you're using Bash
echo 'export PATH="$HOME/.gem/ruby/2.7.2/bin:$PATH"' >> ~/.bash_profile

# Install Ruby
rbenv install 2.7.2
rbenv global 2.7.2
ruby -v

rbenv rehash

# to check outdated gems
gem outdated

#update all outdated gems
sudo gem update

# delete older gems
sudo gem cleanup
The first thing you want to do after installing a new Ruby version is to install Bundler.
This tool will allow you to set up separate environments for your different Ruby projects, so their required gem versions won't conflict with each other.
Install Bundler with:
gem install bundler
In a new Ruby project directory, create a new Gemfile with: like venv of python environment
bundle init
-
brew install exa
-
LSD --> I liked this one
brew install lsd
alias ll='lsd -la'
alias ls='lsd'
-
colorls --> slower compared to other plugins
$sudo gem install colorls
Snapshots of my configurations:
+ — uncommitted changes in the index;
! — unstaged changes;
? — untracked changes;
$ — stashed changes;
⇣ — unpulled commits;
⇡ — unpushed commits

command-failure-status:


brew install zoxide
brew install fzf
# add following at the end of zshrc file
eval "$(zoxide init --cmd cd zsh)"- To configure powerlevel10k, execute following command and choose suitable options for you
p10k configure- This will generate following files and you can have multiple files for each of the config
mv ~/.p10k.zsh ~/.p10k.zsh.config1To use desired config
cp ~/.p10k.zsh.config1 ~/.p10k.zshRestart the terminal.


Other customizations you can try:
The color scheme I have used in above iterm2 snapshots is here
If you need different color schemes then you can ref
- Download the colorscheme file
- double click on it, iterm2 will import it.
Installation:
brew install nnnOR
Refer installation instructions from here
OR
This will add icons to directories and files
Note: Nerd fonts should be installed and configured.
wget https://github.com/jarun/nnn/archive/refs/heads/master.zip
tar -zxvf master.zip
cd nnn-master/
# Not Zero, but Alphabet O, you will get binary nnn in same folder and you can move this bonary to the place you want and use it.
sudo make O_NERD=1

# Since I have install nnn with homebrew and it does not give any colors and icons, so  compiled it manually and replaced nnn binary file
sudo cp nnn /usr/local/Cellar/nnn/4.0/bin/
alias nnn='nnn -de'
Plugins
curl -Ls https://raw.githubusercontent.com/jarun/nnn/master/plugins/getplugs | shPlugins are installed to ${XDG_CONFIG_HOME:-$HOME/.config}/nnn/plugins.
Add active plugin list to .zshrc/.bashrc file
export NNN_PLUG='f:finder;o:fzopen;p:mocplay;d:diffs;t:nmount;v:imgview'
Ref:
brew install jesseduffield/lazygit/lazygitRef:
brew install difftasticRef:


In case if you want to change message prompt and add additional types then edit following file
Add following code at the end of files /usr/local/lib/python3.11/site-packages/commitizen/defaults.py and /usr/local/Cellar/commitizen/3.5.4/libexec/lib/python3.11/site-packages/commitizen/defaults.py.
version_parser = r"(?P<version>([0-9]+)\.([0-9]+)\.([0-9]+)(?:-([0-9A-Za-z-]+(?:\.[0-9A-Za-z-]+)*))?(?:\+[0-9A-Za-z-]+)?(\w+)?)"
For "conventional_commits" type template
commitizen-version --> replace version number
File: /usr/local/lib/python3.11/site-packages/commitizen/cz/conventional_commits/conventional_commits.py, /usr/local/Cellar/commitizen//libexec/lib/python3.11/site-packages/commitizen/cz/conventional_commits/conventional_commits.py
This has one downside that, for every commitizen upgrade, need to change ^^ files manually
cp /usr/local/lib/python3.11/site-packages/commitizen/cz/conventional_commits/conventional_commits.py /usr/local/Cellar/commitizen/$(cz version)/libexec/lib/python3.11/site-packages/commitizen/cz/conventional_commits/conventional_commits.py

cat <<"EOT" >> /usr/local/Cellar/commitizen/$(cz version)libexec/lib/python3.11/site-packages/commitizen/defaults.py

version_parser = r"(?P<version>([0-9]+)\.([0-9]+)\.([0-9]+)(?:-([0-9A-Za-z-]+(?:\.[0-9A-Za-z-]+)*))?(?:\+[0-9A-Za-z-]+)?(\w+)?)"
EOTclass: class ConventionalCommitsCz(BaseCommitizen)
method: def questions(self)
"choices": [
// other existing choices, NOTE: key should be of single character and should not be used by existing choices
{
"value": "chore",
"name": (
"chor: changes that do not relate to a fix or feature and "
"don't modify src or test files (for example updating dependencies)"
),
"key": "h",
},
{
"value": "revert",
"name": (
"revert: reverts a previous commit"
),
"key": "z",
},Similarly scope and subject can be modified.
Add revert and chore in schema patters as well
    def schema_pattern(self) -> str:
        PATTERN = (
            r"(?s)"  # To explictly make . match new line
            r"(build|ci|chore|docs|feat|fix|perf|refactor|style|test|chore|revert|bump)"  # type
            r"(\(\S+\))?!?:"  # scope
            r"( [^\n\r]+)"  # subject
            r"((\n\n.*)|(\s*))?$"
        )
return PATTERNbrew install --cask figYou can opt-out of all telemetry and crash reporting by running:
fig settings telemetry.disabled true
Requires an emailId for the setup. 😒
- if you work with lots of json, yaml, toml, xml, csv, ini, data files, then I would suggest this shell than any other shell, it gives you so many options to make your life easy.
- It is a structured shell like PowerShell.
- Nu views data functionally.
- Rather than using mutation, pipelines act as a means to load, change, and save data without mutable state.
- If you are used to any previous shell then this would help you get started: https://www.nushell.sh/book/nushell_map.html, https://www.nushell.sh/book/nushell_operator_map.html
- Some of the programming language option on shell prompt: https://www.nushell.sh/book/nushell_map_imperative.html
# Linux and macOS
brew install nushell
# Windows
winget install nushell
After installing, launch Nu by typing nu
- pyenv manages multiple versions of Python itself.
- virtualenv/venv manages virtual environments for a specific Python version.
- pyenv-virtualenv manages virtual environments for across varying versions of Python.
brew install python@3
pip install --upgrade setuptools
python -m ensurepip --upgrade
pip install --upgrade pip
info:
Python has been installed as
  /usr/local/bin/python3

Unversioned symlinks `python`, `python-config`, `pip` etc. pointing to
`python3`, `python3-config`, `pip3` etc., respectively, have been installed into
  /usr/local/opt/python/libexec/bin

If you need Homebrew's Python 2.7 run
  brew install python@2

You can install Python packages with
  pip3 install <package>
They will install into the site-package directory
  /usr/local/lib/python3.7/site-packages
brew install python@2
# install py environment manager
brew install pyenv
# identify versions available
pyenv install --list
# Install python
pyenv install <python-version>
# verify installed version
pyenv versions
# To set global python version
pyenv global <python-version>
# To set local version, this is helpful when you have multiple projects depends on different python versions but at the same time, you do not want to change your global python version
pyenv local <python-version>
# check python version
python -version
# Once you close the terminal or open new terminal tab, this may not work, we need to initialize everytime we start a bash/zsh sessions
# add following in .zshrc or .bashrc file, similar to rbenv(ruby environment)
eval "$(pyenv init -)"
# installation location
ls ~/.pyenv/versions/
# To remove any python version
pyenv uninstall <python-version>
# To check installed python versions
pyenv versionsIt offers flexibility in isolating multiple python environment and does not interfer with other virtual environment
Package installed in one virtual environment will not be visible in other virtual environment
Package installed in virtual environment will not be installed system wide hence it will not be available to all programs which uses system python setup.
System python installation path
/System/Library/Frameworks/Python.framework/
Homebrew installed python path
/usr/local/Cellar/python/<version>/
Let us use python3 for virtual environment
pip3 install virtualenv
OR upgrade
pip install --upgrade virtualenv
Setup virtual environment at any location, lets setup at home directory
virtualenv -p python3 ~/virtEnvPy3
python3 -m pip install --upgrade setuptools
virtualenv --upgrade-embed-wheels
Activate virtual environment
cd ~/virtEnvPy3
source bin/activate
Install any package for above virtual environment from terminal
pip install flask
Deactivate environment
deactivate
on similar line we can create virtual environment for python2 as well
Now, if you want to extract which all packages you installed
pip2 freeze > requirements-2.txt
# OR
pip3 freeze > requirements-3.txt
If you want to install all packages from requirements.txt
pip2 install -r requirements.txt
#OR
pip3 install --user -r requirements.txt
# pip3 install help
# --user --> Install to the Python user install directory for your platform.
# Typically ~/.local/, or %APPDATA%\Python on Windows.
# (See the Python documentation for site.USER_BASE for full details.This is possible with pyenv-virtualenv plugin.
Installation of pyenv-virtualenv plugin, for more refer respective github page:
brew install pyenv-virtualenv
# Add following to .zshrc/,bashrc file
eval "$(pyenv virtualenv-init -)"
Create a virtual environment, make sure you have installed python-version from pyenv. This creates .python-version file to project folder.
pyenv virtualenv <python-version> <environment/project_name> e.g. pyenv virtualenv 3.11.9 LLM-demo
If you need all site-packages from parent python version to be available in virtual env then
pyenv virtualenv --system-site-packages <python-version> <environment/project_name>Activate Virtual env
pyenv local <environment_name>LLM-demo e.g. pyenv local LLM-demo
Verify
pyenv which python
pyenv which pip
Ref:
brew install golang or brew install go
check version
go version
Your Go working directory (GOPATH) is where you store your Go code/additional libraries.
It is not mandatory to have your code at go-workspace.
It can be any path you choose but must be separate from your Go installation directory (GOROOT).
mkdir ${HOME}/go-workspace
# GO projects/program will be stored
mkdir ${HOME}/go-workspace/src
# packaged object will be stored
mkdir ${HOME}/go-workspace/pkg
# compiled binary files will be stored
mkdir ${HOME}/go-workspace/bin

export GOPATH="${HOME}/go-workspace"
export GOROOT="$(brew --prefix golang)/libexec"
export PATH="$PATH:${GOPATH}/bin:${GOROOT}/bin"
Import Go packages
go get -u github.com/tednaleid/ganda
More Ref
If you have existing groovy version installed remove it first
brew remove groovy
Then install SDK by
brew install groovysdk
export GROOVY_HOME=/usr/local/opt/groovy/libexec
Point intelliJ idea to following path
/usr/local/Cellar/groovysdk/<version>/libexec
check version
groovy --version
Ref: 1
For IntelliJ keymap, import settings.jar
http://jdk.java.net/12/ unzip and use for latest features, this will not mess-up your mac java version and environment variables
Install:
curl -s "https://get..io" | bash
source "$HOME/.sdkman/bin/sdkman-init.sh"
sdk version
OR using homebrew
brew tap sdkman/tap
brew install sdkman-cli
# then add following lines to the end of your .bash_profile or .zshrc file
export SDKMAN_DIR=$(brew --prefix sdkman-cli)/libexec
[[ -s "${SDKMAN_DIR}/bin/sdkman-init.sh" ]] && source "${SDKMAN_DIR}/bin/sdkman-init.sh"
Uninstall:
tar zcvf ~/sdkman-backup_$(date +%F-%kh%M).tar.gz -C ~/ .sdkman
$ rm -rf ~/.sdkman
# remove following line from bashrc/zshrc
#THIS MUST BE AT THE END OF THE FILE FOR SDKMAN TO WORK!!!
[[ -s "/home/dudette/.sdkman/bin/sdkman-init.sh" ]] && source "/home/dudette/.sdkman/bin/sdkman-init.sh"
Update:
sdk update
Usage:
# Docs: https://sdkman.io/usage
sdk install micronaut
sdk list micronaut
sdk uninstall micronaut 1.0.4
Install Java (multi distribution)
sdk list javaAvailable Java Versions
>>> indicates current default version
| Vendor | Use | Version | Dist | Status | Identifier |
|---|---|---|---|---|---|
| AdoptOpenJDK | 15.0.0.j9 | adpt | 15.0.0.j9-adpt | ||
| >>> | 11.0.8.hs | adpt | installed | 11.0.8.hs-adpt | |
| 8.0.265.j9 | adpt | 8.0.265.j9-adpt | |||
| 8.0.265.hs | adpt | 8.0.265.hs-adpt | |||
| Amazon | 15.0.0 | amzn | 15.0.0-amzn | ||
| 11.0.8 | amzn | 11.0.8-amzn | |||
| 8.0.265 | amzn | 8.0.265-amzn | |||
| Azul Zulu | 15.0.0 | zulu | 15.0.0-zulu | ||
| BellSoft | 15.0.0.fx | librca | 15.0.0.fx-librca | ||
| GraalVM | 20.2.0.r11 | grl | 20.2.0.r11-grl | ||
| Java.net | 16.ea.19 | open | 16.ea.19-open | ||
| SAP | 15.0.0 | sapmchn | 15.0.0-sapmchn |
Use the Identifier for installation:
# syntax
sdk install java <version-dist>
# e.g.
sdk install java 11.0.8.hs-adpt
Ref:
bearer token in pre-script and dynamic variables
If you still could not follow up the steps, follow steps mentioned in the video
Part1:https://www.youtube.com/watch?v=iwH1XqVjZOE
Part2:https://www.youtube.com/watch?v=UsKd9Y42Mo0.
If your zsh is slower:
- check shell loading time
timezsh() { shell=${1-$SHELL} for i in $(seq 1 10); do /usr/bin/time $shell -i -c exit; done } timezsh - check its plugin loading time
# Load all of the plugins that were defined in ~/.zshrc for plugin ($plugins); do timer=$(($(gdate +%s%N)/1000000)) if [ -f $ZSH_CUSTOM/plugins/$plugin/$plugin.plugin.zsh ]; then source $ZSH_CUSTOM/plugins/$plugin/$plugin.plugin.zsh elif [ -f $ZSH/plugins/$plugin/$plugin.plugin.zsh ]; then source $ZSH/plugins/$plugin/$plugin.plugin.zsh fi now=$(($(gdate +%s%N)/1000000)) elapsed=$(($now-$timer)) echo $elapsed":" $plugin done - zsh profiler module
zmodload zsh/zprof
zprof
These are common solutions to problems faced while using mac.
These softwares I find it useful and grateful to the people who take care of it.
Some of the useful application generators.
{% gist a4bdff5c011957f9950b9bebed7f5e30 customize-iterm2.sh %}