Hi All, I'm Dinanath Jayaswal, Senior UI/Web Developer and Adobe Certified Expert Professional, I wanna welcome you to Angular7 step by step guide. In this course/tutorial will go over and learn all the fundamental building blocks of Angular, which a developer needs to know to get started developing Angular applications. Will cover from Node/NPM/Angular CLI Setup, Angular basic+advanced and common concepts like Components, Interpolation, Data Binding, Pipes, Services, Directives, Routing and Nativation, Forms, Http and Observables, etc.
This course is for anyone and everyone, Almost everyone! Fresher/Newcomer as well as experienced UI/frontend/Web Developers who are interested in boost skills and further career - by learning new latest dynamic JavaScript framework from Google to become a hi-tech developer.
- Angular7 Introduction
- Getting Started
- Angular First Hello World App
- Components
- Interpolation (Data Binding)
- Property Binding
- Class Binding
- Style Binding
- Event Binding
- Template Reference Variables
- Two Way Data Binding
- ngIf Directive
- ngSwitch Directive
- ngFor Directive
- Component Interaction
- Pipes
- Services
- Dependency Injection (DI)
- Using a Service
- HTTP and Observables
- Fetch Data Using HTTP and Observables
- Creating Custom Directives
- Custom Directives with Events and @HostListener
- Creating Custom Pipes
- Angular is a JavaScript (TypeScript based) open-source front-end web application framework from Google
- A framework to build a client-side application
- Great for SPAs (Single Page Application)
- Angular Ver2/4/5/6/7 frameworks target Mobile and Desktop
- The very first version
Angular 1.0 (1.xx)is known asAngularJS, versions beyond2+are generally known asAngular
A SPA (Single Page Application) is a website/web applications in which part of page reload asynchronously without loading/re-loading whole page/app. It contains the menu, navigations, buttons, and blocks on a single page, as-and-when a user clicks on any of them; it dynamically rewrites/loads the current page rather than loading entire new pages from a server and so it is reactive, fast and speedy. (Web apps that load a single HTML page and dynamically update that page as the user interacts with the app).
- Modular approach
- Re-usable code (Components)
- Development quicker and easier (Many inbuilt features helps to do development quicker+easier)
- Follows good programming practices and design patterns (MVC - Module View Controller)
- Inbuilt validations & Routing capabilities)
- Unit testable code
- Easily maintainable code
- Uses advanced features and principles like Dependency Injection, DRY (Do Not Repeat Yourself)
- Google + Microsoft collaboration (Angular + TypeScript)
- The first version of Angular was Angular1.0 (AngularJS) which was released in 2010
| Year | Version |
|---|---|
| AngularJs = year 2010 = v1.XX (1.0 version) | |
| Angular = year 2016 = Angular v2.0 and above (2/4/5/6/7 and coming future versions...) | |
| 2010 | Angular JS (Angular v1.XX versions) |
| 2016 | Angular v2.0 |
| Version v3.0 skipped to avoid routing version 3.3.0 | |
| 2016 December | Angular v4.0 |
| 2017 November | Angular v5.0 |
| 2018 April | Angular v6.0 |
| 2018 October | Angular v7.0 |
| AngularJs | Angular |
|---|---|
| Angular is a complete rewrite of AngularJS | |
AngularJS is the name of the first version of v1.XX (1.0 version). |
Angular is the name of the Angular's version beyond 2+ (Angular v2.0 and above i.e. 2/4/5/6/7 and coming future angular versions...) |
AngularJS is a JavaScript based open-source front-end web application framework. |
Angular is a JavaScript/TypeScript/Dart based open-source front-end web application framework. |
AngularJS uses the concept of scope($scope) or controller. |
Angular uses a hierarchy of components as its primary architectural base. |
AngularJS has a simple syntax and uses to work with different directives like ng-app, ng-init, ng-model, ng-for etc. |
In Angular syntax have been changed as it uses [ ] for property binding, and ( ) for event binding. |
- Change is nature's thumb rule, so every tool/technology/framework/library developed have to room for improvement
- Google team decided and declared that Angular major version will be upgraded twice a year with
Semantic Versioning System Semantic Versioning System=Major.Minor.Fix Patch, example: 0.0.1Fix Patch- can increase any time with bug fixes/patch releaseMinor version- increases with every feature release which does not break any functionalitiesMajor version- Break in the functionalities/ extraordinary feature achievements
Basic familiarity with HTML, CSS and JavaScript is must.
- HTML - Markup
- CSS - Style, Formates
- JavaScript - Behaviour, Click, Validations
- TypeScript basics - Advanced JS features (Class, Arrow Function, Spread Operator)
- Text Editor / Visual Text Editors
In this section, we will learn how to set up a local development environment to start developing Angular apps.
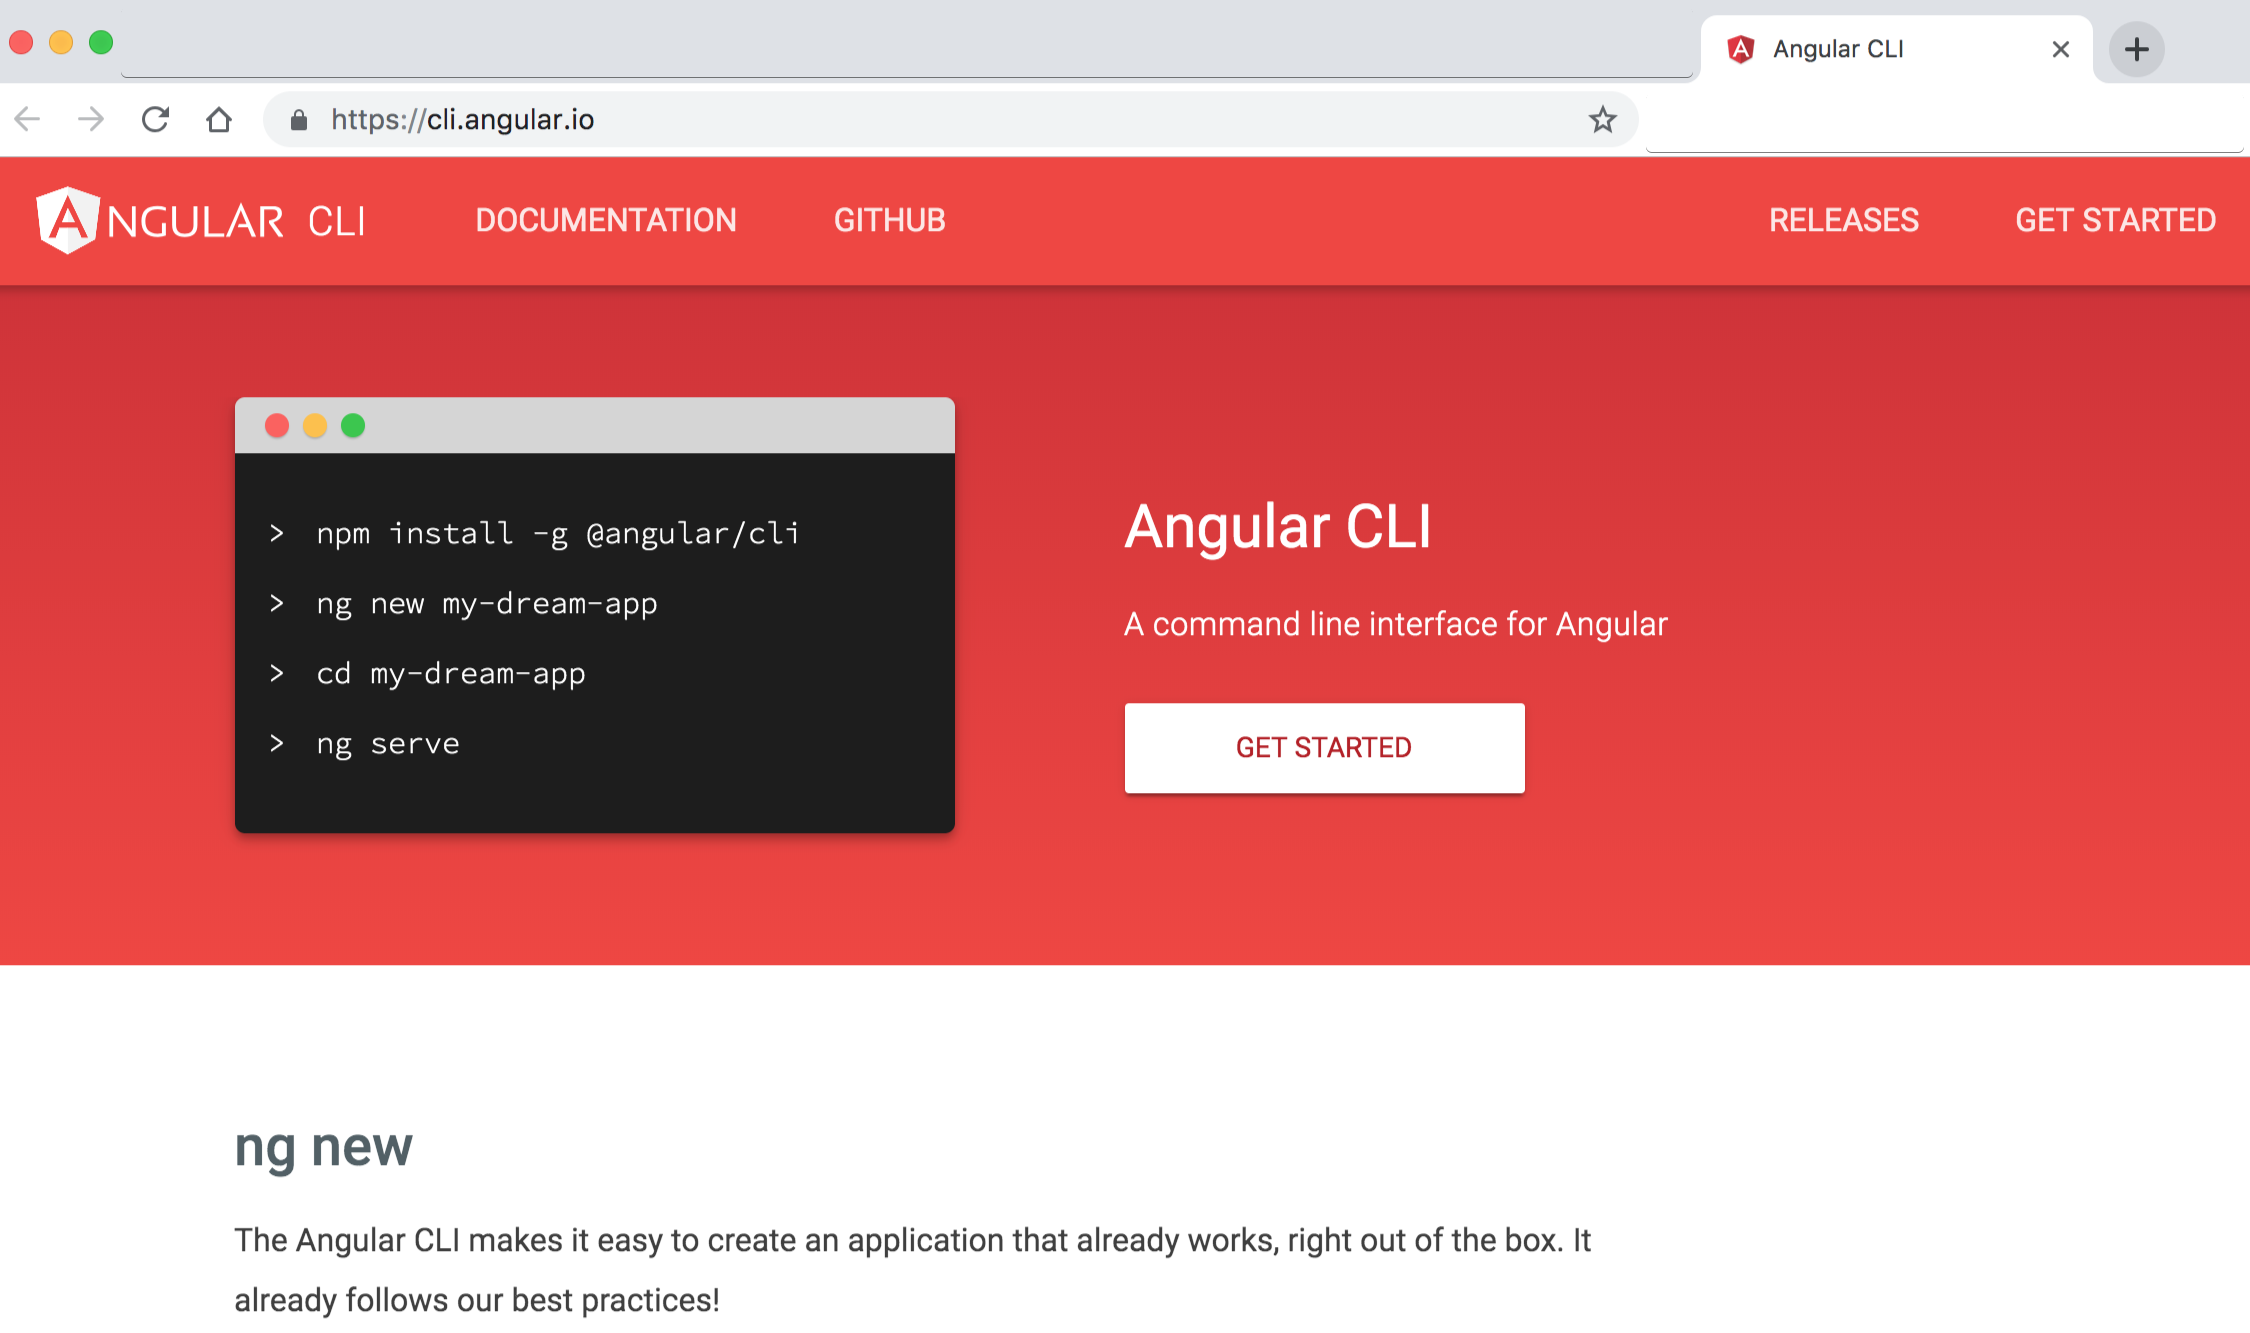
Node, (website: https://nodejs.org/en)NPM, (Node Package Manager - comes inbuilt with Node)Angular CLI = Command Line Interface, Angular CLI (Command Line Interface) for angular (website: https://cli.angular.io/),- it allows the developer to build/generate building blocks of angular application like component, services, routings, modules, etc. with best practices quicker and easier)
Text Editor- Visual Studio Code / Visual Studio Code Insiders (website: https://code.visualstudio.com)
- Sublime Text,
- Atom,
- Brackets etc.
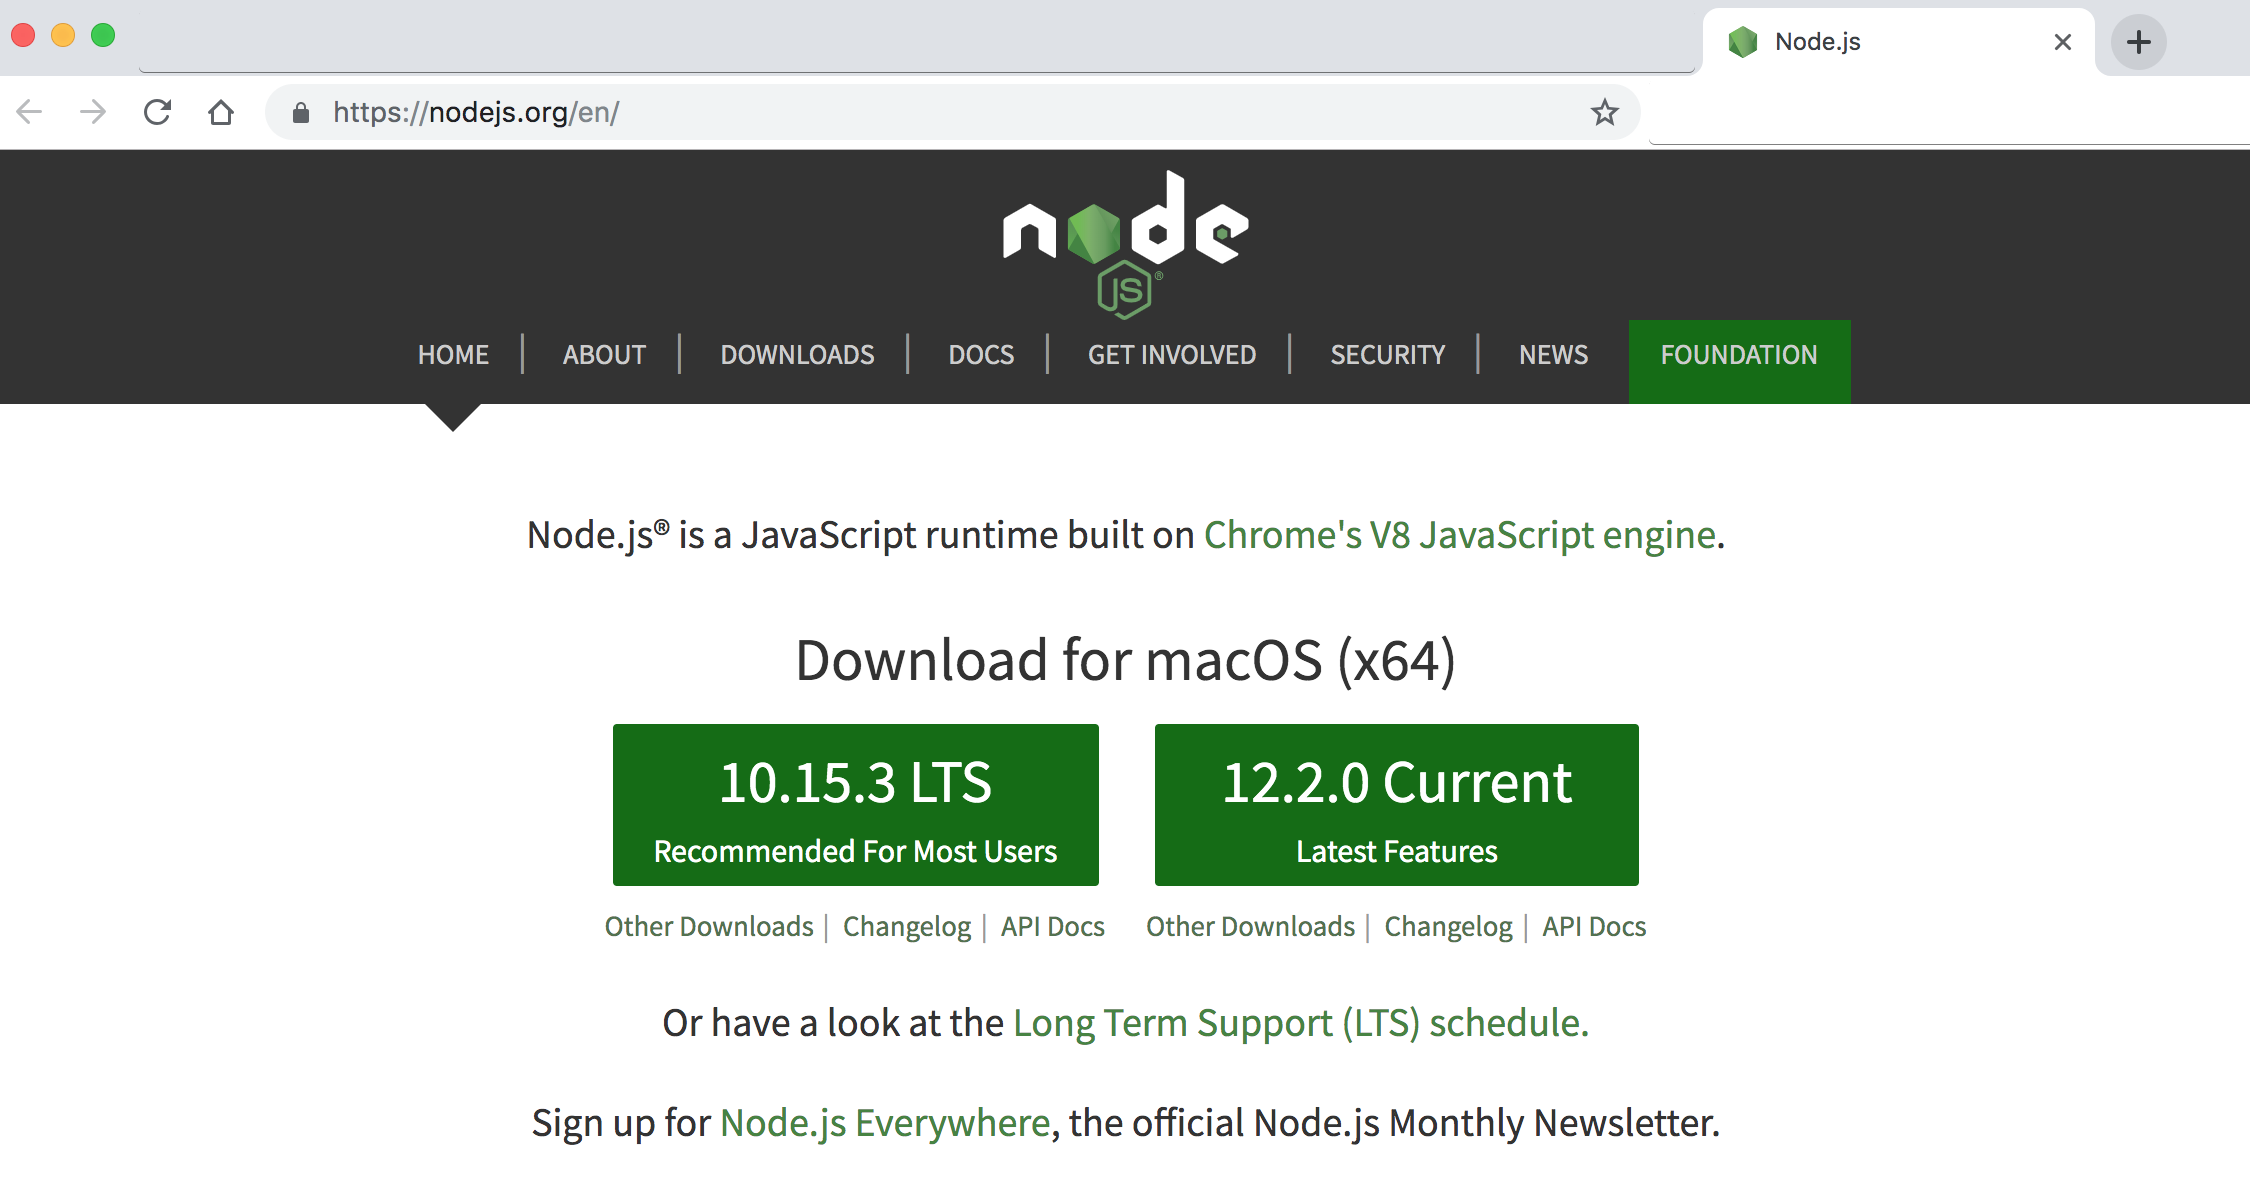
- Download and Install node (node comes with npm) (website: https://nodejs.org/en)
Image - Nodejs website - https://nodejs.org/en
- After installation check version of node and npm by command:
node -v/node --versionORnpm -v/npm --version - Install Angular CLI (website https://cli.angular.io/) by using command:
npm install -g @angular/cli(it will install Angular CLI globally)
Image - Angular CLI website - https://cli.angular.io/
- After installation check version of angular CLI by using the command:
ng -vORng --version, you can also verify angular CLI installation by command:ngORng --help - Create a new app with angular CLI by using syntax:
ng new project/appNameexample: command:ng new angular6-1-demo - Go inside the project/app directory, command:
cd angular6-1-demo - Build and run Angular App, command:
ng serveORng serve -oORng serve --open - Go to the browser and launch/check Angular App by entering the web address:
localhost:4200
- to get Node version, type command:
node -vORnode --version - to get NPM version, type command:
npm -vORnpm --version - to install Angular CLI, type command:
npm install -g @angular/cli - to get angular CLI version, type command:
ng -vORng --version(this command displays details of a node, npm, and other angular package versions) - to get various angular CLI commands, type command:
ngORng --help
- If using Visual Studio Code / Insiders, open Command panel/terminal from menu: View -> Terminal (shortcut key is
CTRL + BackTickORCOMMAND + J) - To create a new app with angular CLI by using syntax:
ng new project/appNameexample: command:ng new angular6-1-demo - Go inside the project/app directory, command:
cd angular6-1-demo OR cd appName - To Build and run Angular App, command:
ng serve / npm startORng serve -oORng serve --open - To change port from 4200 to other port - type command:
ng serve --port 5000 - To check the application in browser type path/url:
localhost:4200 / 5000
- Clone or Download the project/app from Github or any other sources
- If using Visual Studio Code / Insiders, open Command panel/terminal from menu: View -> Terminal (shortcut key is
CTRL + BackTickORCOMMAND + J) - Go inside the project/app directory, command:
cd _examples-angular6-1-demo OR cd appName - Run command:
npm installto install project/app dependencies(node_modules) - To Build and run Angular App, command:
ng serve / npm startORng serve -oORng serve --open - To change port from 4200 to other port - type command:
ng serve --port 5000 - To check the application in browser type path/url:
localhost:4200 / 5000
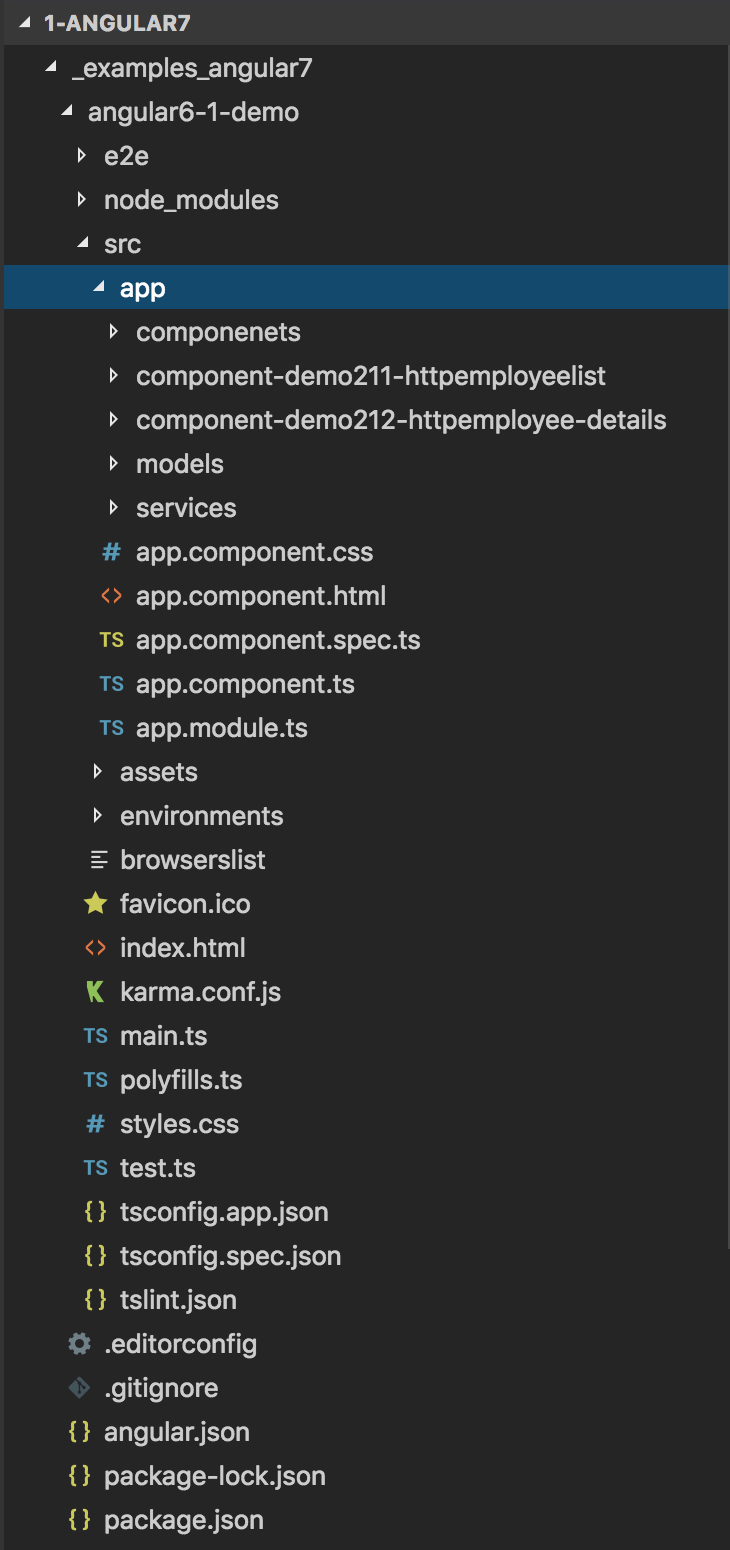
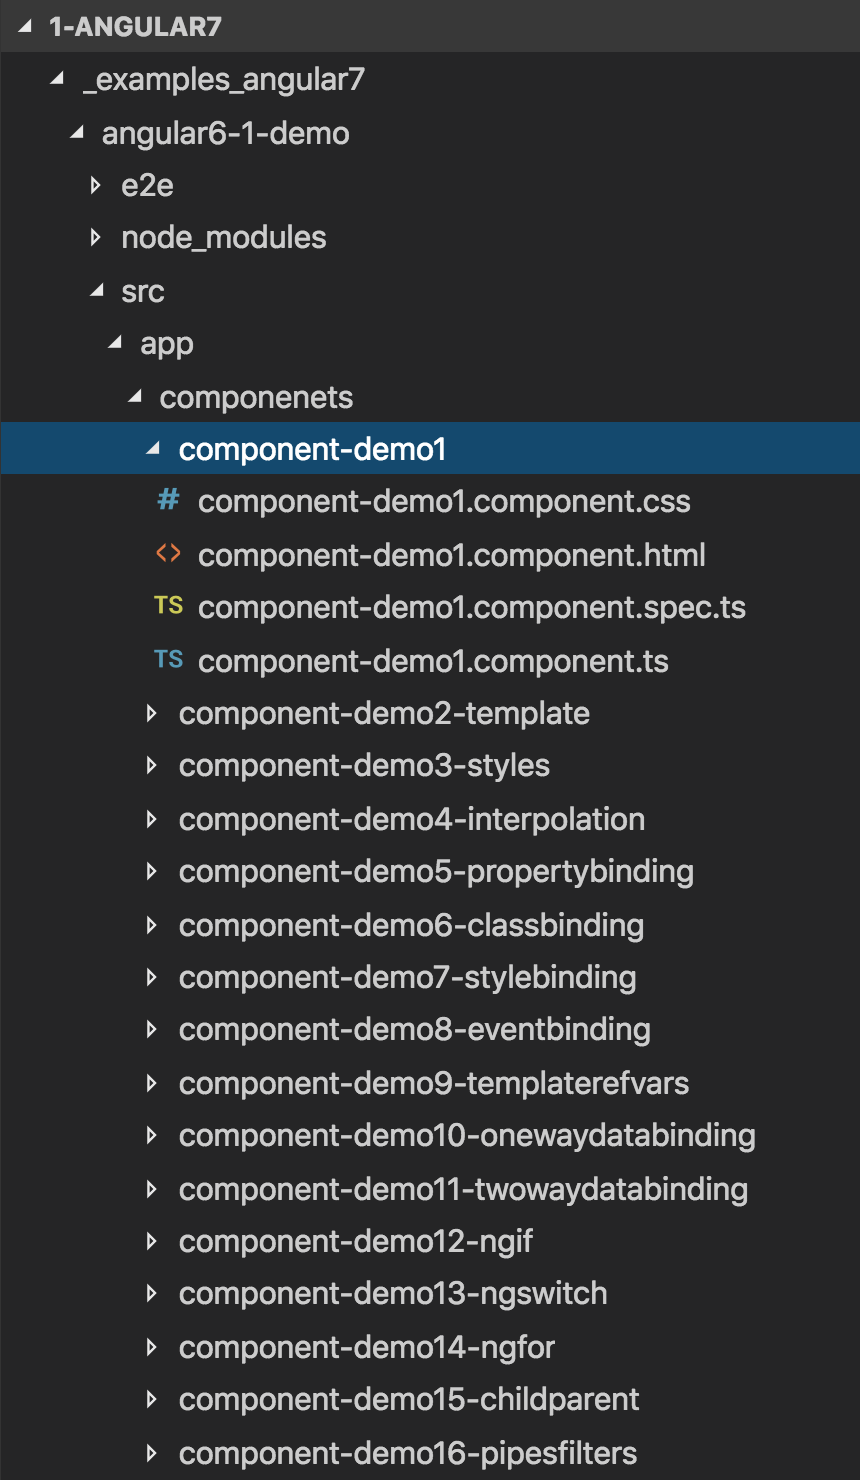
Angular app: (Show graphical representation ofsrc -> app -> componentsfolder)- Angular apps are modular in nature
- Consists of one or more modules (Angular App is a collection of one or many modules)
- Modules are main feature area - User module, Admin module, Dashboard module, Employee module)
Angular Application Root Module is AppModule (app.module.ts)Modulesare lines of code which can be IMPORTed or EXPORTed- Module consists of one or more Components and Services
Components- .HTML Template + .ts Class + .CSS- A component represents/controls view in the browser
- (example: header, footer, sidebar, common panels, common search utility, similar feature components used throughout the application)
Angular Application Root (bootstrapped) component is AppComponent (app.comoponent.ts)
Services- Class which consists of Business logic (common programming feature used throughout the application)
Image - Angular Application Folder Architecture
Modules interact and ultimately render Components+Services view in the browser.
package.json: consists of Node/NPM library/package/module dependencies for application developmentnode_modues- folder consists of all installed packagessrc/main.ts- entry point to angular application. src/index.htmlapp/app.module.ts- route module of applicationapp/app.component.ts- route component of applicationng serve / npm start-> main.ts (index.html) -> app.module.ts -> app.component.ts -> (app.component.html + css)
- The core/key idea behind Angular is to build application using
reusable parts/chunks i.e. components - Components are main building blocks of UI and an/any angular application. (Show graphical representation)
Angular Application Root (bootstrapped) component is AppComponent (app.comoponent.ts)
Image - Angular Components
A component is self contained, reusable piece of UI made up of 3 important parts:
Template-View, HTML code(User Interface for application also known as view)Class-Business logic/Application logicfor the view,TypeScript/JavaScript code, (Data, Methods & properties)Decorator/Metadata-Metadata, a @functionwhich provide more information for angular class. example: app.component.ts:
Syntax & Example: app.component.ts
@Component({
    selector: 'app-root', // selector - a custom html tag
    templateUrl: './app.component.html', // template/templateUrl - html view,
    styleUrls: ['./app.component.css'] // styleUrls - css style sheet
})- We can create component manually, but in that scenario, we need to do and follow various steps/manual entries
- It's advisable to use angular CLI to create a component, services, routing, etc.
To create a component using angular CLI:syntax: ng generate component componentName OR ng generate component path/componentNamecommand: ng generate component components/component-demo1 OR ng g c components/component-demo1It generates 4 new files: .css-styles, .html-markup, .spec.ts-test, .ts-class- Also, an automated
import/update/entry of components is done inapp.module.tsfile at the topimports sectionand indeclarations arraywhich consists of all the components used in the application - A component must be a member of/belongs to an
@NgModule - declarations arrayin order for it to be usable by another component or application - To use current component in application, copy and paste new component
'selector'from .ts file i.e.'app-component-demo1'as a tag inapp.component.html
- Selector is basically a
custom HTML tag used to represent current component - Selector helps to
render .html file/html templatein browser - Example: index.html:
<app-root></app-root> - Example: app.component.html:
<app-component-demo1><app-component-demo1> - There are total 3 ways to specify/write and use selectors:
Syntax & Example: component-demo1.component.ts
    1. tag: < > selector: 'app-test', example: <app-test>
    2. class: . selector: '.app-test', example: <div class="app-test">
    3. attribute / [ ]: selector: '[app-test]', example: <div app-test>
templateproperty denotes writing html markup in current class .ts file onlytemplateproperty can help to write all html/markup in .ts typescript file itself- single line can be written directly:
Syntax & Example:
template: '<h1>Inline single template Heading used - template written in same .ts file</h1>',- multi line html can be written with back-tick
Syntax & Example:
template: `
    <h1> Multiple line template </h1>
    <div> template written in same .ts file </div>
`,templateUrldenotes/points to anexternal .htmlfile OR- Write html code in another .html file and call the file path with
templateUrlproperty (separation of concern)
Syntax & Example:
templateUrl: './app.component.html', // template/templateUrl - html view,Syntax & Example: component-demo2-template.component.ts
import { Component, OnInit } from '@angular/core';

@Component({
  selector: 'app-component-demo2-template',
  templateUrl: './component-demo2-template.component.html',

  // single line template
  // template: '<h1>Inline single template para used </h1>',

  // multi line template
  template:`
    <h1>component-demo2-template templateUrl works!</h1>

    <h2>template</h2>
    template denotes writing html markup in current class file only, template property can help to write all html/markup in .ts typescript file itself.

    <p> Multiple line template </p>
    <div> template written in same .ts file </div>
    `,
  styleUrls: ['./component-demo2-template.component.css']
})
export class ComponentDemo2TemplateComponent implements OnInit {

  constructor() { }

  ngOnInit() {
  }

}- style denotes writing
css style for current component only- like inline css, - multiple css styles written inside array [ ] and back tick
Syntax & Example:
styles: [`
    h1 {
        text-align:center;
    }

    div {
        border:2px dashed gray;
    }
`]styleUrlsdenotes external css file used for current component- write css styles in another .css file and
call the file path with styleUrlsproperty (seperation of concern)
Syntax & Example:
styleUrls: ['./app.component.css'] // styleUrls - css style sheetSyntax & Example: component-demo3-styles.component.ts
import { Component, OnInit } from '@angular/core';

@Component({
  selector: 'app-component-demo3-styles',
  templateUrl: './component-demo3-styles.component.html',
  //styleUrls: ['./component-demo3-styles.component.css']
  styles: [`
    h1{
      text-align:center;
    }

    div{
      border:2px dashed gray;
    }
  `]
})
export class ComponentDemo3StylesComponent implements OnInit {

  constructor() { }

  ngOnInit() {
  }

}
Syntax & Example: component-demo1.component.ts
import { Component, OnInit } from '@angular/core';

@Component({
  // 1. <tag/element> selector
  selector: 'app-component-demo1',
  // 2. .class selector
  // selector: '.app-component-demo1',
  // 3. [attribute] selector
  // selector: '[app-component-demo1]',
  templateUrl: './component-demo1.component.html',
  styleUrls: ['./component-demo1.component.css']
})
export class ComponentDemo1Component implements OnInit {
  private appName:string = 'Angualr 6 Application';

  constructor() { }

  ngOnInit() {
  }

}
Syntax & Example: component-demo1.component.html
<div>
  <h1>component-demo1 works! </h1>
  <ul>
    <li>{{ appName }}</li>
  </ul>

  <h2>What is Angular</h2>
  <ul>
    <li>Framework to build client side application</li>
    <li>Great for SPAs</li>
    <li>Angular 2/4/5/6/7 frameworks targets Mobile and Desktop.</li>
  </ul>
</div>
Syntax & Example: app.component.html
<!--The content below is only a placeholder and can be replaced.-->
<div class="container">

  <!-- There are total 3 ways to specify/write and use selectors:
      tag: < >
      class: .
      attribute / [ ]
    -->

  <app-component-demo1></app-component-demo1>
  <!-- <div class="app-component-demo1"></div> -->
  <!-- <div app-component-demo1></div> -->
  <div class="custom-divider"></div>
</div>
Syntax & Example: app.component.ts
import { Component } from '@angular/core';

@Component({
  selector: 'app-root',
  templateUrl: './app.component.html',
  styleUrls: ['./app.component.css']
})
export class AppComponent {
  // create a property to send from parent to child
  parentMessage = 'From Parent';

  //

}
Syntax & Example: app.module.ts
import { BrowserModule } from '@angular/platform-browser';
import { NgModule } from '@angular/core';

import { AppComponent } from './app.component';
import { ComponentDemo1Component } from './componenets/component-demo1/component-demo1.component';

@NgModule({
  declarations: [
    AppComponent,
    ComponentDemo1Component,
  ],
  imports: [
    BrowserModule,
  ],

  bootstrap: [AppComponent]
})
export class AppModule { }
Syntax & Example: styles.css
/* You can add global styles to this file, and also import other style files */

/* common global generic styles */
.custom-divider {
  margin: 30px 0px;
  border-bottom:2px dashed gray;
}

h1,h2,h3 {
  text-transform: uppercase;
  /* text-transform: capitalize; */
}

h2 {
  text-decoration: underline;
}

body {
  font-family: Cambria, Cochin, Georgia, Times, 'Times New Roman', serif;
  letter-spacing: 2px;
}

li {
  margin: 10px 0px;
}

input{
  padding: 5px;
}

button {
  border-radius: 5px;
  padding: 10px 15px;
  background-color: teal;
  border: none;
  outline: none;
  cursor: pointer;
  color: lightcyan;
}

/* class binding */
.text-primary {
  color: blue;
}

.text-danger {
  color: red;
}

.text-success {
  color: lawngreen;
}

.text-special {
  font-weight:bold;
  font-style: italic;
  color:orchid;
}

.text-strikethrough {
  text-decoration: line-through;
}
Syntax & Example: index.html
<!doctype html>
  <html lang="en">

    <head>
      <meta charset="utf-8">
      <title>Angular7Demo</title>
      <base href="/">

      <meta name="viewport" content="width=device-width, initial-scale=1">
      <link rel="icon" type="image/x-icon" href="favicon.ico">
    </head>

    <body>
      <app-root></app-root>
    </body>

  </html>
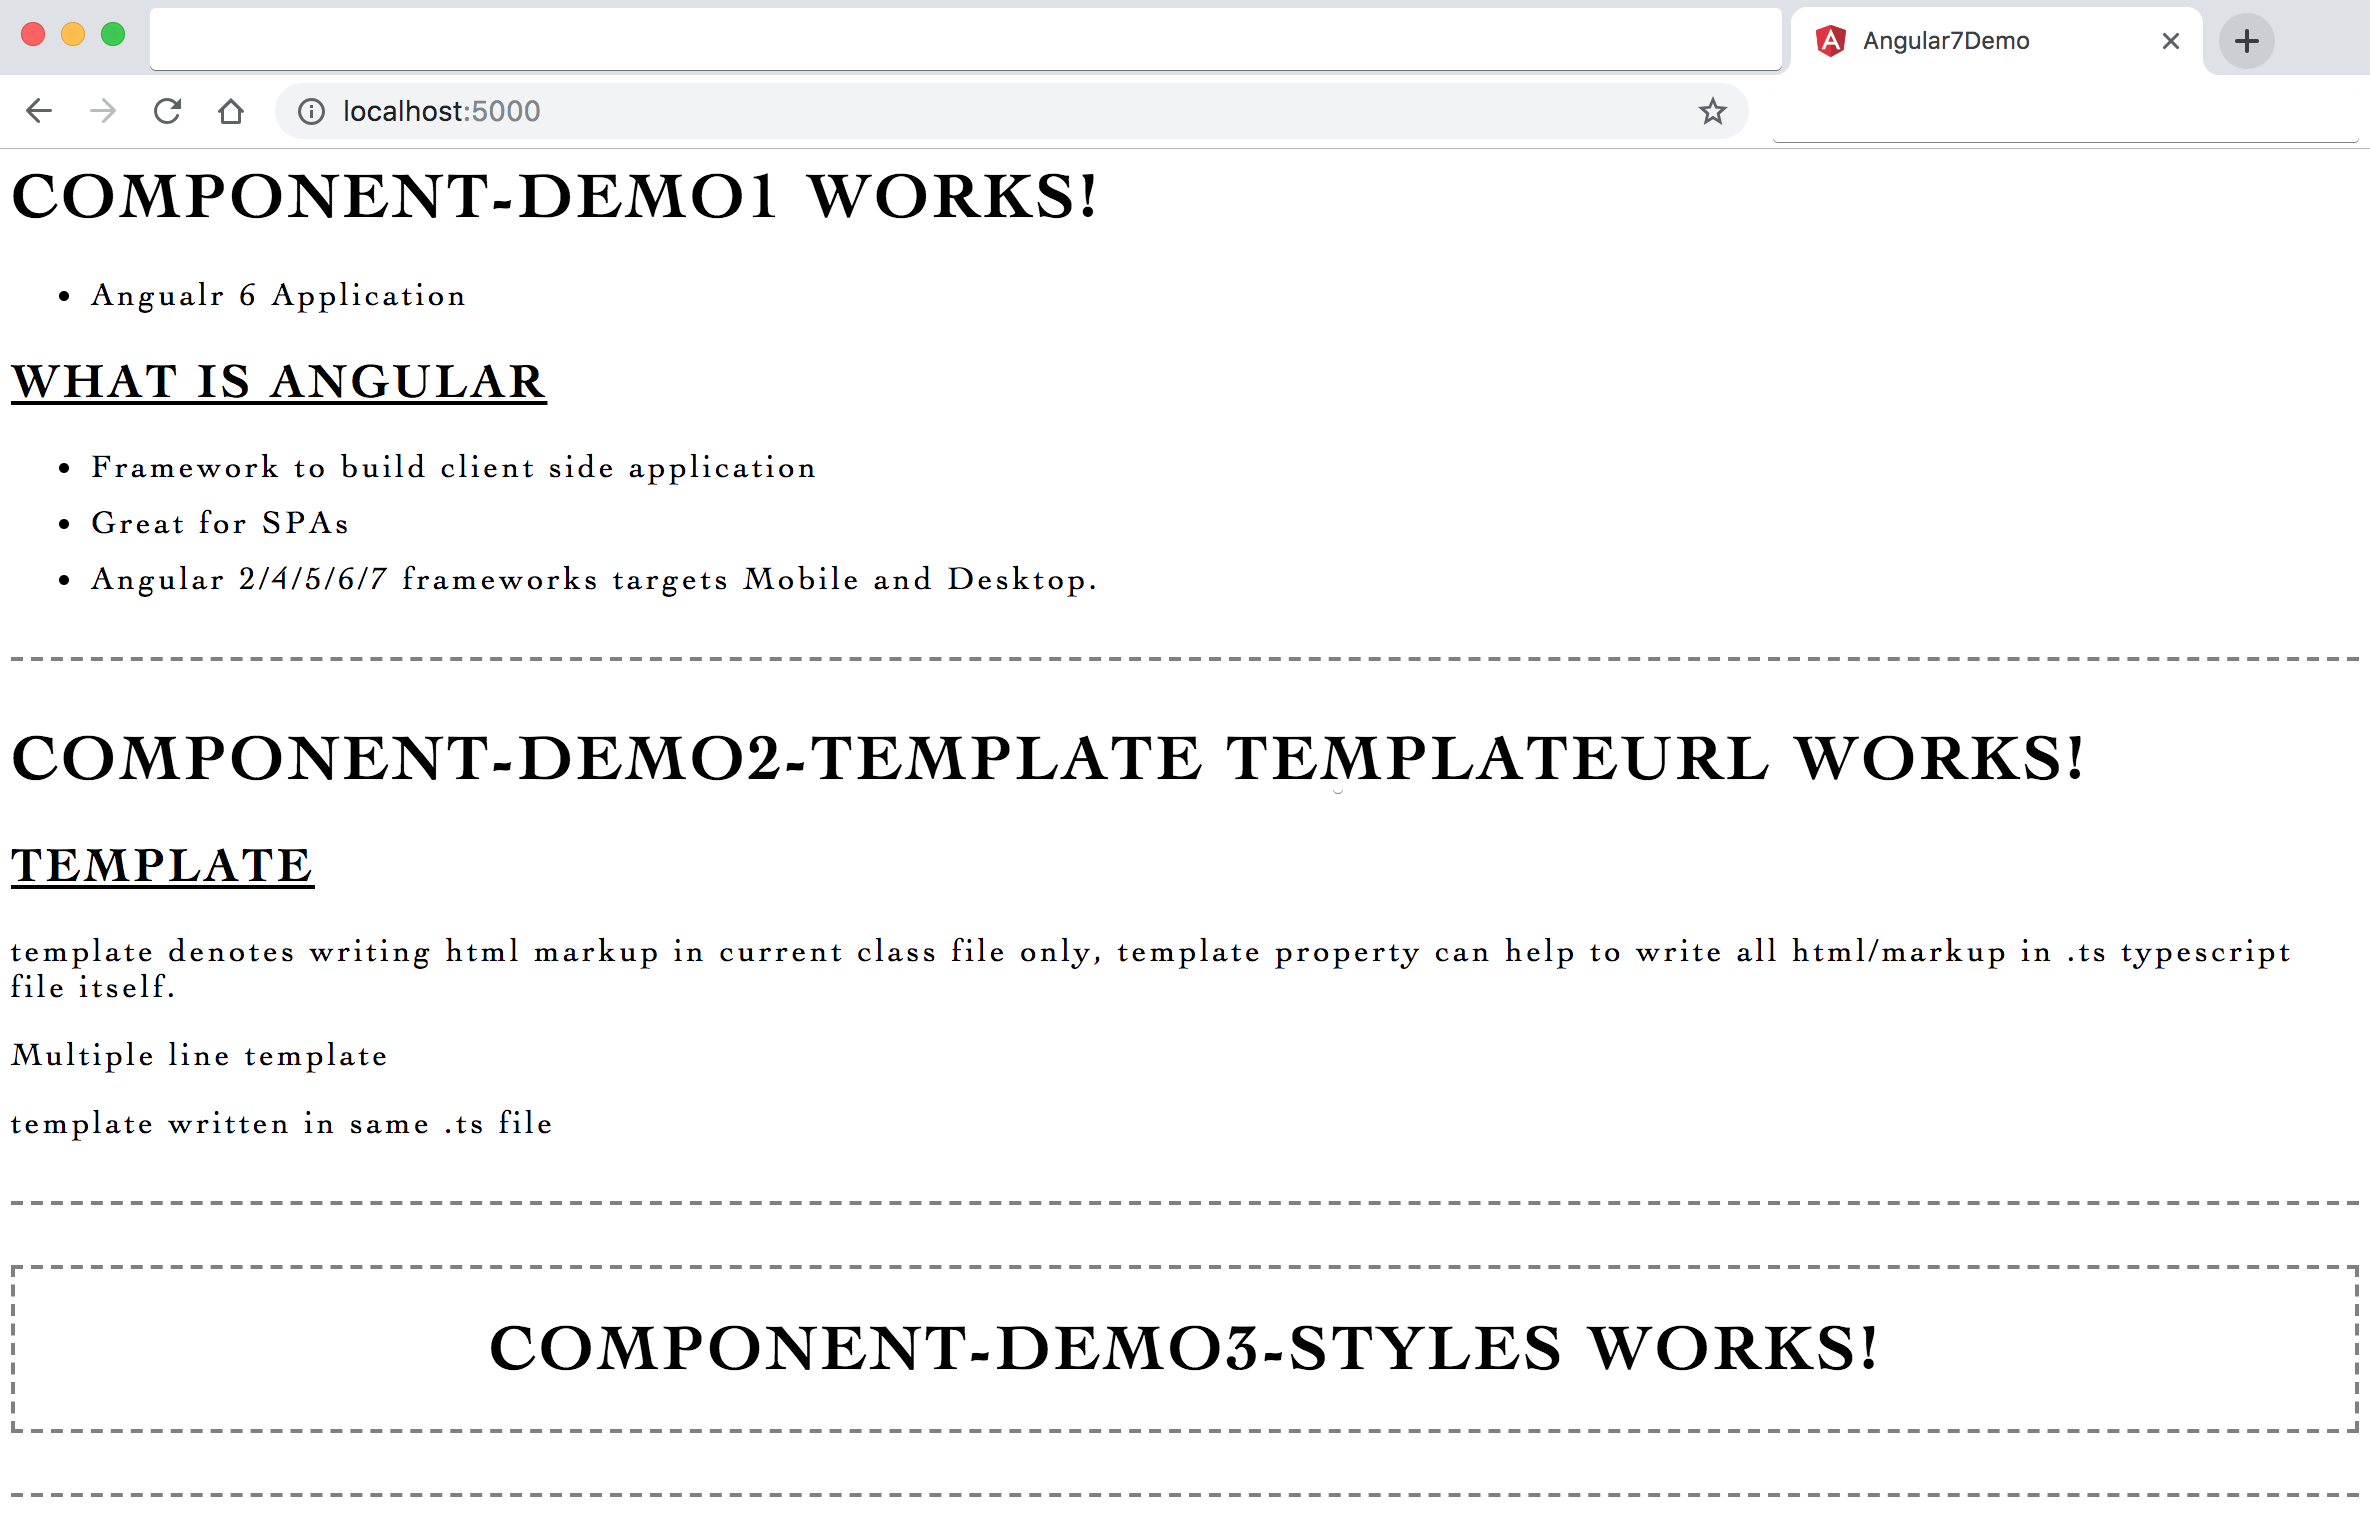
Image - Output - selector, templateUrl, styleUrls
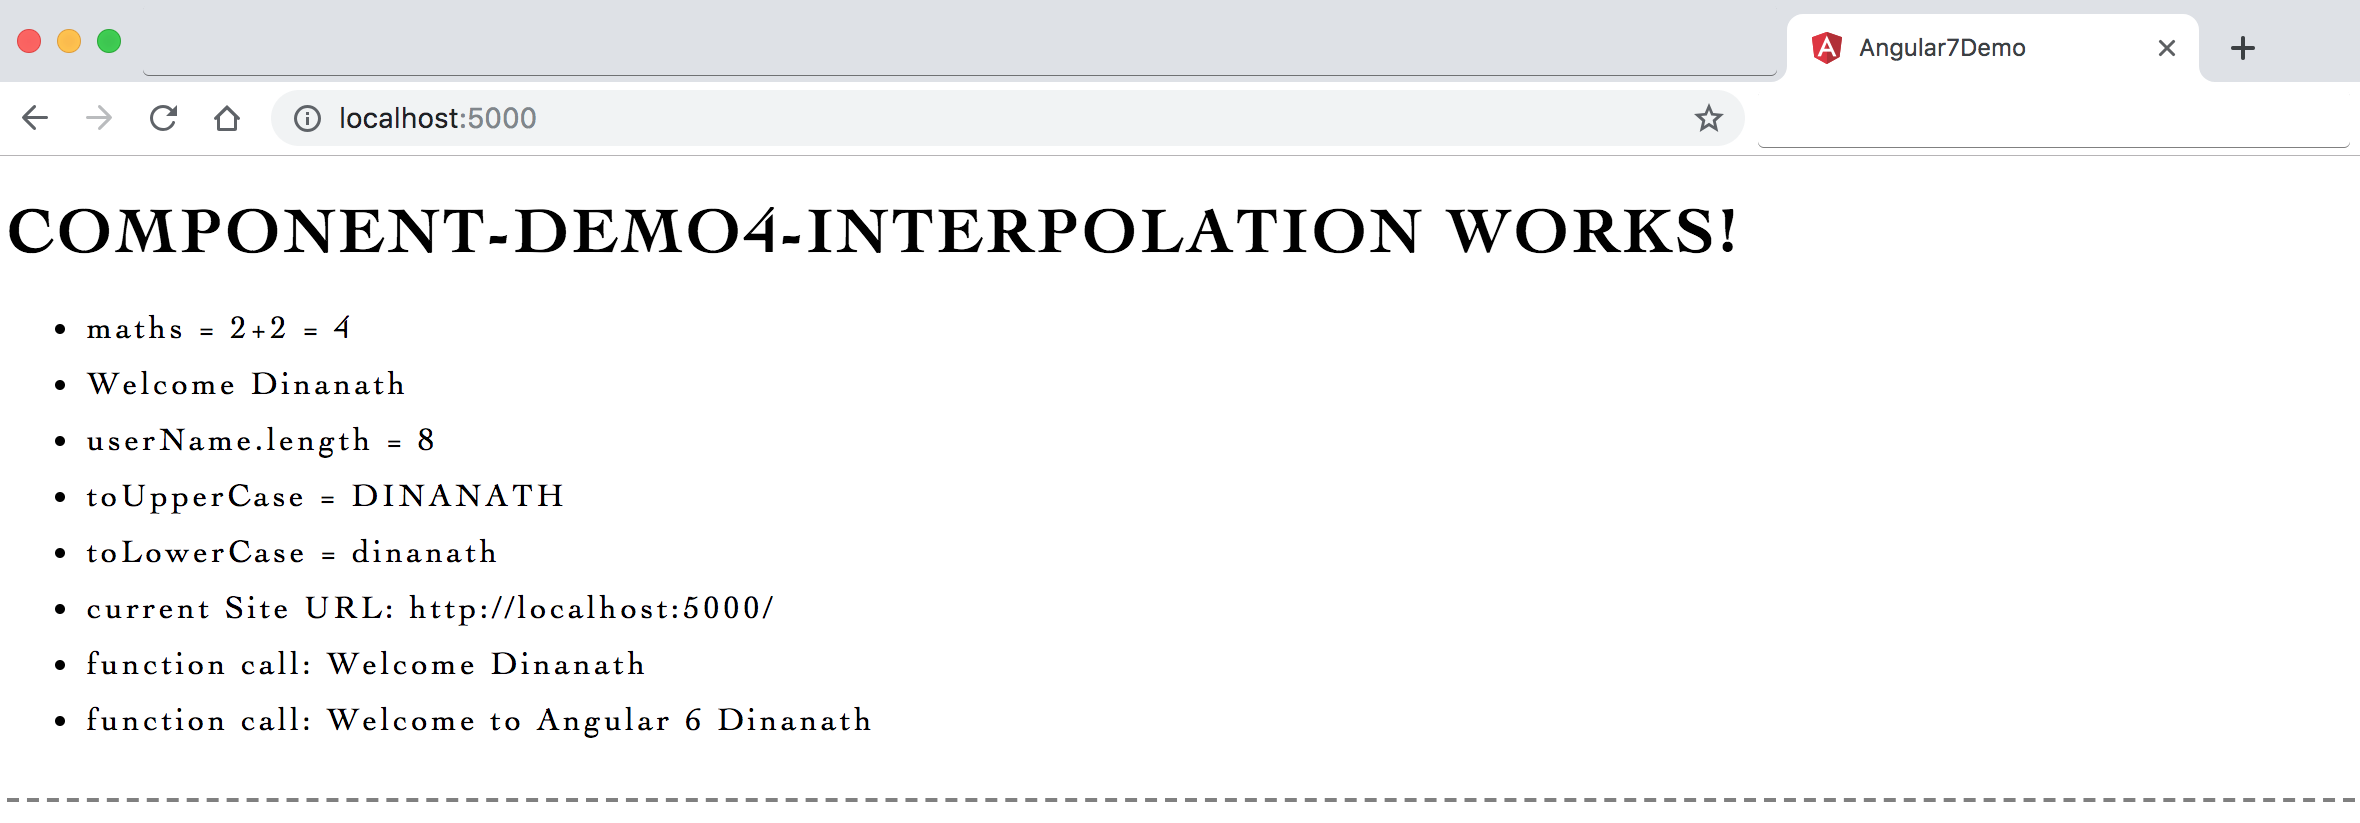
- Interpolation denotes/evaluates the content inside
{{ }} bracesand displays the value in component view file - Interpolation = expressions, data-binding to text nodes and attribute values
- interpolation expression = {{ varName }} or {{ fn_anyReturnFunction() }}
- Angular expressions are much like
JavaScript expressionsand they can contain literals, operators, and variables - Data binding in Angular is the
synchronization/communication between the model and the view String interpolationis used to display dynamic data on HTML template (front end / at user end)- Variable value assignment not possible with interpolation, Example:
{{ name = 'Dinanath' or Total = 10 + 20 }}
Syntax & Example: component-demo4-interpolation.component.ts
import { Component, OnInit } from '@angular/core';

@Component({
  selector: 'app-component-demo4-interpolation',
  templateUrl: './component-demo4-interpolation.component.html',
  styleUrls: ['./component-demo4-interpolation.component.css']
})
export class ComponentDemo4InterpolationComponent implements OnInit {
  // variables - class members
  public technology = 'Angular 6';
  public userName = 'Dinanath';
  // public siteUrl = 'http://www.google.com';
  public siteUrl = window.location.href;

  fn_showGreetingsToUser() {
    return 'Welcome ' + this.userName;
  }

  fn_showMessage() {
    return 'Welcome to ' + this.technology + ' ' + this.userName;
  }

  constructor() { }

  ngOnInit() {
  }

}
Syntax & Example: component-demo4-interpolation.component.html
<div>
  <h1>component-demo4-interpolation works!</h1>
  <ul>
    <li>maths = 2+2 = {{ 2+2 }}</li>
    <li>{{ "Welcome " + userName }}</li>
    <li>userName.length = {{ userName.length }}</li>
    <li>toUpperCase = {{ userName.toUpperCase() }}</li>
    <li>toLowerCase = {{ userName.toLowerCase() }}</li>
    <li>current Site URL: {{ siteUrl }}</li>
    <li>function call: {{ fn_showGreetingsToUser() }}</li>
    <li>function call: {{ fn_showMessage() }}</li>
  </ul>
</div>
Syntax & Example: app.module.ts
import { BrowserModule } from '@angular/platform-browser';
import { NgModule } from '@angular/core';

import { AppComponent } from './app.component';
import { ComponentDemo1Component } from './componenets/component-demo1/component-demo1.component';
import { ComponentDemo2TemplateComponent } from './componenets/component-demo2-template/component-demo2-template.component';
import { ComponentDemo3StylesComponent } from './componenets/component-demo3-styles/component-demo3-styles.component';
import { ComponentDemo4InterpolationComponent } from './componenets/component-demo4-interpolation/component-demo4-interpolation.component';
import { ComponentDemo5PropertybindingComponent } from './componenets/component-demo5-propertybinding/component-demo5-propertybinding.component';

@NgModule({
  declarations: [
    AppComponent,
    ComponentDemo1Component,
    ComponentDemo2TemplateComponent,
    ComponentDemo3StylesComponent,
    ComponentDemo4InterpolationComponent,
  ],
  imports: [
    BrowserModule,
  ],

  bootstrap: [AppComponent]
})
export class AppModule { }
Syntax & Example: app.component.html
<!--The content below is only a placeholder and can be replaced.-->
<div class="container">

  <!-- There are total 3 ways to specify/write and use selectors:
      tag: < >
      class: .
      attribute / [ ]
    -->

  <app-component-demo1></app-component-demo1>
  <!-- <div class="app-component-demo1"></div> -->
  <!-- <div app-component-demo1></div> -->
  <div class="custom-divider"></div>

  <!-- component decorator template -->
  <app-component-demo2-template></app-component-demo2-template>
  <div class="custom-divider"></div>

  <!-- css style -->
  <app-component-demo3-styles></app-component-demo3-styles>
  <div class="custom-divider"></div>

  <!-- interpolation -->
  <app-component-demo4-interpolation></app-component-demo4-interpolation>
  <div class="custom-divider"></div>

</div>
Image - Output - Interpolation Data Binding {{ }}
- String Interpolation and Property binding both are used for the same purpose i.e. one-way Data Binding
- String Interpolation and Property Binding both
flow value in one direction from our components to HTML elements - Basic Attributes are defined by HTML BUT
"value"kind of dynamic attributes (properties) which are like properties are defined and managed by DOM Attributes and properties are NOT the same
Attributes= HTML |Properties= DOM (Document Object Model)
- Attributes initialise DOM properties and then they are done - cannot change once they are initialised
- Property values however can change, HTML attribute value specifies initial value and the
DOM value property is the current value
Syntax & Example: Property Binding is done with [square bracket] OR bind-properyName:
example: <input type="text" value="dinanath" />- type in console:$0.getAttribute("value"); output:"dinanath"
- type in console:$0.value; output:"dinanath"
- Now type something new in text field "new Text"
- type in console:$0.getAttribute("value"); output:"dinanath"
- type in console:$0.value; output:"new Text"
-
Note: Attribute does not changed but
value property changed Property Binding done with [ ] square bracketalso with{{ interpolation }}But its advisable to use [ ] as its supports string, boolean all property types, boolean value like true/false etc does not works well with {{ interpolation }}
Syntax & Example: component-demo5-propertybinding.component.ts
import { Component, OnInit } from '@angular/core';

@Component({
  selector: 'app-component-demo5-propertybinding',
  templateUrl: './component-demo5-propertybinding.component.html',
  styleUrls: ['./component-demo5-propertybinding.component.css']
})
export class ComponentDemo5PropertybindingComponent implements OnInit {
  public _id = 'id1';
  public _isDisabled1 = true;
  public _isDisabled2 = false;

  constructor() { }

  ngOnInit() {
  }

}
Syntax & Example: component-demo5-propertybinding.component.html
<div>
  <h1>component-demo5-propertybinding works!</h1>

  <h3>attributes vs value</h3>
  <input size="40" type="text" value="angular property binding" />

  <h3 ngNonBindable>property binding [ ] vs interpolation {{ ngNonBindable }} </h3>

  <input type="text" [id]="_id" value="[ ] property-binding" /><br />
  <input type="text" id="{{_id}}" value="{ } interpolation property-binding" /> <br /> <br />

  <h3>attribute boolean (property) interpolation does not support </h3>
  <input type="text" disabled="false" [id]="_id" value="boolean false not works" /><br />
  <input type="text" disabled="true" [id]="_id" value="boolean true not works" /> <br /> <br />

  <h3>property binding boolean values supported  </h3>
  <input type="text" [disabled]="false" [id]="_id" value="[property-binding] works" /><br />
  <input type="text" [disabled]="true" [id]="_id" value="[property-binding] works" /><br /> <br />

  <h3>property binding boolean property with variable </h3>
  <input type="text" [disabled]="_isDisabled1" [id]="_id" value="[ var ] disabled works" /><br />
  <input type="text" [disabled]="_isDisabled2" [id]="_id" value="[ var ] enabled works" /><br />

  <h3>property binding with bind- </h3>
  <input type="text" bind-disabled="_isDisabled1" [id]="_id" value="[ var ] disabled works" /><br />
  <input type="text" bind-disabled="_isDisabled2" [id]="_id" value="[ var ] enabled works" /><br />

</div>
Image - Output - Property binding with {{}}, [ ] and bind-
- Class binding refers to applying different classes normally or depends on condition (dynamically)
- Class binding is very important and really useful as it allows developer to apply/add and remove classes to html element dynamically based on condition or user interaction
- Class Binding Syntax:
<tag [class]="varName" />, herevarName holds css className - If
[class] bindingandclass=" "attribute both present in tag,[class] bindingget first/higher priority andclass=" "attribute becomes null & void (class style properties not applied to text - so its advisable to use any one either class binding or class attribute) [ngClass]directive/attribute helps to apply multiple classes conditionally<tag [ngClass]="varObjectName"
Syntax & Example: styles.css (write css classes in any file)
.text-primary {
  color: blue;
}

.text-danger {
  color: red;
}

.text-success {
  color: lawngreen;
}

.text-special {
  font-weight:bold;
  font-style: italic;
  color:orchid;
}

.text-strikethrough {
  text-decoration: line-through;
}

.text-orange {
  color: orange;
}
Syntax & Example: component-demo6-classbinding.component.ts
import { Component, OnInit } from '@angular/core';

@Component({
  selector: 'app-component-demo6-classbinding',
  templateUrl: './component-demo6-classbinding.component.html',
  styleUrls: ['./component-demo6-classbinding.component.css']
})
export class ComponentDemo6ClassbindingComponent implements OnInit {
  public successClass = 'text-success';
  public dangerClass = 'text-danger';
  public isSpecialClass = true;
  public isErrorClass = true;

  public messageClasses = {
    'text-primary': this.isSpecialClass,
    'text-strikethrough': this.isSpecialClass
  }

  constructor() { }

  ngOnInit() {
  }

}
Syntax & Example: component-demo6-classbinding.component.html
<div>
  <h1>component-demo6-classbinding works! </h1>

  <h3 ngNonBindable>[class]="varName" (varName holds css className present in css)</h3>

  <h4 class="text-orange">simple class attribute</h4>

  <h4 [class]="successClass">This is class binding with []</h4>

  <h4 class="{{successClass}}">This is class binding with interpolation</h4>

  <h4 [class]="successClass" class="text-orange">This is class binding with [] also class attribute</h4>

  <h4 [class.text-special]="isSpecialClass">This is class binding with boolean variable condition </h4>

  <h4 [class.text-danger]="isErrorClass">This is class binding with boolean variable condition </h4>

  <h4 [ngClass]="messageClasses">This is ngClass binding to deal with multiple classes at once</h4>

</div>
Image - Output - Class binding with {{}}, [ ] and ngClass
- Style binding is similar to class binding but it refers to applying different inline styles to html element instead of applying css classes
- Style Binding Syntax:
<tag [style.color]="'orange'"> text </tag>
OR
<tag [style.color]="'varName'"> text </tag>
[ngStyle]directive/attribute helps to apply multiple inline styles<tag [ngStyle]="varObjectName"
Syntax & Example: component-demo7-stylebinding.component.ts
import { Component, OnInit } from '@angular/core';

@Component({
  selector: 'app-component-demo7-stylebinding',
  templateUrl: './component-demo7-stylebinding.component.html',
  styleUrls: ['./component-demo7-stylebinding.component.css']
})
export class ComponentDemo7StylebindingComponent implements OnInit {
  public greenColor = 'green';
  public redColor = 'red';
  public orangeColor = 'orange';
  public hasError = true;

  public headerStyles = {
    color: 'blue',
    textDecoration: 'line-through',
    fontStyle: 'italic'
  }

  constructor() { }

  ngOnInit() {
  }

}
Syntax & Example: component-demo7-stylebinding.component.html
<div>
<h1>component-demo7-stylebinding works!</h1>
<h3 ngNonBindable> <tag [style.color]="'orange'"> text </tag></h3>
<h4 [style.color]="'orange'">applying inline styles</h4>
<h3 ngNonBindable> <tag [style.color]="'varName'"> text </tag></h3>
<h4 [style.color]="greenColor">applying inline styles with variable </h4>
<h3 ngNonBindable> <style.color]="hasError ? 'red' : 'green' "> text </tag></h3>
<h4 [style.color]="hasError ? 'red' : 'green' ">applying inline styles with variable conditions</h4>
<h4 [ngStyle]="headerStyles">applying multiple inline styles</h4>
</div>Image - Output - Style binding with [style.] and [ngStyle]
- Event binding captures any DOM event and performs actions
- Angular provides an ability to bind the events along with the methods, Event binding is used with
parenthesis () - Usually data binding done from Component Class
.tsto Component Template.html(variables in class .ts files used/bind with html/template .html) - To responds to user events like mouse clicks or keyboard events we need data flow from TEMPLATE to CLASS, event binding flows from TEMPLATE to CLASS (.HTML/TEMPLATE/VIEW to .TS/CLASS file)
- Syntax:
<h1 (click)="fn()">Click Me - Change Style</h1>
Syntax & Example: component-demo8-eventbinding.component.ts
import { Component, OnInit } from '@angular/core';

@Component({
  selector: 'app-component-demo8-eventbinding',
  templateUrl: './component-demo8-eventbinding.component.html',
  styleUrls: ['./component-demo8-eventbinding.component.css']
})
export class ComponentDemo8EventbindingComponent implements OnInit {
  public isButtonClicked = false;
  public greetingMessage = '';
  public eventType = '';
  // public withoutHandlerMessage = '';

  fn_changeStyles() {
    this.isButtonClicked = !this.isButtonClicked;
    this.greetingMessage = 'welcome to event binding';
  }

  fn_checkClick(evt) {
    console.log(evt);
    this.eventType = evt.type;
  }

  constructor() { }

  ngOnInit() {
  }

}
Syntax & Example: component-demo8-eventbinding.component.html
<div>
  <h1>component-demo8-eventbinding works!</h1>

  <h2>Event Binding</h2>

  <h1 (click)="fn_changeStyles()" [class.text-primary]="isButtonClicked" style="cursor:pointer;">Click Me - Change Style</h1>

  <div>isButtonClicked: {{isButtonClicked}}.  | {{isButtonClicked ? greetingMessage : " "}} </div> <br /><br />

  <button (click)="fn_checkClick($event)">Click me!</button> Event: {{eventType}}

  <button (click)="withoutHandlerMessage = 'Without handler function' ">Without handler function - Click me!</button> {{withoutHandlerMessage}}

</div>
Image - Event binding with (click)
Image - Output - Event binding with (click) - After Click
- When there is a user interaction we may want some data to flow from VIEW/TEMPLATE (.HTML) to the class .TS) to perform some operation
- Example: value from input fields to perform some validation etc
- To easily access DOM elements and their properties, Template Reference Variables is used
- Template Reference Variables is created with #hash symbol followed by var name i.e.
#heading1 - Syntax:
<h1 #heading1>I am heading 1</h1>, here#heading1is Template Reference Variable (a dynamic name/id) assigned to h1 tag
Syntax & Example: component-demo9-templaterefvars.component.ts
import { Component, OnInit } from '@angular/core';

@Component({
  selector: 'app-component-demo9-templaterefvars',
  templateUrl: './component-demo9-templaterefvars.component.html',
  styleUrls: ['./component-demo9-templaterefvars.component.css']
})
export class ComponentDemo9TemplaterefvarsComponent implements OnInit {
  logDetails(_value) {
    console.log(_value);
  }

  constructor() { }

  ngOnInit() {
  }

}
Syntax & Example: component-demo9-templaterefvars.component.html
<div>
<h1>component-demo9-templaterefvars works!</h1>
<h2>Template Reference Variables</h2>
<input #textInput type="text" placeholder="Enter Name" />
<button (click)="logDetails(textInput)">Get Input Field</button>
<button (click)="logDetails(textInput.value)">Get Value of field </button>
</div>Image - Output - Template Reference Variables
- Data binding is one of the most powerful features of Angular, used widely for communication between TypeScript code (.ts - business logic) and different components (.html - view/template) shown to the users
- Whenever we work with Input Form fields its necessary/essentials that MODEL (data) and VIEW (template) both syncs well (any changes into HTML field should update the model/property and any updates/changes in model/property/variable than view should reflect those updated values)
- There are two types of data binding:
- One way data binding
- Two way data binding
- One way data binding is a simple/normal one way communication where HTML template is changed when any changes to TypeScript code/model/data/variable
- In one way data binding value of Model is used in the View (HTML) but we can't update Model from the View (.HTML Template)
- Example: Interpolation / String Interpolation, Property Binding, and Event Binding
- One way data binding works from class .ts file to template/view .html file:
Syntax & Example: component-demo10-onewaydatabinding.component.ts
import { Component, OnInit } from '@angular/core';

@Component({
  selector: 'app-component-demo10-onewaydatabinding',
  templateUrl: './component-demo10-onewaydatabinding.component.html',
  styleUrls: ['./component-demo10-onewaydatabinding.component.css']
})
export class ComponentDemo10OnewaydatabindingComponent implements OnInit {
  public inputResultValue = 'One Way Data Binding!';

  public userNameText = 'Angular 7';

  public changeInputText(evt) {
    console.log(evt);
    this.userNameText = evt.target.value;
  }

  constructor() { }

  ngOnInit() {
  }

}
Syntax & Example: component-demo10-onewaydatabinding.component.html
<div>
<h1>component-demo10-onewaydatabinding works!</h1>
<h2>One way data binding</h2>
One way data binding works from class .ts file to template/view .html file: <br /> <br />
<input type="text" value={{inputResultValue}} /> <br />
<input type="text" [value]=inputResultValue /> <br />
<input type="text" bind-value=inputResultValue /> <br />
<h2>One Way Data Binding works as Two way (work around)</h2>
<input type="text" placeholder="Enter Name" [value]="userNameText" (input)="changeInputText($event)" />
<span><em><strong>{{userNameText}}</strong></em></span>
</div>Image - Simple one way data binding with {{}}, [ ] and bind-
Image - Output - Simple one way data binding with {{}}, [ ] and bind-, used as two way data binding
- Two Way Data Binding helps to update the property at the same time displays the value of the property
- In two way data binding,
automatic synchronization of data happens between the Model and the View - Here whenever we make changes in the Model(data/variable) it will be reflected in the View and when you make changes in View(HTML/template) it will be reflected in Model
"ngModel"Directive is used to implement Two Way Data Binding (basically VIEW & MODEL should always be sync)[ ] square bracket/property bindingis used for data flow from class to the template and( ) parentheses/event bindingfor data from template to class[(ngModel)]- this syntax is known as[(banana in the box)]- To use
[(ngModel)]Directive we must need toimport FormsModulefrom@angular/formsand also add to imports array in app.module.ts:import { FormsModule } from '@angular/forms'; -
Note: In two way data binding value flow from an Input Text field to the class file and then to view/template file
Syntax & Example: app.module.ts
// import forms module for two way data binding
import { FormsModule } from '@angular/forms';

imports: [
    BrowserModule,
    FormsModule
  ],
Syntax & Example: component-demo11-twowaydatabinding.component.ts
import { Component, OnInit } from '@angular/core';

@Component({
  selector: 'app-component-demo11-twowaydatabinding',
  templateUrl: './component-demo11-twowaydatabinding.component.html',
  styleUrls: ['./component-demo11-twowaydatabinding.component.css']
})
export class ComponentDemo11TwowaydatabindingComponent implements OnInit {
  public nameText = 'Angular 6';

  constructor() { }

  ngOnInit() {
  }

}
Syntax & Example: component-demo11-twowaydatabinding.component.html
<div>
  <h1>component-demo11-twowaydatabinding works!</h1>

  <h2>Two way data binding</h2>

  <input type="text" [(ngModel)]="nameText" placeholder="Enter Name"/> {{nameText}}

</div>
Image - Output - Two way data binding with [(ngModel)], FormsModule
- Directives are an
instructions in the DOM, they specify how to place your components and business logic in the Angular - Directives are js class and
declared as @directive - There are 3 main types of directives in Angular:
- Component Directives - Component directives are used in
main class (app.component.ts). They contain the detail of how the component should be processed, instantiated and used at runtime - Structural Directives - Structural Directives let us
Add or Remove (Show or Hide) HTML elementsfrom DOM. Structural directivesstart with a * sign. These directives are used tomanipulate and change the structure of the DOM elements. For example, *ngIf and *ngFor etc. - Attribute Directives - Attribute directives
look like a normal HTML Attributeand mainly used indatabinding and event binding. Attribute directives are used tochange the look and behavior of the DOM elements. Attribute Directives affect only the element they are added to. For example: ngClass, ngStyle etc.
- Component Directives - Component directives are used in
- Most important/widely used inbuilt Structural directives are:
- ngIf - conditionally render/show-hide html elements
- ngSwitch - conditionally render/show-hide html elements
- ngFor - render/show list of html elements through loop
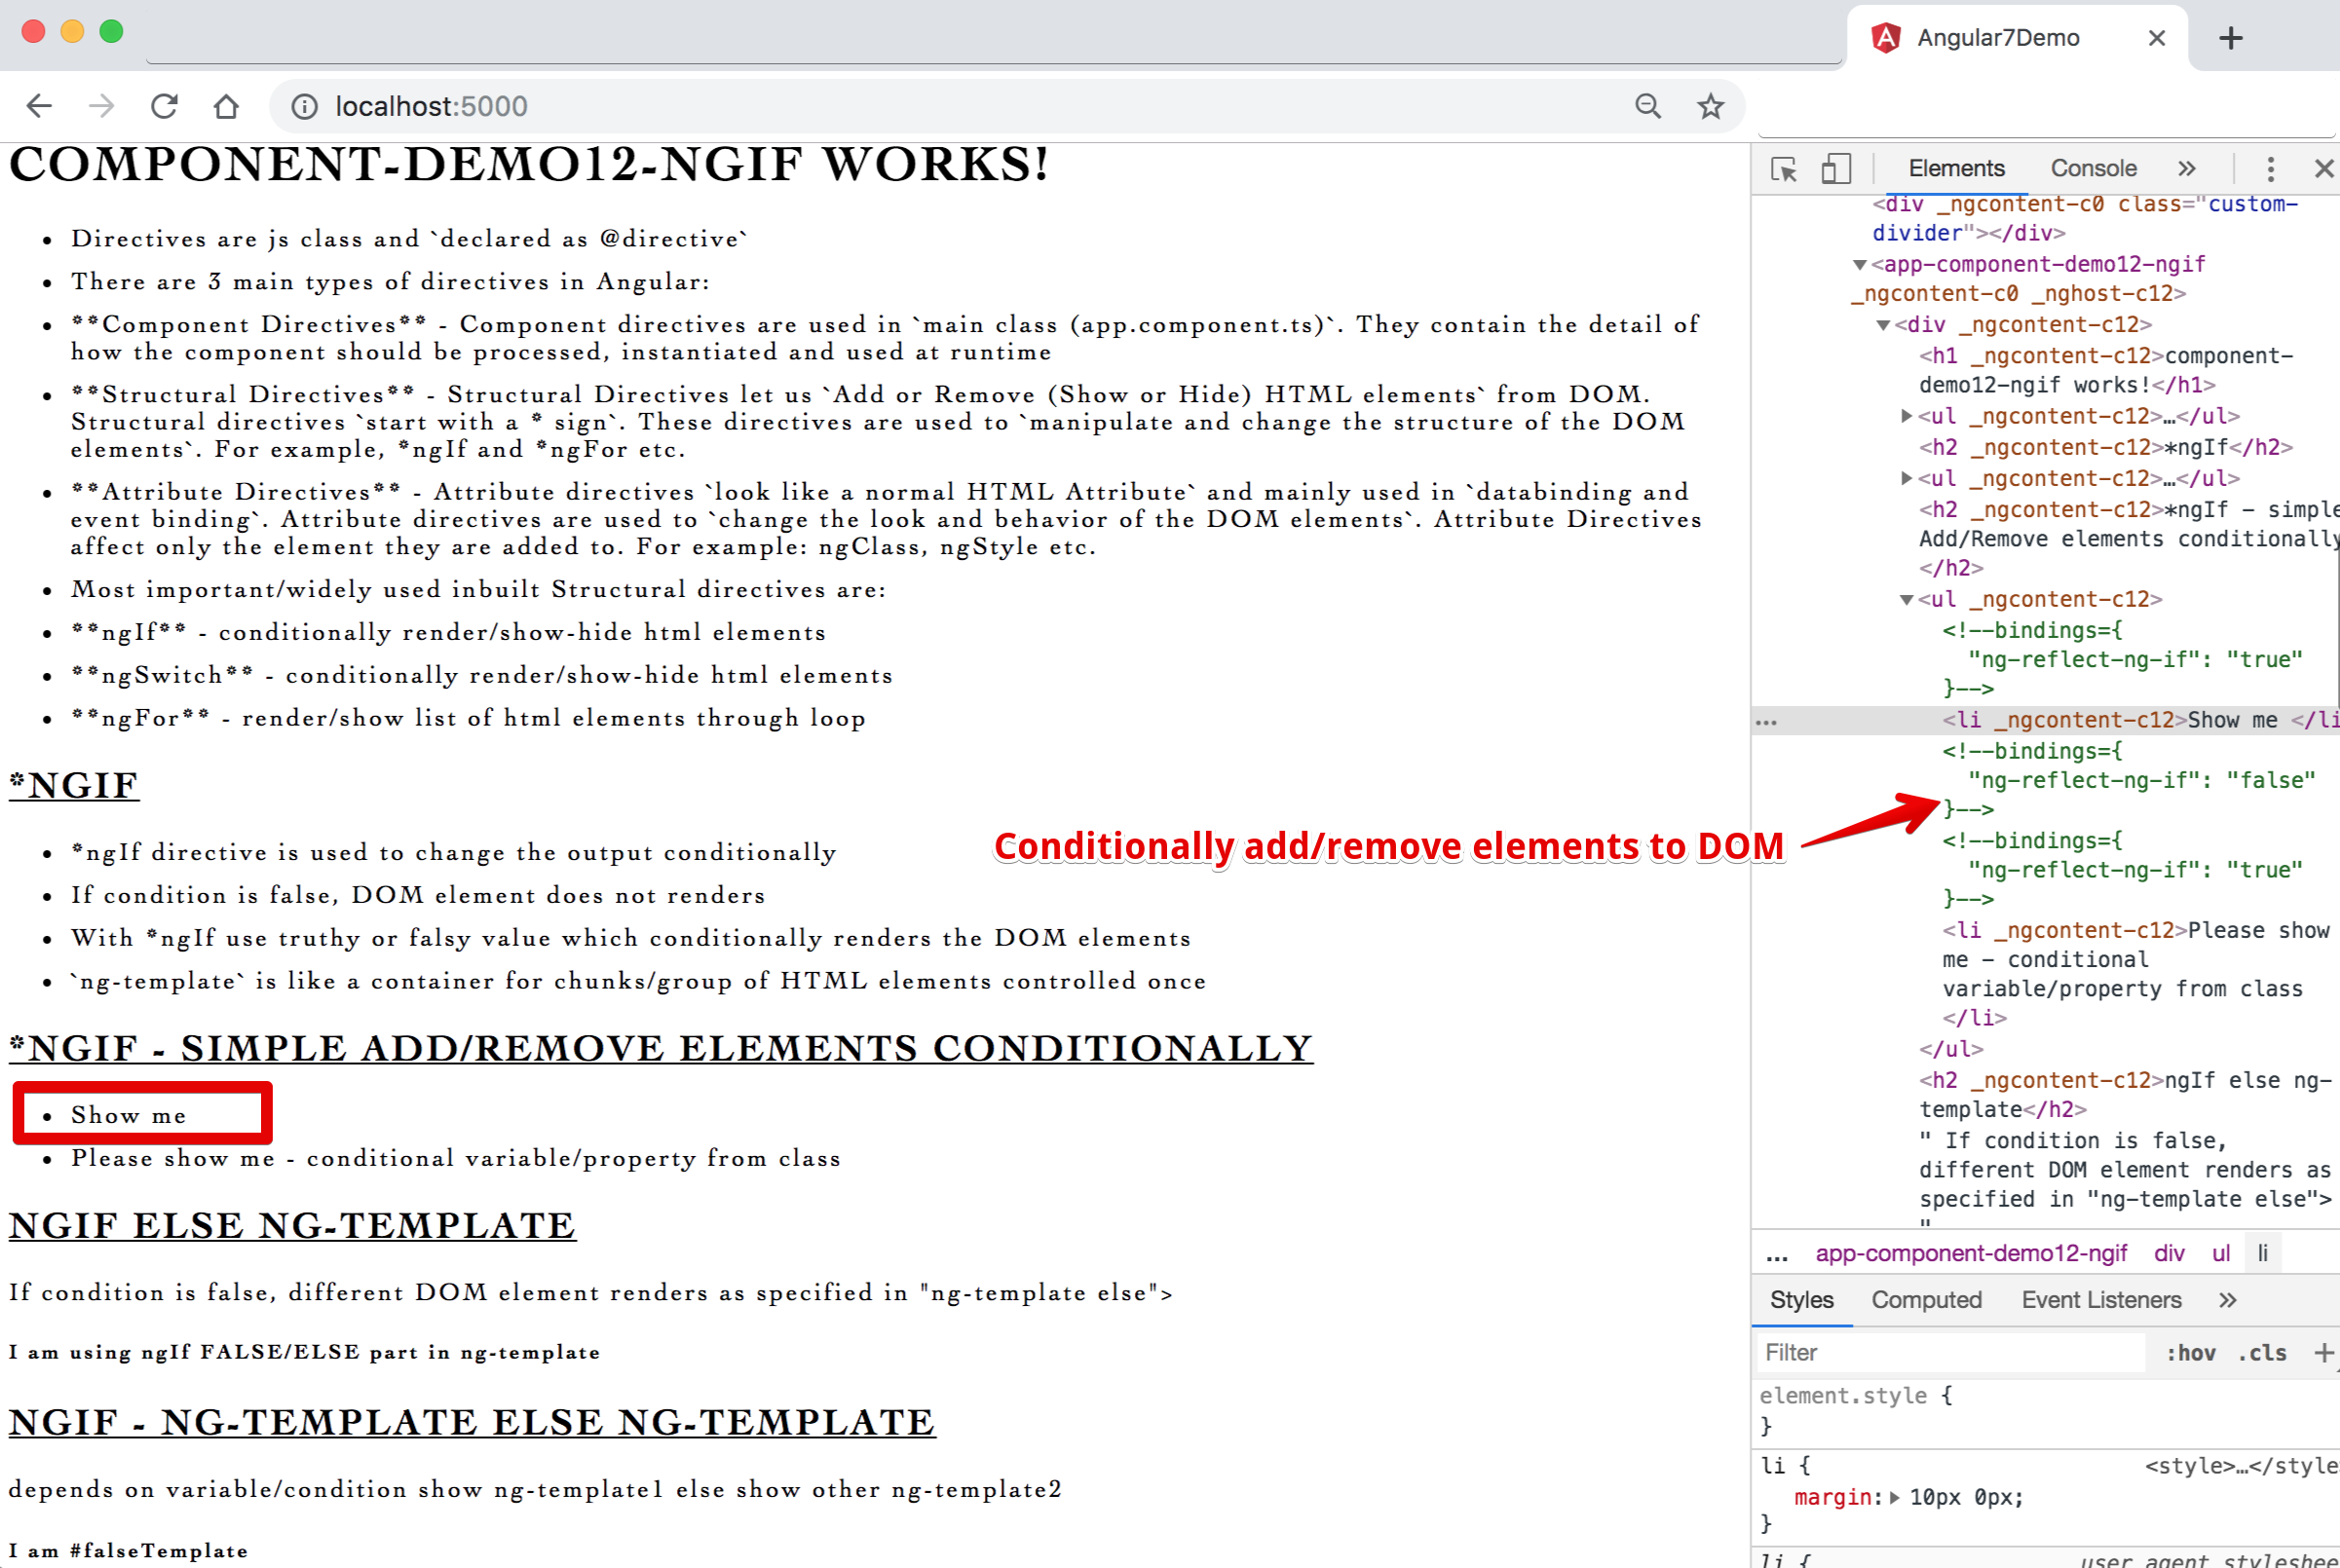
- *ngIf directive is used to change the output conditionally
- If the condition is false, the DOM element does not render
- With *ngIf use truthy or falsy value which conditionally renders the DOM elements
ng-templateis like a container for chunks/group of HTML elements controlled once
Syntax & Example: component-demo12-ngif.component.ts
import { Component, OnInit } from '@angular/core';

@Component({
  selector: 'app-component-demo12-ngif',
  templateUrl: './component-demo12-ngif.component.html',
  styleUrls: ['./component-demo12-ngif.component.css']
})
export class ComponentDemo12NgifComponent implements OnInit {
  public isShow=true;
  public hasDisplay=false;

  constructor() { }

  ngOnInit() {
  }

}
Syntax & Example: component-demo12-ngif.component.html
<div>
  <h1>component-demo12-ngif works!</h1>

  <h2>*ngIf</h2>

  <ul>
    <li *ngIf="true">Show me </li>
    <li *ngIf="false">I am NOT rendered in DOM </li>
    <li *ngIf="isShow">Please show me - conditional variable/property from class</li>
  </ul>

  <h2>ngIf else ng-template</h2>
  If condition is false, different DOM element renders as specified in "ng-template else">

  <!-- variable true - show me, else show other ng-template -->
  <div *ngIf="hasDisplay; else elseTemplate">
    <h5>I have used in ngIf TRUE part</h5>
  </div>

  <ng-template #elseTemplate>
    <h5>I am using ngIf FALSE/ELSE part in ng-template</h5>
  </ng-template>

  <h2>ngIf - ng-template else ng-template</h2>
  depends on variable/condition show ng-template1 else show other ng-template2

  <!-- variable true then show ng-template1 else show other ng-template2 -->
  <div *ngIf="hasDisplay; then trueTemplate; else falseTemplate"></div>

  <ng-template #trueTemplate>
    <h5>I am #trueTemplate</h5>
  </ng-template>

  <ng-template #falseTemplate>
    <h5>I am #falseTemplate</h5>
  </ng-template>

</div>
Image - Output - *ngIf - Structural directive to control/add/remove elements to DOM conditionally
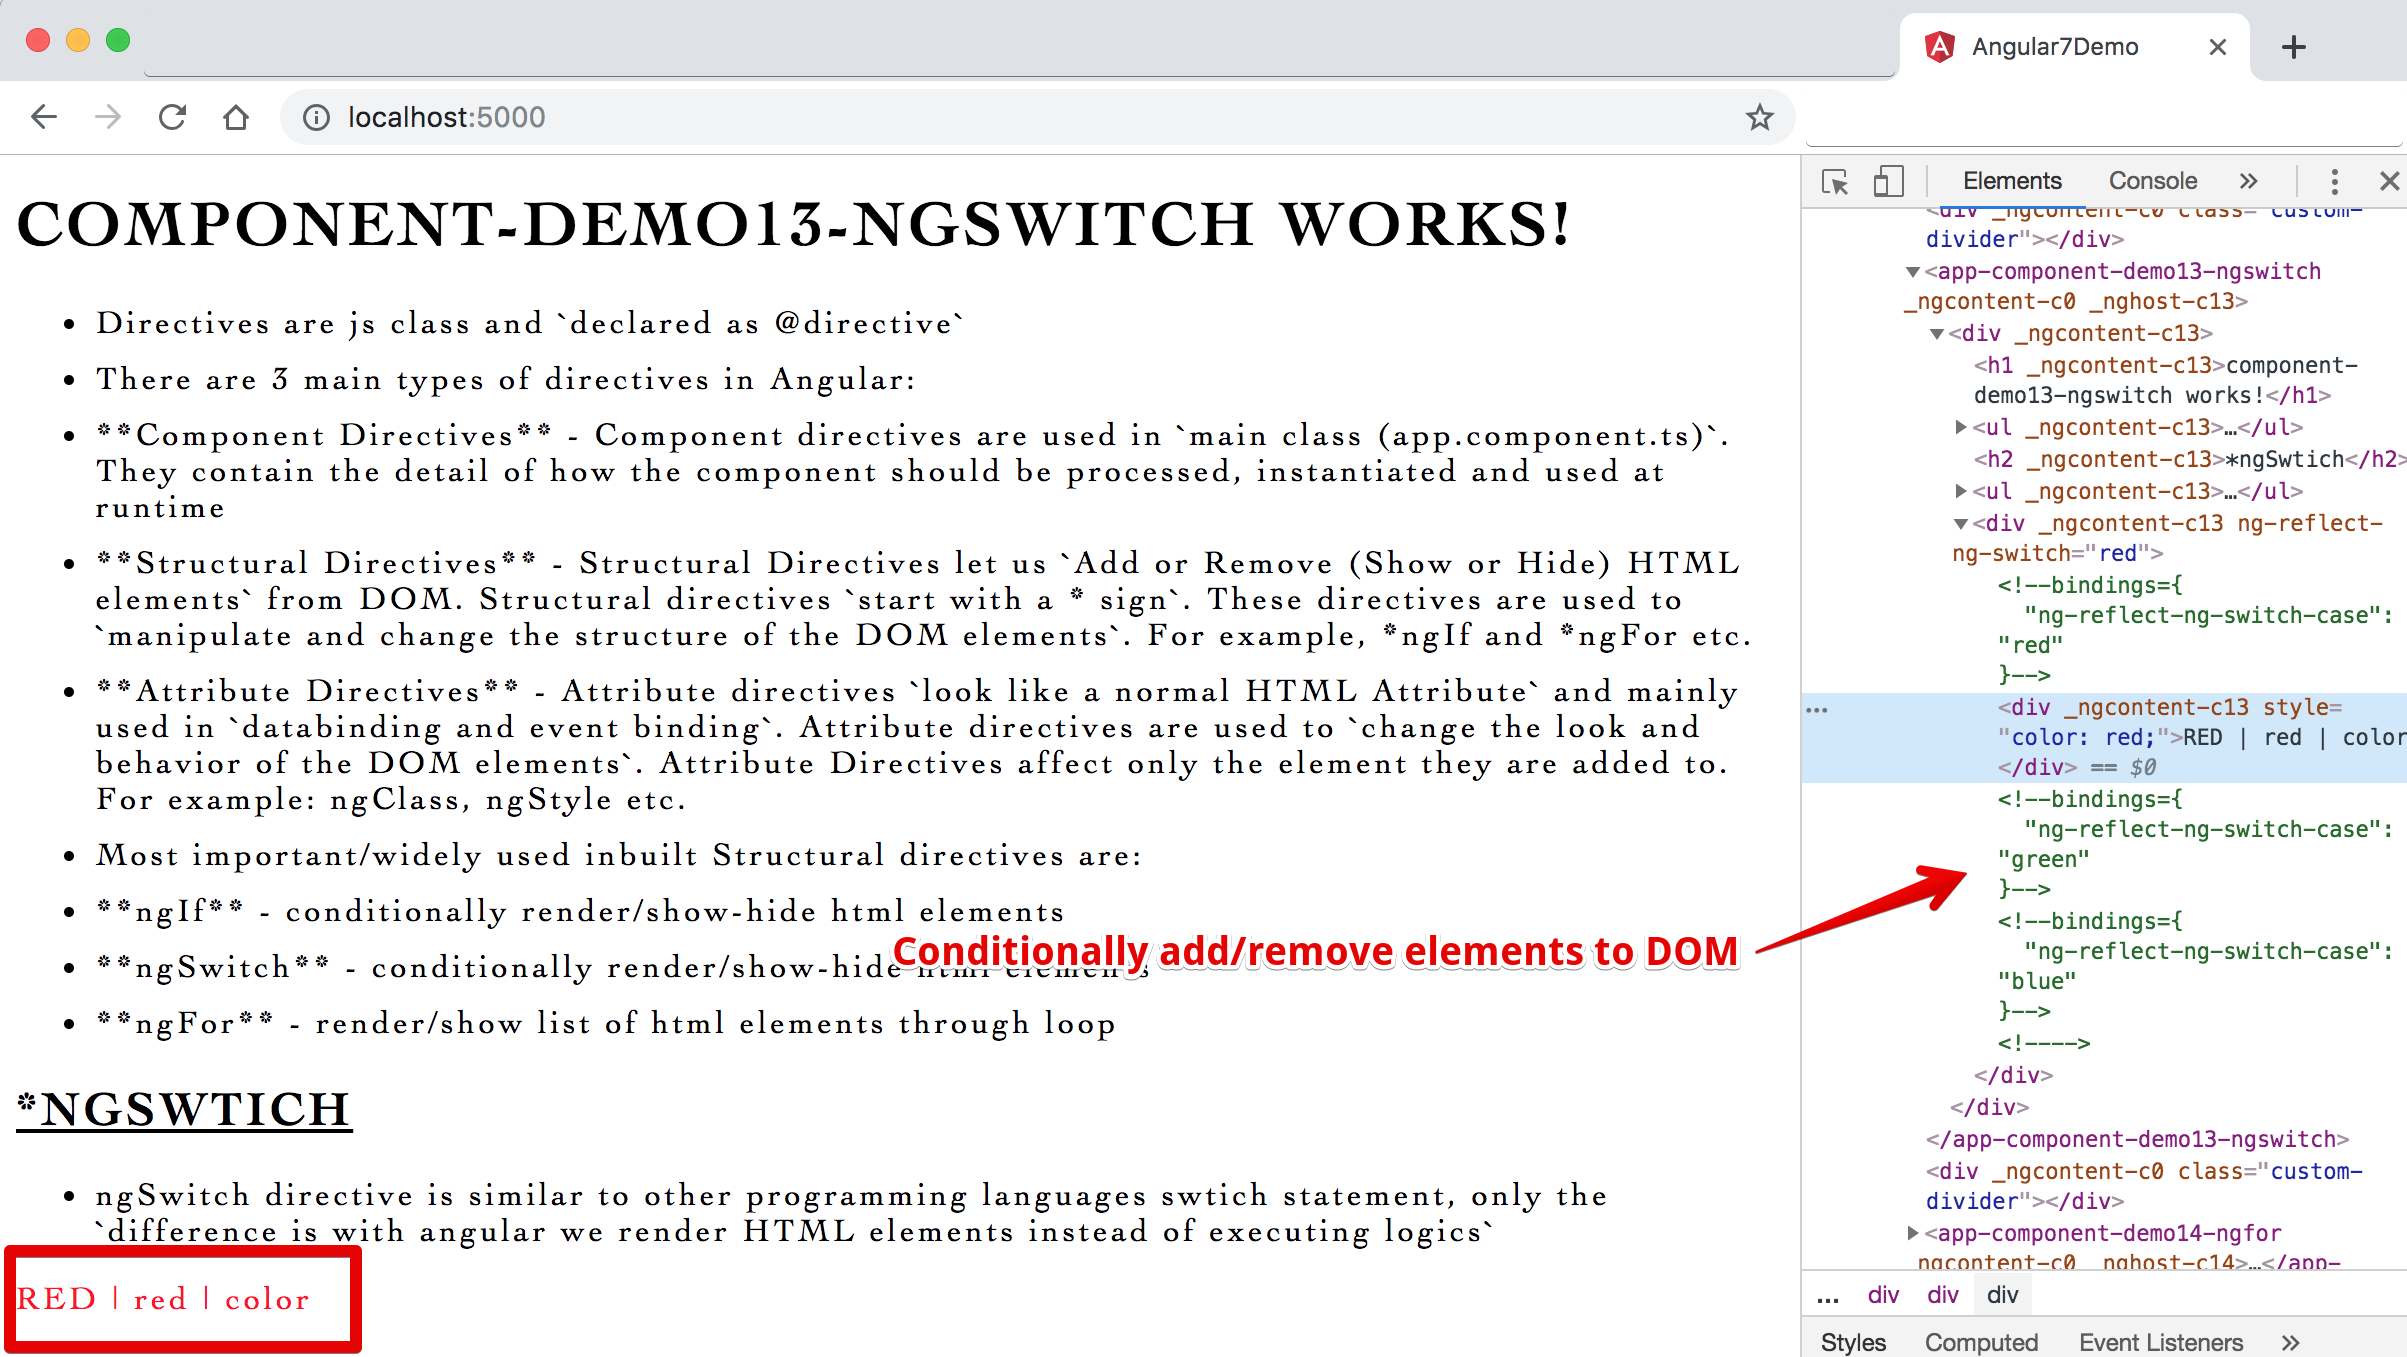
- ngSwitch directive is similar to other programming languages swtich statement, only the
difference is with angular we render HTML elements instead of executing logics
Syntax & Example: component-demo13-ngswitch.component.ts
import { Component, OnInit } from '@angular/core';

@Component({
  selector: 'app-component-demo13-ngswitch',
  templateUrl: './component-demo13-ngswitch.component.html',
  styleUrls: ['./component-demo13-ngswitch.component.css']
})
export class ComponentDemo13NgswitchComponent implements OnInit {
  public curColor='red';
  // public curColor='green';
  // public curColor = 'blue';

  // public curColor = 'black';

  constructor() { }

  ngOnInit() {
  }

}
Syntax & Example: component-demo13-ngswitch.component.html
<div>
  <h1>component-demo13-ngswitch works!</h1>

  <h2>*ngSwtich</h2>

  <div [ngSwitch]="curColor">
    <div *ngSwitchCase="'red'" [style.color]="curColor">RED | {{curColor}} | color</div>
    <div *ngSwitchCase="'green'" [style.color]="curColor">GREEN | {{curColor}} | color</div>
    <div *ngSwitchCase="'blue'" [style.color]="curColor">BLUE | {{curColor}} | color</div>
    <div *ngSwitchDefault>Default BLACK</div>
  </div>

</div>
Image - Output - *ngSwitch - Structural directive to control/add/remove elements to DOM conditionally
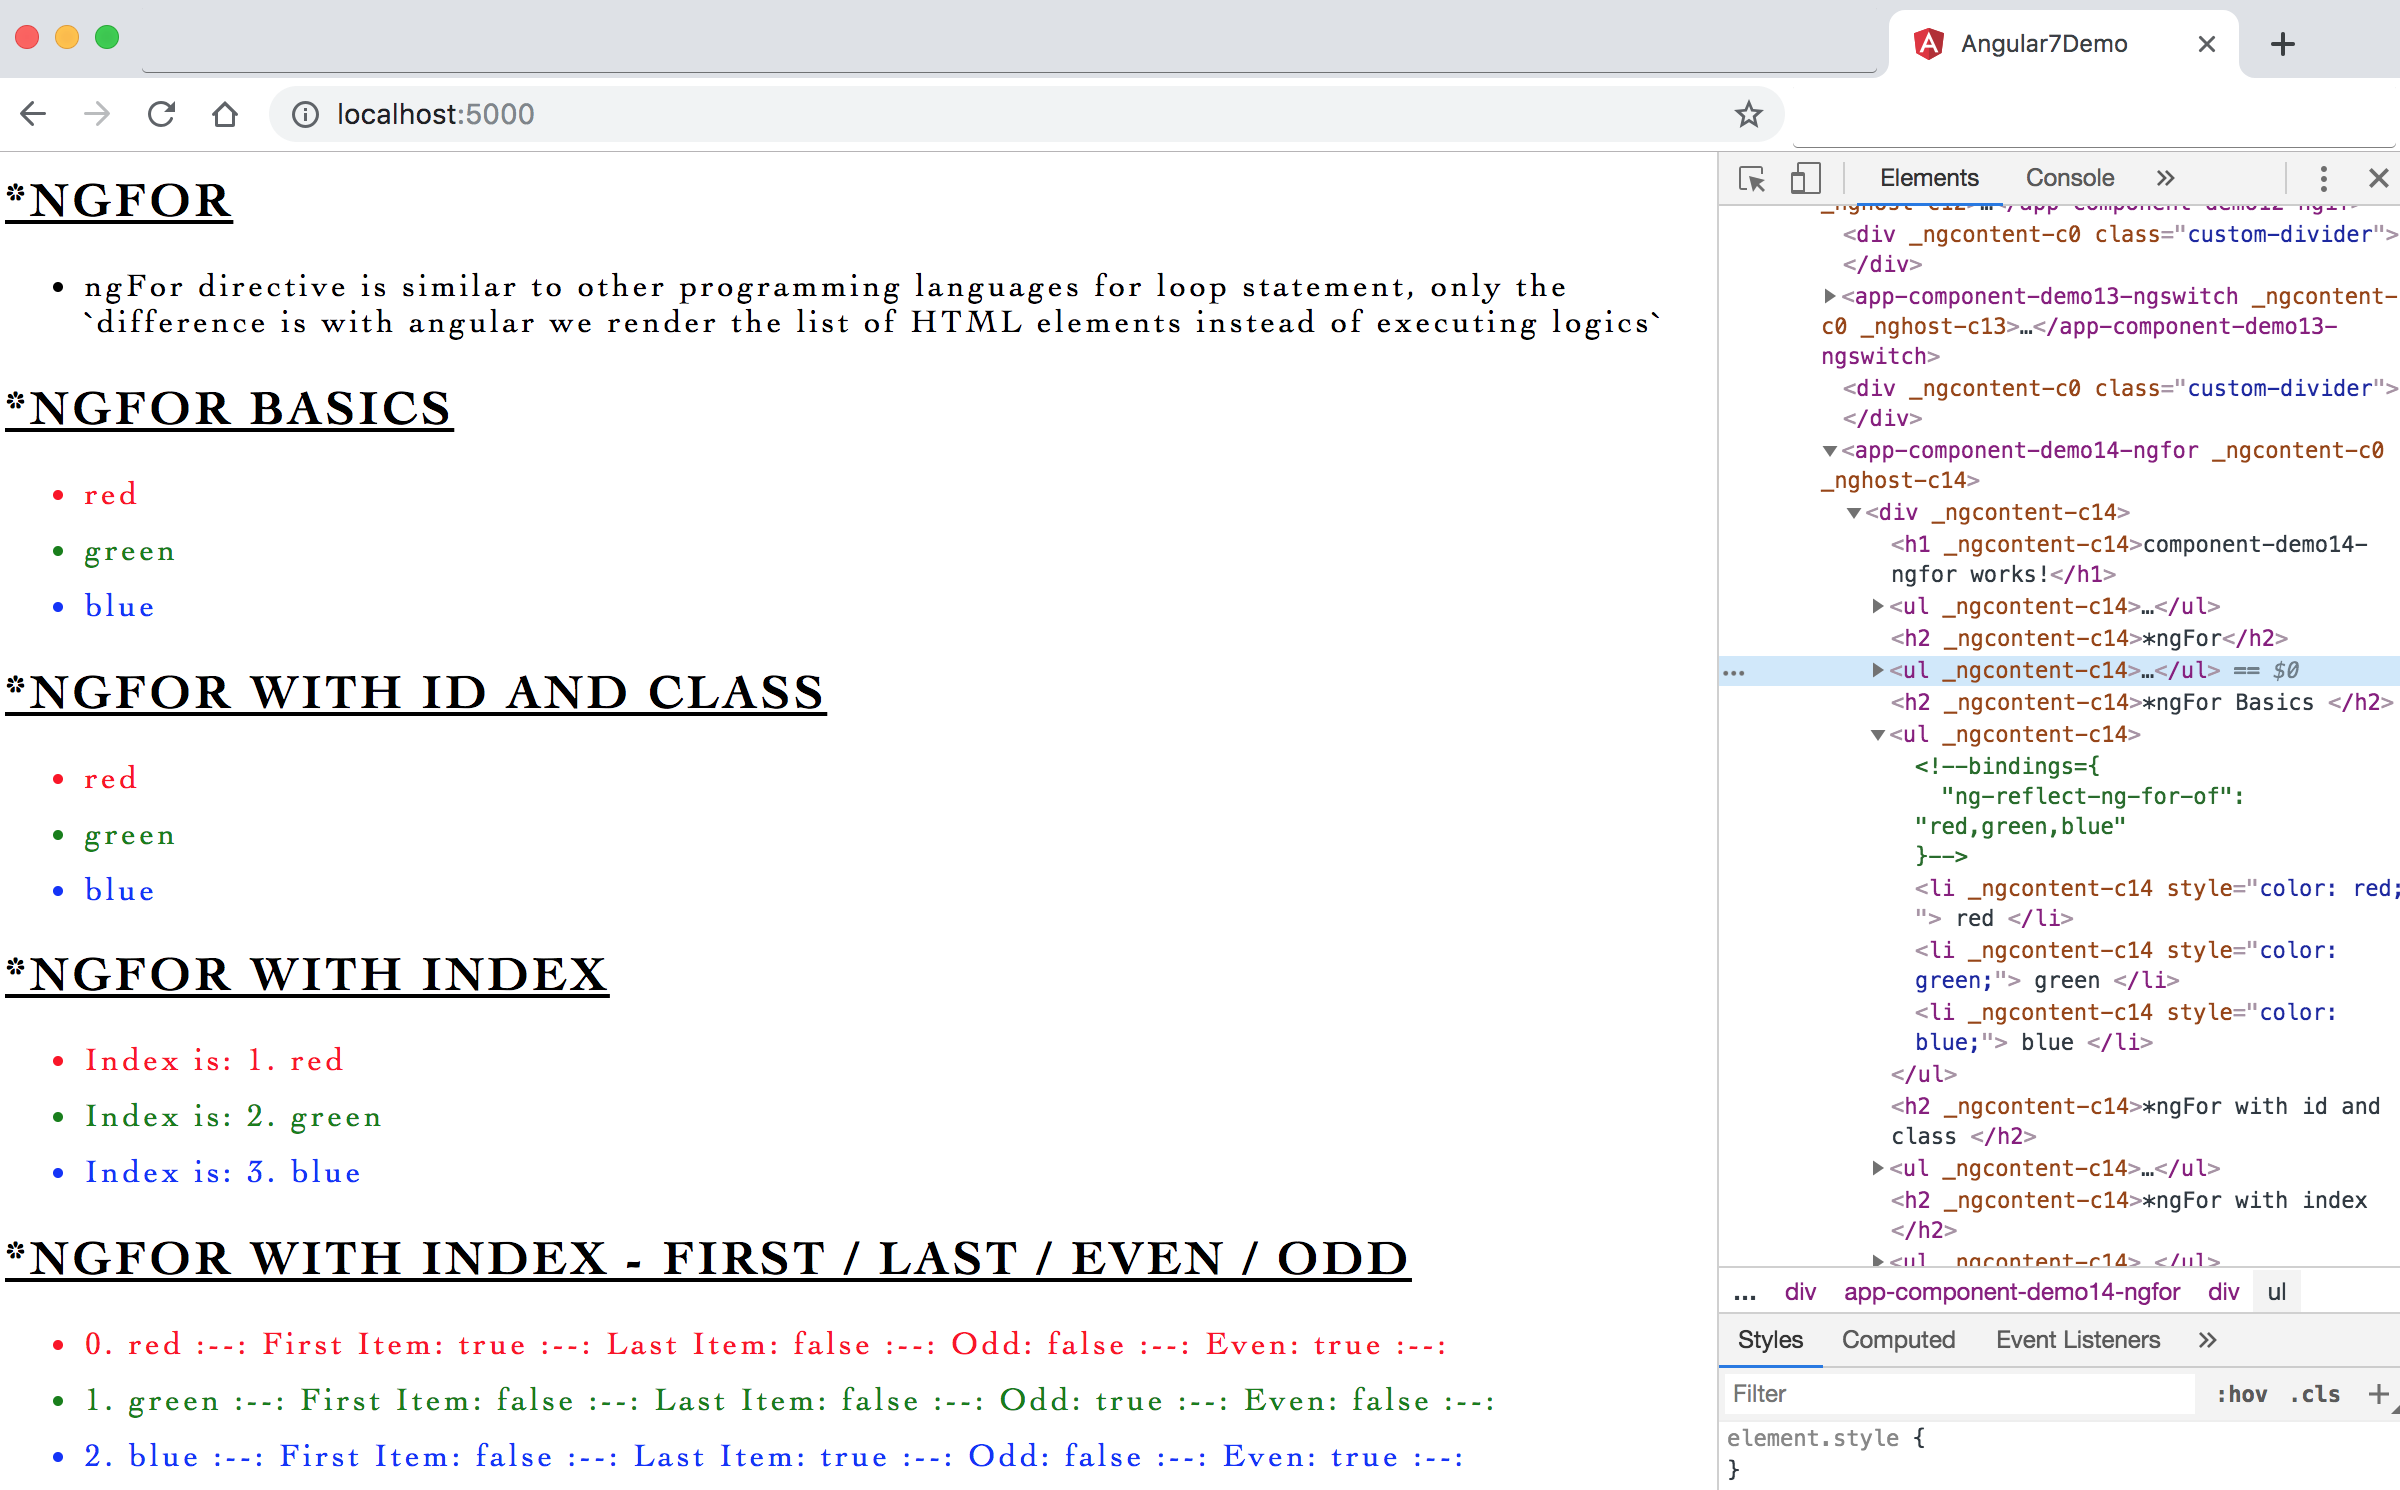
- ngFor directive is similar to other programming languages for loop statement, only the
difference is with angular we render the list of HTML elements instead of executing logics
Syntax & Example: component-demo14-ngfor.component.ts
import { Component, OnInit } from '@angular/core';

@Component({
  selector: 'app-component-demo14-ngfor',
  templateUrl: './component-demo14-ngfor.component.html',
  styleUrls: ['./component-demo14-ngfor.component.css']
})
export class ComponentDemo14NgforComponent implements OnInit {
  // public arrColors = ['red', 'green', 'blue','cyan','magenta','black'];
  public arrColors = ['red', 'green', 'blue'];

  constructor() { }

  ngOnInit() {
  }

}
Syntax & Example: component-demo14-ngfor.component.html
<div>
  <h1>component-demo14-ngfor works!</h1>

  <h2>*ngFor</h2>

  <h2>*ngFor Basics </h2>
  <ul>
    <li *ngFor="let color of arrColors" [style.color]="color">
      {{color}}
    </li>
  </ul>

  <h2>*ngFor with id and class </h2>
  <ul>
    <li *ngFor="let color of arrColors;" id="{{color}}" class="{{color}}" [style.color]="color">
      {{color}}
    </li>
  </ul>

  <h2>*ngFor with index </h2>
  <ul>
    <li *ngFor="let color of arrColors; index as curIndex" id="{{color}}" class="{{color}}" [style.color]="color">
      Index is: {{curIndex + 1 }}. {{color}}
    </li>
  </ul>

  <h2>*ngFor with index - first / last / even / odd </h2>
  <ul>
    <li *ngFor="let color of arrColors; index as curIndex; first as firstIndex; last as lastIndex; even as evenIndex; odd as oddIndex" id="{{color}}" class="{{color}}" [style.color]="color">
      {{curIndex}}. {{color}}  :--:  First Item: {{firstIndex}}  :--: Last Item: {{lastIndex}}  :--:  Odd: {{oddIndex}} :--:  Even: {{evenIndex}} :--:
    </li>
  </ul>

</div>
Image - Output - *ngFor - Structural directive to render/loop html elements from an array/object
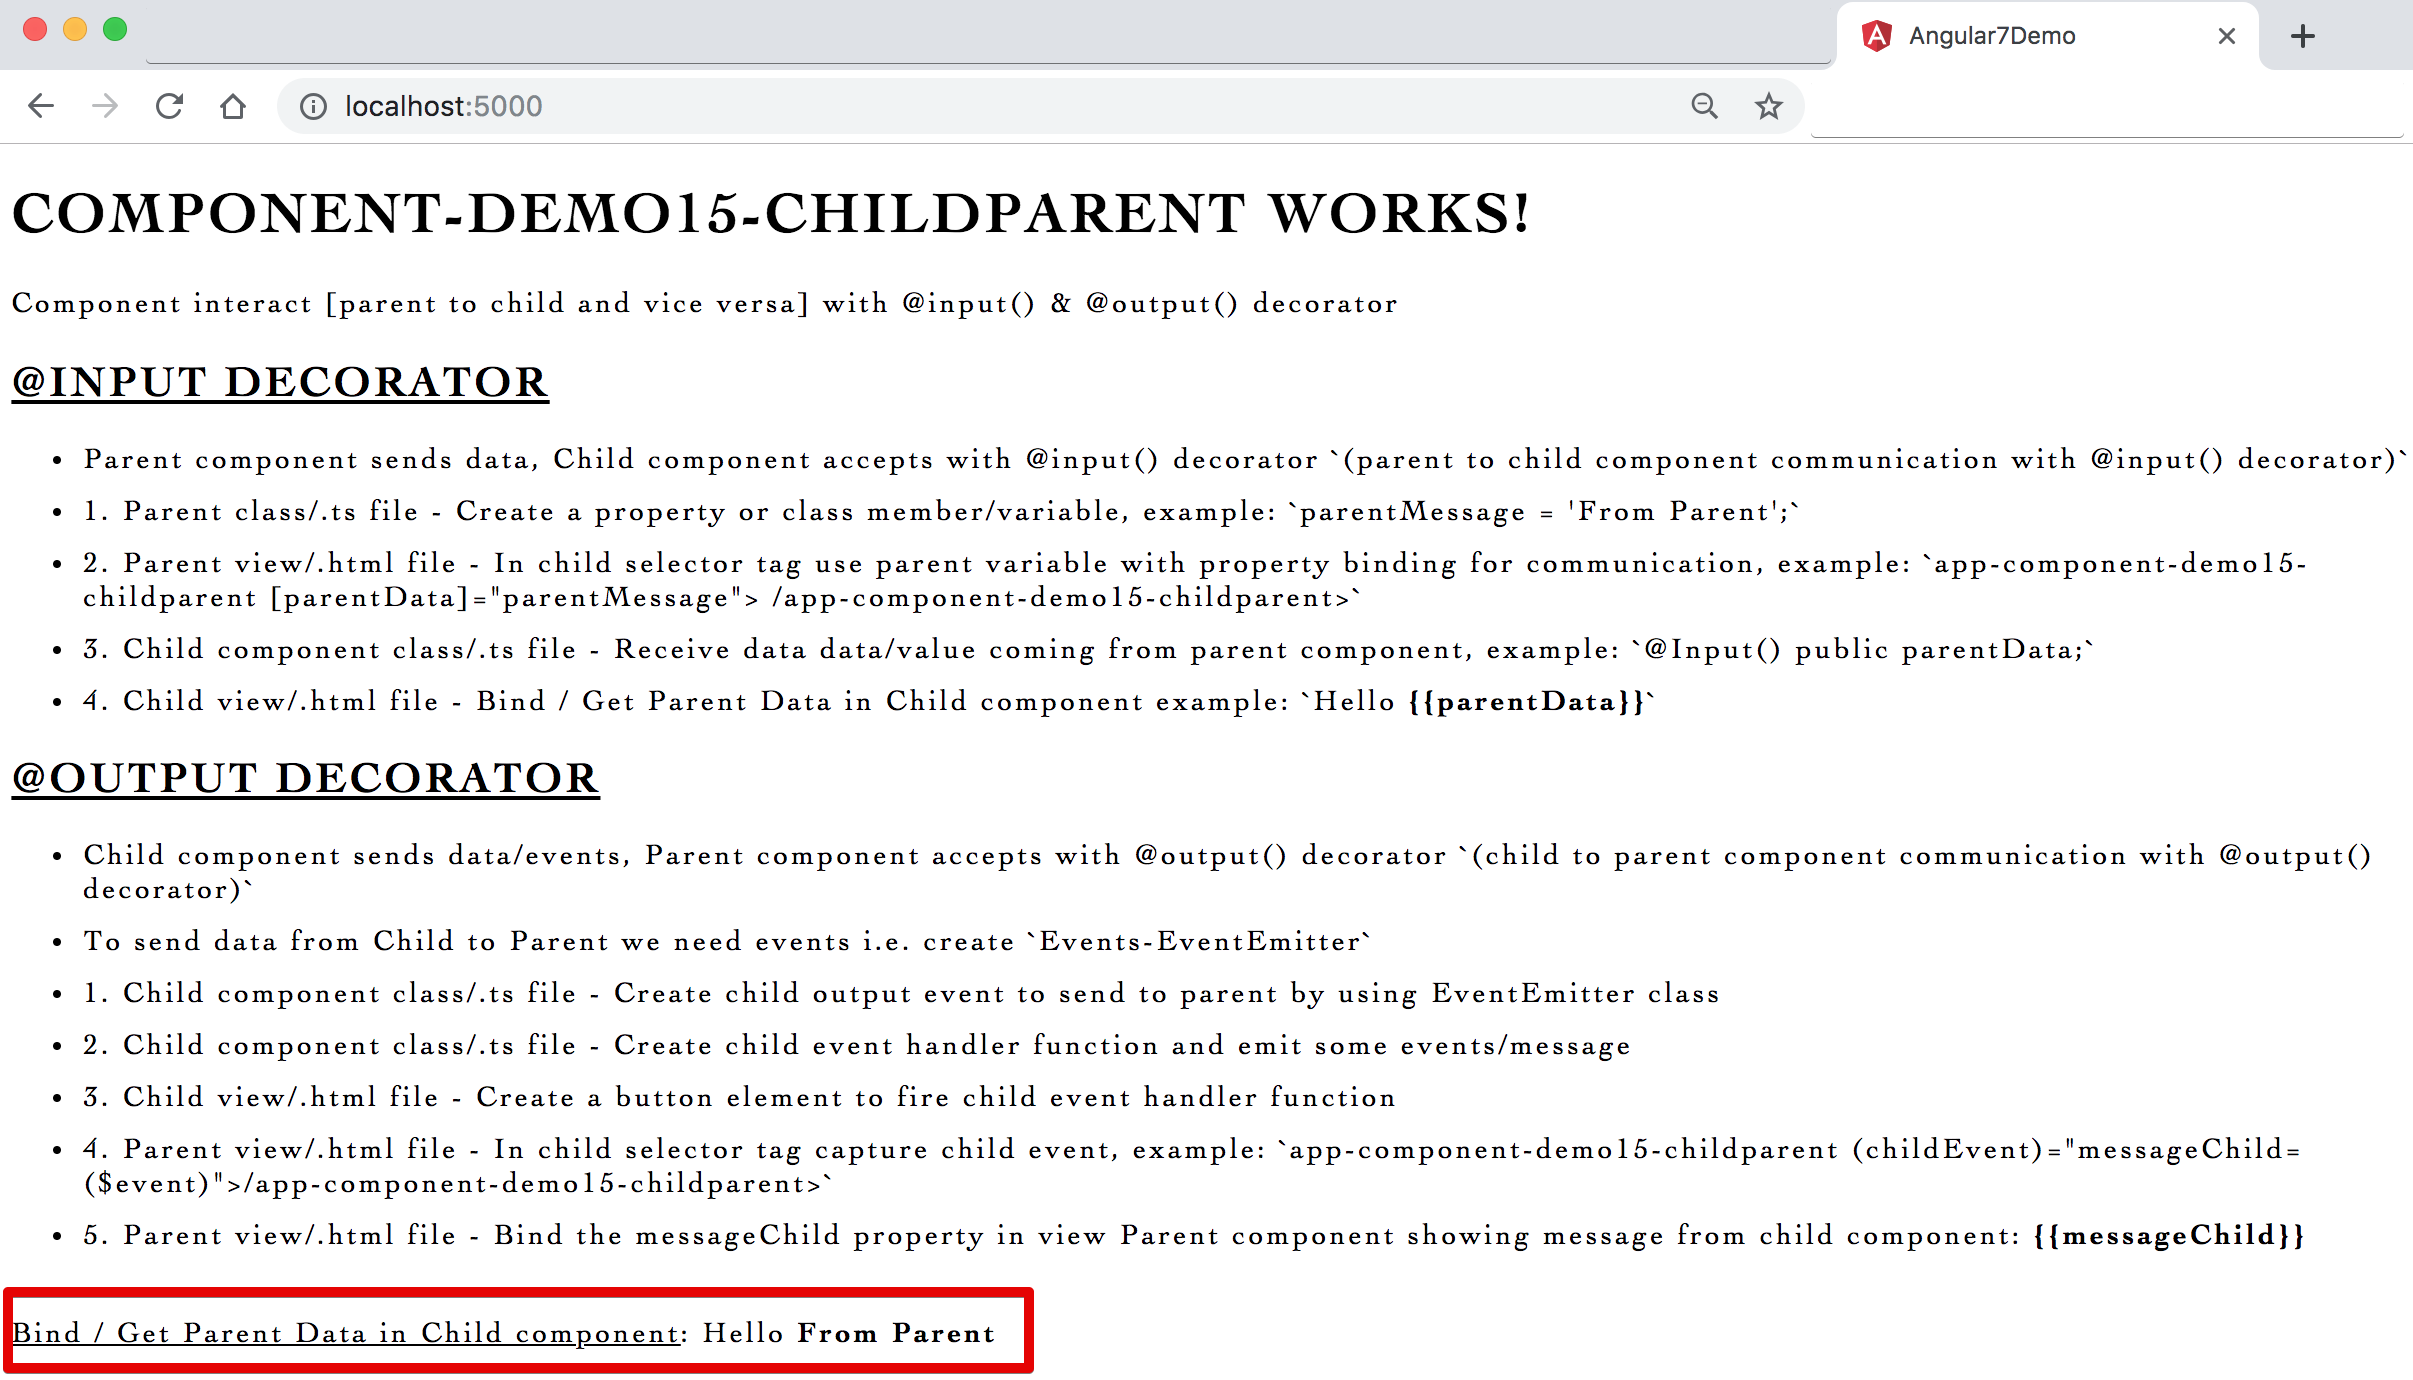
- Component interact [parent to child and vice versa] with @input() & @output() decorator
- @input() decorator - Parent component sends data, Child component accepts with @input() decorator
(parent to child component communication with @input() decorator) - @output() decorator - Child component sends data/events, Parent component accepts with @output() decorator
(child to parent component communication with @output() decorator)
- @input() decorator - Parent component sends data, Child component accepts with @input() decorator
- To send data from Child to Parent we need events i.e. create
Events-EventEmitter
- Parent class/.ts file - Create a property or class member/variable, example:
parentMessage = 'From Parent'; - Parent view/.html file - In child selector tag use parent variable with property binding for communication, example:
<app-component-demo15-childparent [parentData]="parentMessage"></app-component-demo15-childparent> - Child component class/.ts file - Receive data data/value coming from parent component, example:
@Input() public parentData; - Child view/.html file - Bind / Get Parent Data in Child component example:
Hello <strong>{{parentData}}</strong>
Syntax & Example: parent component - app.component.ts
import { Component } from '@angular/core';

@Component({
  selector: 'app-root',
  templateUrl: './app.component.html',
  styleUrls: ['./app.component.css']
})
export class AppComponent {
  // create a property to send from parent to child
  parentMessage = 'From Parent';

}
Syntax & Example: parent component - app.component.html
<!-- component interaction - parent to child and child to parent communication -->

<!-- send property from parent to child - include in child element component selector -->
<app-component-demo15-childparent [parentData]="parentMessage"></app-component-demo15-childparent>
Syntax & Example: child component - component-demo15-childparent.component.ts
import { Component, OnInit, Input, Output, EventEmitter } from '@angular/core';

@Component({
  selector: 'app-component-demo15-childparent',
  templateUrl: './component-demo15-childparent.component.html',
  styleUrls: ['./component-demo15-childparent.component.css']
})
export class ComponentDemo15ChildparentComponent implements OnInit {
  // parent to child

  // receive data data/value coming from parent component
  @Input() public parentData;
  // @Input() public parentName;

  // alias based method
  // @Input('parentData') public parentName;

  constructor() { }

  ngOnInit() {
  }

}
Syntax & Example: child component - component-demo15-childparent.component.html
<div>
  <h1>component-demo15-childparent works!</h1>

  <!-- parent to child -->

  <u>Bind / Get Parent Data in Child component</u>:
  Hello <strong>{{parentData}}</strong> <br /> <br /> <br />

  <!-- <u>bind / Get Parent Data in Child alias based method</u>:
  Hello <strong>{{parentName}}</strong> <br /><br /> -->

</div>
Image - Output - component communication parent to child with input decorator
- Child component class/.ts file - Create child output event to send to parent by using EventEmitter class
- Child component class/.ts file - Create child event handler function and emit some events/message
- Child view/.html file - Create a button element to fire child event handler function
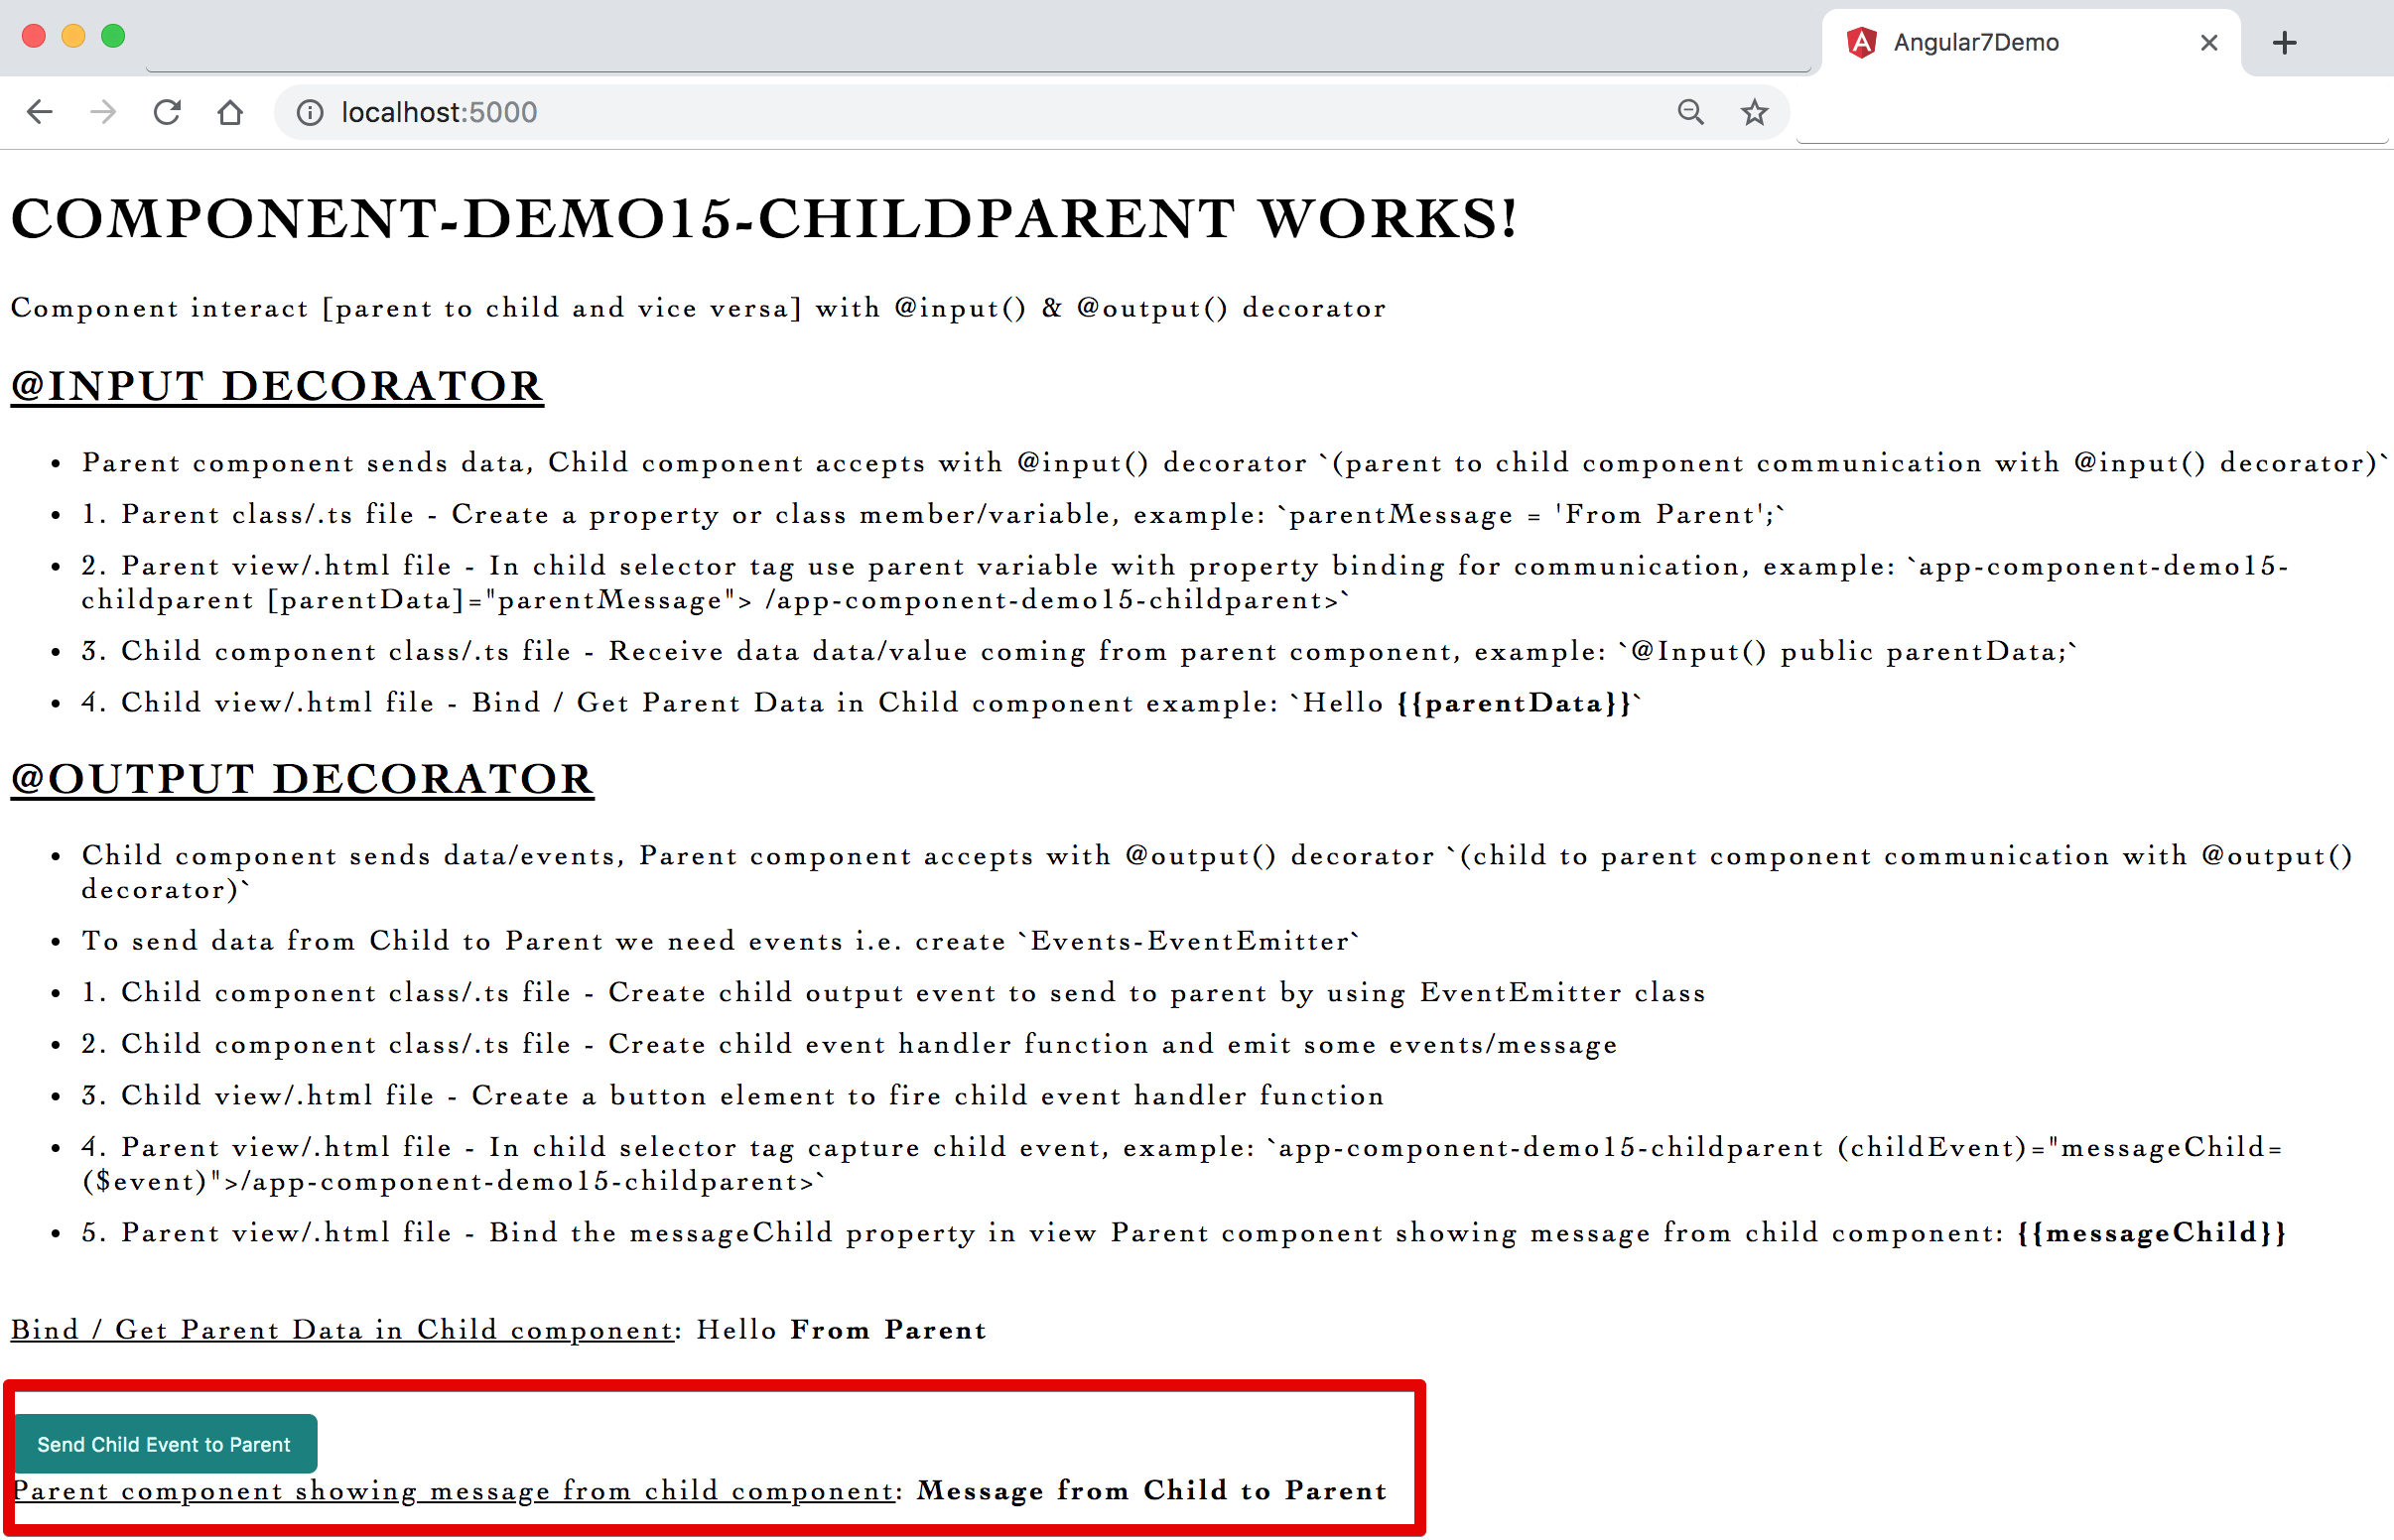
- Parent view/.html file - In child selector tag capture child event, example:
<app-component-demo15-childparent (childEvent)="messageChild=($event)"></app-component-demo15-childparent> - Parent view/.html file - Bind the messageChild property in view
<u>Parent component showing message from child component</u>: <strong>{{messageChild}}</strong>
Syntax & Example: child component - component-demo15-childparent.component.ts
import { Component, OnInit, Input, Output, EventEmitter } from '@angular/core';

@Component({
  selector: 'app-component-demo15-childparent',
  templateUrl: './component-demo15-childparent.component.html',
  styleUrls: ['./component-demo15-childparent.component.css']
})
export class ComponentDemo15ChildparentComponent implements OnInit {
  // parent to child

  // receive data data/value coming from parent component
  @Input() public parentData;
  // @Input() public parentName;

  // alias based method
  // @Input('parentData') public parentName;

  // child to parent

  // create child event to send to parent
  @Output() public childEvent = new EventEmitter();

  // child event handler function
  childFireEvent() {
    this.childEvent.emit("Message from Child to Parent");
  }

  constructor() { }

  ngOnInit() {
  }

}
Syntax & Example: child component - component-demo15-childparent.component.html
<div>
    <h1>component-demo15-childparent works!</h1>
    <!-- child to parent -->

    <!-- Fire child event on button click -->
    <button (click)="childFireEvent()">Send Child Event to Parent</button>
</div>
Syntax & Example: parent component - app.component.ts
import { Component } from '@angular/core';

@Component({
  selector: 'app-root',
  templateUrl: './app.component.html',
  styleUrls: ['./app.component.css']
})
export class AppComponent {
  // create a property to send from parent to child
  parentMessage = 'From Parent';

  // child to parent
  messageChild;
}
Syntax & Example: parent component - app.component.html
<!-- component interaction - parent to child and child to parent communication -->

<!-- send property from parent to child - include in child element component selector -->
<app-component-demo15-childparent [parentData]="parentMessage" (childEvent)="messageChild=($event)"></app-component-demo15-childparent>
Image - Output - component communication child to parent with ouput decorator
- Pipes (Filters) helps to
transform data before displaying to view - Pipes (Filters) can be added in AngularJS to format data
- Pipes (Filters) is denoted by
piping |symbol - There are many built-in/default pipes available in angular like:
String related pipes(uppercase, lowercase),Number related pipes(number),Currencypipes,Datepipes,JSONpipes. - We can also create custom pipes as per out requirements with
Pipe, PipeTransform class & transform method
Syntax & Example: component-demo16-pipesfilters.component.ts
import { Component, OnInit } from '@angular/core';

@Component({
  selector: 'app-component-demo16-pipesfilters',
  templateUrl: './component-demo16-pipesfilters.component.html',
  styleUrls: ['./component-demo16-pipesfilters.component.css']
})
export class ComponentDemo16PipesfiltersComponent implements OnInit {
  public nameText = 'Angular js';
  public messageText = 'Welcome to Angularjs';
  public greetingText = 'angular 2/4/5/6 is component based';

  public objTechnology = {
    'firstName': 'angular',
    'lastName': 'js',
    'version': 6.0
  }

  public number1 = 5.786;

  public currentDate = Date();

  constructor() { }

  ngOnInit() {
  }

}
Syntax & Example: component-demo16-pipesfilters.component.html
<div>
  <h1>component-demo16-pipesfilters works!</h1>

  <h2>pipes</h2>

  <h2>String based Pipes : Format string</h2>
  uppercase: {{ nameText | uppercase }} <br />
  lowercase: {{ messageText | lowercase }} <br />
  titlecase: {{ greetingText | titlecase }} <br />

  slice:start:end (not including that letter): {{ greetingText | slice:8}} <br />
  <!-- slice:starting point:limit/up to (not including that letter) -->
  slice:start:end (not including that letter): {{ greetingText | slice:14:15}} <br />

  <h2>JSON Pipes - Shows json representation of an object</h2>
  json: {{ objTechnology | json }} <br />

  <h2>Number Pipes - Format Number, Integers</h2>
  <!-- min integer digit. min decimal digit - max decimal digit. -->
  number (min integer digit. min decimal digit - max decimal digit): {{ 5.29898 | number:"1.2-3" }} <br />
  number (min integer digit. min decimal digit - max decimal digit): {{ 5.29898 | number:"2.2-2" }} <br />

  percent: {{ 0.29898 | percent }} <br />

  <h2>Currency Pipes - Transform Currency values</h2>
  currency: {{ 0.29898 | currency }}<br />
  currency: {{ 0.29898 | currency:'Rs.' }} <br />
  currency: {{ 0.29898 | currency:'GBP' }} <br />
  currency: {{ 0.29898 | currency:'GBP':'code' }} <br />

  <h2>Date Pipes - Transform Date</h2>
  Date: {{ currentDate }}<br />

  date:short: {{ currentDate | date:'short' }}<br />
  date:shortDate: {{ currentDate | date:'shortDate' }}<br />
  date:shortTime: {{ currentDate | date:'shortTime' }} <br /> <br />

  date:medium: {{ currentDate | date:'medium' }}<br />
  date:mediumDate: {{ currentDate | date:'mediumDate' }}<br />
  date:mediumTime: {{ currentDate | date:'mediumTime' }}<br /> <br />

  date:long: {{ currentDate | date:'long' }}<br />
  date:longDate: {{ currentDate | date:'longDate' }}<br />
  date:longTime: {{ currentDate | date:'longTime' }}<br /> <br />

</div>
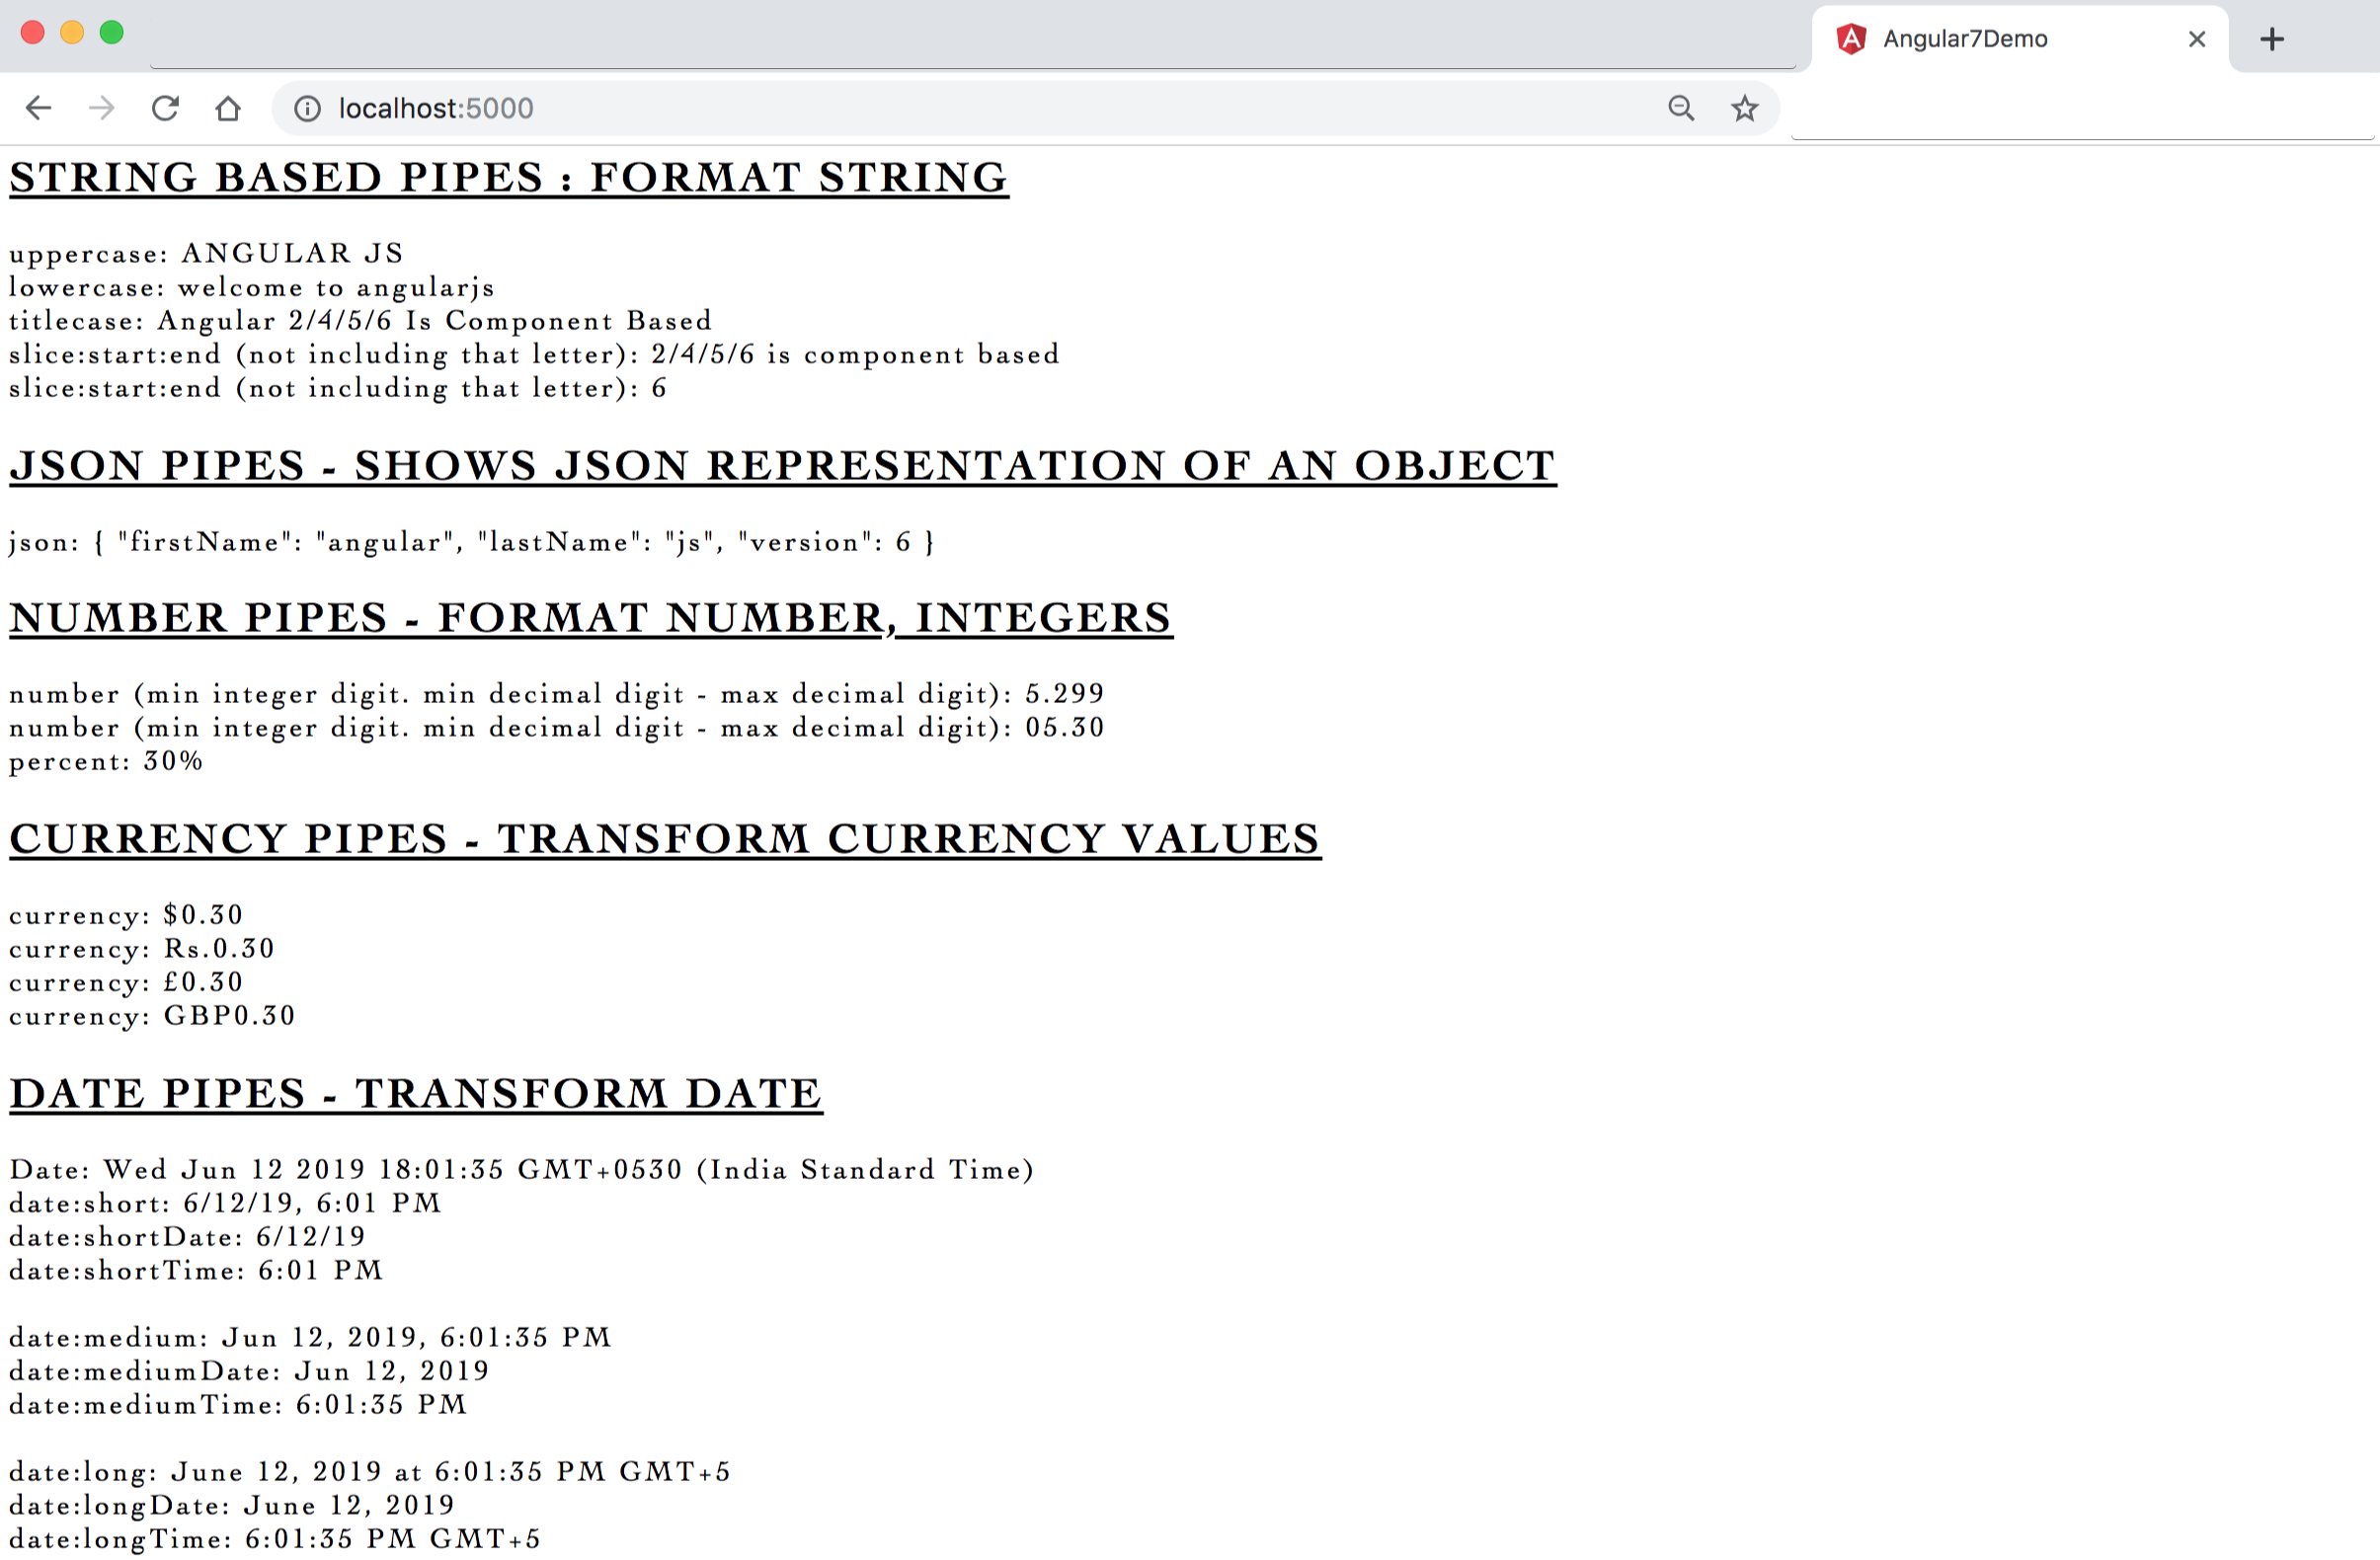
Image - Output - Transform/Format data with pipes
- Programming Principles:
- DRY - Do not repeat yourself (DRY) - Avoid making copies of data in different files. (example: List & Details components using same employee object created twice in respective class file)
- SRP - Single Responsibility Principles (one class/function should perform one task/responsibility)
- KISS - Keep It Simple Stupid!
- Service is a class with a specific purpose and widely used to:
- Share data - Between multiple pages/components
- Implement application logic - Calculations, Repeatative tasks/functionalities etc.
- External Interaction - Database connectivity
- Services are a great and awesome way to share information among multiple classes/components, just create a service and inject it in respective classes/components
- Drawback of code without Dependency Injection (DI):
- Code is not flexible
- If main code (dependencies) changed we need to check and change our code
- Code is not suitable for testing
- Dependency Injection (DI) as a design pattern
- Dependency Injection DI is a coding pattern/standard in which a class receives its required dependencies from external sources rather than creating them itself to avoid tight coupling
- Dependency Injection (DI) as a Framework - Register all dependencies with Injector a central place/container
- 3 steps involved to create and use service in angular:
- Define the Service class
- Register with Injector
- Declare as a dependency in List and Details both component
- 3 steps involved to create and use service in angular:
@Injectable()decorator tells angular that this service might itself have injected dependencies
- 3 steps involved to create and use service in angular:
- Define the Service class
- Register with Injector
- Declare as a dependency in List and Details both component
- Create service (which is responsible for providing employee data) with the command
"ng g s employee"OR"ng generate service employee"
Syntax & Example: employee.service.ts
import { Injectable } from '@angular/core';

@Injectable({
  providedIn: 'root'
})
export class EmployeeService {
  // 1.1. create a new method which holds employee data
  getEmployees() {
    return [
      { 'id': 1, 'name': 'Amitabh', 'age': 75, 'city': 'Alahabad' },
      { 'id': 2, 'name': 'Akshay', 'age': 55, 'city': 'Delhi' },
      { 'id': 3, 'name': 'RajaniKanth', 'age': 73, 'city': 'Chennai' },
      { 'id': 4, 'name': 'Rajesh Khanna', 'age': 85, 'city': 'Kolkatta' }
    ]
  }

  constructor() { }

}- Register with Injector in app module file
'app.module.ts'
Syntax & Example: app.module.ts
// 2.1. import custom created service to Register with Injector
import { EmployeeService } from './services/employee.service';

// 2.2. import service in providers its compulsion to insert services in the provider's array
providers: [ EmployeeService ]- import service in necessary component files - Declare as dependency in constructor employee-list.component.ts & employee-details.component.ts
Syntax & Example: component-demo191-serviceemployeelist.component.ts & component-demo192-serviceemployeedetails.component.ts
import { Component, OnInit } from '@angular/core';

// 3.1. import service in necessary component files - Declared as dependency
import { EmployeeService } from '../../services/employee.service';

@Component({
  selector: 'app-component-demo191-serviceemployeelist',
  templateUrl: './component-demo191-serviceemployeelist.component.html',
  styleUrls: ['./component-demo191-serviceemployeelist.component.css']
})
export class ComponentDemo191ServiceemployeelistComponent implements OnInit {
  // 3.3. define an empty local employees array which will hold employees data after service all
  public employees = [];

  // 3.2. refer to service with local variable as dependency in constructor
  constructor(private employeeService: EmployeeService) { }

  ngOnInit() {
    // 3.4. on component initialization get values from service method
    this.employees = this.employeeService.getEmployees();
  }

}
4.Add Markup and bind required data in template/view - employee-list.component.html (component-demo191-serviceemployeelist.component.html) file:
Syntax & Example:
<h2>Employee list:</h2>
<ul>
    <li *ngFor="let employee of employees">
        {{employee.id}} {{employee.name}}
    </li>
</ul>
5.Add Markup and bind required data in template/view - employee-details.component.html file: component-demo192-serviceemployeedetails.component.html
Syntax & Example:
<div>
  <h1>component-demo192-serviceemployeedetails works!</h1>

  <h2>Employee Details list:</h2>
  <ul>
    <li *ngFor="let employee of employees">
      {{employee.id}} {{employee.name}} {{employee.age}} {{employee.city}}
    </li>
  </ul>

</div>
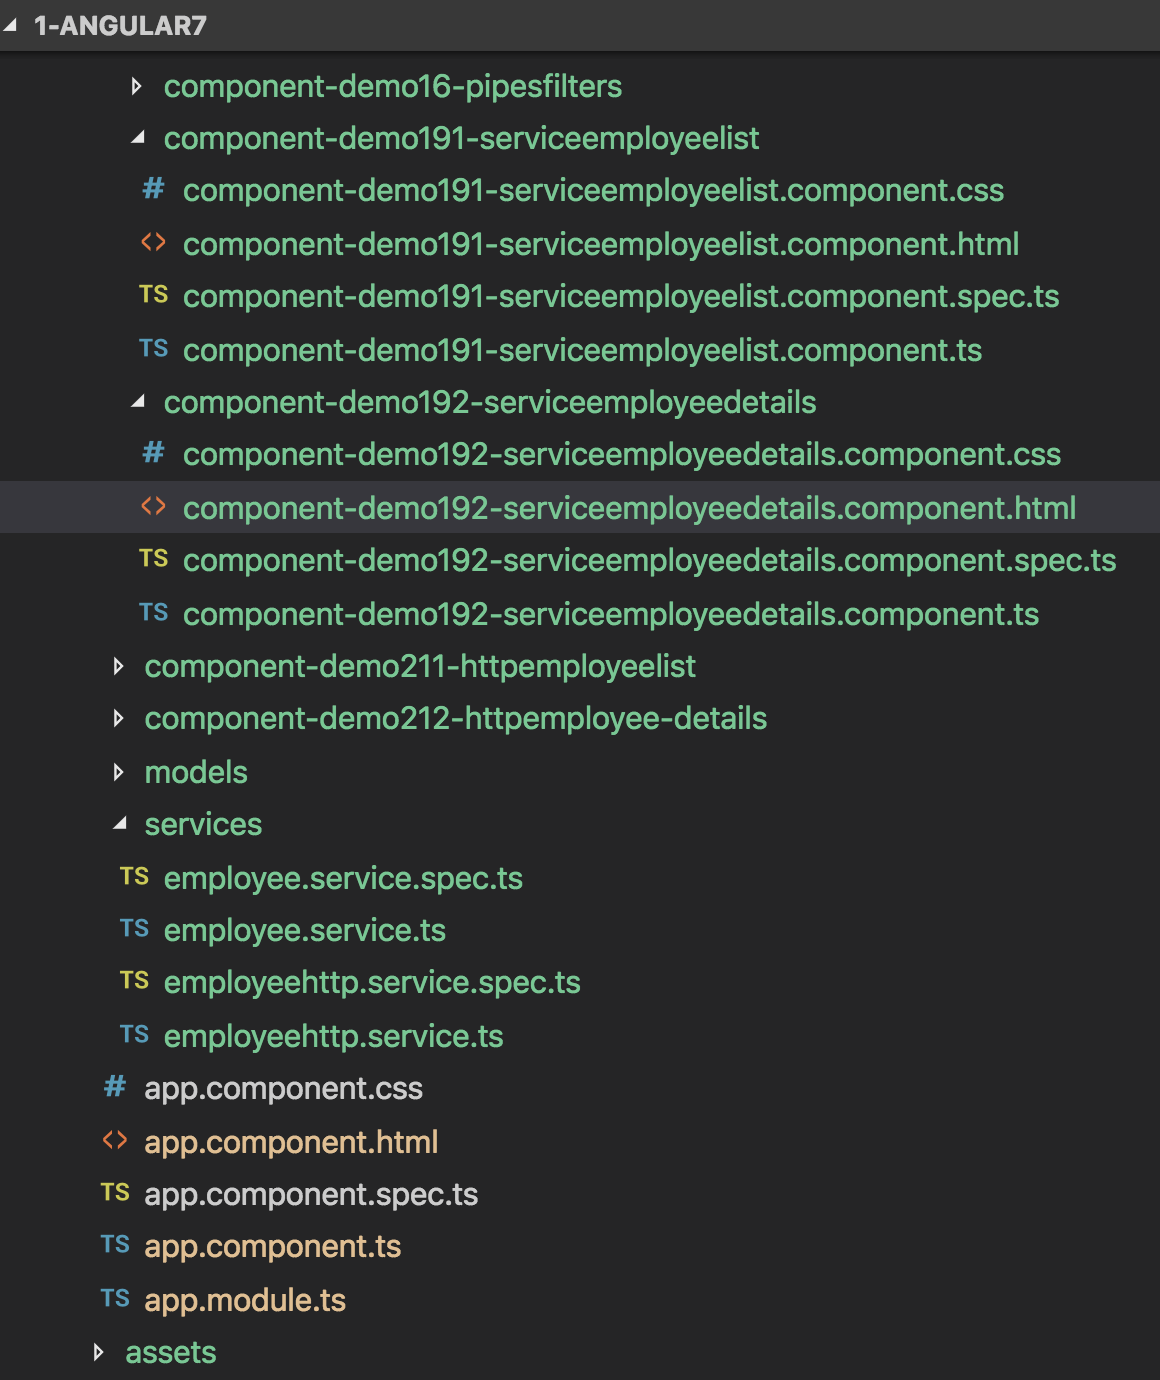
Image - Output - services and component folder structure
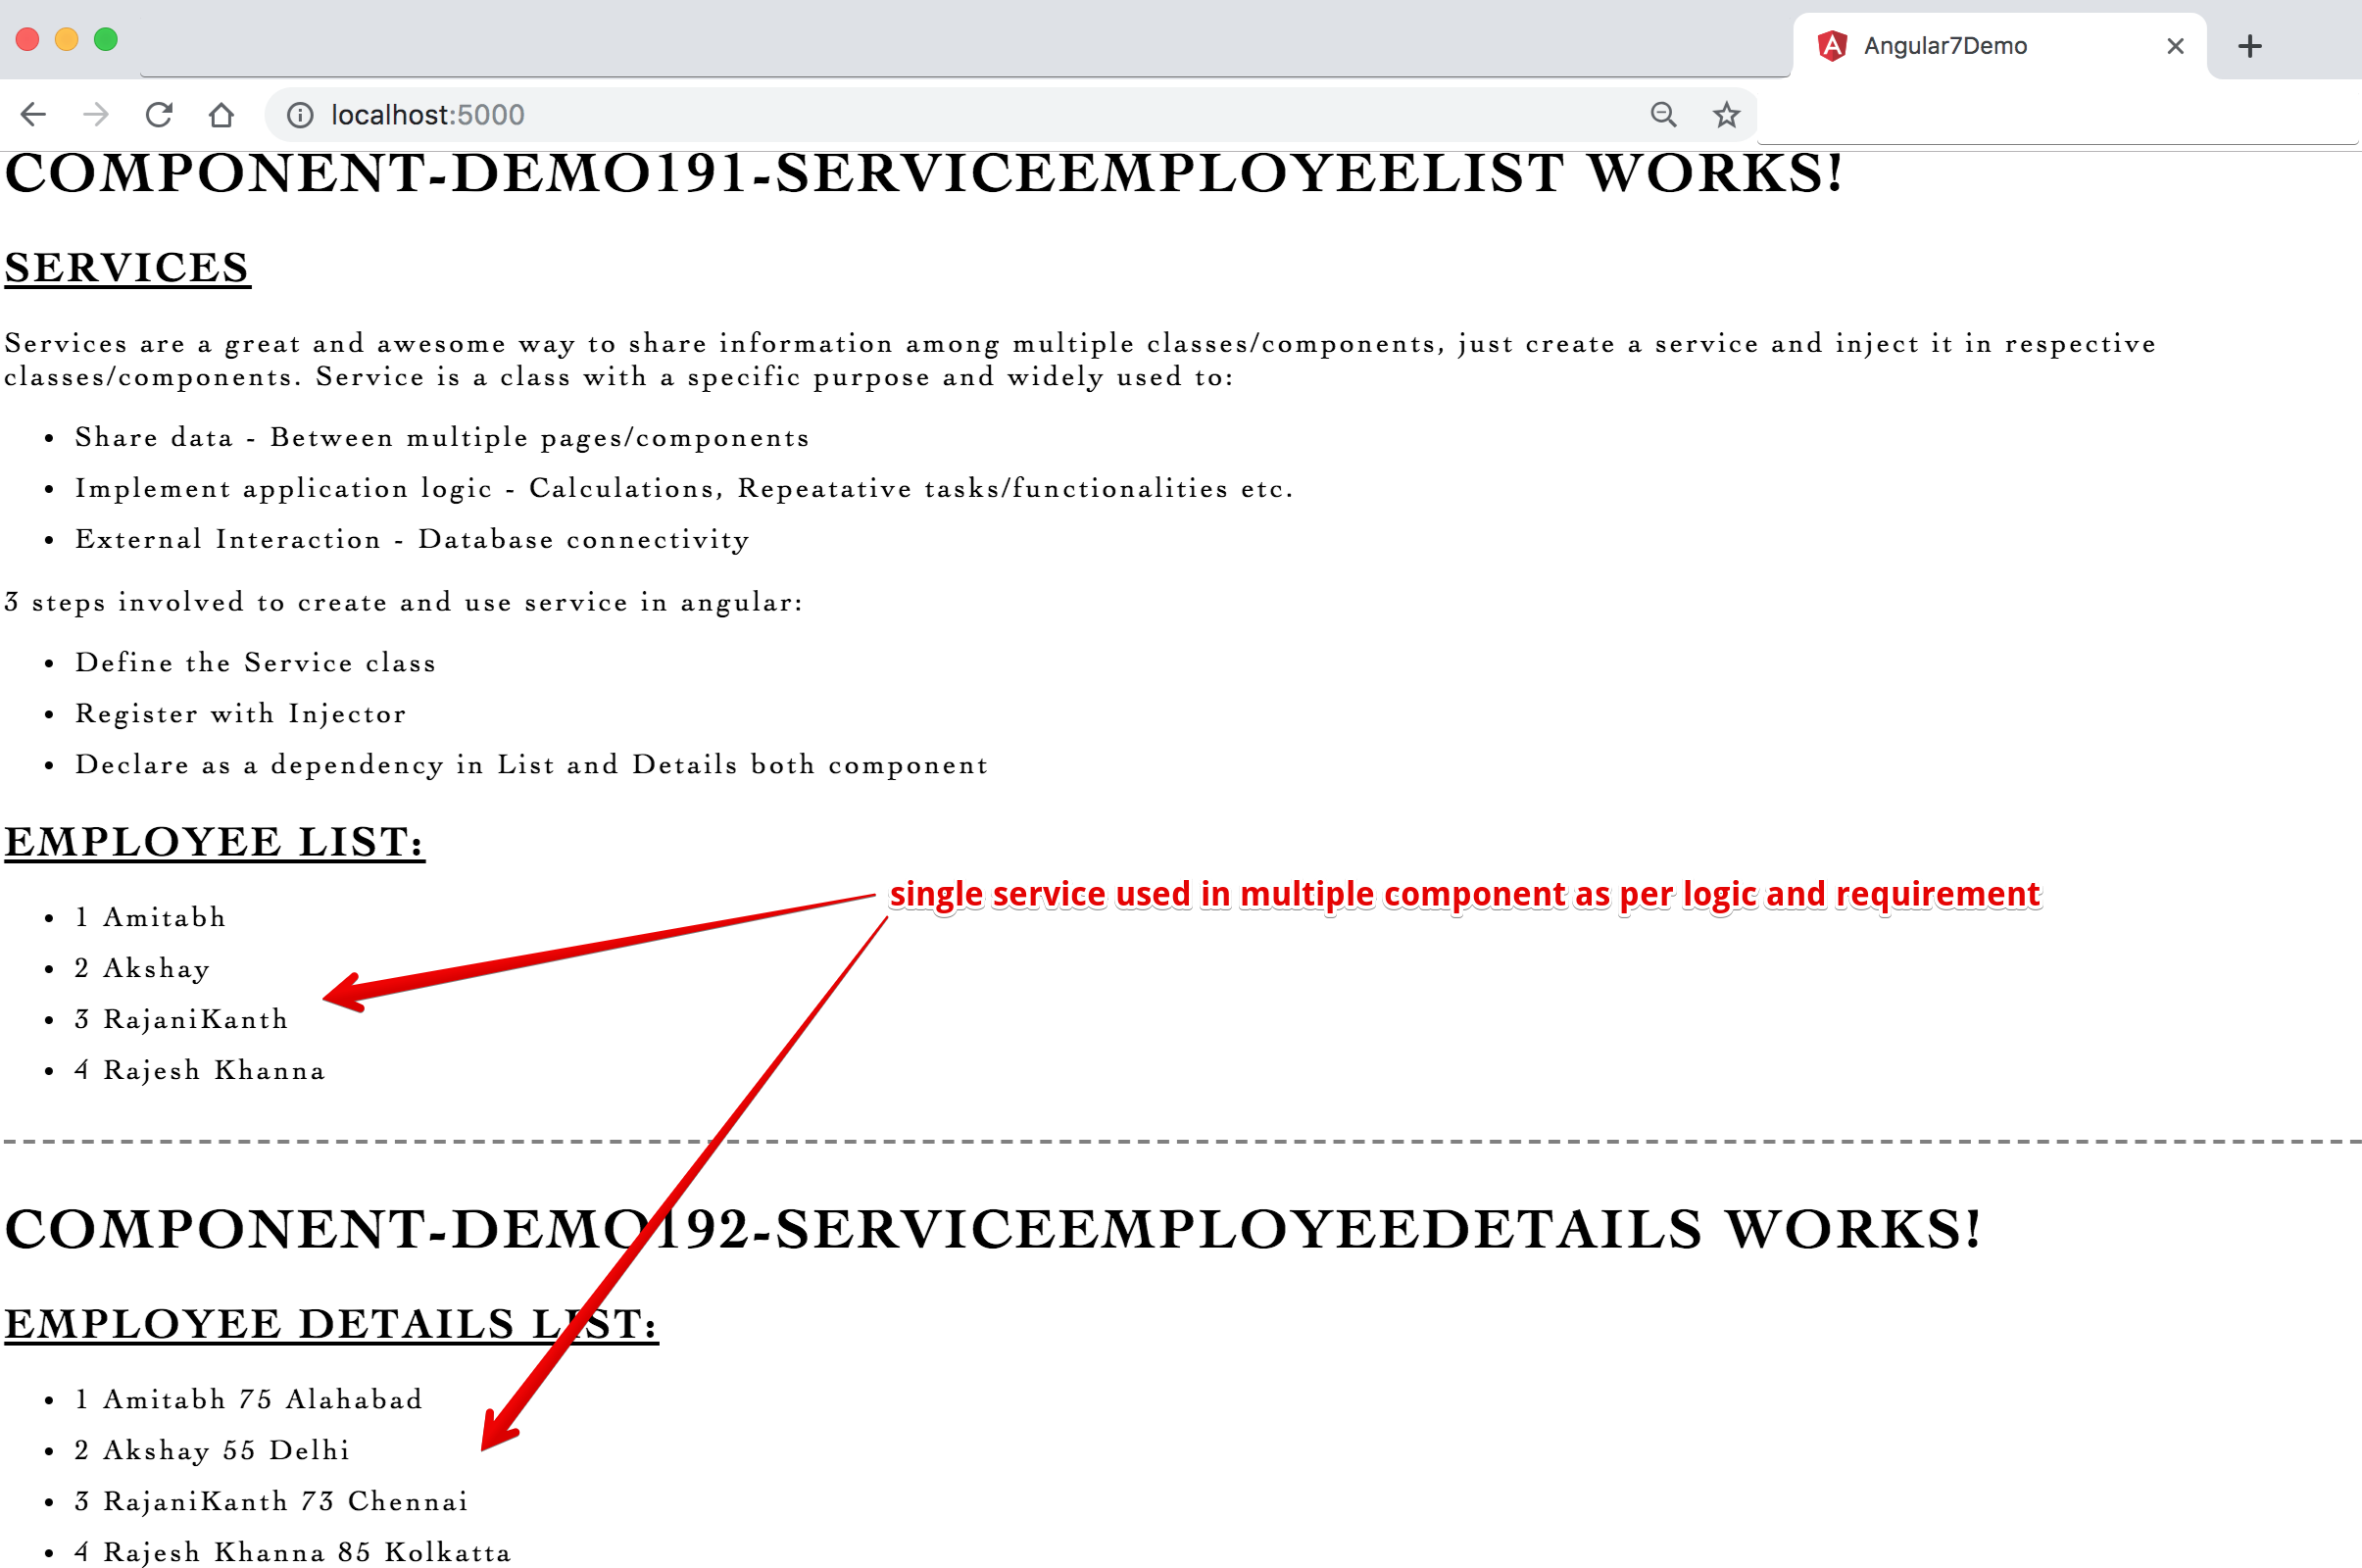
Image - Output - single service used in multiple component as per logic and requirement
- Http services are used to fetch the data from web server (instead of using hard coded data/json files)
- Send http request
- Receive and process http response
Component file calls -> Service -> Get -> HTTP -> request -> server (DB)
Component file calls <- Service (cast data) <- Observable <- HTTP <- response <- server (DB)
The response/results/returns which we get from the HTTP call is nothing but an Observables. The service needs to cast Observables into an Array/Object and then pass to the required components.
- A sequence of data/items that arrive asynchronously over time
- HTTP Call = Single item and Single item = HTTP response
- Observables are HTTP response which arrives asynchronously
- 4 steps to fetch data from HTTP & observables:
- HTTP Get request from service
- Receive the observable and cast it into an array/Object
- Subscribe to the observable from List and Details component class
- Assign the received array/Object to a local variable
- Reactive Extensions for JavaScript
- External library to work with Observables
- No-where related to ReactJS library from Facebook
- Http & HttpClientModule:
- Till Angular 4 - Http module used
- In Angular 5 - HttpClientModule used (HttpClientModule provides simplified APIs to work with http functionality)
- We know an Observables are return as result of a http call, to handle an exceptions on observables we make a use of 'catch' operator
- 4 steps to fetch data from http & observables:
- HTTP Get request from service
- Receive the observable and cast it into an array/Object
- Subscribe to the observable from List and Details component class
- Assign the received array/Object to local variable
- create a custom service to handle http data with command: ng g s employeeHttp
Syntax & Example: 1. app.module.ts
 // import HttpClientModule and add to imports array
    // 1a. import HttpClientModule
    import { HttpClientModule } from '@angular/common/http'

    // 1b. add to imports array
    imports: [
        BrowserModule,
        BrowserAnimationsModule,
        FormsModule,
        HttpClientModule
    ],

    // 1c. import custom created service Register with Injector
    import { EmployeeHttpService } from './employee-http.service';

    // import service in providers
providers: [EmployeeService, EmployeeHttpService],Syntax & Example: 2. employee-http.service.ts
import { Injectable } from '@angular/core';
import { HttpClient } from '@angular/common/http';
import { Observable } from 'rxjs';
import { IEmployee } from '../models/iemployee';

@Injectable({
  providedIn: 'root'
})
export class EmployeehttpService {
  // 2c. create json data file
  private jsonUrl:string= "/assets/data/employees.json";

  // 2a. create local variable for HttpClient as DI
  constructor(private httpClient: HttpClient) { }

  // 2b. http get
  getEmployees(): Observable<IEmployee[]> {
    return this.httpClient.get<IEmployee[]>(this.jsonUrl);
  }

}

/*
// 2a. create local variable for HttpClient as DI
    constructor(private _HttpClient:HttpClient) { }

    import { HttpClient } from '@angular/common/http';

    // 2b. in a getEmployees method make get request
    // getEmployees(){
    //   return this._HttpClient.get(_jsonUrl);
    // }

    // 2b. http get
    getEmployees():Observable<IEmployee[]>{
        return this._HttpClient.get<IEmployee[]>(this._jsonUrl);
    }

    // 2c. create json data file
    private _jsonUrl:string= "/assets/data/employees.json";

    // import model/interface file
    import { IEmployee } from './employee-model-interface';
    import { Observable } from 'rxjs/Observable';
*/
Syntax & Example: 3. ceate employees.json data file inside assets/data folder
[
    { "id": 1, "name": "Amitabh", "age": 75, "city": "Alahabad" },
    { "id": 2, "name": "Akshay", "age": 55, "city": "Delhi" },
    { "id": 3, "name": "RajaniKanth", "age": 73, "city": "Chennai" },
    { "id": 4, "name": "Rajesh Khanna", "age": 85, "city": "Kolkatta" }
]

[
    {"id":1, "name":"Ratan Tata", "age":75},
    {"id":2, "name":"Adi Godrej", "age":65},
    {"id":3, "name":"K M Birla", "age":55},
    {"id":4, "name":"Laxmi Mittal", "age":58},
    {"id":5, "name":"Chanda Kochar", "age":50},
    {"id":6, "name":"Amitabh B", "age":76}
]
Syntax & Example: 4. create IEmployee.ts an employee model/interface file to store exact data types and rules
export interface IEmployee {
    id:number;
    name:string;
    age:number
}
3.Subscribe to the observable from List and Details component class
4.Assign the received array/Object to local variable
Syntax & Example: 3. employee-http-list.component.ts
import { Component, OnInit } from '@angular/core';
import { EmployeehttpService } from '../services/employeehttp.service';

@Component({
  selector: 'app-component-demo211-httpemployeelist',
  templateUrl: './component-demo211-httpemployeelist.component.html',
  styleUrls: ['./component-demo211-httpemployeelist.component.css']
})
export class ComponentDemo211HttpemployeelistComponent implements OnInit {
  public employees = [];

  constructor(private employeehttpService: EmployeehttpService) { }

  ngOnInit() {
    // on component initialization get value from http subscribe
    // data =>: argument of the function
    // this.employees = data: body of the function
    // subscribe: to receive data
    this.employeehttpService.getEmployees().subscribe(data => this.employees = data)
  }

}
Syntax & Example: component-demo211-httpemployeelist.component.html
<div>
  <h1>component-demo211-httpemployeelist works!</h1>

  <h2>HTTP Services and Observables</h2>

  <h2>Employee HTTP Observables list:</h2>
  <ul>
    <li *ngFor="let employee of employees">
      {{employee.id}} {{employee.name}}
    </li>
  </ul>

</div>
Syntax & Example: component-demo212-httpemployee-details.component.html
<div>
  <h1>component-demo212-httpemployee-details works!</h1>

  <h2>Employee HTTP Observables Details list:</h2>
  <ul>
    <li *ngFor="let employee of employees">
      {{employee.id}} {{employee.name}} {{employee.age}} {{employee.city}}
    </li>
  </ul>

</div>
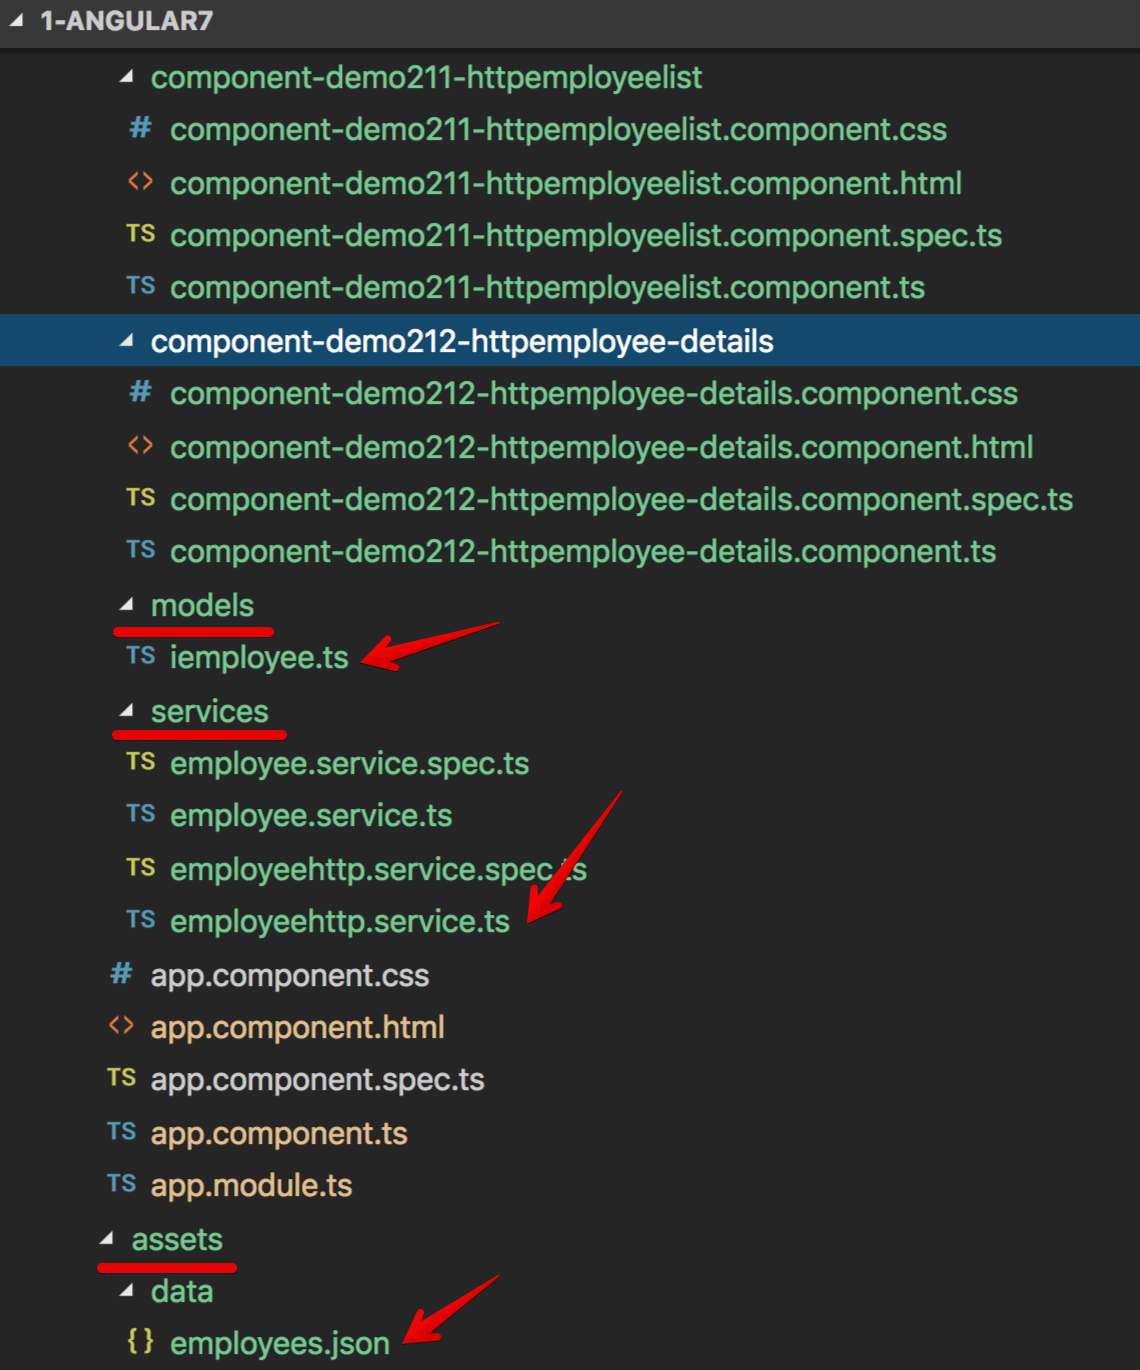
Image - Output - http-observables services and component folder structure
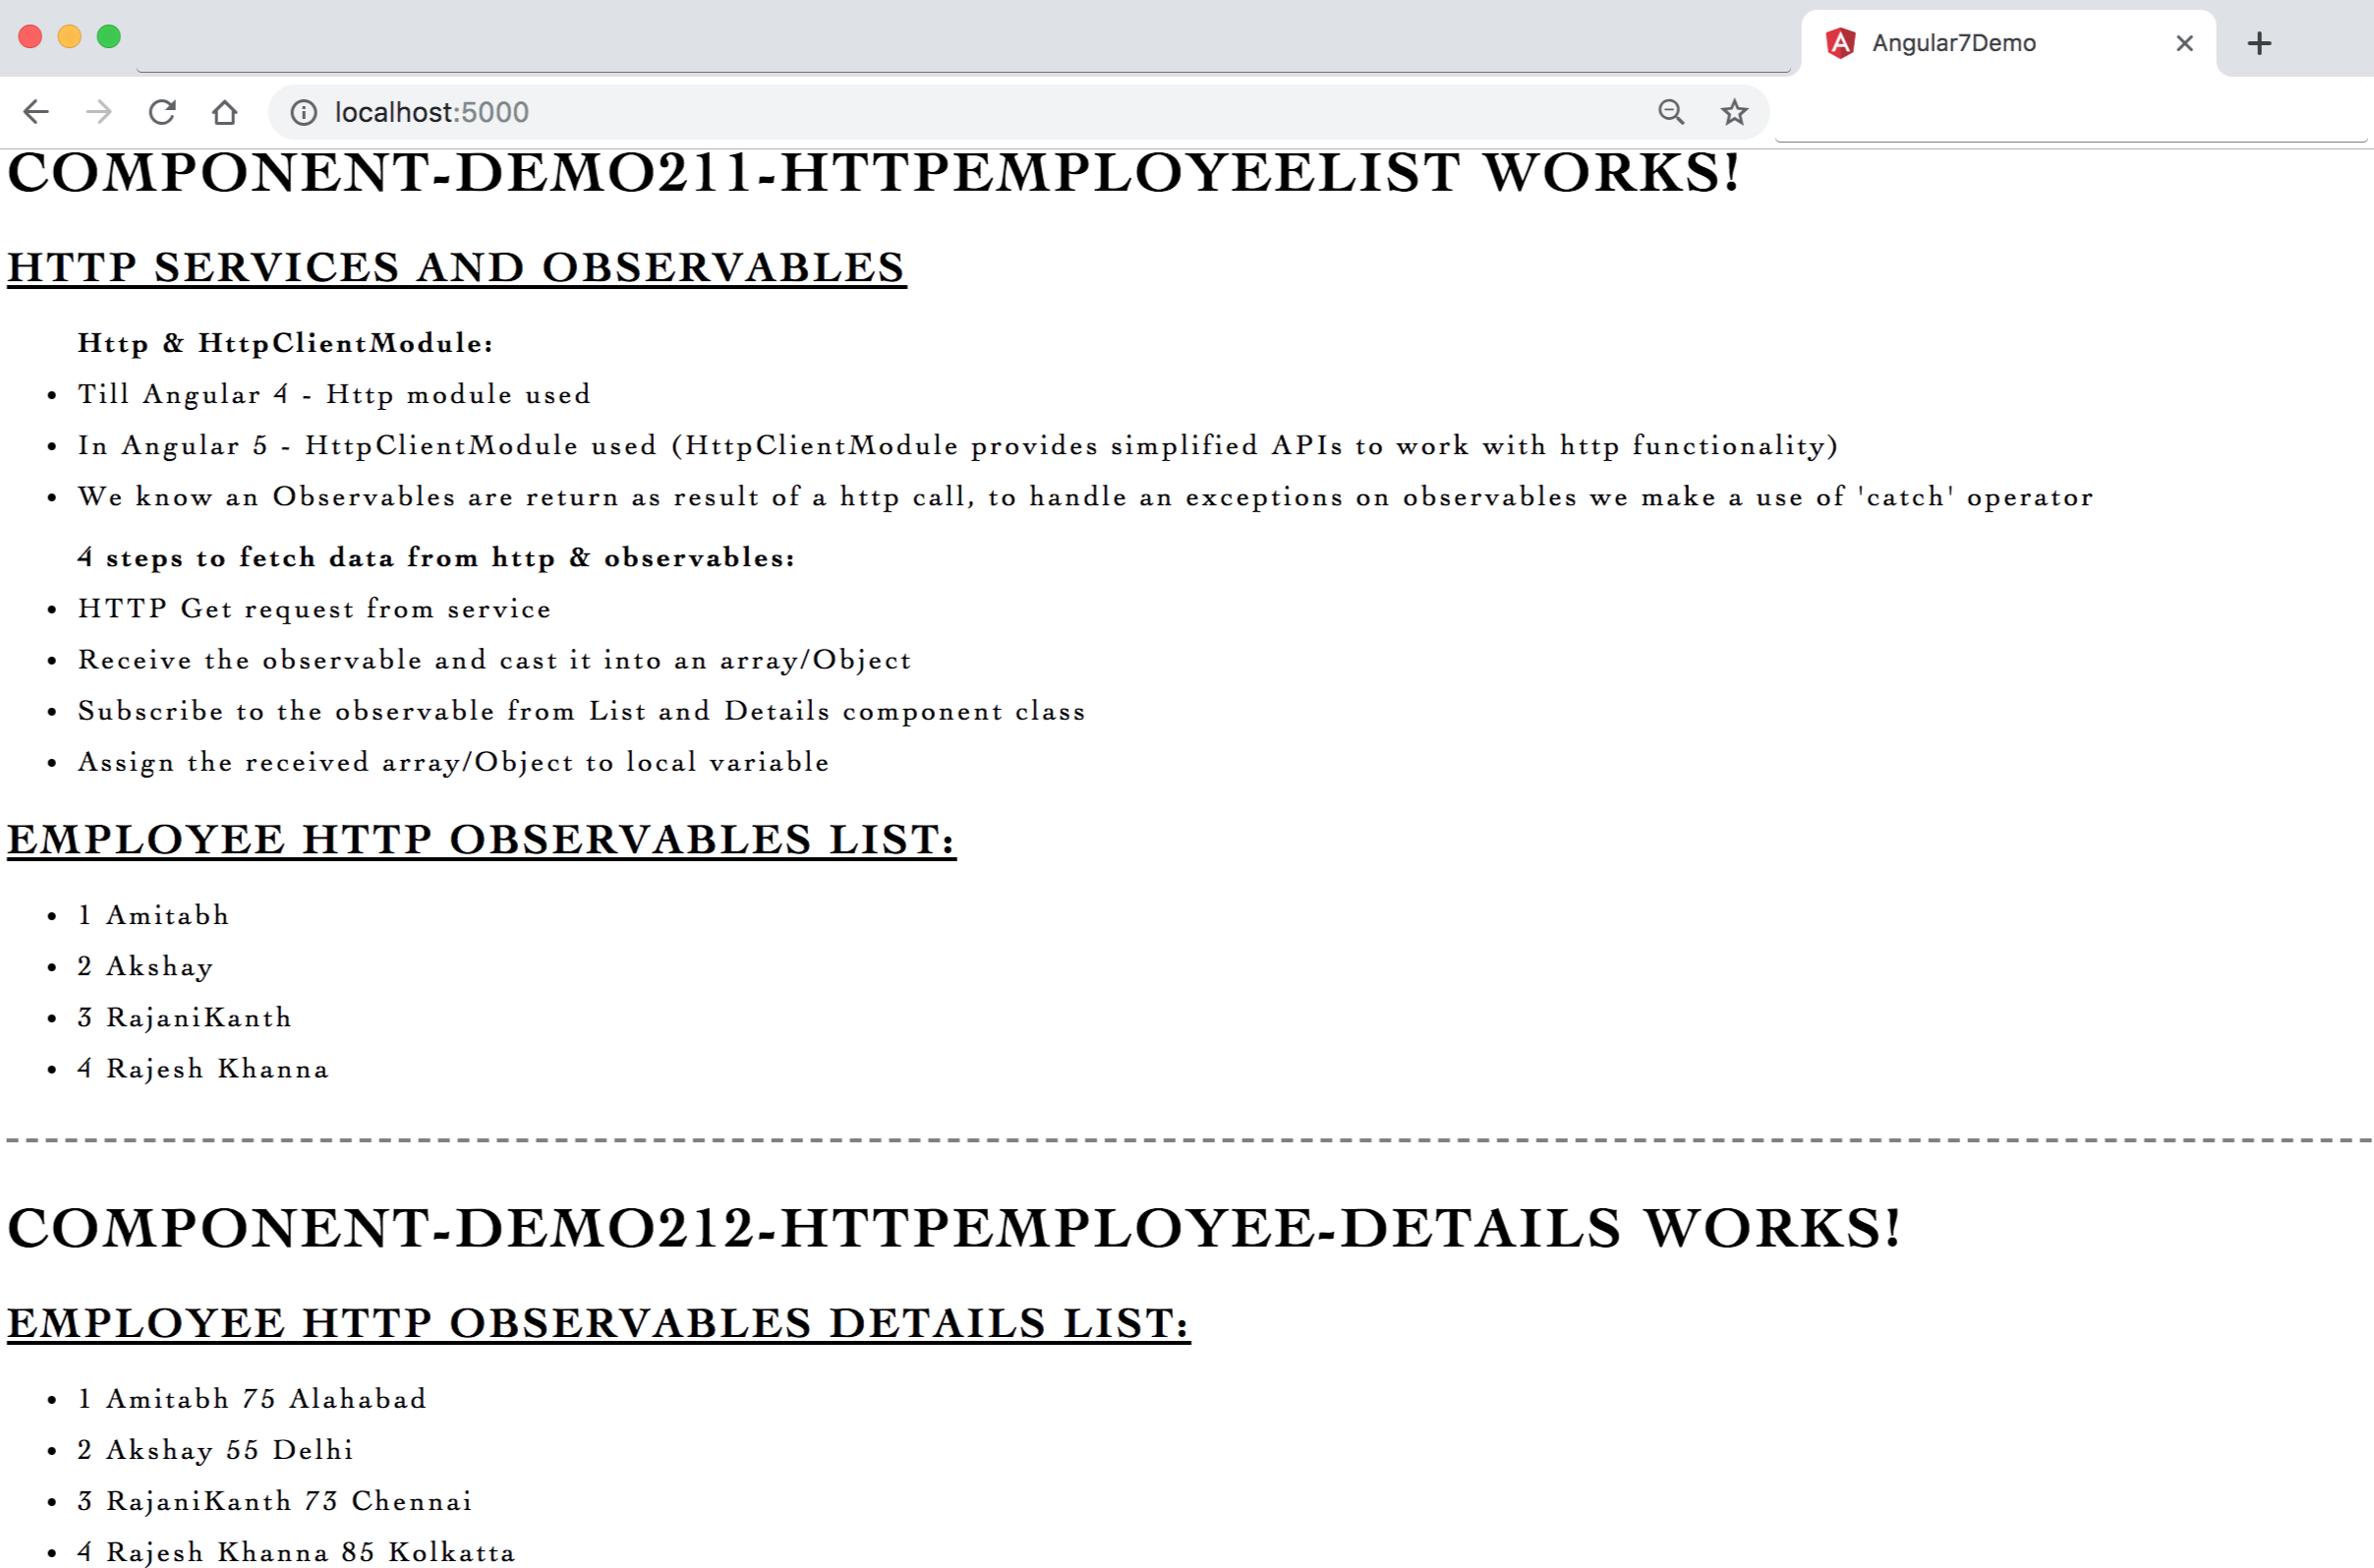
Image - Output - http-observables
- We know that Directives are an
instructions in the DOM, they specify how to place your components and business logic in the Angular - There are many inbuilt structural directives like
ngIf,ngSwitchandngForused widely in angular - We can also create custom directives to implement some common logic/functionality (not existing) as a class
declared as @directive
- The command to create directive:
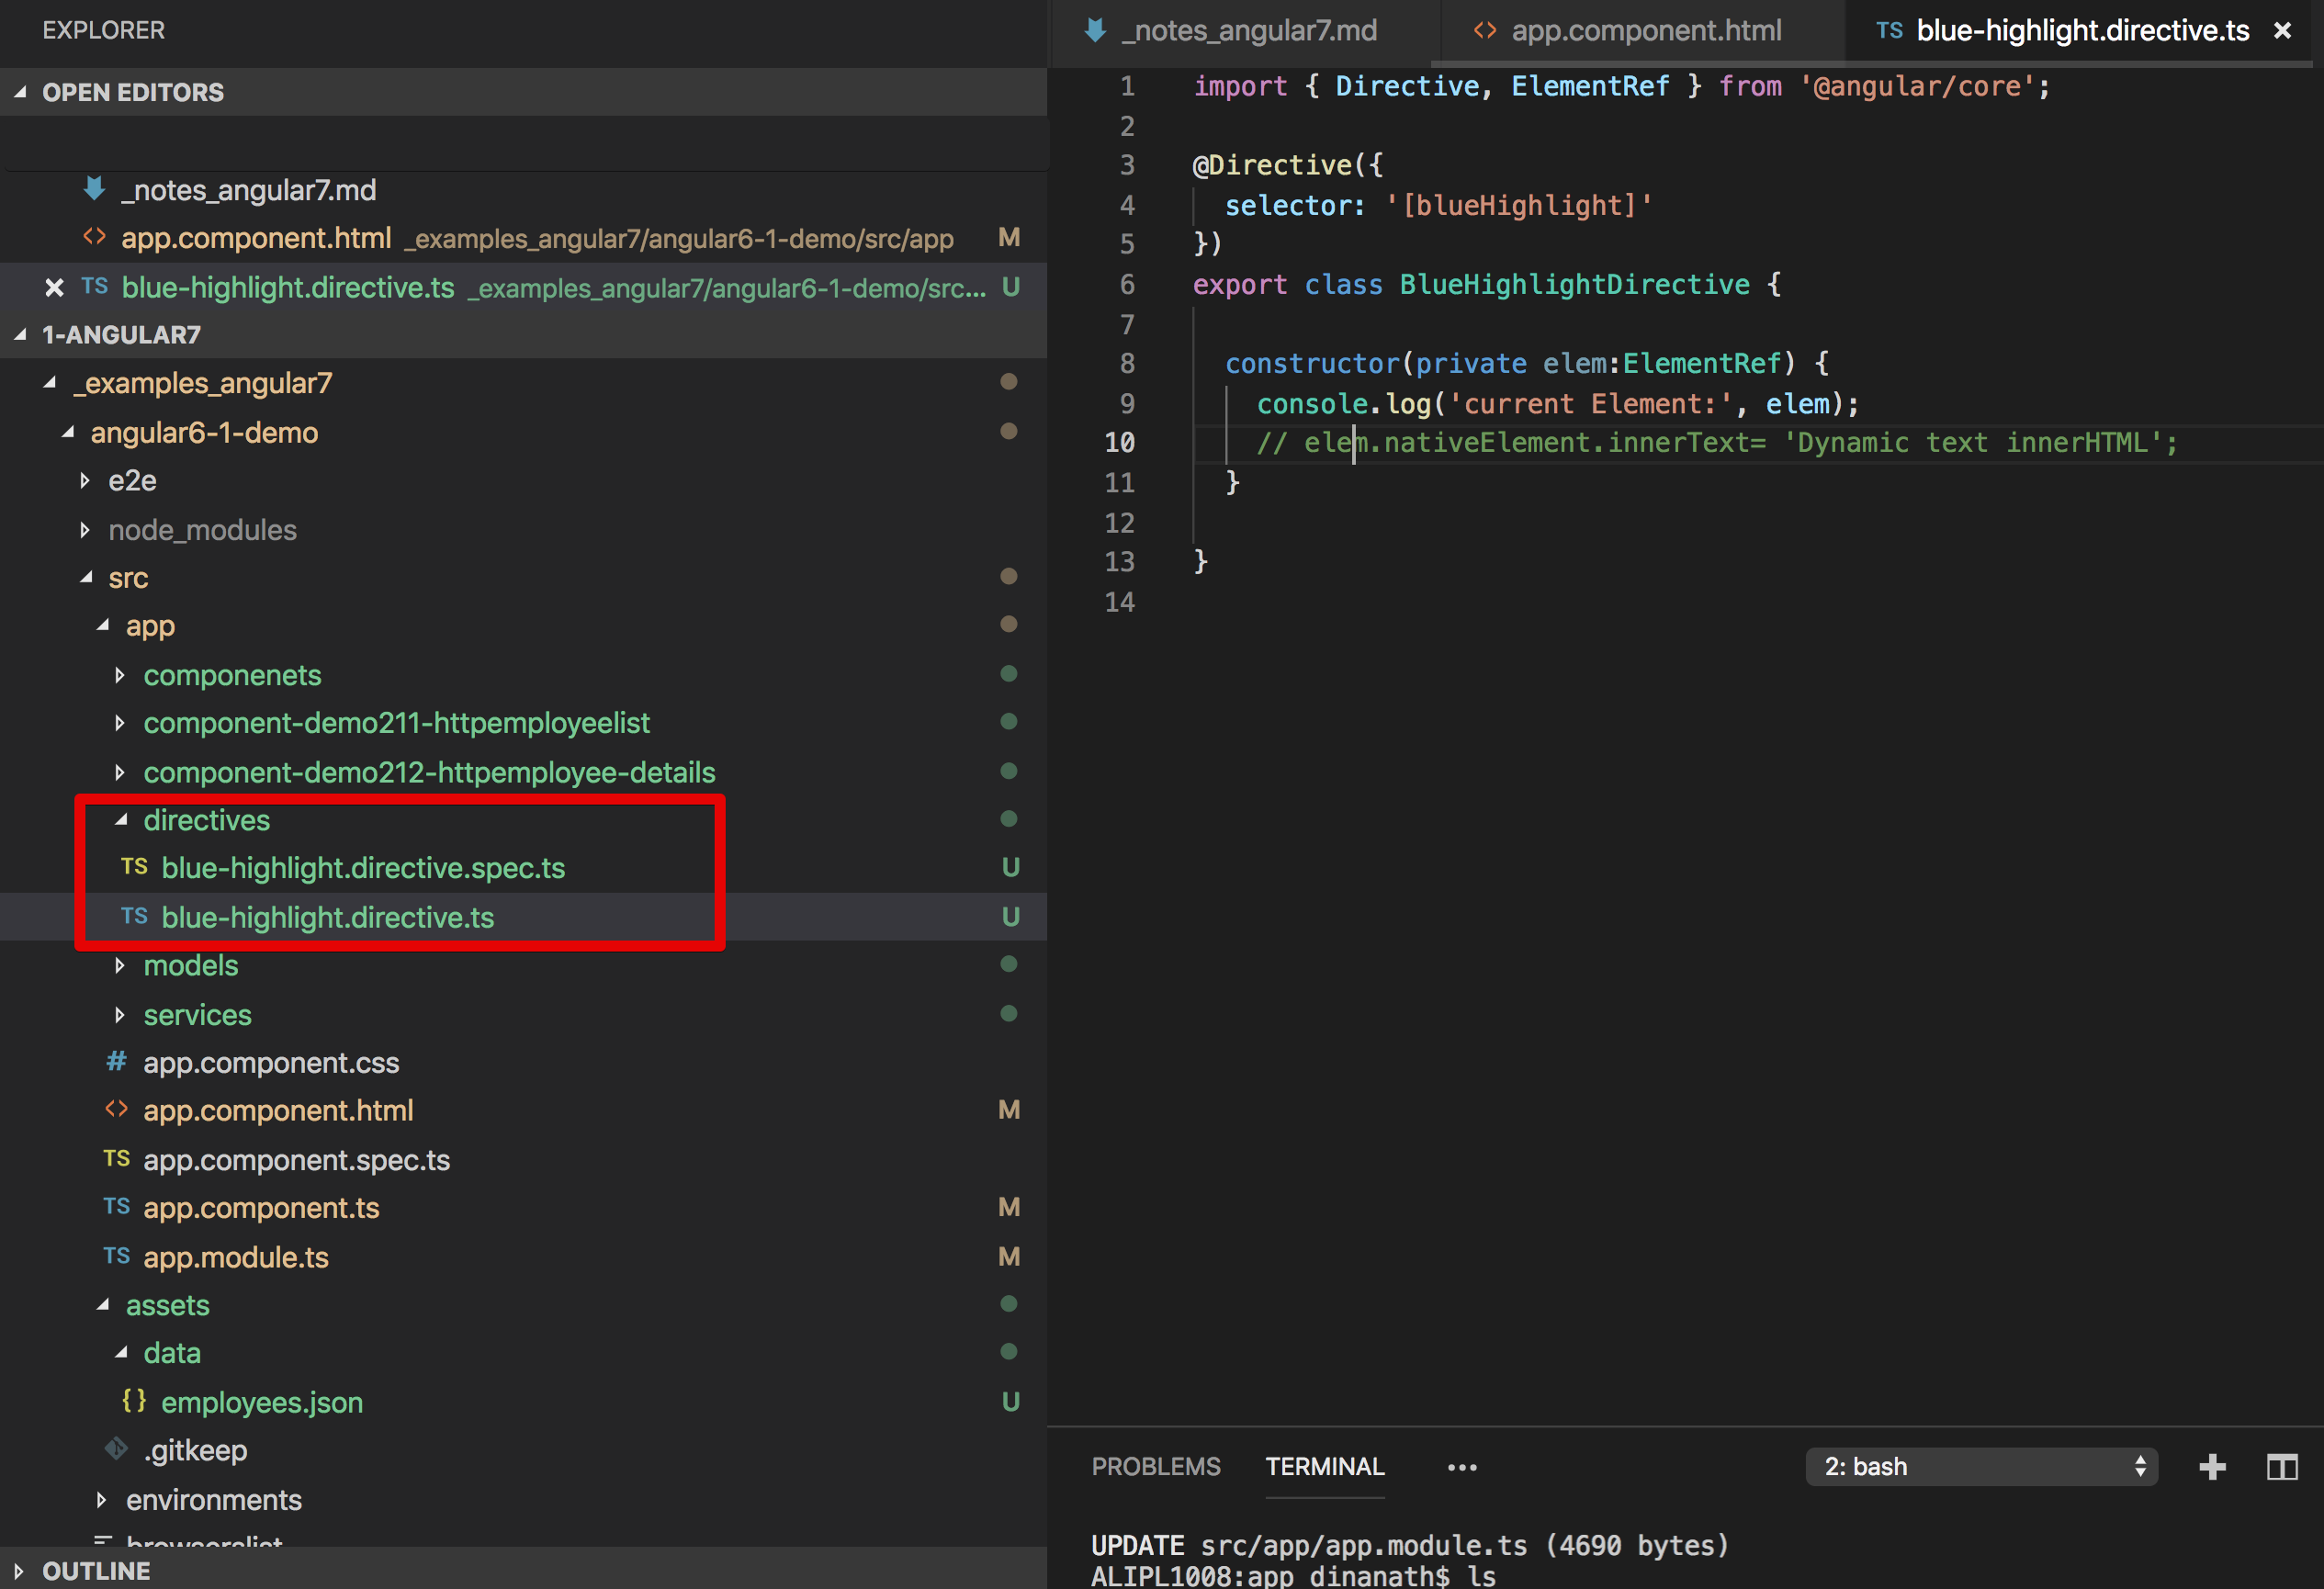
ng generate directive nameORng g directive name.- In the current app, we want to create all custom directives under
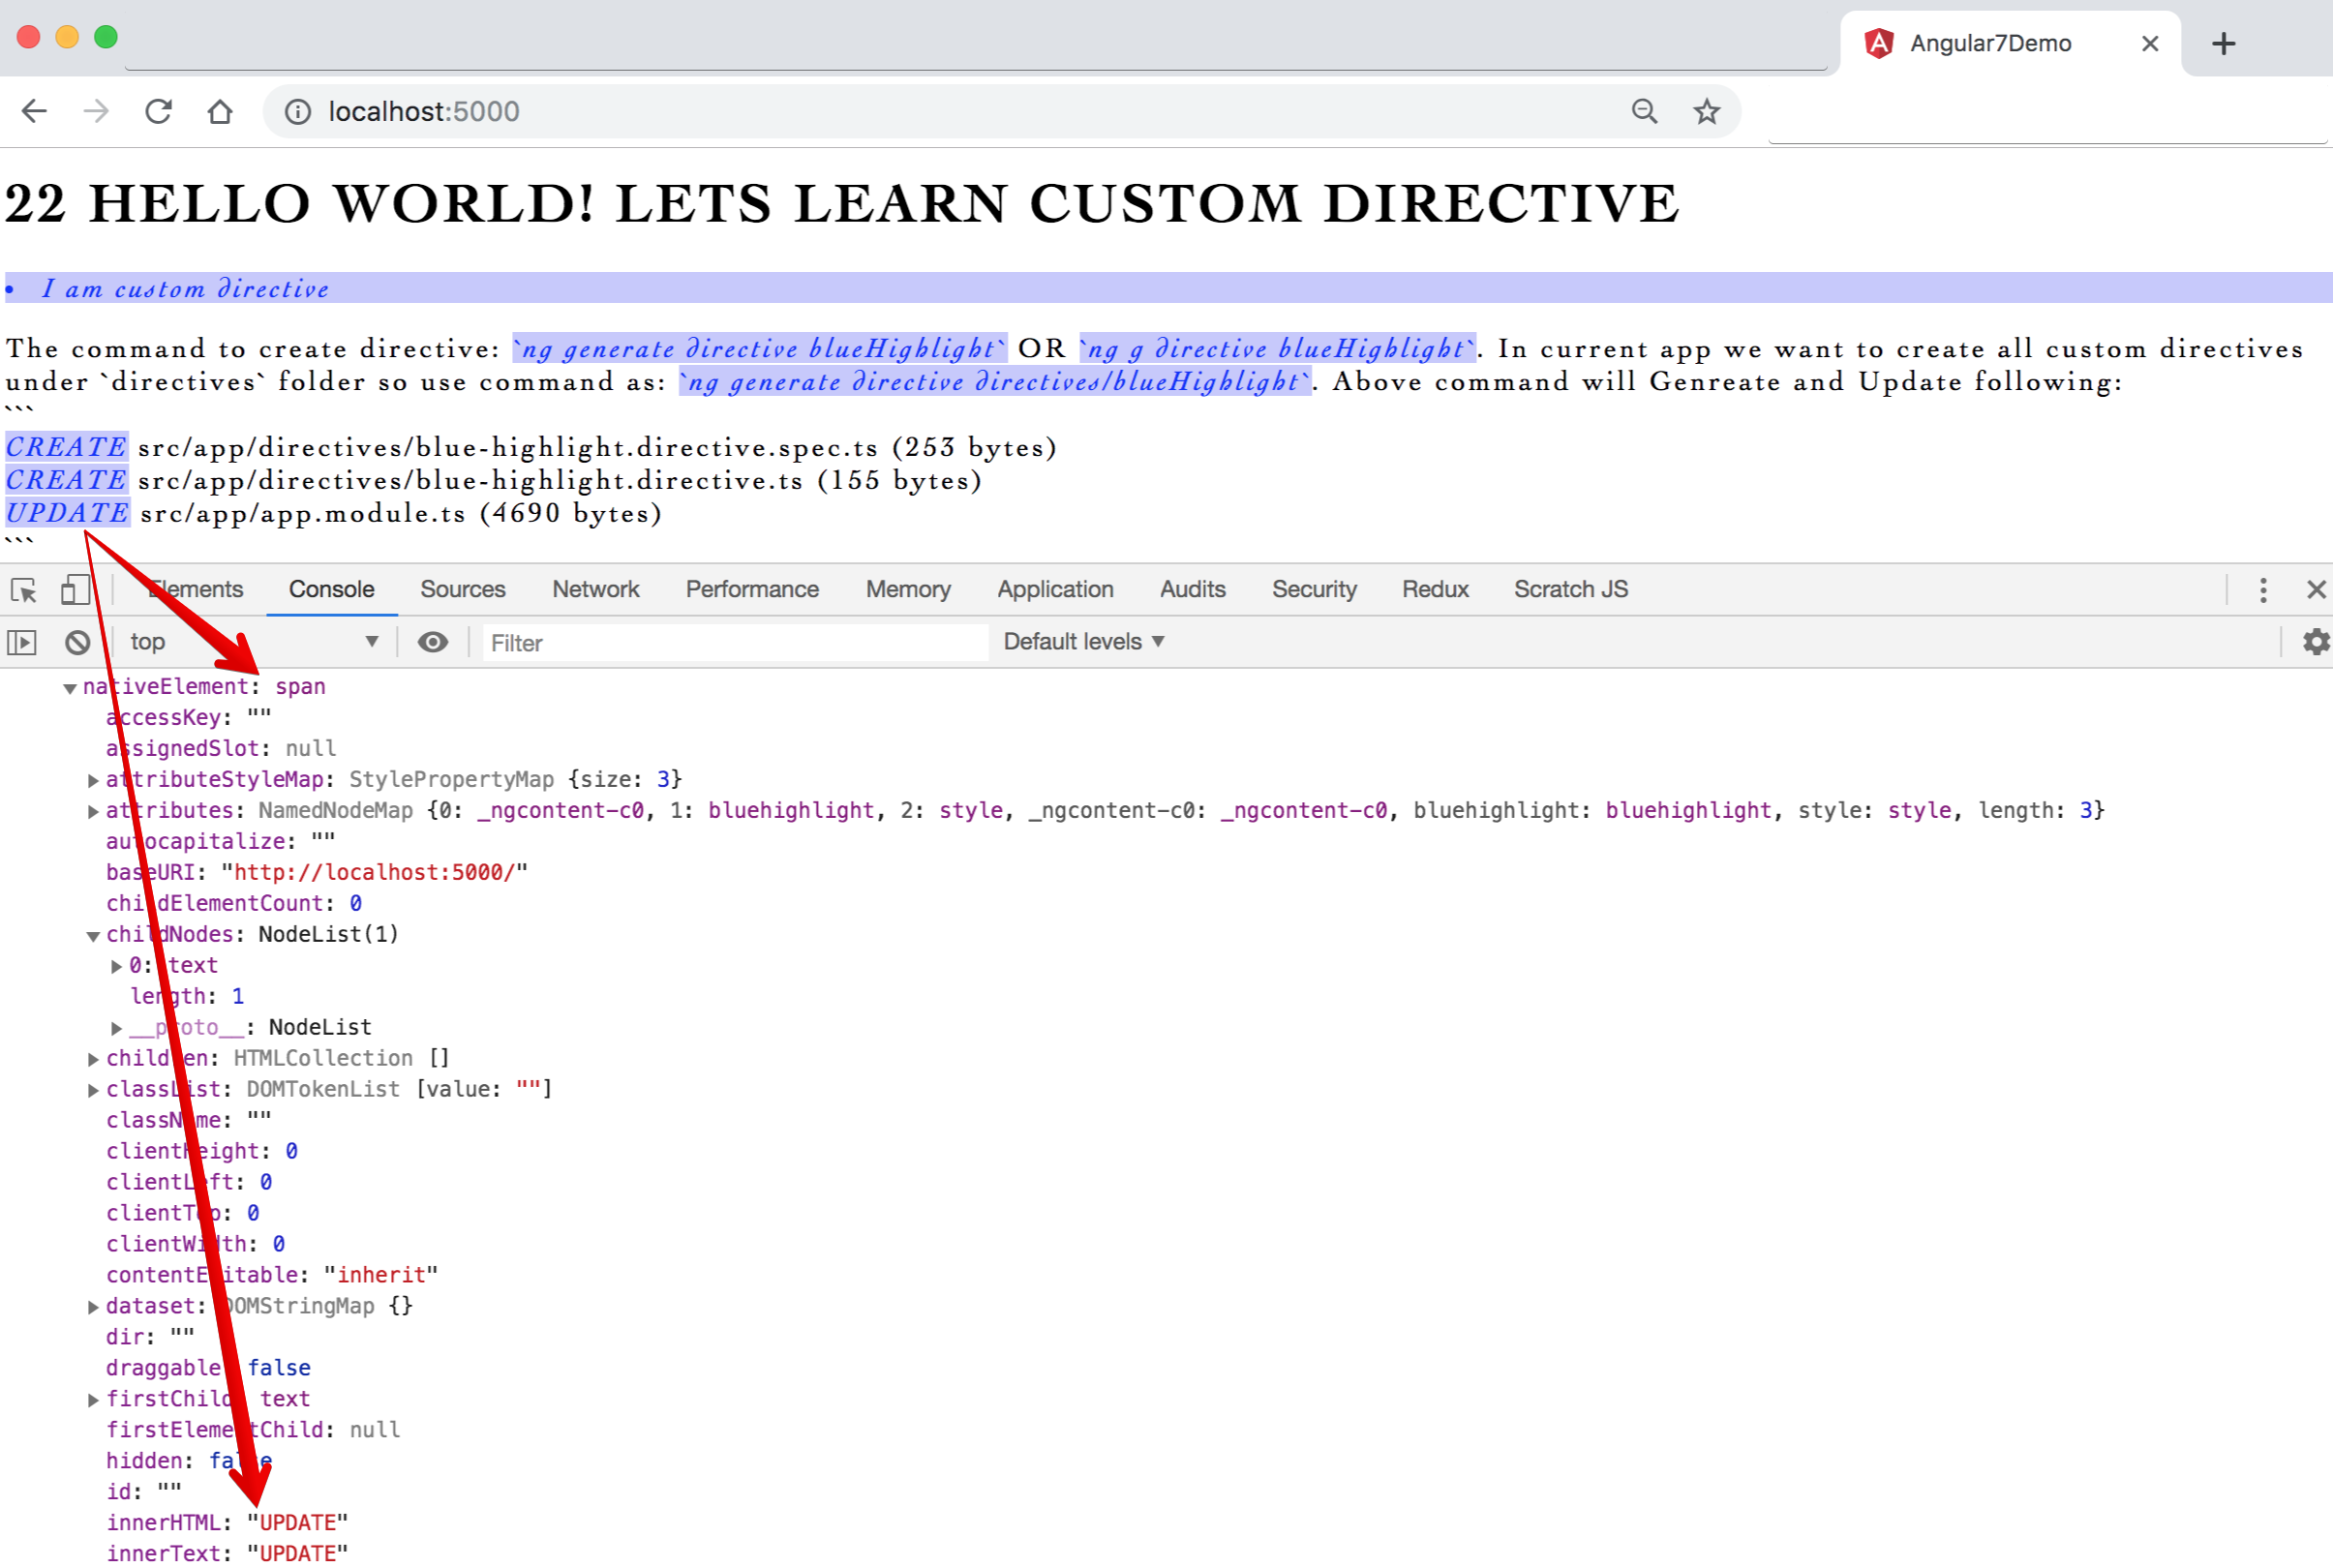
directivesfolder so use command as:ng generate directive directives/blueHighlight - The above command will generate and update the following:
- In the current app, we want to create all custom directives under
    CREATE src/app/directives/blue-highlight.directive.spec.ts (253 bytes)
    CREATE src/app/directives/blue-highlight.directive.ts (155 bytes)
    UPDATE src/app/app.module.ts (4690 bytes)
Syntax & Example: app.module.ts will be updated automatically with new directive entry
// 22. directives - import custom created directives
import { BlueHighlightDirective } from './directives/blue-highlight.directive';

declarations: [
    BlueHighlightDirective
],-
Once directive created, in
blue-highlight.directive.tsassign/change selector name fromappBlueHighlightto"blueHighlight"or so.- Open any component html file and use
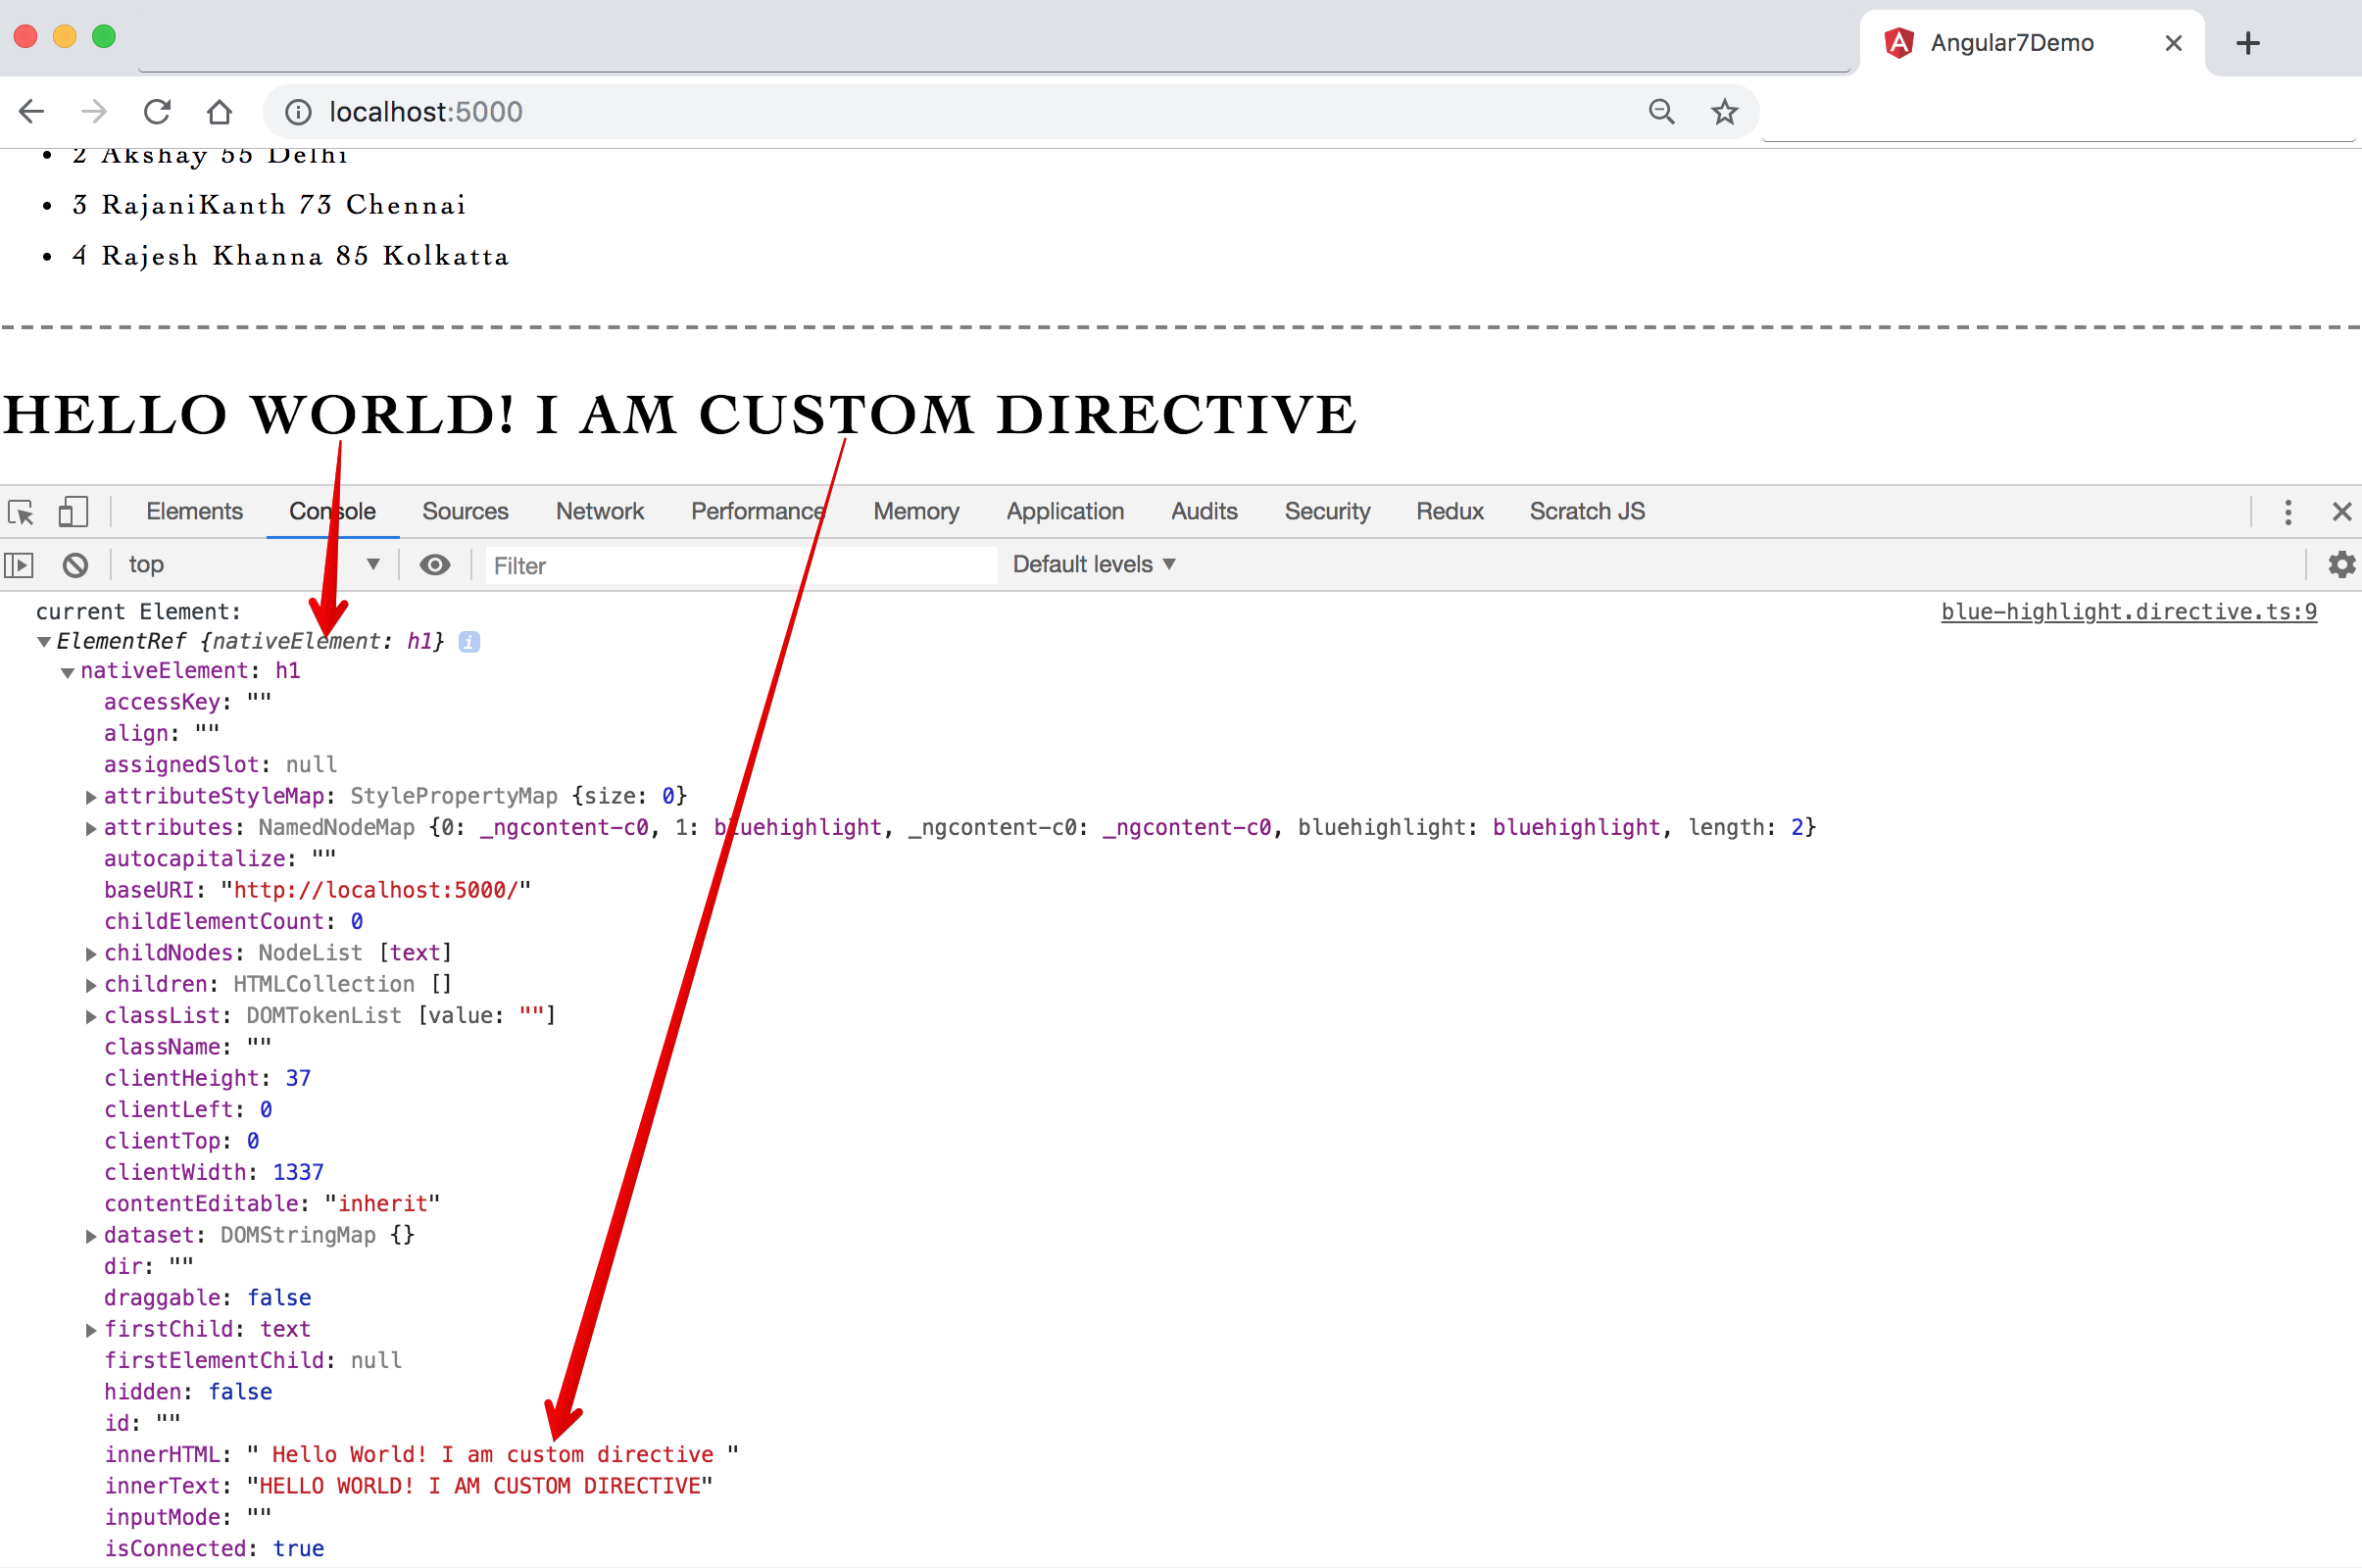
"blueHighlight"directive as a attribute (i am trying in app.component.html):<h1 blueHighlight> Hello World! I am custom directive </h1> - To target, get or capture the current html element we can import and use
ElementRefandnativeElementutilities
- Open any component html file and use
-
Directives called before the element is rendered so it's advisable to perform all content related actions inside
ngOnInit()life cycle hook
Syntax & Example: blue-highlight.directive.ts
import { Directive, ElementRef } from '@angular/core';

@Directive({
  selector: '[blueHighlight]'
})
export class BlueHighlightDirective {

  constructor(private elem:ElementRef) {
    console.log('current Element:', elem);
    // elem.nativeElement.innerText= 'Dynamic text innerHTML';
    elem.nativeElement.style.color = `#0000ff`;
    elem.nativeElement.style.fontStyle = 'italic';
    elem.nativeElement.style.backgroundColor   = '#c7c7ff';
  }

}
Syntax & Example: app.component.html
<!-- custom directive  -->
<h1> 22 Hello World! Lets learn custom directive </h1>

<li blueHighlight> I am custom directive </li>

<p>The command to create directive: <span blueHighlight>`ng generate directive blueHighlight`</span> OR <span blueHighlight>`ng g directive blueHighlight`</span>. In current app we want to create all custom directives under `directives` folder so use command as: <span blueHighlight>`ng generate directive directives/blueHighlight`</span>. Above command will Genreate and Update following: <br/>
<br/>
<span blueHighlight>CREATE</span> src/app/directives/blue-highlight.directive.spec.ts (253 bytes) <br/>
<span blueHighlight>CREATE</span> src/app/directives/blue-highlight.directive.ts (155 bytes) <br/>
<span blueHighlight>UPDATE</span> src/app/app.module.ts (4690 bytes) <br/>
</p>
Image - Output - custom-directives folder structure
Image - Output - custom-directives elementref nativelement
Image - Output - custom-directives elementref nativelement style
- In Angular, the
@HostListener() function decoratorallows you to handle events of the host element in the directive class @HostListener Decoratordeclares a DOM event to listen for, and provides a handler method to run when that event occurs- Basic syntax of @Hostlistener is:
@Hostlistener('eventName',[args])OR@Hostlistener('target:EVENT',[args])- eventName: The CSS event to listen for
- args: A set of arguments to pass to the handler method when the event occurs
- The command to create directive:
ng generate directive nameORng g directive name.- In the current app, we want to create all custom directives under
directivesfolder so use command as:ng generate directive directives/highlightClick - The above command will generate and update the following:
- In the current app, we want to create all custom directives under
    CREATE src/app/directives/highlight-cilck.directive.spec.ts (257 bytes)
    CREATE src/app/directives/highlight-cilck.directive.ts (157 bytes)
    UPDATE src/app/app.module.ts (4855 bytes)
Syntax & Example: app.module.ts will be updated automatically with new directive entry
/// 23. directives - import custom created directives
import { HighlightCilckDirective } from './directives/highlight-cilck.directive';

declarations: [
    HighlightCilckDirective
],- Once directive created, in
highlight-cilck.directive.tsassign/change selector name fromappHighlightCilckto"highlightCilck"or so.- Open any component html file and use
"highlightCilck"directive as a attribute (i am trying in app.component.html):<h1 highlightCilck> Hello World! I am custom directive with Click</h1> - To target, get or capture the current html element we can import and use
ElementRefandnativeElementwith@HostListenerutilities
- Open any component html file and use
Syntax & Example: blue-highlight.directive.ts
import { Directive, ElementRef, HostListener } from '@angular/core';

@Directive({
  selector: '[highlightCilck]'
})
export class HighlightCilckDirective {

  constructor(private elem: ElementRef) {
    console.log('current Element:', elem);
    // elem.nativeElement.innerText= 'Dynamic text innerHTML';
    elem.nativeElement.style.color = `#ff0000`;
    elem.nativeElement.style.backgroundColor = '#ffd5d5';
    elem.nativeElement.style.cursor = 'pointer';
  }

  // element click event - @Hostlistener('eventName',[args])
  @HostListener('click') showAlert() {
    window.alert('Custom Directive - @HostListener events!');
  }

  // use global objects like document/window click - @Hostlistener('target:EVENT',[args])
  // @HostListener('document:click', ['$event'])
  // showElementClicked(elem) {
  //   window.alert('Document Clicked');
  // }
}
Syntax & Example: app.component.html
<!-- custom directive with @HostListener -->
  <h1> 23 Hello World! Lets learn custom directive with click </h1>

  <li highlightCilck> I am custom directive </li>

  <p>The command to create directive: <span highlightCilck>`ng generate directive highlightCilck`</span> OR <span highlightCilck>`ng g directive highlightCilck`</span>. In current app we want to create all custom directives under `directives` folder so use command as: <span highlightCilck>`ng generate directive directives/highlightCilck`</span>. Above command will Genreate and Update following: <br/>
  <br/>
    <span highlightCilck>CREATE</span> src/app/directives/blue-highlight.directive.spec.ts (253 bytes) <br/>
    <span highlightCilck>CREATE</span> src/app/directives/blue-highlight.directive.ts (155 bytes) <br/>
    <span highlightCilck>UPDATE</span> src/app/app.module.ts (4690 bytes) <br/>
  </p>
Image - Output - custom-directives events @hostlistener
- We learnt that Pipes (Filters) helps to
transform data before displaying to view,format the data - There are many inbuilt pipes like
uppercase,number,currencyanddateused widely in angular to transform data - We can also create custom pipes as per our requirements with
Pipe, PipeTransform class & transform method
- Inside
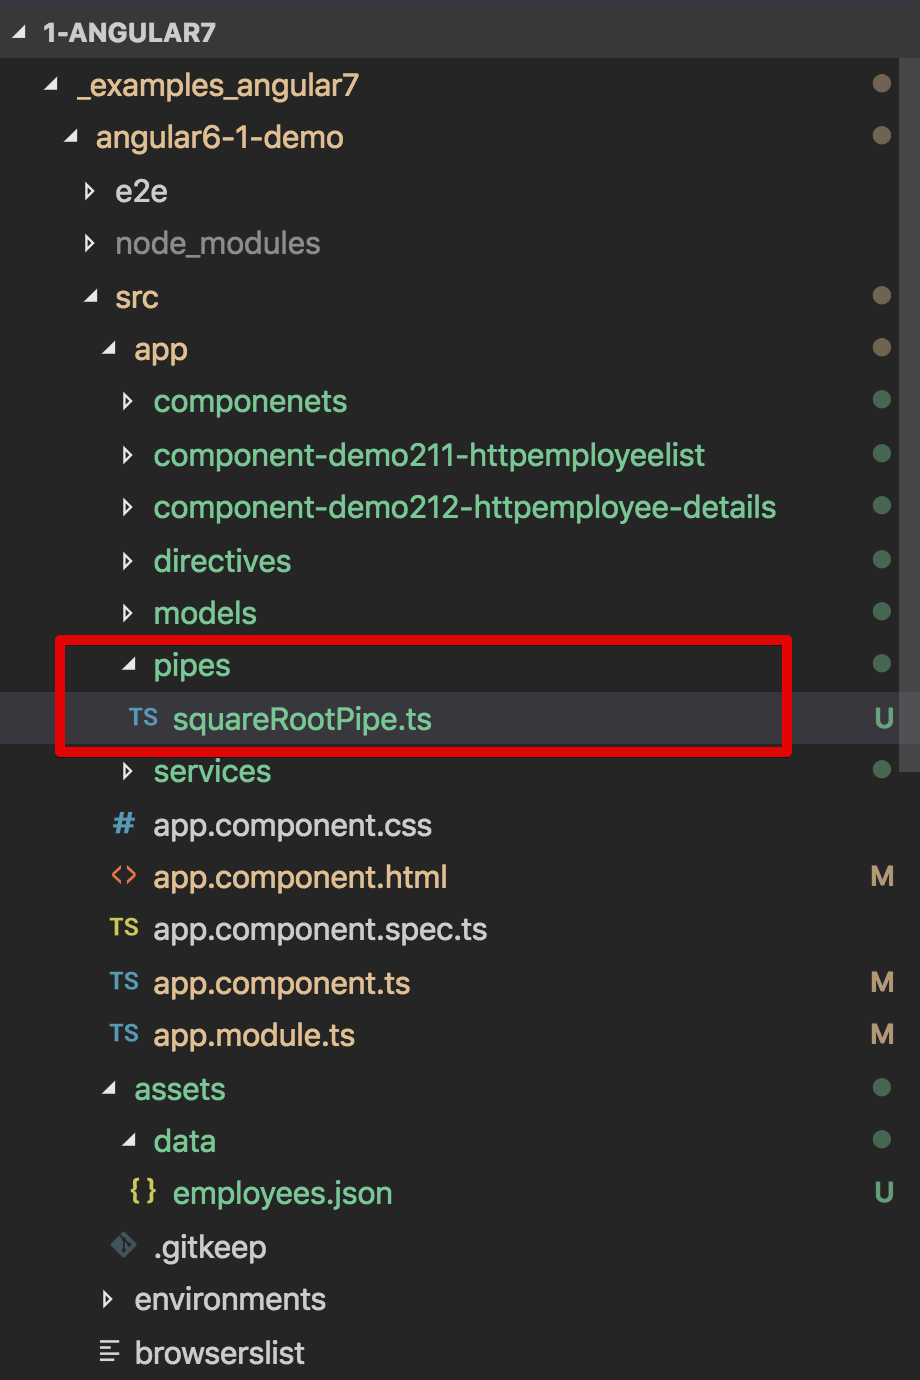
app/pipesfolder create a new .ts file namedsquareRootPipe.ts - In
squareRootPipe.tsto create a custom pipe we need to importPipe, PipeTransform class from @angular/core and also use transform method - Also in the
@Pipe directivewe have to give the name to the current pipe, which will be used in the .html file, likename: 'squareRootPipe' - In
app.module.tsfile import and add in declarationssquareRootPipe.tsas it's created manually
- To create a pipe using angular CLI:
syntax: ng generate pipe pipeName OR ng generate pipe path/pipeNamecommand: ng generate pipe pipes/reversText
- The above command will generate pipe
reversTextPipe.tswith@Pipedecorator, implementsPipeTransformand also update the src/app/app.module.ts with necessary imports entries
Syntax & Example: squareRootPipe.ts
import { Pipe, PipeTransform } from '@angular/core';

@Pipe({
  name: 'squareRootPipe'
})

export class SquareRootPipe implements PipeTransform {
  transform(curValue: number): number {
    return Math.sqrt(curValue);
  }

}
Syntax & Example: app.module.ts
// 24. pipes - import custom created pipes
import { SquareRootPipe } from './pipes/squareRootPipe';

declarations: [
    SquareRootPipe
],
Syntax & Example: app.component.html
<!-- custom pipe  -->
<h1> 24 Lets learn custom pipe to format/transform data </h1>

<ul>
    <li>Square Root of 81 is: {{ 81 | squareRootPipe }}</li>
    <li>Square Root of 100 is: {{ 100 | squareRootPipe }}</li>
</ul>
Image - Output - custom-pipes-filters folder structure
Image - Output - custom-pipes, filters with pipe & pipeTransform
![Output - Property binding with {{}}, [ ] and bind- Output - Property binding with {{}}, [ ] and bind-](https://raw.githubusercontent.com/dinanathsj29/angular7-step-by-step-tutorial/master/./_images_angular7/6.property-binding.png)
![Output - Class binding with {{}}, [ ] and ngClass Output - Class binding with {{}}, [ ] and ngClass](https://raw.githubusercontent.com/dinanathsj29/angular7-step-by-step-tutorial/master/./_images_angular7/7.class-binding.png)
![Output - Style binding with [style.] and [ngStyle] Output - Style binding with [style.] and [ngStyle]](https://raw.githubusercontent.com/dinanathsj29/angular7-step-by-step-tutorial/master/./_images_angular7/8.style-binding.png)
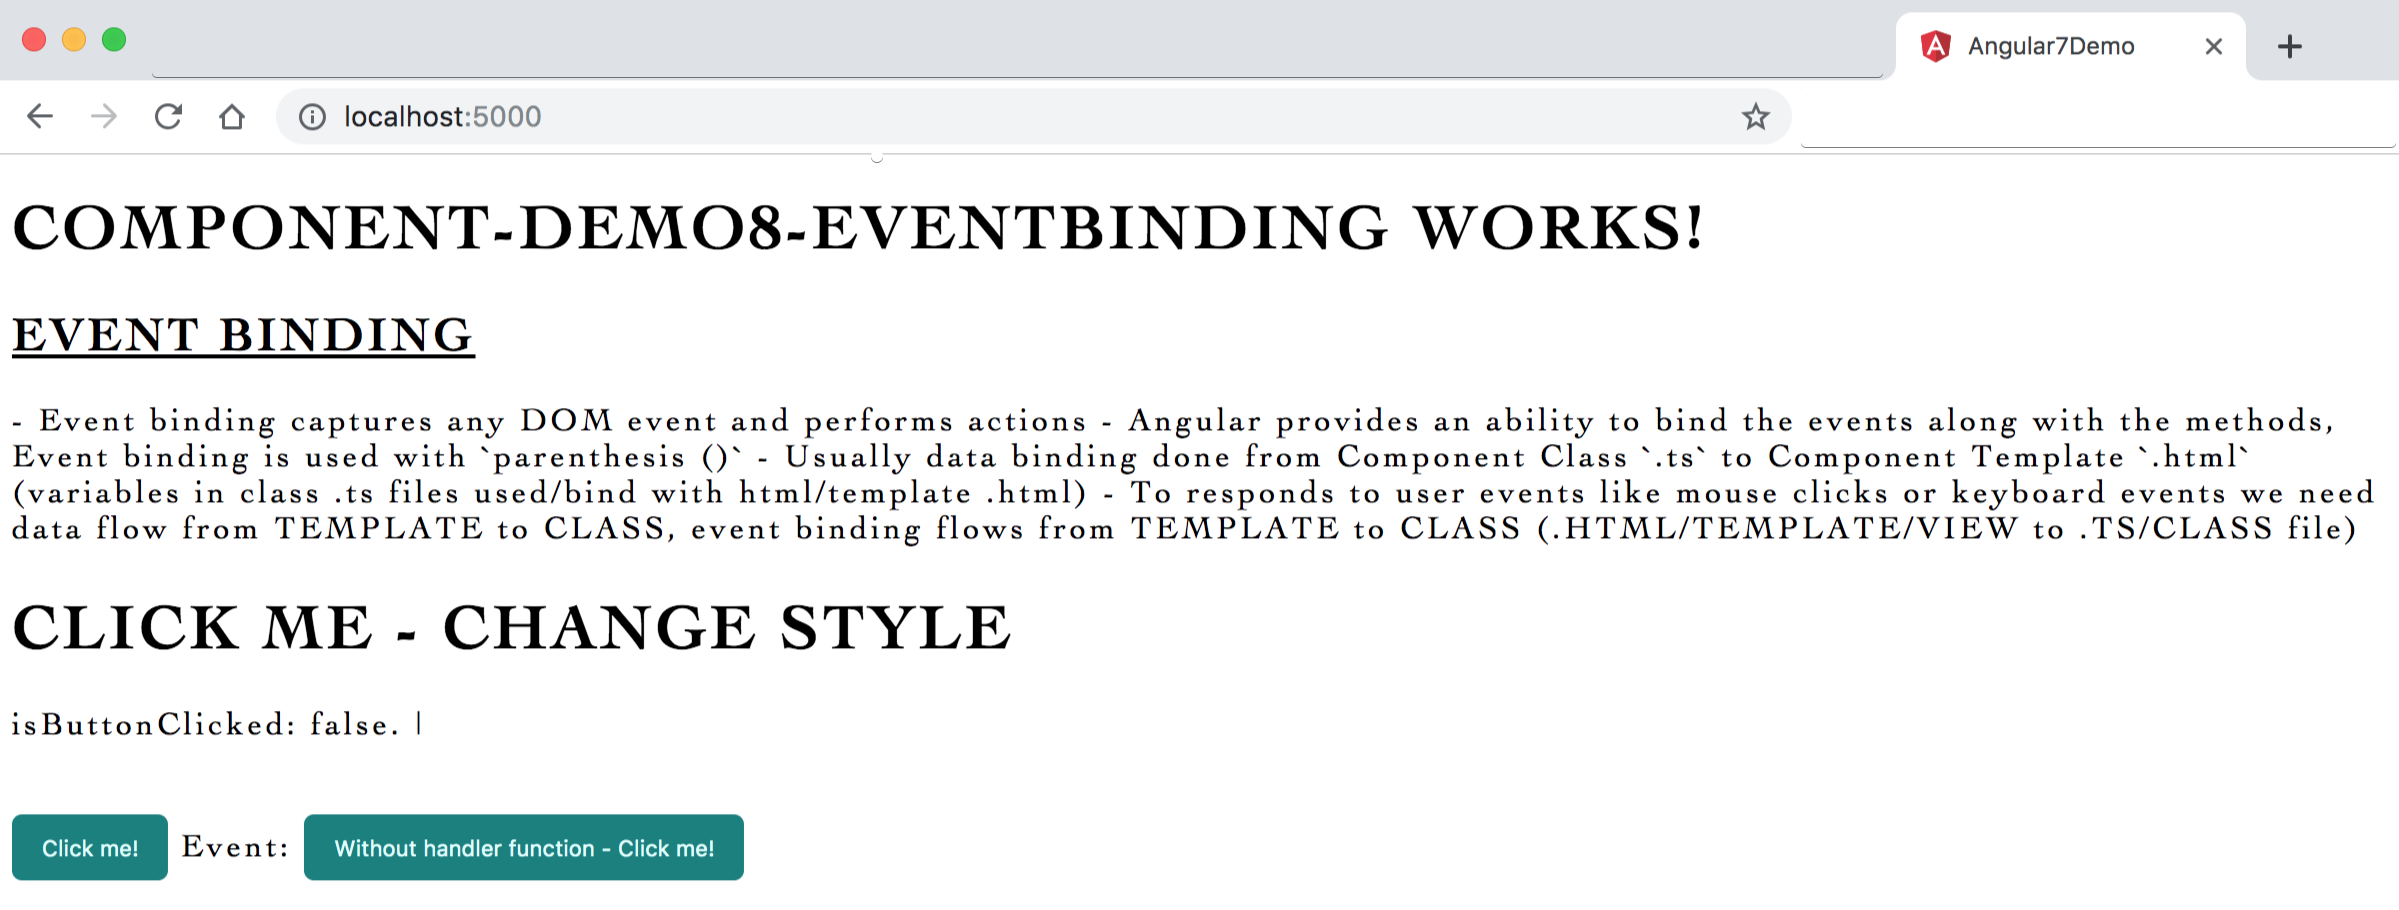
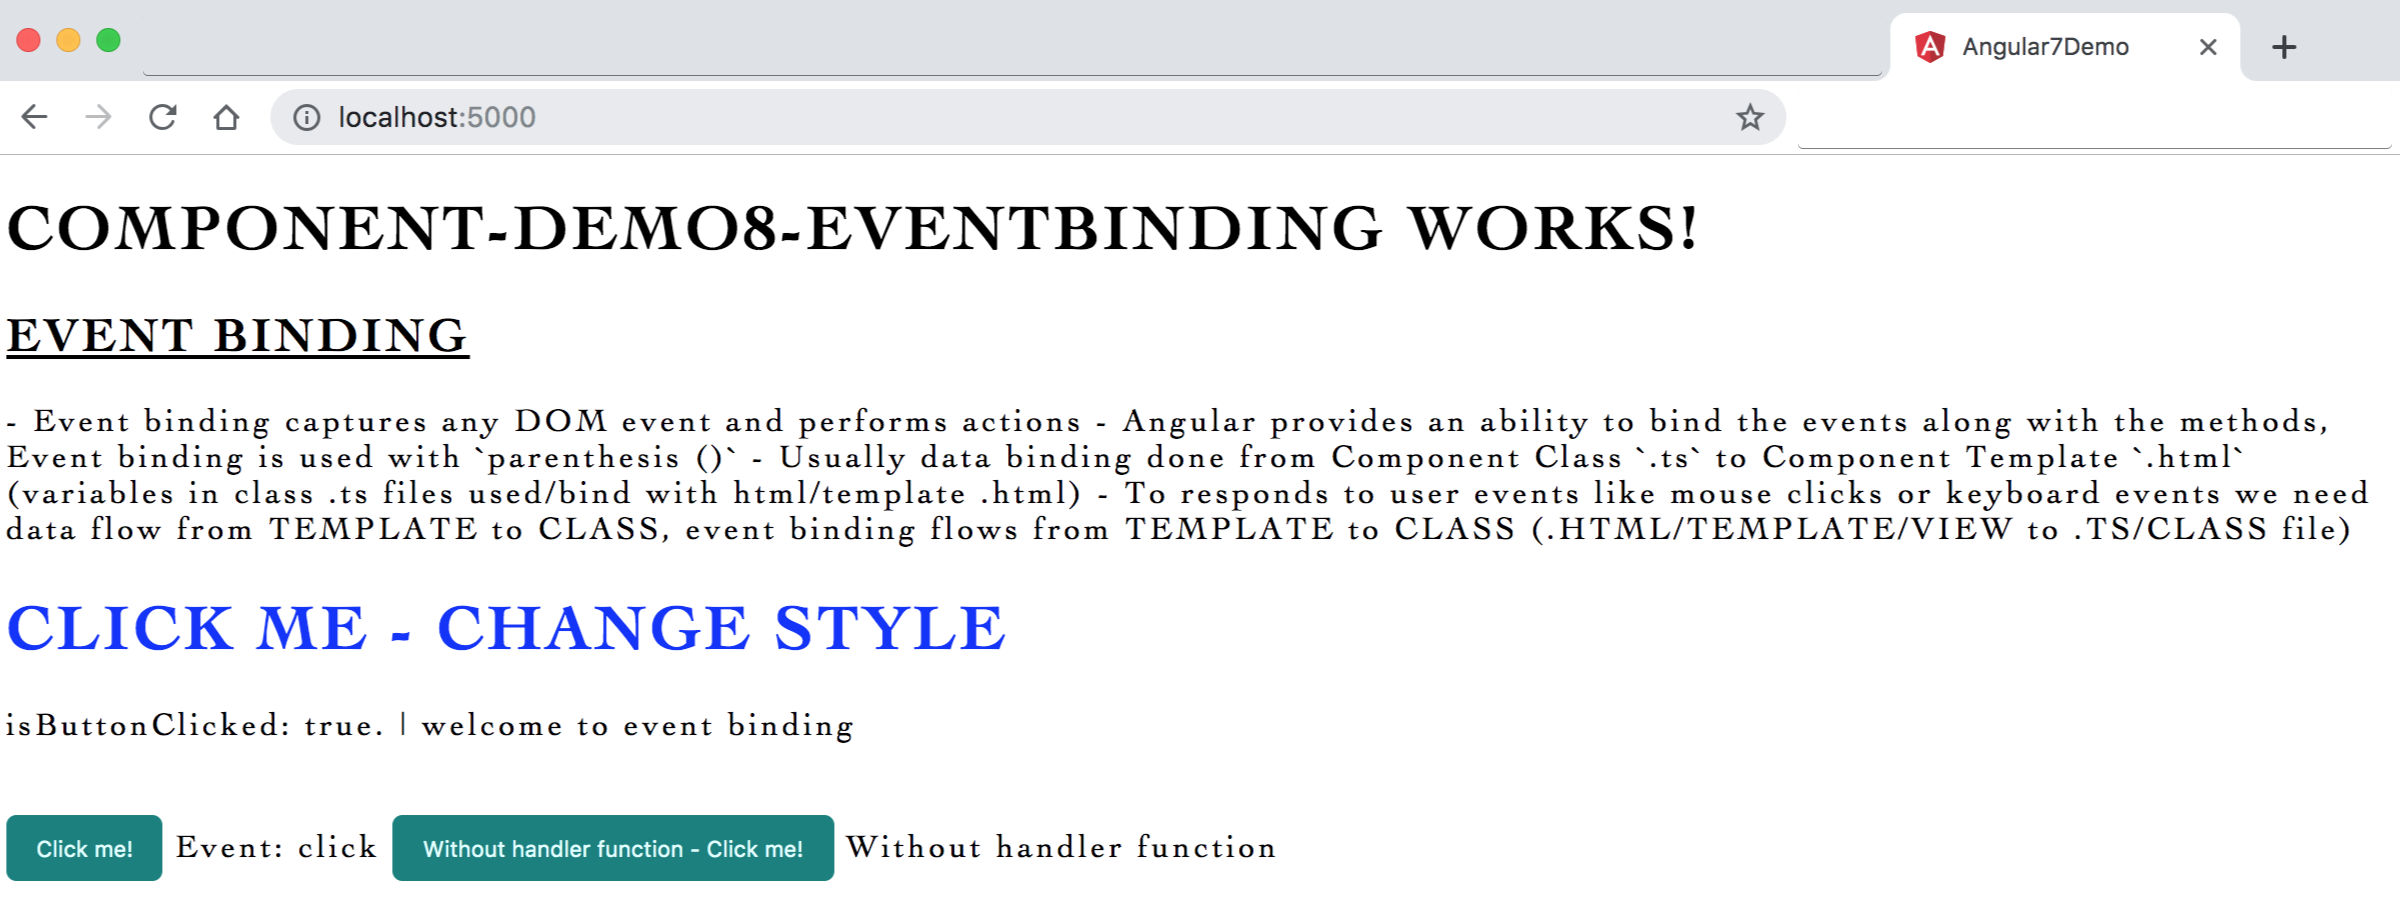
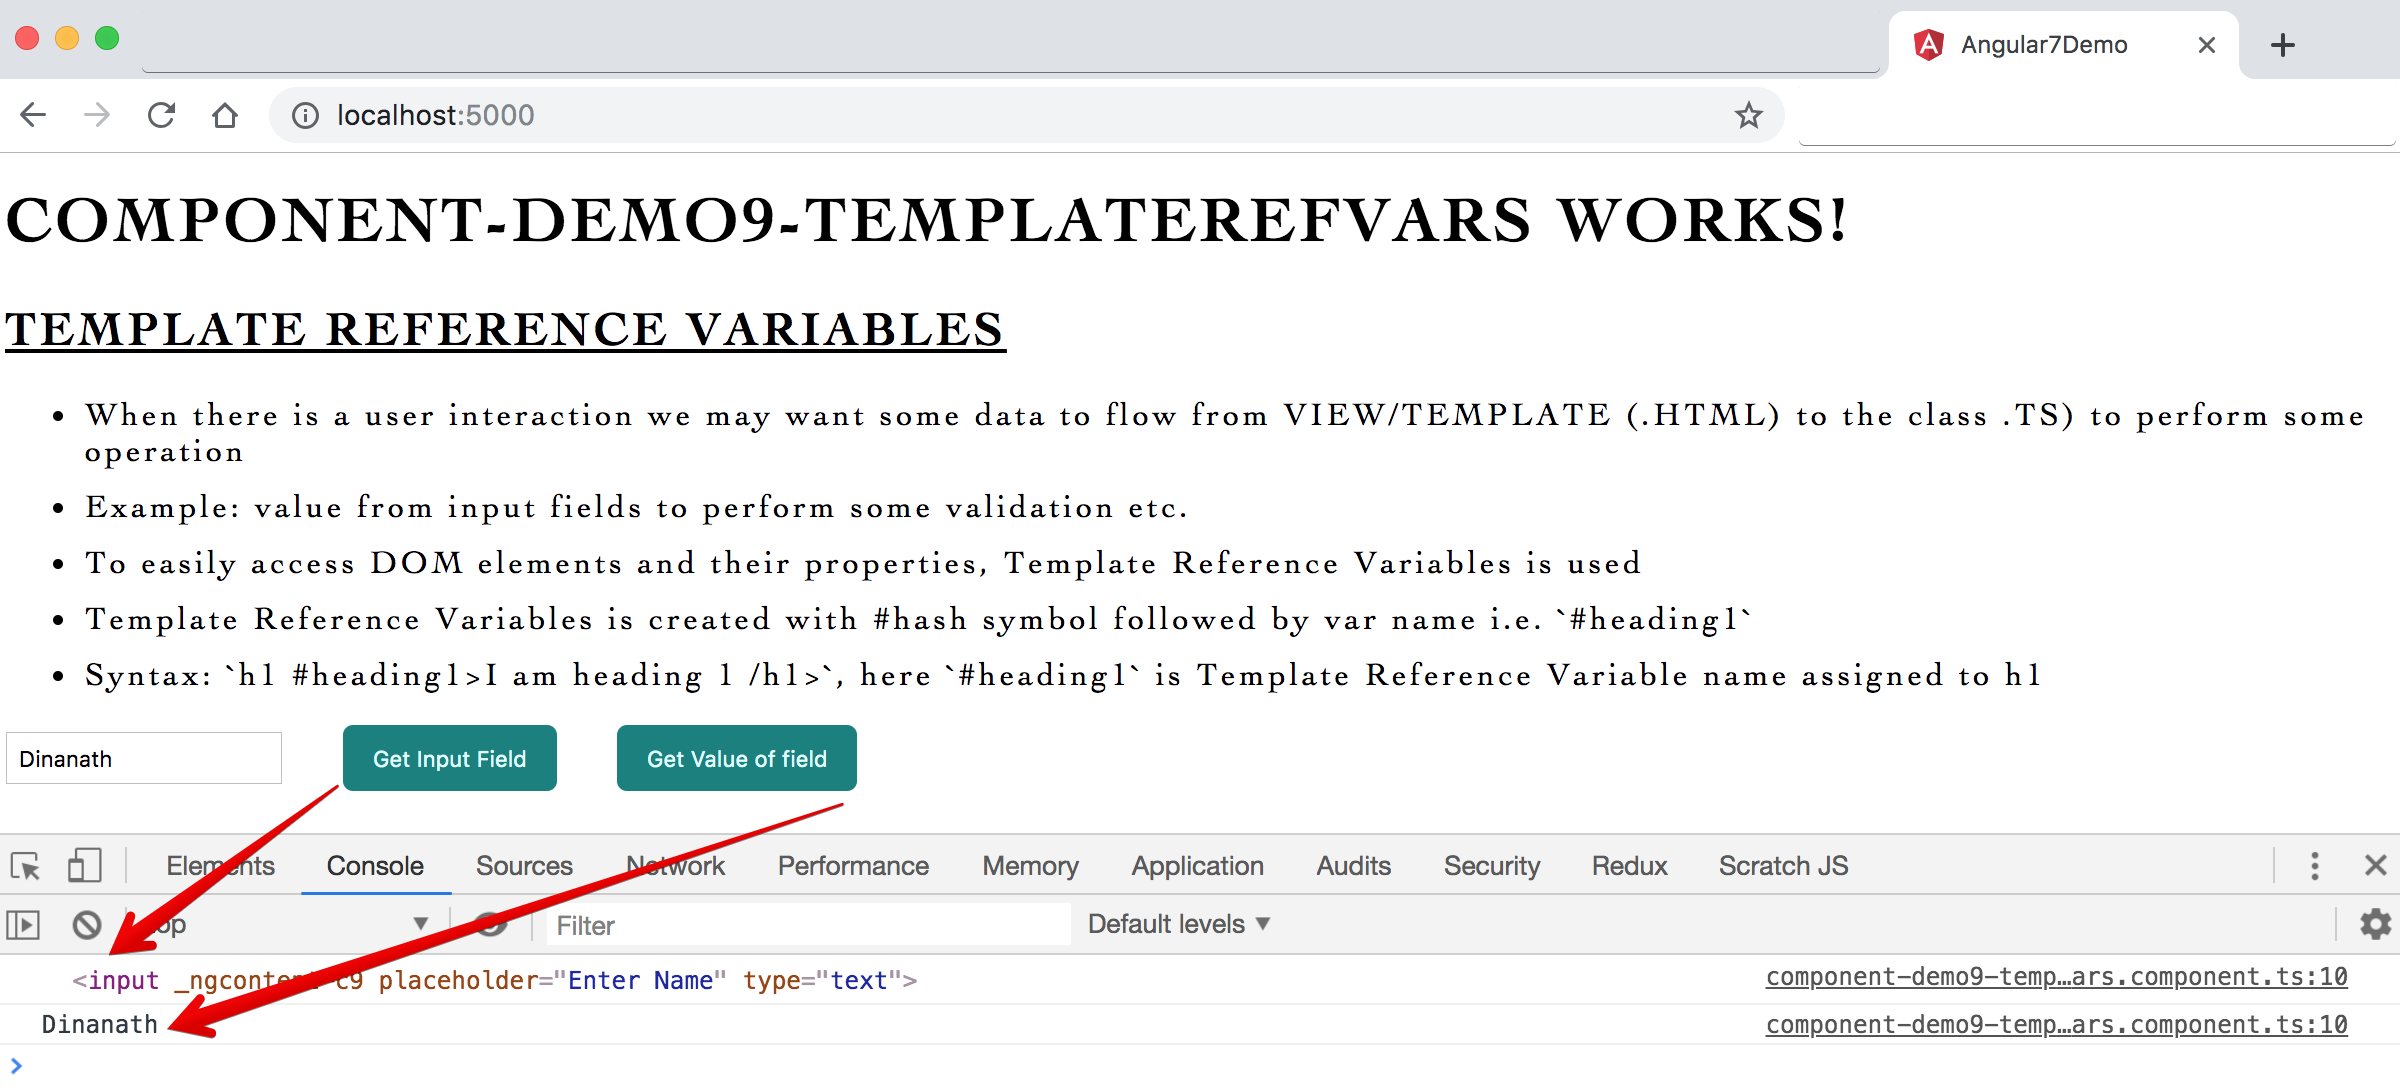
![Simple one way data binding with {{}}, [ ] and bind- Simple one way data binding with {{}}, [ ] and bind-](https://raw.githubusercontent.com/dinanathsj29/angular7-step-by-step-tutorial/master/./_images_angular7/11.one-way-data-binding-1.png)
![Image - Output - Simple one way data binding with {{}}, [ ] and bind-, used as two way data binding Image - Output - Simple one way data binding with {{}}, [ ] and bind-, used as two way data binding](https://raw.githubusercontent.com/dinanathsj29/angular7-step-by-step-tutorial/master/./_images_angular7/11.one-way-data-binding-2.png)
![Image - Output - Two way data binding with [(ngModel)], FormsModule Image - Output - Two way data binding with [(ngModel)], FormsModule](https://raw.githubusercontent.com/dinanathsj29/angular7-step-by-step-tutorial/master/./_images_angular7/12.two-way-data-binding.png)
