
Catapult defines a best-practice infrastructure and release management workflow, saving you thousands of engineering hours - it also aligns with Agile methodologies, like Scrum, to afford you everything you need to develop, deploy, and maintain a website with ease.

💥 Catapult is a complete website and workflow management platform built from leading and affordable technologies.
🌎 Our mission is to create a lean platform that orchestrates DevOps for website lifecycles with familiar technologies.
🚀 Our vision is to afford organizations reduced risk and improved performance while lowering barriers to entry.
Do you need a website and workflow management platform? Here are a few triggers.
- Production is down.
- We need a test site.
- Why is this costing so much?
- Are my environments safe?
- Is my website backed up?
- How quickly can I recover my website after a disaster?
- Can I easily scale my website for more traffic?
- What is my uptime?
What makes Catapult different?
- Catapult is an open-source, complete, and distributed architecture
- Catapult only orchestrates - it is not required to run your infrastructure
- Catapult uses platform native shell scripting rather than configuration management tools such as Chef, Puppet, or Salt
- Catapult features Gitflow workflow while enforcing exactly matching, branch-driven environments
- Catapult features a unique software workflow model - upstream or downstream
- Catapult overlays seamlessly with Scrum methodology
- Catapult is very cost-effective
Go ahead, give Catapult a shot.
Security is very important to us. If you have any issue regarding security, please disclose the information responsibly by sending an email to security@devopsgroup.io and not by creating a GitHub issue.
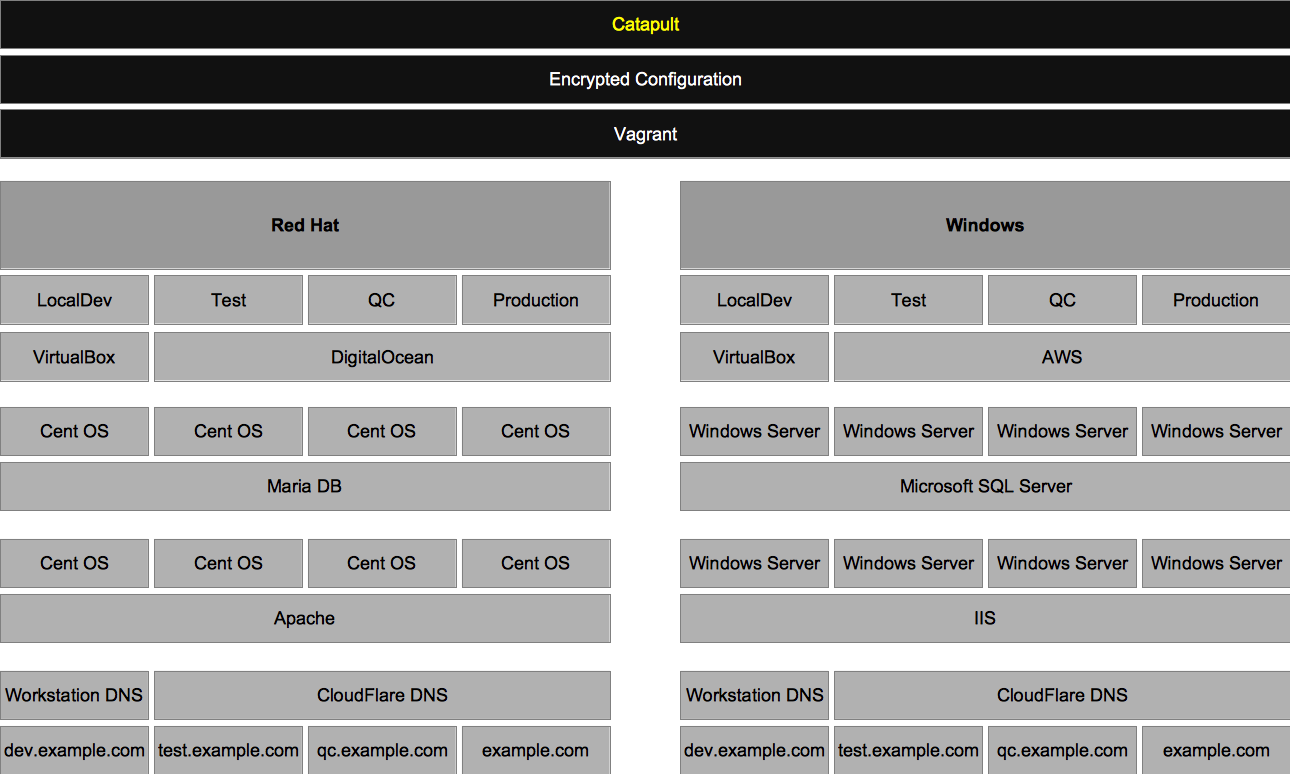
Catapult orchestrates the following key components of DevOps to provide you with a full-featured infrastructure. Implementing both a Red Hat stack for PHP software and a Windows stack for .NET software.
- Security Management
- Configuration Secrets - GnuPG Encryption
- Source Code Management
- Catapult - Git (via GitHub)
- Websites - Git (via GitHub or Bitbucket)
- Environment Management
- Vagrant
- Environment Virtualization
- Local
- VirtualBox and VMware Fusion - Red Hat and Windows
- Cloud
- DigitalOcean - Red Hat
- Amazon Web Services (AWS) - Windows
- Local
- DNS Management
- Local
- vagrant-hostmanager
- Cloud
- CloudFlare
- Local
- Release Management
- Automated Deployments - Atlassian Bamboo Server
- Continuous Integration - Branch-based environments with Git triggers
- Monitoring and Performance
- Server Resources - New Relic Servers
- Application Performance - New Relic APM
- Browser Performance - New Relic Browsers
- Website Availability - New Relic Synthetics
- Catapult
- Setup Catapult
- Setup Environments
- Release Management
- Security
- Compliance
- Performance
- Capacity
- Performance and Capacity Testing
- How-to
- Troubleshooting
- Contributing
- Community
Catapult intelligently manages the following website software that have been chosen from trending usage statistics from BuiltWith and aligns with the CentOS 7 and Software Collections trunks:
| Software | Key | Minimum PHP Version | Running PHP Version | Released | End-of-Life |
|---|---|---|---|---|---|
| CodeIgniter 2 | codeigniter2 |
5.1.6 | 5.4 | January 28, 2011 | October 31, 2015 |
| CodeIgniter 3 | codeigniter3 |
5.6 | 7.1 | March 30, 2015 | |
| concrete5 8 | concrete58 |
5.5.9 | 7.1 | December 1, 2016 | |
| Drupal 6 | drupal6 |
5.4 | 5.4 | February 13, 2008 | February 24, 2016 |
| Drupal 7 | drupal7 |
5.2.5 | 7.1 | January 5, 2011 | |
| Drupal 8 | drupal8 |
7.0.8 | 7.2 | November 19, 2015 | |
| Elgg 1 | elgg1 |
5.4 | 5.4 | August 20, 2008 | |
| Elgg 2 | elgg2 |
5.6 | 7.1 | December 14, 2015 | |
| ExpressionEngine 3 | expressionengine3 |
5.3.10 | 5.4 | October 13, 2015 | December 14, 2018 |
| Joomla 3 | joomla3 |
5.3.10 | 7.1 | September 27, 2012 | |
| Laravel 5 | laravel5 |
7.0.0 | 7.1 | February 4, 2015 | |
| MediaWiki 1 | mediawiki1 |
5.5.9 | 7.1 | December 8, 2003 | |
| Moodle 3 | moodle3 |
5.6.5 | 7.1 | November 16, 2015 | |
| SilverStripe 3 | silverstripe3 |
5.3.3 | 5.4 | June 29, 2012 | |
| SuiteCRM 7 | suitecrm7 |
5.5 | 7.1 | October 21, 2013 | November 15, 2019 |
| WordPress 4 | wordpress4 |
5.2 | 7.1 | September 4, 2014 | |
| WordPress 5 | wordpress5 |
5.6 | 7.2 | December 6, 2018 | |
| WordPress 6 | wordpress6 |
5.6 | 7.3 | May 24, 2022 | |
| XenForo 1 | xenforo1 |
5.2.11 | 5.4 | March 8, 2011 | December 31, 2019 |
| XenForo 2 | xenforo2 |
5.4.0 | 7.1 | November 28, 2017 | |
| Zend Framework 2 | zendframework2 |
5.3.23 | 5.4 | September 5, 2012 |
If you do not see your website software listed, Catapult supports basic PHP projects that do not have a database requirement.
- When an above software type is not defined, the default PHP version that is used is PHP 5.4. This is not configurable.
- PHP-less static site generators, such as, Jekyll, are supported.
Catapult maintains a high level of integrity when it comes to PHP versions, through maintaining security, backwards compatibility, performance, and new features. Below is an overview of the PHP versions used in Catapult and when you can expect these versions to be End-of-Life (EOL). We will bump to the next highest version of PHP in the list when nearing the EOL - this provides ample time for support of the newer PHP version by the software. In cases where a software version is sunsetting, the CentOS Long-term Support (LTS) version of PHP is used.
| PHP Version | End-of-Life | Maintainer | Updater |
|---|---|---|---|
| 5.4 | June 30, 2024 | CentOS | Red Hat |
| 7.1 | December 1, 2019 | Software Collections | Red Hat |
| 7.2 | November 30, 2020 | Software Collections | Red Hat |
| 7.3 | June 30, 2024 | Jan Staněk | Red Hat |
Catapult tracks vendor announced EOL dates for website software and a red EOL date will be displayed during vagrant status if one of your website's software is EOL. Currently Catapult has no plan to block Catapult supported software that is past its EOL date - it is up to you to move to the next major supported version.
Here, we compare similar platforms to shed light on where we are and we're headed. Catapult's approach is holistic, meaning, there are no optional features - the platform includes everything in its default state and its default state is the only state of the platform. Some platforms offer and support optional third-party features that need configured - these are excluded.
| Platform Feature | Catapult | Pantheon | Acquia |
|---|---|---|---|
| Source | Open | Closed | Closed |
| Subscription Feature Set | Bundled | Separated | Separated |
| Traditional Tooling (VMs & Shell) | ✅ | ❌ | ❌ |
| Multi-Platform (Linux & Windows) | ✅ | ❌ | ❌ |
| Supported PHP Software | 20+ | 2 | 1 |
| Supported .NET Software | TBA | ❌ | ❌ |
| Minimum Bundled Monthly Cost |
$45 | $400 | $134 |
| Websites per instance | Unlimited | 1 | 1 |
| Managed Workflow | Git Flow (branch-based environments) | ❌ | ❌ |
| Managed Software Workflow Model | Upstream or Downstream | ❌ | ❌ |
| Agile Methodology Focus | Scrum | ❌ | ❌ |
| Managed Continuous Integration | ✅ | ❌ | ❌ |
| Environments | LocalDev, Test, QC, Production | Multidev, Dev, Test, Live | Dev Desktop, Dev, Stage, Prod |
| Exacting Configuration | ✅ | ❌2 | ❌3 |
| Approach | Virtual Machine | Container | Virtual Machine |
| Data Center | DigitalOcean and AWS | Rackspace | AWS |
| Scaling | Horizontal | Horizontal | Vertical |
| Scaling Management | Manual | Automatic | Manual |
| Development Environment | Unlimited Local | 5 Cloud | Unlimited Local |
| Development Environment Approach | Exact | Exact | Similar |
| Dashboard - Control | CLI | CLI & Web | CLI & Web |
| Dashboard - Monitor | Web | Web | Web |
| Managed Public Git Website Repository Support | GitHub & Bitbucket | ❌ | ❌ |
| Managed DNS | CloudFlare | ❌ | ❌ |
| Managed Free HTTPS Certificates | CloudFlare/Let's Encrypt | ❌ | ❌ |
| Managed Server Monitoring | New Relic | ❌ | Proprietary |
| Managed Application Error Logs | New Relic | Proprietary | Proprietary |
| Managed Application Performance Monitoring | New Relic | ❌ | ❌ |
| Managed Browser Performance Monitoring | New Relic | ❌ | ❌ |
| Managed Synthetic Monitoring | New Relic | ❌ | ❌ |
See an error or have a suggestion? Email competition@devopsgroup.io - we appreciate all feedback.
Catapult requires a Developer Setup, Instance Setup, and Services Setup as described in the following sections.
There are two roles when using Catapult, Catapult User and Catapult Admin.
- Catapult Users are developers who use Catapult for developing within the websites that the Catapult Admin has added and configured
- Catapult Admins are administrators who setup their organization's Catapult instance and required services
The Catapult User only needs to complete the Developer Setup and the Catapult Admin completes the Instance Setup and Services Setup.
Please Note:
- It is advised to turn off any antivirus software that you may have installed during setup and usage of Catapult - tasks such as forwarding ports and writing hosts files may be blocked.
- Virtualizaion must be enabled in the BIOS of the developer's workstation - follow this how-to to get started.
- It is recommended to disable Internet Service Provider (ISP) Domain Name System (DNS) helpers, such as opting out of the Verizon DNS Assitance.
- Using a VPN client during usage of LocalDev may result in lost communication between your workstation and the guests, requiring a
vagrant reloadto regain communication.
Catapult uses Vagrant and the command line of a developer's workstation, below is a list of required software that will need to be installed.
- macOS workstations: Compatible and supported
- Linux workstations: Compatible and supported
- Windows workstations: Limited testing and support
- Terminal
- Using macOS?
- The terminal in the base distributions are 100% compatible.
- Using Windows?
- Run all Vagrant commands from Command Prompt as Administrator by right-clicking and selecting "Open as Administrator"
- Using Linux?
- The terminal in the base distributions are 100% compatible.
- Using macOS?
- GPG2
- Using macOS?
- Download and install GPG Suite from https://gpgtools.org
- Using Windows?
- Download and install Gpg4win from http://gpg4win.org/download.html
- Using Linux?
- GPG is included in the base distribution in most cases.
- If being prompted by the Passphrase GUI Agent, comment out 'use-agent' in
~/.gnupg/gpg.conf
- Using macOS?
- Git
- Using macOS?
- Git command line is included in the base distribution in most cases.
- For a streamlined Git GUI, download and install SourceTree from https://www.sourcetreeapp.com/
- Using Windows?
- Download and install Git from https://git-scm.com/download/win
- Download and install SourceTree from https://www.sourcetreeapp.com/
- Using Linux?
- Git command line is included in the base distribution in most cases.
- For a streamlined Git GUI, download and install SmartGit from http://www.syntevo.com/smartgit/
- Using macOS?
- Hypervisor
- Using macOS with Apple silicon?
- Download and install the latest version of VMware Fusion Player from https://customerconnect.vmware.com/en/evalcenter?p=fusion-player-personal-13
- Using macOS?
- Download and install the latest version of VirtualBox from https://www.virtualbox.org/wiki/Downloads
- Using Windows?
- Download and install the latest version of VirtualBox from https://www.virtualbox.org/wiki/Downloads
- Using Linux (Debian, Ubuntu)?
- Download and install the latest version of VirtualBox using Advanced Packaging Tool (APT)
sudo apt-get install virtualbox
- Download and install the latest version of VirtualBox using Advanced Packaging Tool (APT)
- Using Linux (Fedora, Red Hat, Suse)?
- Download and install the latest version of VirtualBox using Yellowdog Updater, Modified (yum)
sudo yum install virtualbox
- Download and install the latest version of VirtualBox using Yellowdog Updater, Modified (yum)
- Using macOS with Apple silicon?
- Vagrant
- Using macOS?
- Ensure Xcode Command Line Tools are installed by running
xcode-select --installfrom the Terminal - Download and install the latest version of Vagrant v2.x from https://releases.hashicorp.com/vagrant/
- Ensure Xcode Command Line Tools are installed by running
- Using macOS with Apple silicon?
- Download and install the latest version of Vagrant VMware Utility from https://developer.hashicorp.com/vagrant/downloads/vmware
- Using Windows?
- Download and install the latest version of Vagrant v2.x from https://releases.hashicorp.com/vagrant/
- Using Linux (Debian, Ubuntu)?
- Download the latest version of Vagrant v2.x respective to your architecture from https://releases.hashicorp.com/vagrant/ by running e.g.
wget https://releases.hashicorp.com/vagrant/2.2.9/vagrant_2.2.9_x86_64.deb - Install Vagrant using dpkg e.g.
sudo dpkg --install vagrant_2.2.9_x86_64.deb - Install Network File System (NFS)
sudo apt-get install nfs-kernel-server
- Download the latest version of Vagrant v2.x respective to your architecture from https://releases.hashicorp.com/vagrant/ by running e.g.
- Using Linux (Fedora, Red Hat, Suse)?
- Download the latest version of Vagrant v2.x respective to your architecture from https://releases.hashicorp.com/vagrant/ by running e.g.
wget https://releases.hashicorp.com/vagrant/2.2.9/vagrant_2.2.9_x86_64.rpm - Install Vagrant using yum e.g.
sudo yum install vagrant_2.2.9_x86_64.rpm
- Download the latest version of Vagrant v2.x respective to your architecture from https://releases.hashicorp.com/vagrant/ by running e.g.
- Using macOS?
- Java SE Development Kit
- Download the respective Java SE Development Kit for your system http://www.oracle.com/technetwork/java/javase/downloads/jdk8-downloads-2133151.html
- Instance Configuration
- If you are a Catapult admin:
- If you are setting up a new Catapult instance, continue on to the Instance Setup step. If you are configuring a new workstation with an existing Catapult instance, ensure the following is completed:
- Run
vagrant statusto verify the correct workstation software is installed and to generate your Catapult user files - Set
~/secrets/configuration-user.yml["settings"]["admin"]totrue - Enable Git credential caching by following the instructions outlined for your system to store your Git credentials. This will allow you to push changes to your Catapult instance without a prompt for credentials.
- Run
- If you are setting up a new Catapult instance, continue on to the Instance Setup step. If you are configuring a new workstation with an existing Catapult instance, ensure the following is completed:
- If you are a Catapult user:
- Using Git, clone your team's Catapult instance repository
- Once cloned, from your workstation's terminal, change the directory into the root of the newly cloned Catapult repository
- Run
vagrant statusto verify the correct workstation software is installed and to generate your Catapult user files - Contact your Catapult admin for your Catapult instance's GPG passphrase and place at
~/secrets/configuration-user.yml["settings"]["gpg_key"] - You may stop at this point and contact your Catapult admin for the next steps. The following Instance Setup and Services Setup will be or have been, completed by your Catapult admin
- Any role: personal accounts:
- Users can choose to specify a personal Bamboo user (rather than the company user) for certain Bamboo calls that originate locally
- Set
~/secrets/configuration-user.yml["settings"]["bamboo_username"]to the username for this Bamboo user - Set
~/secrets/configuration-user.yml["settings"]["bamboo_password"]to the password for this Bamboo user
- Set
- Users can choose to specify a personal Bamboo user (rather than the company user) for certain Bamboo calls that originate locally
- If you are a Catapult admin:
- If you are a Catapult User, contact your Catapult Admin for next steps. If you are a Catapult Admin, continue to the Instance Setup and Services Setup.
Catapult is quick to setup. You have the option of using GitHub (public) or Bitbucket (private) to store your Catapult instance. Your Catapult secrets are encrypted and safe, but please use your best judgment when choosing a destination for your Catapult instance.
- Fork Catapult
- GitHub (public)
- Fork https://github.com/devopsgroup-io/catapult and clone via SourceTree or the Git utility of your choice.
- BitBucket (private)
- From BitBucket, create a new repository and import https://github.com/devopsgroup-io/catapult. Then clone via SourceTree or the Git utility of your choice.
- GitHub (public)
- Admin Mode
- Once cloned, from your workstation's terminal, change the directory into the root of the newly cloned Catapult repository
- Run
vagrant statusto verify the correct workstation software is installed and to generate your Catapult user files - Set
~/secrets/configuration-user.yml["settings"]["admin"]totrue - Enable Git credential caching by following the instructions outlined for your system to store your Git credentials
- GPG Edit Mode
- GPG Edit Mode is set at
~/secrets/configuration-user.yml["settings"]["gpg_edit"](falseby default) and is used to encrypt your Catapult configuration secrets using your GPG Passphrase:~/secrets/id_rsaas~/secrets/id_rsa.gpg~/secrets/id_rsa.pubas~/secrets/id_rsa.pub.gpg~/secrets/configuration.ymlas~/secrets/configuration.yml.gpg
- GPG Edit Mode requires that you are on your Catapult fork's
developbranch. - Running any Vagrant command (e.g.
vagrant status) will encrypt your configuration, of which, will allow you to commit and push safely to your public Catapult fork.
- GPG Edit Mode is set at
- SSH Key Pair
- Create a passwordless SSH key pair - this will drive authentication for Catapult.
- For instructions please see https://help.github.com/articles/generating-a-new-ssh-key-and-adding-it-to-the-ssh-agent/
- Place the newly created passwordless SSH key pair
id_rsaandid_rsa.pubin the~/secrets/folder.
- Create a passwordless SSH key pair - this will drive authentication for Catapult.
- GPG Passphrase
- Generate a GPG passphrase
- This passphrase is used to encrypt and decrypt your Catapult instance's configuration file.
- NEVER SHARE THE PASSPHRASE WITH ANYONE OTHER THAN YOUR TEAM.
- Spaces are not permitted and must be at least 20 characters.
- To create a strong passphrase, please visit https://xkpasswd.net/
- Place your newly generated passphrase at
~/secrets/configuration-user.yml["settings"]["gpg_key"] - It is recommended to print a QR code of the passphrase to distribute to your team, please visit http://educastellano.github.io/qr-code/demo/
- Remember! Effective security is equal parts process and technology.
- Generate a GPG passphrase
Catapult is designed with a distributed services model, below are the required third-party services and their sign-up and configuration steps.
| Service | Product | Use Case | Monthly Cost |
|---|---|---|---|
| †Cloud Hosting: Red Hat (PHP) | DigitalOcean Droplets | Web and Database Servers (6) | *$30+ |
| †Cloud Hosting: Windows (.NET) | Amazon Web Services (AWS) EC2 | Web and Database Servers (6) | *$80+ |
| Source Code Repositories | Atlassian Bitbucket | Private Repositories | Free |
| Source Code Repositories | GitHub | Public Repositories | Free |
| Automated Deployments / Continuous Integration | Atlassian Bamboo Server | Build Server | $15 |
| DNS | CloudFlare | Cloud DNS | Free |
| Monitoring | New Relic Application Performance Monitoring (APM), Browser, Server, and **Synthetics | Performance and Infrastructure Monitoring | Free |
| Total | †$45+ |
† Only one platform (Red Hat or Windows) is required to have a full-featured infrastructure. Generally speaking, the industry-standard Red Hat platform will be used.
* Depending on load, resources may need to be increased, starting at an additional $5 per month per server.
** New Relic customers receive a trial "pro" period ranging from 14-days to 30-days, however, there is no free tier beyond the trial
- DigitalOcean sign-up and configuration
- Create an account at http://digitalocean.com
- [Free Stuff] Get a $10 credit and give us $25 once you spend $25 https://www.digitalocean.com/?refcode=6127912f3462
- Go to your DigitalOcean Applications & API Dashboard https://cloud.digitalocean.com/settings/api
- Create a Personal Access Token named "Vagrant" and place the token value at
~/secrets/configuration.yml["company"]["digitalocean_personal_access_token"]
- Create a Personal Access Token named "Vagrant" and place the token value at
- Go to your DigitalOcean Security Dashboard https://cloud.digitalocean.com/settings/security
- Add a new SSH Key named "Vagrant" with your newly created
id_rsa.pubfrom~/secrets/id_rsa.pubkey
- Add a new SSH Key named "Vagrant" with your newly created
- Create an account at http://digitalocean.com
- Amazon Web Services (AWS) sign-up and configuration
- Create an account https://portal.aws.amazon.com/gp/aws/developer/registration
- [Free Stuff] Receive Free Tier benefits for the first 12 months after signing up https://aws.amazon.com/ec2/pricing/
- Sign in to your new AWS console https://console.aws.amazon.com
- Go to your AWS Identity and Access Management (IAM) Users Dashboard https://console.aws.amazon.com/iam/home#users
- Create a "Catapult" user.
- Place the Access Key ID at
~/secrets/configuration.yml["company"]["aws_access_key"] - Place the Secret Access Key at
~/secrets/configuration.yml["company"]["aws_secret_key"]
- Go to your AWS Identity and Access Management (IAM) Groups Dashboard https://console.aws.amazon.com/iam/home#groups
- Create a "Catapult" group.
- Attach the "AmazonEC2FullAccess" policy to the "Catapult" group.
- Go back to your AWS Identity and Access Management (IAM) Groups Dashboard https://console.aws.amazon.com/iam/home#groups
- Select your newly created "Catapult" group.
- Select Add Users to Group and add your newly created "Catapult" user.
- Go to your AWS EC2 Key Pairs Dashboard https://console.aws.amazon.com/ec2/home#KeyPairs
- Select "N. Virginia" from the top navigation
- Click Import Key Pair
- Add your newly created
id_rsa.pubfrom~/secrets/id_rsa.pubkey - Set the Key pair name to "Catapult"
- Go to your AWS EC2 Security Groups Dashboard https://console.aws.amazon.com/ec2/home#SecurityGroups
- Select the "default" Group Name
- Select the Inbound tab and click Edit
- Change Source to "Anywhere"
- Click Save
- Create an account https://portal.aws.amazon.com/gp/aws/developer/registration
Bitbucket provides free private repositories and GitHub provides free public repositories, you will need to sign up for both. If you already have Bitbucket and GitHub accounts you may use them, however, it's best to setup a machine user if you're using Catapult with your team.
- Bitbucket sign-up and configuration
- Create an account at https://bitbucket.org
- Place the username (not the email address) that you used to sign up for Bitbucket at
~/secrets/configuration.yml["company"]["bitbucket_username"]
- Place the username (not the email address) that you used to sign up for Bitbucket at
- Create an App password at https://bitbucket.org/account/settings/app-passwords/
- Create an App password with the label of "Catapult" and check off all Read permissions, with the exception of "Repositories", check up to Admin permissions.
- Place the App password at
~/secrets/configuration.yml["company"]["bitbucket_password"]
- Add your newly created
id_rsa.pubfrom~/secrets/id_rsa.pubkey in https://bitbucket.org/account/user/`your-user-here`/ssh-keys/ named "Catapult"
- Create an account at https://bitbucket.org
- GitHub sign-up and configuration
- Create an account at https://github.com
- Place the username (not the email address) that you used to sign up for GitHub at
~/secrets/configuration.yml["company"]["github_username"] - Place the password of the account for GitHub at
~/secrets/configuration.yml["company"]["github_password"]
- Place the username (not the email address) that you used to sign up for GitHub at
- Go to your account then Settings, Developer settings, and Personal access tokens.
- Create a personal access token and name it Catapult. Enable repo, admin:public_key, and user permissions.
- Place the personal access token at
~/secrets/configuration.yml["company"]["github_personal_access_token"]
- Add your newly created
id_rsa.pubfrom~/secrets/id_rsa.pubkey in https://github.com/settings/ssh named "Catapult"
- Create an account at https://github.com
Bamboo Server set-up
- Sign up for an Atlassian account at https://my.atlassian.com/
- Purchase the $10 Bamboo Server license from https://www.atlassian.com/purchase/product/bamboo
- It's now time to bring up your build server, please run
vagrant up ~/secrets/configuration.yml["company"]["name"]-build- The initial
upwill take some time, please be patient
- The initial
- Login to DigitalOcean to obtain the IP address of the virtual machine to access via URL
- Place your Bamboo base URL at
~/secrets/configuration.yml["company"]["bamboo_base_url"], the format should be http://[digitalocean-ip-here]/
- Place your Bamboo base URL at
- Once your Bamboo Server instance is accessible via URL, you will be prompted with a license prompt, enter your license. Select Express installation.
- You will next be prompted to enter the following information:
- Username (required) - root
- Password (required) - specify a complex password
- Confirm password (required)
- Full name (required) - use
~/secrets/configuration.yml["company"]["name"] - Email - use
~/secrets/configuration.yml["company"]["email"]
Bamboo Configuration
- Place your Bamboo username at
~/secrets/configuration.yml["company"]["bamboo_username"]- Normally root for Bamboo Server
- Place your Bamboo password at
~/secrets/configuration.yml["company"]["bamboo_password"] - Allow anonymous users to trigger remote repository change detection by clicking the gear at the top right and going to Overview
- Next, under Security, go to Security settings and click the Edit button at the bottom
- Check the "Allow anonymous users to trigger remote repository change detection and Bamboo Specs detection" setting and click Save
To avoid having to manually configure the Bamboo project, plans, stages, jobs, and tasks configuration, you may optionally install and purchase the "Bob Swift Atlassian Add-ons - Bamboo Command Line Interface (CLI)" Bamboo add-on. To install, click the settings gear top right, and click "Manage apps". Once the add-on is installed, by running a vagrant status, Catapult will automatically detect its existence and automatically configure the settings required.
Otherwise, the manual setup configuration steps are outlined below:
- Disable anonymous user access by clicking the gear at the top right and going to Overview
- Next, under Security, go to Global permissions and remove Access from Anonymous Users
- Click Create > Create a new plan from the top navigation:
- Create Catapult Project and create BUILD Plan
- Project and build plan name
- Project > New Project
- Project name: Catapult
- Project key: CAT
- Plan name: BUILD
- Plan key: BUILD
- Plan description:
- Link repository to new build plan
- Repository host: Other > None
- Project and build plan name
- Create Catapult Project and create TEST Plan
- Project and build plan name
- Project > New Project
- Project name: Catapult
- Project key: CAT
- Plan name: TEST
- Plan key: TEST
- Plan description:
- Link repository to new build plan
- Repository host: Other > None
- Project and build plan name
- Create QC Plan
- Project and build plan name
- Project: Catapult
- Plan name: QC
- Plan key: QC
- Plan description:
- Link repository to new build plan
- Repository host: Other > None
- Project and build plan name
- Create PROD Plan
- Project and build plan name
- Project: Catapult
- Plan name: PROD
- Plan key: PROD
- Plan description:
- Link repository to new build plan
- Repository host: Other > None
- Project and build plan name
- Create WINTEST Plan
- Project and build plan name
- Project: Catapult
- Plan name: WINTEST
- Plan key: WINTEST
- Plan description:
- Link repository to new build plan
- Repository host: Other > None
- Project and build plan name
- Create WINQC Plan
- Project and build plan name
- Project: Catapult
- Plan name: WINQC
- Plan key: WINQC
- Plan description:
- Link repository to new build plan
- Repository host: Other > None
- Project and build plan name
- Create WINPROD Plan
- Project and build plan name
- Project: Catapult
- Plan name: WINPROD
- Plan key: WINPROD
- Plan description:
- Link repository to new build plan
- Repository host: Other > None
- Project and build plan name
- Create Catapult Project and create BUILD Plan
- CloudFlare sign-up and configuration
- Create a CloudFlare account at https://www.cloudflare.com
- Sign in to your new CloudFlare account
- Visit your My Account section at https://www.cloudflare.com/a/account/my-account and scroll down to your Global API Key and place the token value at
~/secrets/configuration.yml["company"]["cloudflare_api_key"] - Place the email address of the email address that you used to sign up for Cloudflare at
~/secrets/configuration.yml["company"]["cloudflare_email"]
- New Relic sign-up and configuration
- Create a New Relic account at http://newrelic.com/
- [Free Stuff] Sign-up up for New Relic and get a Data Nerd shirt! http://newrelic.com/lp/datanerd
- [Free Stuff] Refer Catapult and get a New Relic hoodie! http://newrelic.com/referral
- Sign in to your New Relic account
- Go to your Account Settings > Integrations > API keys.
- Generate and place your REST API key at
~/secrets/configuration.yml["company"]["newrelic_api_key"] - Generate and place your Admin API key at
~/secrets/configuration.yml["company"]["newrelic_admin_api_key"] - Go to your Account Settings > Account > Summary.
- Place your License key at
~/secrets/configuration.yml["company"]["newrelic_license_key"]
- Create a New Relic account at http://newrelic.com/
- SendGrid sign-up and configuration
- Create a SendGrid account at https://sendgrid.com/
- Sign in to your SendGrid account
- Go to Settings > API Keys.
- Generate an API key named "Catapult" and place at
~/secrets/configuration.yml["company"]["sendgrid_api_key"]- Place the username "apikey" at
~/secrets/configuration.yml["company"]["sendgrid_username"] - Place the API key at
~/secrets/configuration.yml["company"]["sendgrid_password"]
- Place the username "apikey" at
- To verify all of the configurations that you just set, open your command line and change the directory into your fork of Catapult, then run
vagrant status. Catapult will confirm the connection to all of the Services and inform you of any problems.
To start using Catapult you will need to Provision Environments and Configure Automated Deployments.
| Environment | LocalDev | Test | QC | Production |
|---|---|---|---|---|
| Server Provider | Locally via VirtualBox and VMware Fusion | Hosted via DigitalOcean | Hosted via DigitalOcean | Hosted via DigitalOcean |
| Server Provisioning | Manually via Vagrant | Manually via Vagrant | Manually via Vagrant | Manually via Vagrant |
For each Environment you will need to:
- Web Servers
vagrant up ~/secrets/configuration.yml["company"]["name"]-dev-redhatvagrant up ~/secrets/configuration.yml["company"]["name"]-test-redhatvagrant up ~/secrets/configuration.yml["company"]["name"]-qc-redhatvagrant up ~/secrets/configuration.yml["company"]["name"]-production-redhat
- Database Servers
vagrant up ~/secrets/configuration.yml["company"]["name"]-dev-redhat-mysqlvagrant up ~/secrets/configuration.yml["company"]["name"]-test-redhat-mysqlvagrant up ~/secrets/configuration.yml["company"]["name"]-qc-redhat-mysqlvagrant up ~/secrets/configuration.yml["company"]["name"]-production-redhat-mysql
Once the Web and Database Servers are up and running, it's then time to configure your Bamboo Catapult project's TEST, QC, and PROD plans. To avoid having to manually configure the Bamboo project, plans, stages, jobs, and tasks configuration, you may optionally install and purchase the "Bob Swift Atlassian Add-ons - Bamboo CLI Connector" Bamboo add-on. Otherwise, the manual setup configuration steps are outlined below:
- Sign in to your new custom Bamboo instance
~/secrets/configuration.yml["company"]["bamboo_base_url"] - Click Build > All build plans from the header:
- From the Build Dashboard and under the Catapult project:
- Configure Catapult Project BUILD Plan
- Click the edit icon for the BUILD plan
- From the Stages tab, select Default Job
- Remove all tasks that may have been added by default during initial setup
- Click Add task
- Search for Script Task and select it
- Interpreter:
shell - Script Location:
Inline - Script body:
bash /catapult/provisioners/redhat/provision.sh "build" "https://github.com/[your-name-here]/catapult" "~/secrets/configuration-user.yml["settings"]["gpg_key"]" "bamboo" - Click Save
- Configure Catapult Project TEST Plan
- Click the edit icon for the TEST plan
- From the Stages tab, select Default Job
- Remove all tasks that may have been added by default during initial setup
- Click Add task
- Search for SSH Task and select it
- Host:
~/secrets/configuration.yml["environments"]["test"]["servers"]["redhat"]["ip"] - Username:
root - Authentication Type:
Key without passphrase - SSH Key:
~/secrets/id_rsa - SSH command:
bash /catapult/provisioners/redhat/provision.sh "test" "https://github.com/[your-name-here]/catapult" "~/secrets/configuration-user.yml["settings"]["gpg_key"]" "apache" - Click Save
- Click Add task
- Search for SSH Task and select it
- Host:
~/secrets/configuration.yml["environments"]["test"]["servers"]["redhat_mysql"]["ip"] - Username:
root - Authentication Type:
Key without passphrase - SSH Key:
~/secrets/id_rsa - SSH command:
bash /catapult/provisioners/redhat/provision.sh "test" "https://github.com/[your-name-here]/catapult" "~/secrets/configuration-user.yml["settings"]["gpg_key"]" "mysql" - Click Save
- Configure Catapult Project QC Plan
- Click the edit icon for the QC plan
- From the Stages tab, select Default Job
- Remove all tasks that may have been added by default during initial setup
- Click Add task
- Search for SSH Task and select it
- Host:
~/secrets/configuration.yml["environments"]["qc"]["servers"]["redhat"]["ip"] - Username:
root - Authentication Type:
Key without passphrase - SSH Key:
~/secrets/id_rsa - SSH command:
bash /catapult/provisioners/redhat/provision.sh "qc" "https://github.com/[your-name-here]/catapult" "~/secrets/configuration-user.yml["settings"]["gpg_key"]" "apache" - Click Save
- Click Add task
- Search for SSH Task and select it
- Host:
~/secrets/configuration.yml["environments"]["qc"]["servers"]["redhat_mysql"]["ip"] - Username:
root - Authentication Type:
Key without passphrase - SSH Key:
~/secrets/id_rsa - SSH command:
bash /catapult/provisioners/redhat/provision.sh "qc" "https://github.com/[your-name-here]/catapult" "~/secrets/configuration-user.yml["settings"]["gpg_key"]" "mysql" - Click Save
- Configure Catapult Project PRODUCTION Plan
- Click the edit icon for the PRODUCTION plan
- From the Stages tab, select Default Job
- Remove all tasks that may have been added by default during initial setup
- Click Add task
- Search for SSH Task and select it
- Host:
~/secrets/configuration.yml["environments"]["production"]["servers"]["redhat"]["ip"] - Username:
root - Authentication Type:
Key without passphrase - SSH Key:
~/secrets/id_rsa - SSH command:
bash /catapult/provisioners/redhat/provision.sh "production" "https://github.com/[your-name-here]/catapult" "~/secrets/configuration-user.yml["settings"]["gpg_key"]" "apache" - Click Save
- Click Add task
- Search for SSH Task and select it
- Host:
~/secrets/configuration.yml["environments"]["production"]["servers"]["redhat_mysql"]["ip"] - Username:
root - Authentication Type:
Key without passphrase - SSH Key:
~/secrets/id_rsa - SSH command:
bash /catapult/provisioners/redhat/provision.sh "production" "https://github.com/your-name-here/catapult" "~/secrets/configuration-user.yml["settings"]["gpg_key"]" "mysql" - Click Save
- Configure Catapult Project WINTEST Plan
- Click the edit icon for the WINTEST plan
- From the Stages tab, select Default Job
- Remove all tasks that may have been added by default during initial setup
- Click Add task
- Search for Script Task and select it
- Interpreter:
shell - Script Location:
Inline - Script body:
python /catapult/provisioners/windows/provision.py "~/secrets/configuration.yml["environments"]["test"]["servers"]["windows"]["ip"]" "Administrator" "~/secrets/configuration.yml["environments"]["test"]["servers"]["windows"]["admin_password"]" "test" "https://github.com/[your-name-here]/catapult" "~/secrets/configuration-user.yml["settings"]["gpg_key"]" "iis" - Click Save
- Click Add task
- Search for Script Task and select it
- Interpreter:
shell - Script Location:
Inline - Script body:
python /catapult/provisioners/windows/provision.py "~/secrets/configuration.yml["environments"]["test"]["servers"]["windows_mssql"]["ip"]" "Administrator" "~/secrets/configuration.yml["environments"]["test"]["servers"]["windows_mssql"]["admin_password"]" "test" "https://github.com/[your-name-here]/catapult" "~/secrets/configuration-user.yml["settings"]["gpg_key"]" "mssql" - Click Save
- Configure Catapult Project WINQC Plan
- Click the edit icon for the WINQC plan
- From the Stages tab, select Default Job
- Remove all tasks that may have been added by default during initial setup
- Click Add task
- Search for Script Task and select it
- Interpreter:
shell - Script Location:
Inline - Script body:
python /catapult/provisioners/windows/provision.py "~/secrets/configuration.yml["environments"]["qc"]["servers"]["windows"]["ip"]" "Administrator" "~/secrets/configuration.yml["environments"]["qc"]["servers"]["windows"]["admin_password"]" "qc" "https://github.com/[your-name-here]/catapult" "~/secrets/configuration-user.yml["settings"]["gpg_key"]" "iis" - Click Save
- Click Add task
- Search for Script Task and select it
- Interpreter:
shell - Script Location:
Inline - Script body:
python /catapult/provisioners/windows/provision.py "~/secrets/configuration.yml["environments"]["qc"]["servers"]["windows_mssql"]["ip"]" "Administrator" "~/secrets/configuration.yml["environments"]["qc"]["servers"]["windows_mssql"]["admin_password"]" "qc" "https://github.com/[your-name-here]/catapult" "~/secrets/configuration-user.yml["settings"]["gpg_key"]" "mssql" - Click Save
- Configure Catapult Project WINPROD Plan
- Click the edit icon for the WINPROD plan
- From the Stages tab, select Default Job
- Remove all tasks that may have been added by default during initial setup
- Click Add task
- Search for Script Task and select it
- Interpreter:
shell - Script Location:
Inline - Script body:
python /catapult/provisioners/windows/provision.py "~/secrets/configuration.yml["environments"]["production"]["servers"]["windows"]["ip"]" "Administrator" "~/secrets/configuration.yml["environments"]["production"]["servers"]["windows"]["admin_password"]" "production" "https://github.com/[your-name-here]/catapult" "~/secrets/configuration-user.yml["settings"]["gpg_key"]" "iis" - Click Save
- Click Add task
- Search for Script Task and select it
- Interpreter:
shell - Script Location:
Inline - Script body:
python /catapult/provisioners/windows/provision.py "~/secrets/configuration.yml["environments"]["production"]["servers"]["windows_mssql"]["ip"]" "Administrator" "~/secrets/configuration.yml["environments"]["production"]["servers"]["windows_mssql"]["admin_password"]" "production" "https://github.com/[your-name-here]/catapult" "~/secrets/configuration-user.yml["settings"]["gpg_key"]" "mssql" - Click Save
- Configure Catapult Project BUILD Plan
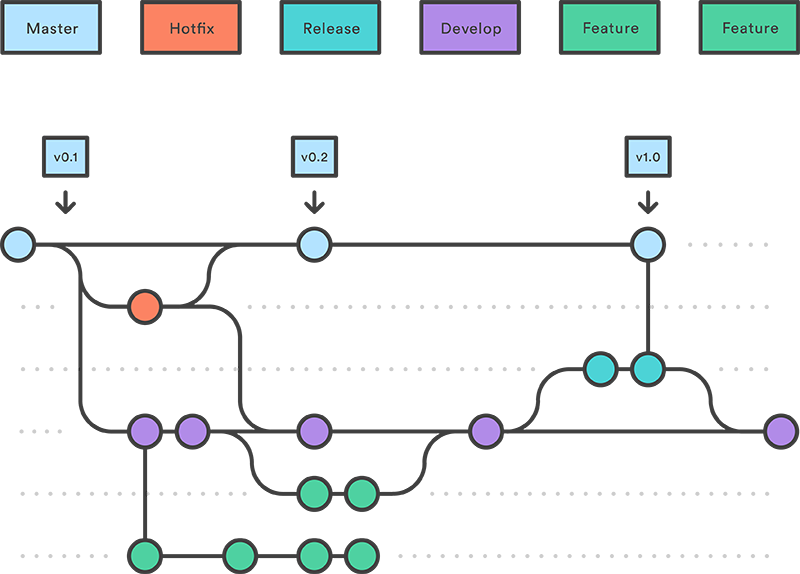
Catapult follows Gitflow for its infrastructure configuration and website development model - each environment is branch-based and changesets are introduced into each environment by pull requests from one branch to the next.
| LocalDev | Test | QC | Production | |
|---|---|---|---|---|
| Running Branch | develop | develop | release | master |
| Automated Deployments | No, manually via vagrant provision |
Yes, triggered by new commits to develop | Yes, nightly or manually via Bamboo | Yes, nightly or manually via Bamboo |
| Testing Activities | Component Test | Integration Test, System Test | Acceptance Test, Release Test | Operational Qualification |
| Scrum Activity | Sprint Start: Development of User Stories | Daily Scrum | Sprint Review | Sprint End: Accepted Product Release |
| Scrum Roles | Development Team | Scrum Master, Development Team, Product Owner (optional) | Scrum Master, Development Team, Product Owner | Product Owner |
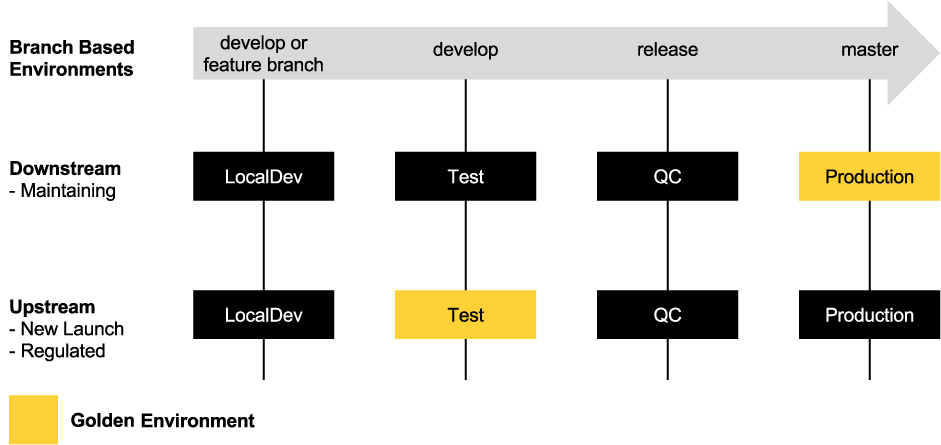
Catapult enforces a unique solution to Release Management of a website, Software Workflow. Software Workflow offers two modes, downstream or upstream, creating a "golden environment".
| LocalDev | Test | QC | Production | |
|---|---|---|---|---|
| Downstream Software Workflow - Database | Restore from develop ~/_sql folder of website repo |
Restore from develop ~/_sql folder of website repo |
Restore from release ~/_sql folder of website repo |
Auto-commit one backup per day (up to 500MB or 1) to master ~/_sql folder of website repo |
| Downstream Software Workflow - Untracked File Stores | rsync file stores from Production | rsync file stores from Production | rsync file stores from Production | |
| Downstream Software Workflow - Tracked File Stores | Pull file stores from develop | Pull file stores from develop | Pull file stores from release | Auto-commit file stores (up to 750MB each) to master of website repo |
Note: Catapult will automatically pull the master branch into the develop branch of a website's repository when in the Downstream Software Workflow direction.
| LocalDev | Test | QC | Production | |
|---|---|---|---|---|
| Upstream Software Workflow - Database | Restore from develop ~/_sql folder of website repo |
Auto-commit one backup per day (up to 500MB or 1) to develop ~/_sql folder of website repo |
Restore from release ~/_sql folder of website repo |
Restore from master ~/_sql folder of website repo |
| Upstream Software Workflow - Untracked File Stores | rsync file stores from Test | rsync file stores from Test | rsync file stores from Test | |
| Upstream Software Workflow - Tracked File Stores | Pull file stores from develop | Auto-commit file stores (up to 750MB each) to develop of website repo | Pull file stores from release | Pull file stores from master |
All Catapult configuration is stored in ~/secrets/configuration.yml and encrypted as ~/secrets/configuration.yml.gpg. There are three main sections - Company, Environments, and Websites.
The exclusive Company entry contains top-level company information and service credentials, configured during Setup Catapult.
name:- required: yes
- Your company's name or your name
- required: yes
email:- required: yes
- The primary contact email
- required: yes
timezone_redhat:- required: yes
- Your company's timezone in tz database format
- See this list for a list of valid tz database format timezones
- required: yes
timezone_windows:- required: yes
- Your company's timezone in Windows Standard Format
- See this list for a list of valid Windows Standard Format timezones
- required: yes
The remaining keys include credentials to services:
digitalocean_personal_access_tokenbitbucket_usernamebitbucket_passwordgithub_usernamegithub_passwordgithub_personal_access_tokenbamboo_base_urlbamboo_usernamebamboo_passwordaws_access_keyaws_secret_keybamboo_passwordcloudflare_api_keycloudflare_emailnewrelic_admin_api_keynewrelic_api_keynewrelic_license_keysendgrid_api_keysendgrid_usernamesendgrid_password
The setup- and maintenance-free Environments entries contain environment configurations such as IP addresses and system credentials - all of which are automatically set during Setup Catapult and Setup Environments.
Adding websites to Catapult is driven by simple configuration. After establishing a repository at GitHub or Bitbucket, simply add entries to ~/secrets/configuration.yml. The entries must be ordered alphabetically by domain name and all entries exist under the single websites: key as reflected in this example:
websites:
  apache:
  - domain: devopsgroup.io
    repo: git@github.com:devopsgroup-io/devopsgroup-io.git
  - domain: example.com
    repo: git@github.com:example-company/example.com.git
The following options are available:
domain:- required: yes
- example:
domain: example.com - example:
domain: subdomain.example.com- this root domain entry is the Production canonical domain name without
www.- a
www.subdomain is created for you - the key for all management orchestration of this website
- a
- one subdomain level is supported for this root domain entry (
subdomain.example.com) - manages DNS of LocalDev (via hosts file) and Test, QC, Production (via CloudFlare)
dev.example.com,test.example.com,qc.example.com,example.comwww.dev.example.com,www.test.example.com,www.qc.example.com,www.example.com
- this root domain entry is the Production canonical domain name without
domain_tld_override:- default: not set
- required: no
- example:
domain_tld_override: mycompany.com- a domain name under your name server authority to append to the top-level-domain (e.g.
.com)- useful when you cannot or do not wish to host the Test/QC website at the
domain
- useful when you cannot or do not wish to host the Test/QC website at the
- appends the
domain_tld_overridefor Environmentsdev.example.com.mycompany.com,test.example.com.mycompany.com,qc.example.com.mycompany.com,example.com.mycompany.comwww.dev.example.com.mycompany.com,www.test.example.com.mycompany.com,www.qc.example.com.mycompany.com,www.example.com.mycompany.com
- PLEASE NOTE: When removing this option from a website with
software:, you need to manually replace URLs in the database respective to thesoftware_workflow:option.- ie
vagrant ssh mycompany.com-test-redhat-mysql wp-cli --allow-root --path="/var/www/repositories/apache/example.com/(webroot if applicable)" search-replace ":\/\/(www\.)?(dev\.|test\.)?(example\.com\.mycompany\.com)" "://example.com" --regex
- ie
- a domain name under your name server authority to append to the top-level-domain (e.g.
configure_email:- default:
true - required: no
- option:
configure_email: false- should be used for when there is an already configured email provider at this website's domain
- disables creating dns spf records for the website's dns zone
- disables configuring website software smtp settings
- default:
force_auth:- default: not set
- required: no
- example:
force_auth: letmein- forces HTTP basic authentication in LocalDev, Test, QC, and Production (see
force_auth_exclude) letmeinis both the username and password
- forces HTTP basic authentication in LocalDev, Test, QC, and Production (see
force_auth_exclude:- default: not set
- required: no
- dependency:
force_auth: - example:
force_auth_exclude: ["production"]- array of select environments
["dev","test","qc","production"]to exclude from theforce_authoption
- array of select environments
force_https:- default:
false - required: no
- option:
force_https: true- rewrites all http traffic to https
- all
dev.domains in LocalDev will have an unsigned certificate warning - free certificates are created and managed for you compliments of CloudFlare (single-subdomain) and Let's Encrypt (multi-subdomain)
- default:
force_ip:- default: not set
- example:
force_ip: ["208.80.154.224"]- an array of valid IPv4 or IPv6 addresses that denies all traffic except for traffic coming from the defined addresses
- option applies to LocalDev, Test, QC, and Production unless
force_ip_excludeis defined - can be used as an alternative to
force_authfor when HTTP basic authentication cannot be used. e.g. Drupal 8 Basic Auth Module - can be used in addition to
force_authfor added security
force_ip_exclude:- default: not set
- required: no
- dependency:
force_ip: - example:
force_ip_exclude: ["production"]- array of select environments
["dev","test","qc","production"]to exclude from theforce_ipoption
- array of select environments
idle:- default:
false - required: no
- option:
idle: true- used for websites that are not under active software development
- turns off all website operations in the dev and test environment, including git pulls and database refreshing
- turns off nightly database backups in the test (upstream software workflow) and production (downstream software workflow) environments, hosting provider snapshots should be used for backups
- default:
repo:- required: yes
- example:
repo: git@github.com:devopsgroup-io/devopsgroup-io.git- the existing source code repository of your website (repo automatically created if none exists)
- GitHub and Bitbucket over SSH are supported, HTTPS is not supported
software:- default: not set
- required: no
- description: manages many aspects of software respective to each environment for websites with supported software types
- php version
- git ignore file entries
- directory and file permissions
- database configuration file
- software file stores
- operations such as cron, garbage collection, and cache rebuilds
- performance configuration
- database migrations
- database backups and restores
- url references in database
- administrator account integrity
- option:
software: codeigniter2 - option:
software: codeigniter3 - option:
software: concrete58 - option:
software: drupal6 - option:
software: drupal7 - option:
software: drupal8 - option:
software: elgg1 - option:
software: expressionengine3 - option:
software: joomla3 - option:
software: laravel5 - option:
software: mediawiki1 - option:
software: moodle3 - option:
software: silverstripe3 - option:
software: suitecrm7 - option:
software: wordpress4 - option:
software: wordpress5 - option:
software: wordpress6 - option:
software: xenforo1 - option:
software: xenforo2 - option:
software: zendframework2
software_auto_update:- default:
false - required: no
- dependency:
software: - option:
software_auto_update: true- manages software core and pluggable component (plugins, modules, etc.) updates to the latest compatible versions using the software's CLI tool or similar method
- updates only occur in the
software_workflowenvironment - not all
softwareis supported, see Software Auto Updates
- default:
software_dbprefix:- default: not set
- required: no
- dependency:
software: - example:
software_dbprefix: wp_- the value that prefixes table names within the database
- PLEASE NOTE: table prefixes included in software distributions, such as WordPress'
wp_, must be specified if desired
- PLEASE NOTE: table prefixes included in software distributions, such as WordPress'
- the value that prefixes table names within the database
software_dbtable_retain:- default: not set
- required: no
- dependency:
software: - dependency:
software_workflow: upstream - example:
software_dbtable_retain: ["comments","commentmeta"]- array of tables, excluding the
software_dbprefix:, to retain from the Production environment whensoftware_workflow:is set toupstream - this will backup and commit a
YYYYMMDD_software_dbtable_retain.sqlfile to~/_sql - this is useful in a content-regulated situation when moving a database upstream is necessary, however, needing to retain a table that includes, for example, a table of contact form submissions
- array of tables, excluding the
software_workflow:- required: yes
- dependency:
software: - option:
software_workflow: downstream- this option is useful for maintaining a website
- specifies the Production environment and the
masterbranch as the source and automated save point for software files and database - the
masterbranch is automatically merged into thedevelopbranch for convenience
- option:
software_workflow: upstream- this option is useful for launching a new website or maintaining a regulated website
- specifies the Test environment and the
developbranch as the source and automated save point for software files and database - REMINDER: websites with this option will have their Production instance overwritten with software files and database from the
masterbranch - see Release Management
webroot:- default:
/ - required: no
- example:
webroot: www/- if the webroot differs from the repo root, specify it here
- must include the trailing slash
- default:
Website development is done on the developer's workstation using the LocalDev environment for local and real-time software development in an environment that is exactly matching to upstream environments.
Once websites are added to your configuration and you have performed a provision of your LocalDev environment, repositories for websites are cloned into your Catapult instance at ~/repositories and into the respective apache or iis folder, listed by the domain name. Website repository folders are linked between the developer's workstation (host) and the LocalDev environment (guest) for real-time development.
Catapult enforces software configuration best practices for software fresh installs. A typical software fresh install workflow would be to fork the software project on GitHub and add then add a new website entry to your ~/configuration.yml file. Given the broad spectrum of software requirements there are minor configuration caveats worth noting:
| Software | Install Approach | Install Notes |
|---|---|---|
codeigniter2 |
Follow the Installation Instructions. | |
codeigniter3 |
Follow the Installation Instructions. | |
concrete58 |
Download | Download concrete5. |
drupal6 |
Drush | drush pm-download drupal-6 |
drupal7 |
Drush | drush pm-download drupal-7 |
drupal8 |
Drush | drush pm-download drupal-8 |
elgg1 |
Fork | Follow the installation Overview. Catapult requires the dataroot directory to be within the webroot, it's pertinent to create a .gitignore to ignore and .htaccess to deny access to this directory. |
elgg2 |
Fork | Follow the installation Overview. Catapult requires the dataroot directory to be within the webroot, it's pertinent to create a .gitignore to ignore and .htaccess to deny access to this directory. |
expressionengine3 |
Download | |
joomla3 |
Fork | |
laravel5 |
Composer | Follow the Composer Create-Project documentation. |
mediawiki1 |
Fork | |
moodle3 |
Fork | Catapult requires the moodledata directory to be within the webroot, it's pertinent to create a .gitignore to ignore and .htaccess to deny access to this directory. |
silverstripe3 |
Composer | Follow the Installing and Upgrading with Composer. During a fresh install, the database config file mysite/_config.php will need to be given 0777 permissions. |
suitecrm7 |
Fork | |
wordpress4 |
Fork | |
wordpress5 |
Fork | |
wordpress6 |
Fork | |
xenforo1 |
Download | |
xenforo2 |
Download | |
zendframework2 |
Fork | Your best bet is to start from the zendframework/ZendSkeletonApplication GitHub project. Catapult assumes Zend Framework is at the root of your repo and writes a database config file at config/autoload/global.php, you will also need to set webroot: public/ in your Catapult configuration. |
The below table outlines what software is supported for the software_auto_update website option. When this option is set to true, Catapult manages software core and pluggable component (plugins, modules, etc.) updates to the latest compatible versions using the software's CLI tool or similar method.
| Software | software_auto_update Support |
|---|---|
codeigniter2 |
✅ |
codeigniter3 |
✅ |
concrete58 |
✅ |
drupal6 |
✅ |
drupal7 |
✅ |
drupal8 |
✅ |
elgg1 |
❌ |
elgg2 |
❌ |
expressionengine3 |
❌ |
joomla3 |
❌ |
laravel5 |
❌ |
mediawiki1 |
❌ |
moodle3 |
✅ |
silverstripe3 |
❌ |
suitecrm7 |
❌ |
wordpress4 |
✅ |
wordpress5 |
✅ |
wordpress6 |
✅ |
xenforo1 |
❌ |
xenforo2 |
✅ |
zendframework2 |
✅ |
In the scenario where an update may overwrite customizations to a file that is expected to be able to be customized (e.g. .htaccess, .gitignore, or robots.txt), you may create an _append directory within the repository root of the website with files containing your customizations.
- The files in
~/_append/will be appended to files in~/{webroot}/ - The append filenames must match the filenames that you would like to append.
- The append files must only contain the lines of content that you would like to append.
- Please note that only files that allow for hash style comments (i.e.
# THIS IS A COMMENT) are supported. - Please note that only files that are in the root of the website's
webrootare supported.
Catapult manages free Domain Validation (DV) certificates compliments of Cloudflare and Let's Encrypt automatically for all of your websites and optionally manages purchased certificates.
It's important to note that certificates are not dependent on protocols. Many vendors tend to use the phrase "SSL/TLS certificate", it may be more accurate to call them "certificates for use with SSL and TLS" since the protocols are determined by your server configuration, not the certificates themselves. It's likely you will continue to see certificates referred to as SSL certificates because at this point that’s the term more people are familiar with, however, we're just calling them "certificates".
Browser Compatibility
Catapult tracks Mozilla's Operations Security (OpSec) team Security/Server Side TLS recommendations document and the "Intermediate" recommended configuration and is our objective to maintain at least an A rating with Qualys Labs. An important note is that Catapult does not support old browsers that do not support Server Name Indication (SNI). Here is Catapult's list of oldest compatible browsers:
- Chrome 1
- Internet Explorer 7 / Windows Vista
- Internet Explorer 8 / Windows 7
- Firefox 1
- Safari 1
Purchased Certificates
Depending on your compliance needs you may need to purchase custom certificates unique to your organization. Below is a table of the three different types of certificates that should be taken into account when auditing your compliance needs.
| Feature | Domain Validation (DV certificates) | Organization Validation (OV certificates) | Extended Validation (EV certificates) |
|---|---|---|---|
| Single Domain Certificate | ✅ | ✅ | ✅ |
| Wildcard Certificate | ✅ | ✅ | ❌ |
| Multiple Domain Certificate | ✅ | ✅ | ✅ |
| Cost | $ | $$ | $$$ |
| Issuing Process | Automatic | Application vetted by Certificate Authority | Application vetted by Certificate Authority |
| Issuing Criteria: Domain Name(s) Ownership | ✅ | ✅ | ✅ |
| Issuing Criteria: Organization Existence | ❌ | ✅ | ✅ |
| Issuing Criteria: Organization Legal Existence | ❌ | ❌ | ✅ |
| Industry Accepted Issuing Standard | ❌ | ❌ | CAB EV SSL Certificate Guidelines |
| Standard Browser Padlock | ✅ | ✅ | ❌ |
| Greenbar Browser Padlock | ❌ | ❌ | ✅ |
| Browser Compatibility | Google Chrome 1+, Mozilla Firefox 1+, Internet Explorer 5+ | Google Chrome 1+, Mozilla Firefox 1+, Internet Explorer 5+ | Google Chrome 1+, Mozilla Firefox 3+, Internet Explorer 7+ |
Catapult optionally manages custom certificates purchased and issued by a Certificate Authority. The following files are required for Catapult to detect and use the custom certificate:
- A bundled file that contains the Root Certificate Authority (CA) certificate and any Intermediate Certificate Authority certificates
- CA root and intermediate certificate files can be combined like this
cat COMODORSADomainValidationSecureServerCA.crt COMODORSAAddTrustCA.crt AddTrustExternalCARoot.crt >> example_com.ca-bundle
- CA root and intermediate certificate files can be combined like this
- The certificate file
- The Certificate Signing Request (CSR) including the CSR file and private key file
- Generated with
openssl req -new -newkey rsa:2048 -nodes -keyout server.key -out server.csr - Your Certificate Signing Request file
- Your private key file
- Generated with
Here is an example of a certificate implementation for example.com:
reporoot/_cert/example_com/example_com.ca-bundlereporoot/_cert/example_com/example_com.crtreporoot/_cert/example_com/server.csrreporoot/_cert/example_com/server.key
Here is an example of a certificate implementation for dev.example.com:
reporoot/_cert/dev_example_com/dev_example_com.ca-bundlereporoot/_cert/dev_example_com/dev_example_com.crtreporoot/_cert/dev_example_com/server.csrreporoot/_cert/dev_example_com/server.key
Note: If you have a wildcard certificate, duplicate each environment directory and use the same set of files
Forcing www is generally software-specific, unlike forcing the HTTPS protocol, which is environment-specific and driven by the force_https option. To force www (why force www?), please follow the respective guides per software below.
For software that does not have specific documentation, please follow this generic .htaccess approach http://stackoverflow.com/a/4958847/4838803
| Software | Approach | Documentation |
|---|---|---|
codeigniter2 |
.htaccess |
|
codeigniter3 |
.htaccess |
|
concrete58 |
.htaccess |
|
drupal6 |
.htaccess |
|
drupal7 |
.htaccess |
|
drupal8 |
.htaccess |
|
elgg1 |
||
expressionengine3 |
||
joomla3 |
||
laravel5 |
||
mediawiki1 |
||
moodle3 |
||
silverstripe3 |
mysite/_config.php |
http://api.silverstripe.org/3.1/class-Director.html -> http://stackoverflow.com/a/26865882 |
suitecrm7 |
||
wordpress4 |
Database | http://codex.wordpress.org/Changing_The_Site_URL |
wordpress5 |
Database | http://codex.wordpress.org/Changing_The_Site_URL |
wordpress6 |
Database | http://codex.wordpress.org/Changing_The_Site_URL |
xenforo1 |
||
xenforo2 |
||
zendframework2 |
Debug output, unlike logging, is a configuration that outputs exceptions on-screen of your website while you're developing in LocalDev for convenience. It also aligns with the testing activies as defined in Release Management. Debug output is configured at two levels; PHP and software-specific, the below chart provides a breakdown.
| LocalDev | Test | QC | Production |
|---|---|---|---|
| Verbose | Verbose | Hidden | Hidden |
Caching plays a very important role in the performance of your website and enforces and recommends many performance optimizations. Catapult generally enforces caching of files to 1 year, because of this, to ensure that a new website release is reflected in a user's browser you should consider semantic versioning of website resource files. Here's an example of query string cache busting:
<link rel="stylesheet" href="/css/style.min.css?v=3.4.1">
Ready to deploy a new release? Update the version number and the cache will be "busted":
<link rel="stylesheet" href="/css/style.min.css?v=3.4.2">
A more complicated, yet effective method of cache-busting is by using versioned folders. Resources with a "?" in the URL are not cached by some proxy caching servers. Here is an example of URL path cache busting:
<link rel="stylesheet" href="/css/3.4.1/style.min.css">
Ready to deploy a new release? Update the version number and the cache will be "busted":
<link rel="stylesheet" href="/css/3.4.2/style.min.css">
Each software type will vary as to the standard convention of website resource file versioning, here is a Wordpress example to get you started.
Progressive Web App (PWA), in general, is a term used to denote web apps that use the latest web technologies. Catapult allows a manifest.json file to be placed in your webroot. Note that this will be accessible regardless of whether or not you are using the force_auth option, which is necessary because manifest.json is sometimes accessed outside of the session under which you authenticated. Don't forget to include the link tag <link rel="manifest" href="/manifest.json"> to notify the browser of your manifest. More information regarding PWAs can be found at Google's Web App Manifest and Progressive Web App Checklist.
SMTP: SendGrid
Email delivery is an art, there are many considerations when trying to get an email into someone's inbox. Some considerations include message encryption, authentication, IP reputation, bounce management, analytics visibility, and more. For that reason, Catapult requires the setup of the managed SMTP relay provider, SendGrid. To configure SendGrid with your website's software, please set the SMTP configuration to the following:
- SMTP host:
smtp.sendgrid.net - SMTP port:
587 - Encryption:
TLS - Authentication:
yes - Username:
~/secrets/configuration.yml["company"]["sendgrid_username"] - Password:
~/secrets/configuration.yml["company"]["sendgrid_password"]
An example implementation would be the WP Mail SMTP WordPress plugin.
SMTP: Default
If you do not use SendGrid as your SMTP relay provider in your website software SMTP configuration, then the following default configurations will apply to assist with email deliverability:
- SPF DNS record: If your website's domain is configured to use Cloudflare, Catapult will automatically configure an SPF record for each environment.
- TLS message encryption: If the receiving mail server supports it, the message will be TLS encrypted.
Bounce Management
- With SendGrid: Catapult automatically configures SendGrid to forward bounces to your
~/secrets/configuration.yml["company"]["email"]to clear hard bounces every 5 days and soft bounces every 3 days. - Without SendGrid: Postfix will retry sending every hour for five days. Catapult cron looks for bounces and emails them to your
~/secrets/configuration.yml["company"]["email"]daily.
The following HTTP request limits are defined for all websites:
HTTP (ModSecurity) Limits
- Maximum request body size excluding the size of any files being transported in the request (
SecRequestBodyNoFilesLimit):1 MB- Limits the
application/x-www-form-urlencodedContent-Type
- Limits the
- Maximum request body size (
SecRequestBodyLimit):64 MB- Limits the
multi-partContent-Type
- Limits the
PHP Limits
- Maximum size of an uploaded file (
upload_max_filesize):16 MB - Maximum size of post data allowed (
post_max_size):64 MB
Troubleshooting
If you are experiencing 401 or 413 HTTP response codes it may be due to the HTTP client not supporting the HTTP 1.1 Expect header. This header essentially says "I've got a huge payload, but before I send it please let me know if you can handle it". This gives the endpoints time to renegotiate the client certificate before the payload is sent. The SSLRenegBufferSize is set to 128 KB for security reasons, so if your payload exceeds this size it will fail if the client does not support the HTTP 1.1 Expect header. Read more here.
The best way to handle changes to the software's database schema is through a migrations system. Database migrations are software-specific and are invoked via Catapult for you, here we outline the specifics:
- Databases are dumped once per day to the
~/_sqlfolder and restored, dependent on the environment andsoftware_workflowsetting per website - see Release Management for details. - Leverage Catapult's workflow model (configured by
software_workflow) to trigger a database refresh. From the develop branch, commit a deletion of today's database backup lock file from the~/_sqlfolder.
Oracle SQL Developer is the recommended tool, to connect to and work with databases. It is free, commercially supported, cross-platform, and supports multiple database types.
- Download and install Oracle SQL Developer, some platforms require the Java SE Development Kit
- Install third-party JDBC drivers: Oracle SQL Developer uses JDBC, via a .jar file, to connect to different database types. To install a new JDBC connector, download the respective .jar file then from Oracle SQL Developer > Preferences > Database > Third Party JDBC Drivers, click Add Entry.4
- MySQL http://dev.mysql.com/downloads/connector/j/5.0.html
- For convenience, you may also use
~/catapult/installers/mysql-connector-java-5.0.8-bin.jar
- For convenience, you may also use
- MSSQL https://sourceforge.net/projects/jtds/files/jtds/
- For convenience, you may also use
~/catapult/installers/jtds-1.3.1.jar
- For convenience, you may also use
- MySQL http://dev.mysql.com/downloads/connector/j/5.0.html
- Connecting to: LocalDev
- The firewall allows direct connection to the database server.
- From Oracle SQL Developer > View > Connections, add a New Connection with the respective environment's mysql user values in
~/secrets/configuration.yml.
- From Oracle SQL Developer > View > Connections, add a New Connection with the respective environment's mysql user values in
- The firewall allows direct connection to the database server.
- Connecting to: Test, QC, Production
- The firewall does not allow a direct mysql connection to the database servers.
- From Oracle SQL Developer > View > SSH, add a New SSH Host in Oracle SQL Developer with the respective environment's mysql server host public IP address, root username with key file at
~/secrets/id_rsa.- Create a New Local Port Forward with 127.0.0.1 as the IP address and port 3306.
- From Oracle SQL Developer > View > Connections, add a New Connection with the respective environment's mysql user values in
~/secrets/configuration.yml.- The hostname will be localhost since we are forwarding the port through our local SSH tunnel.
- From Oracle SQL Developer > View > SSH, add a New SSH Host in Oracle SQL Developer with the respective environment's mysql server host public IP address, root username with key file at
- The firewall does not allow a direct mysql connection to the database servers.
Always weigh the risk of not performing a production hotfix versus performing it, as production hotfixes require going outside of the normal development and testing workflow. Below is an example of how you can determine severity:
Ask key stakeholders the following questions and assign a 1 or 0 for the answer, then add up the total:
- What is the organizational risk?
- High = 1 or Low = 0
- How many users does this affect?
- Many = 1 or Few = 0
- Is there a workaround?
- No = 1 or Yes = 0
- What is the user impact?
- High = 1 or Low = 0
The total will determine the level of severity, typically a 4 would be considered a candidate for a production hotfix:
- 0=Tolerate
- 1=Trivial
- 2=Minor
- 3=Major
- 4=Critical
Performing a production hotfix varies depending on the website's software type, software_workflow direction, and type of change (code or database).
software_workflow: downstream- Code
- In
~/configuration.yml, temporarily set the environments -> dev -> branch key tobranch: master, and do not commit the change - Provision any related LocalDev servers
- Develop, test, then commit any changes directly to the
masterbranch - Run the Production Bamboo build and verify the release
- Create a pull request and merge the
masterbranch into thedevelopbranch - Set the environments -> dev -> branch key back to
branch: develop - Provision any related LocalDev servers
- In
- Database
- Login to the Production website and make the change
- (any database change that is beyond the direct capability of the
softwareshould not be taken out as a production hotfix)
- (any database change that is beyond the direct capability of the
- Login to the Production website and make the change
- Code
software_workflow: upstream- Code
- In
~/configuration.yml, temporarily set the environments -> dev -> branch key tobranch: master, and do not commit the change - Provision any related LocalDev servers
- Develop, test, then commit any changes directly to the
masterbranch - Run the Production build and verify the release
- Create a pull request and merge the
masterbranch into thedevelopbranch - Set the environments -> dev -> branch key back to
branch: develop - Provision any related LocalDev servers
- In
- Database
- Login to the Production and Test website and make the change
- (any database change that is beyond the direct capability of logging into the
softwareand safely making the change, should not be taken out as a production hotfix)
- (any database change that is beyond the direct capability of logging into the
- From LocalDev and the
developbranch of the website's repository, commit a deletion of today's (if exists) SQL dump file from within the~/sqlfolder- (this ensures there is a known committed SQL dump of your change to the
developbranch for when this branch is merged upstream)
- (this ensures there is a known committed SQL dump of your change to the
- From LocalDev, temporarily checkout the
masterbranch of the website's repository, make your change in the most recent SQL dump file from within the~/sqlfolder- (this ensures that during the next Production build your change is not overwritten)
- Login to the Production and Test website and make the change
- Code
The automated deployment cycle releases changesets merged into respective environment branches for websites and your Catapult configuration, in addition to running server updates.
| Environment | Scheduled |
|---|---|
| LocalDev | n/a, requires provision |
| Test | 12:00 AM |
| QC | 1:00 AM |
| Production | 2:00 AM |
- Operating System and server software updates
- Website software updates
- Website repository changesets
- Website software database restores
- Website software database migrations
- Website software database backups
A maintenance cycle is scheduled for defined times within the timezone that is defined within ~/secrets/configuration.yml at the timezone_redhat and timezone_windows values of the Company entry. This ensures system and website software are patched and other security controls are run within your infrastructure to automatically mitigate security vulnerabilities.
Daily maintenance occurs:
- Red Hat - 3:05 AM
- Windows - 2:00 AM
Daily maintenance includes:
- Updating Operating System and server software
- Rotating logs
- Discovering mail that has failed to send
Weekly maintenance occurs:
- Red Hat - Sunday 3:25 AM
- Windows - Sunday 3:00 AM
Weekly maintenance includes:
- Security Preventive Controls
- Security Detective Controls
- Security Corrective Controls
- Auto-rewew HTTPS certificate
- Git garbage collection for website repositories
- Performing database maintenance
Servers will be rebooted when:
- Red Hat - a kernel update is staged
- Windows - Microsoft Update indicates a restart is required
Being able to react to disasters immediately and consistently is crucial - Catapult affords you fast rebuilding and rollbacks.
- LocalDev is rebuildable by running
vagrant destroyand thenvagrant upfor the respective virtual machine. - Test, QC, and Production are rebuildable by running
vagrant rebuildfor the respective virtual machine - this is necessary (rather than a destroy and up) to retain the IP addresses of the machine.
Production Website Rollbacks:
software_workflow: upstream- Files
- Reverse the offending merge commit from the master branch and run the Production deployment.
- Database
- Reverse the offending merge commit from the master branch and run the Production deployment.
- Note: The Production database is overwritten and restored from the latest sql dump file from Test in the
~/_sqlfolder.
- Files
software_workflow: downstream- Files
- Reverse the offending merge commit from the master branch and run the Production deployment.
- Database
- Reverse the offending database dump auto-commit from the develop branch and manually restore the Production database from the desired sql dump file in the
~/_sqlfolder. - Note: The Production database is dumped once per day when the production build is run.
- Reverse the offending database dump auto-commit from the develop branch and manually restore the Production database from the desired sql dump file in the
- Files
Catapult enforces many security best practices that are important for you to be aware of and understand. These controls avoid, detect, counteract, or minimize security risks to the platform and visitors. The Lynis security auditing tool is used to evaluate and harden the configuration of the system.
Edge
- *DDoS protection
- *Bad browser
- *Bad IP from Project Honeypot and Cloudflare's Threat Score list
Server
- Hardened kernel and network interface configuration
- Hardened SSH configuration including key-only authentication
- Strict firewall ruleset
- Automatic weekly kernel updates
Application
- OWASP ModSecurity Core Rule Set (CRS) Apache rules
- Mozilla OpSec strict HTTPS protocol and cipher suite
- OWASP Secure Headers Project recommended HTTP response headers
- Automatic hourly application updates
Software
- Strict directory and file permissions
- Automatic software updates during a build
* This security feature only takes effect when the website's nameservers are set to CloudFlare
- ARPwatch (Address Resolution Protocol) notifies of changed MAC/IP pairings
- Fail2Ban filters for sshd, sshd-ddos, and apache-botsearch
- SysStat collects and stores system performance and usage activity
- Weekly report of 404s and error keywords targeted at the server and virtual hosts
- Weekly ClamAV antivirus scan of website files
Catapult introduces many best practice data protection measures, however, the security of personal data is ultimately your responsibility. Generally speaking, if personal information is compromised, you are required by law to notify the party. Laws vary country-by-country and state-by-state and can be enforceable in the state or country where the individual is physically located when the data is collected. This means that, even if your website is hosted within the U.S., you could potentially be subject to another country's data protection laws. The main principles of data protection include:
- Privacy by design
- Right to access
- Right to be forgotten
- Data portability
- Breach notification
Personally identifiable information (PII), in the U.S., is generally classified as an individual's first and last name in combination with a Social Security number, driver's license number, or financial account number. For more information, please see this list of data breach laws by U.S. states compiled by IT Governance.
The General Data Protection Regulation (GDPR) is a regulation in E.U. law on data protection and privacy for all individuals within the European Union that becomes enforceable starting May 25, 2018. Article 4(1) of the GDPR defines "personal data" as any information relating to an identified or identifiable natural person ('data subject'); an identifiable natural person is one who can be identified, directly or indirectly, in particular by reference to an identifier such as a name, an identification number, location data, an online identifier or to one or more factors specific to the physical, physiological, genetic, mental, economic, cultural or social identity of that natural person. For more information, please see the GDPR.
There are many complex compliance and audit standards that are your responsibility to understand and execute. Each Catapult instance is independent to you - including the required services that you signed up for during Services Setup.
Security of the cloud. This is the responsibility of the cloud service.
| Service | Catapult Context | SOC 1 | SOC 2 | SOC 3 |
|---|---|---|---|---|
| AWS EC2 US EAST | Windows server hosting | ✅ | ✅ | ✅ |
| BitBucket | Repository hosting | ✅ | ||
| DigitalOcean NYC3 | Red Hat and Bamboo server hosting | ✅ | ✅ | |
| GitHub | Repository hosting | |||
| New Relic | Server communication, log files | ✅ |
Security in the cloud. This is your responsibility, however, the underlying service must have basic support for the compliance scenario.
| Service | Catapult Context | HIPAA BAA | PCI DSS Level 1 |
|---|---|---|---|
| AWS EC2 US EAST | Windows server hosting | ✅ | ✅ |
| CloudFlare (Pro) | Web application firewall | ✅ | |
| BitBucket | Repository hosting | ❌ | |
| DigitalOcean NYC3 | Red Hat and Bamboo server hosting | ❓ | ❓ |
| GitHub | Repository hosting | ❓ |
See an error or have a suggestion? Email security@devopsgroup.io if confidential or submit a pull request - we appreciate all feedback.
Your website's performance is maximized with bandwidth, caching, and geographic optimizations. Catapult enforces these throughout every layer of your website, all in an effort to improve page loading times. Below is an example of the great performance gain of when page caching and CSS/JS aggregation are enabled for a Drupal website - all of which is managed by Catapult.
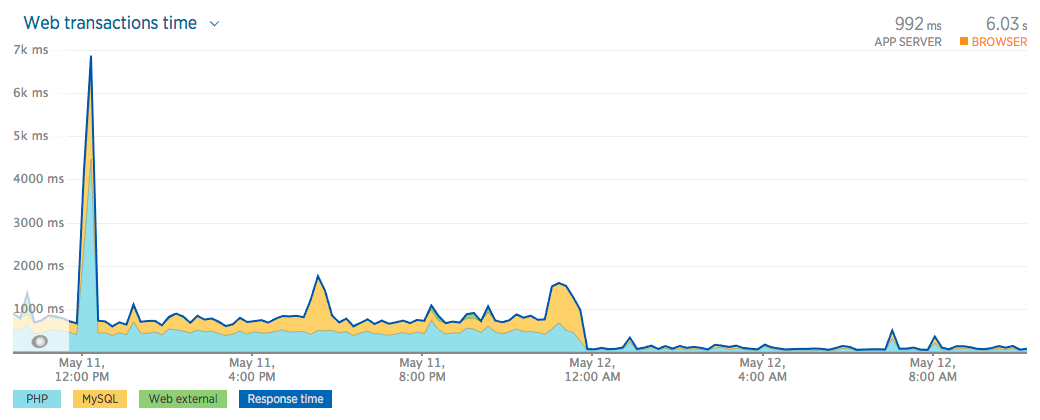
Please note: Any performance optimization that would impact development or component testing in LocalDev is disabled; this workflow aligns with the testing activites described in the Release Management section.
Bandwidth optimizations are made to lower the total bytes downloaded and decrease the amount of requests made by the browser.
- HTTP Content-Encoding headers are set for a defined list of files, this will compress the file sent from the server to the client using gzip. This saves network bandwidth and total time for the client to download the file.
- Aggregating CSS and JavaScript files is enabled for the website's software type if available.
Caching is enabled for many layers of your website including storing pre-interpreted PHP in memory, storing page caches for certain software types, and storing files on visitor's local disk.
- Zend OPcache is enabled for faster PHP execution through opcode caching and optimization.
- Page caching is enabled for the website's software type if available.
- HTTP Cache-Control headers are set to expire browser-cached files after a default of 7 days; longer for specific file types.
- HTTP ETag headers are set for all files, the ETag is a unique value based on the file modified time and size in bytes. If the ETag value is unchanged then a cached version is served if available. This saves network bandwidth.
Shortening the physical distance between the server and the visitor can trim priceless milliseconds from page loading time. (One might use this as an argument as to why browser caching and your overall caching strategy is so important.)
- If your website's name servers are set to Cloudflare, you will take advantage of files being cached across their global network, bringing it closer to visitors from every region.
Catapult as a platform can only reach so far into the configuration of your website's software. Here are a few recommended development practices that will improve the performance of your website:
- Use a development task automation tool, like Gulp to perform the following:
- Execute
<script>tags asynchronously- Note that asynchronous scripts are not guaranteed to execute in specified order
- Execute
<script>tags after the document has been parsed with defer- Note this is the same as placing script tags just before the
</body>tag
- Note this is the same as placing script tags just before the
- Use CSS sprites to reduce the number of HTTP requests
- Take advantage of resource prioritization using
rel="prefetch" - Take advantage of cross-origin performance gains for external
target="_blank"links, userel="noopener" - Write PHP the right way
- Practice self-documenting code
- Write efficient PHP
Google's PageSpeed Insights and Lighthouse are good tools to test for performance optimizations.
Your website's capacity potential is defined by two key elements; 1) your website's average resource requirement per request and 2) server resources available. We recommend to first Performance optimize your website and then consider your website's capacity potential through Performance and Capacity Testing.
Catapult defines horizontal scaling by adding additional servers, this affords you increased capacity. Currently, only the Red Hat stack supports horizontal scaling and only one (1) additional server is supported. Each Red Hat environment (LocalDev, Test, QC, and Production) supports horizontal scaling independently. To spin up the additional server per environment, please run the following command:
* `vagrant up ~/secrets/configuration.yml["company"]["name"]-dev-redhat1`
* `vagrant up ~/secrets/configuration.yml["company"]["name"]-test-redhat1`
* `vagrant up ~/secrets/configuration.yml["company"]["name"]-qc-redhat1`
* `vagrant up ~/secrets/configuration.yml["company"]["name"]-production-redhat1`
HAProxy is used to facilitate capacity management by means of a layer 7 load balancer. The HAProxy status dashboard is made available to you for each environment by visiting port 32700 at the respective environment's -redhat server ip address as defined in ~/secrets/configuration.yml. As example, 42.67.232.56:32700. The username to log in is admin and the password is the password as defined at the respective environment's ["software"]["admin_password"] entry.
Often disregarded, performance and capacity testing are crucial components of quality assurance. The risks of neglecting performance and capacity testing include downtime, SEO impacts, gaps in analytics, poor user experience, and unknown ability to scale.
With Catapult's exactly duplicated configuration, even the Test environment can accurately represent the performance and capacity potential of the Production environment. ApacheBench is a powerful tool to test request performance and concurrency - macOS includes ApacheBench out of the box, while this StackOverflow post details how to get up and running on Windows.
ApacheBench enables us to perform both performance and capacity testing. Each website has its own unique resource requirements and knowing these requirements are paramount to the performance, capacity, and uptime of your website.
-
Performance testing
- Definition: Testing for the time it takes for a client to request a web page from the server.
- Why: Enables us to see real-world request times for our website.
- How to improve: Please reference the Performance section and its many optimization recommendations.
-
Capacity testing
- Definition: Testing many concurrent requests at a time to uncover when performance begins to degrade.
- Why: Enables us to see real-world capacity limits for our website's unique resource fingerprint.
- How to improve: Please reference the Capacity section and its many optimization recommendations.
Using a website with historical Google Analytics data, access the Audience Overview and find the busiest Pageview day from the past 30 days, and then drill into that date. Find the hour with the most page views, and then the accompanying Avg. Session Duration. Using the following formula, we are able to find the Concurrency Maxiumum.
(Pageviews x Avg. Session Duration in seconds) / 3,600 seconds = Concurrency Maximum
365,000 pageviews per month
Take a website with an average of 500 pageviews per hour, or 365,000 pageviews per month, which has a busiest hour of 1,000 pageviews.
| Pageviews | Avg. Session Duration | Total Session Seconds | Concurrency Maximum |
|---|---|---|---|
| 1,000 | 60 minutes (3,600 seconds) | 3,600,000 | 1,000 |
| 1,000 | 10 minutes (600 seconds) | 600,000 | 166 |
| 1,000 | 5 minutes (300 seconds) | 300,000 | 88 |
| 1,000 | 1 minute (60 seconds) | 60,000 | 16 |
100 concurrent requests performed 10 times
ab -l -r -n 1000 -c 100 -H "Accept-Encoding: gzip, deflate" http://test.drupal7.devopsgroup.io/
14,600 pageviews per month
Take a website with an average of 20 pageviews per hour, or 14,600 pageviews per month, which has a busiest hour of 100 pageviews.
| Pageviews | Avg. Session Duration | Total Session Seconds | Concurrency Maximum |
|---|---|---|---|
| 100 | 60 minutes (3,600 seconds) | 36,000 | 1,000 |
| 100 | 10 minutes (600 seconds) | 60,000 | 16 |
| 100 | 5 minutes (300 seconds) | 30,000 | 8 |
| 100 | 1 minute (60 seconds) | 6,000 | 1.6 |
10 concurrent requests performed 10 times
ab -l -r -n 100 -c 10 -H "Accept-Encoding: gzip, deflate" http://test.drupal7.devopsgroup.io/
Using a satisfied Apdex of 7 seconds, we can see that 98% of users would be satisfied.
Percentage of the requests served within a certain time (ms)
  50%     19
  66%     21
  75%     24
  80%     27
  90%     34
  95%   3968
  98%   6127
  99%   7227
 100%   7325 (longest request)
This section outlines Catapult usage and maintenance.
In the LocalDev environment, convenience commands are provided for use with Vagrant. These allow you to execute reload, provision, or up against both dev environment VMs with a single command. Simply use dev as the machine name; e.g. vagrant reload dev or vagrant provision dev.
As your team members change, there may be a need to rotate Catapult secrets. The following is the recommended method and order to do so.
- GPG Passphrase
- Disable all Bamboo build plans
- Generate a new GPG passphrase, as described in the Instance Setup, and place it at
~/secrets/configuration-user.yml["settings"]["gpg_key"] - Encrypt the file
~secrets/configuration.ymlwith the new GPG passphrase:gpg --verbose --batch --yes --passphrase "[insert newly generated passphrase here]" --output secrets/configuration.yml.gpg --armor --cipher-algo AES256 --symmetric secrets/configuration.yml - Encrypt the file
~secrets/id_rsawith the new GPG passphrase:gpg --verbose --batch --yes --passphrase "[insert newly generated passphrase here]" --output secrets/id_rsa.gpg --armor --cipher-algo AES256 --symmetric secrets/id_rsa - Encrypt the file
~secrets/secrets/id_rsa.pubwith the new GPG passphrase:gpg --verbose --batch --yes --passphrase "[insert newly generated passphrase here]" --output secrets/id_rsa.pub.gpg --armor --cipher-algo AES256 --symmetric secrets/id_rsa.pub - Commit the updated files to the
developbranch, then ensure the TEST Bamboo build plan's jobs have the updated GPG passphrase, and run the build for confirmation. - Create and merge a pull request from
developinto thereleasebranch, then ensure the QC Bamboo build plan's jobs have the updated GPG passphrase, and run the build for confirmation. - Create and merge a pull request from
releaseinto themasterbranch, then ensure the PROD Bamboo build plan's jobs have the updated GPG passphrase, and run the build for confirmation.
- Bamboo Server
- Login to the Bamboo Server and change the password
- With GPG Edit Mode enabled, update
~/secrets/configuration.ymlwith the new credential and commit
- DigitalOcean
- Login to DigitalOcean and generate a new personal access token and delete the old
- With GPG Edit Mode enabled, update
~/secrets/configuration.ymlwith the new credential and commit
- Bitbucket
- Login to Bitbucket and change the password
- With GPG Edit Mode enabled, update
~/secrets/configuration.ymlwith the new credential and commit
- GitHub
- Login to GitHub and change the password, generate a new personal access token and delete the old
- With GPG Edit Mode enabled, update
~/secrets/configuration.ymlwith the new credential and commit
Below is a log of service-related troubleshooting. If you're having issues related to Catapult, submit a GitHub Issue.
-
Apple Silicon (M1 and M2 chips)
- When using Catapult with a Mac computer with Apple silicon, you will need to set
~/secrets/configuration-user.yml["settings"]["provider_dev"]tovmware_fusion
- When using Catapult with a Mac computer with Apple silicon, you will need to set
-
Vagrant
- When upgrading Vagrant you may run into errors - the most common issue is mismatched plugins, running this command has a good chance of success
sudo rm -Rf ~/.vagrant.d/gems/ && sudo rm ~/.vagrant.d/plugins.json
- When upgrading Vagrant you may run into errors - the most common issue is mismatched plugins, running this command has a good chance of success
Here are some ways in which we welcome you to contribute to Catapult:
- Submit a pull request
- Report an issue
- Provide feedback on open issues
- Improve documentation in the README
- Share your experiences with Catapult
When you first set Catapult, a develop-catapult branch is created for you under your forked repository with the git remote upstream set to https://github.com/devopsgroup-io/catapult.git so that you can easily create a pull request. Also keep in mind when closing issues to submit a pull request that includes GitHub's: Closing issues via commit messages.
Releases are driven by the devopsgroup.io team and occur when accepting new pull requests from contributors like you. Releases follow Semantic Versioning 2.0.0. Given a version number MAJOR.MINOR.PATCH, increment the:
- MAJOR version when you make incompatible API changes,
- MINOR version when you add functionality in a backwards-compatible manner, and
- PATCH version when you make backward-compatible bug fixes.
In addition, the release version number will be prefaced with a v (v1.0.0) to conform to standard practice.
As part of a new release, the version number in ~/VERSION.yml will be incremented and git tagged with the same version number along with a GitHub Release.
The Catapult team values partnerships and continuous improvement.
- [06-03-2016] New Relic creates a request on Catapult's behalf for a free entry point for the New Relic Synthetics API
- [01-28-2016] Pantheon provides feedback
- [01-22-2016] New Relic provides private beta access to their Synthetics API alongside Breather, Carfax, Ring Central, Rackspace, and IBM.
Catapult is making the conference tour! We plan to attend the following conferences, with more to come. Get a chance to see Catapult in action, presented by it's core developers.
- Spring 2016 [04-08-2016] Drupaldelphia: DevOps Discipline: Detailed and Complete
Catapult will also be seen throughout local meetups in the Philadelphia and Greater Philadelphia area! Get a chance to meet the team and engage at a personal level.
- Technical.ly Philly 12k+ technologists
- Tech in Motion Philly 7k+ technologists
- Philadelphia WordPress Meetup Group 2.5k+ technologists
- Philly DevOps 3k+ technologists
- Greater Philadelphia Drupal Meetup Group .75k+ technologists
- Atlassian. Comparing Workflows. https://www.atlassian.com/git/tutorials/comparing-workflows/gitflow-workflow. Accessed February 15, 2016.
- Pantheon. Load and Performance Testing: Before You Begin. https://pantheon.io/docs/articles/load-and-performance-testing/. Accessed February 20, 2016.
- Acquia. Acquia Dev Desktop. https://www.acquia.com/products-services/dev-desktop. Accessed February 20, 2016.
- Oracle Technology Network. Oracle SQL Developer Migrations: Getting Started. http://www.oracle.com/technetwork/database/migration/omwb-getstarted-093461.html#conf. Accessed March 14, 2016.