The steps taken to build a deep learning behavioral cloning model are the following:
- Use the driving simulator to collect data of good driving behavior
- Build a convolution neural network in Keras that predicts steering angles from vehicle position on the road based on front viewing image
- Train and validate the model with a training and validation set
- Test that the model successfully drives around track one without leaving the road
The following files can be found in this github repo:
model.py- contains the script to read the training & validation data, build the deep learning model, and train the modeldrive.py- this file loads the trained model and starts a webserver that listens for the simulator's requests when the simulator in autonomous modemodel.h5- contains the layer weights of the trained deep neural network
Using the Udacity provided simulator and the drive.py file, the car can be driven autonomously around the track by executing
python drive.py model.h5.
The model.py file contains the code for training and saving the convolution neural network. Examining this file will demonstrate how the model is built, how generators feed training and validation data to the model, and how the model is trained using hyper parameters such as mean squared error for the loss and ADAM for the optimizer. Comments in the code provide explanation for each step in the script.
During the initial experimentation phase of this project, several transfer learning methods we're explored as potential solutions. The general model architecture in my model includes an image preprocessing input to the convolutional backbone of the model followed by 3 fully connected layers at the top. This structure allowed me to easily swap out different model backbones including ResNet50 and VGG16. ResNet50 was quickly found to be too complicated of a model for this behavioral cloning task because it would achieve very low loss scores on the training and validation sets, but was completely incapable of driving the car. Next, VGG16 was an improvement, with the simpler architecture, this backbone was able to learn where the edges of the road were, but failed to keep the car centered. Eventually the car drifted off the road.
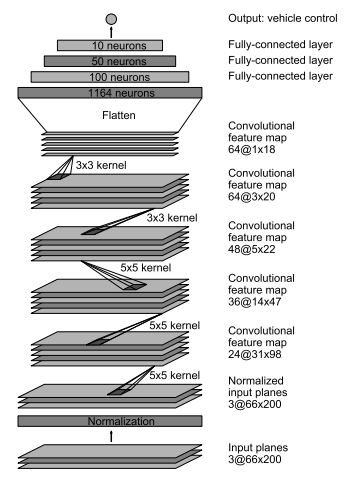
Continuing down the path of testing simpler convolutional neural network architectures, I then built the Nvidia End to End Learning for Self-Driving Cars architecture shown in the figure below. This architecture proved to be an instant success because the simpler architecture was able to better generalize to more driving situations. The model quickly learned how to select a steering able that kept the car in the center of the road and was able to gracefully handle left and right turns of varying curvature. An added bonus of this simple architecture was that it trained very quickly when compared to VGG16 and ResNet50 because it has about 1/10 the parameters of VGG16 and about 1/20 the parameters of ResNet50.
Figure provided by the End to End Learning for Self Driving Cars paper from Nvidia found here
The input to the model starts with a normalization step by way of a Keras lambda layer to divide the pixels by 255 and subtract 0.5 (model.py line 68). Next, the image is cropped by keeping only the lower half of the image. Next, the image is fed to a series of convolutional layers with increasing depth to allow for a sufficiently large feature map to learn different road characteristics (model.py lines 89 - 93). The last convolutional layer is flattened and connected to three fully connected layers which include ReLU activation functions to introduce nonlinearity into the model (model.py lines 94 - 99). The final layer is also a fully connected layer, but with only one node to predict steering angle. No activation function is applied at the output because this model is active as a regression function rather than a classification function where we would want the probability of a given class. Further details of the model can be found in the End to End Learning for Self-Driving Cars from Nvidia found here.
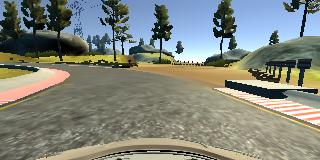
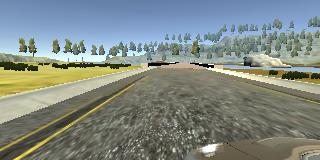
Training data was generated by manually driving the simulator car and recording the forward looking images from the car as well as the steering angle at the time of each image. A few different driving strategies were used to generate training data that would be most effective at teaching the model how to drive. First, about 3 laps of smooth, center-line driving were recorded going counter-clockwise around the tract. Then 2 laps of smooth, center-line driving was recorded going clockwise around the track. Finally, a few dozen short recordings were made of corrective actions after the car got too close to the edge of the road. A few examples of the training images are shown below.
As previously mentioned, the images are cropped as they are passed through the convolutional neural network. And example cropped image can be found in the figure below.
The center-line driving is necessary to teach the model our preferred style of driving, which is smoothly around the track in the center of the road. Training data of the car driving in both directions around the track is advantageous because it prevents a left turning bias that may develop if the training data were to include primarily left turning data. The corrective action data is particularly important because it will help the model develop strategies for bringing the car back to the center of the road if it gets too close to the edge.
In total the dataset contains 58,086 driving images and steering angles, where the model was trained on 46,469 samples and then validated on the remaining 11,617 samples. During training, the data was randomly shuffled to prevent the model from learning one set of driving behavior to then be overwritten by learning a different driving behavior if the model was trained in the order the data was recorded.
The model contains dropout layers, with dropout rates of 50%, to reduce overfitting (model.py lines 96 and 98).
The model was trained on 80% of the total dataset and validated on the remaining 20%. Training and validating on separate data is a key technique in watching for overfitting as the model trains (model.py line 116). Finally, the model was tested by running the simulator in autonomous mode and allowing the model to steer the car. We consider the model to be sufficiently trained when the car can complete a full lap without leaving the road.
The model employed the ADAM optimizer which automatically tunes learning rate, momentum, and a few other optimizer hyperparameters (model.py line 139).
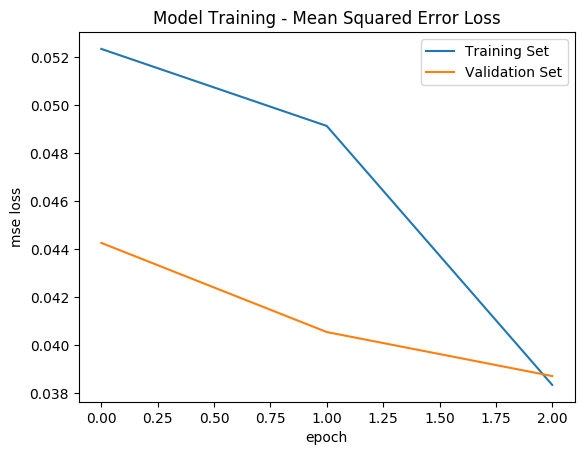
The model was trained for 3 epochs with 15 samples per batch, which turned out to be more than enough to fit the model to the data. The training loss and validation loss plot shown below demonstrates how the model quickly reached a validation loss score below 0.05. After training for the 3 epochs the model reaches a training loss of 0.0384 and a validation loss of 0.0387. I believe the model was able to fit the data very will in one epoch because the dataset is fairly large and is relatively undiverse in the types of samples present. I suspect if I also gathered training data from a second track, the model would take longer to achieve a similarly low loss score. This training routine was able to generate a model that could easily navigate the car around the track and keep the car relatively centered for the entire test.
A video recording of the model steering the car around the track in autonomous mode can be found here


