Video Demo: https://youtu.be/hU1TNWC_eOY
Description: An Online Booking app that allows SMBs & service professionals to offer online service booking to their customers, as well as a back-end to manage their services, work-hours, prices, appointments and customers. It also offers a dynamic, responsive and beautiful website, integrated with the backend.
The app allows professionals and SMBs to offer their customers to book services directly on a business website. The front-end presents an intuitive, clean and beautifully stylized interface for the customer, to book a service and enter details in a fast & easy to understand animated and interactive form-based wizard.
In the admin area, the user is able to manage appointments, create new services, manage prices, working hours and check customer activity in a dashboard. Also, the user may set Business details and contact information that will then be updated & displayed in the website.
For business owners, the value lies on increased sales & decreased appointment cancelations, as well as to save time and stop interruptions to answer the phone just to book appointments. Since the app books the appointments automatically, and the customer is presented with the available time slots, it frees the business owner up, to focus on delivering the service and provide their customers with a better experience.
For business' customers, the app offers them a better experience to book services faster and easier at the time they need, without having to wait until the phone is answered or the business opens.
| Benefits for Businesses | Benefits for Customers |
|---|---|
| Offer a better experience to their customers | Enjoy a better service booking experience |
| Save time when booking appointments | Book their services faster & at any hour |
| Increase sales through differentiation from competitors | Enjoy an easier & clearer booking process |
| Have better control of their time and service time slots | Have real-time info about their appointment status |
The intended market for the app are professionals and SMBs that offer services that need a previous appointment, some of the audiences are:
- Doctors & Clinics
- Dentists
- Mental Health Professionals
- Therapists
- Beauty Parlors
Intended use for business' customers:
- Select the desired service and the day & hour to book it, from the available time slots.
- Register into the business customers list, by entering their name and phone.
Intended use for businesses:
- Offer automated online booking on their website.
- Manage appointments by confirming, rejecting or cancelling them
- Build a customer list, automatically built from appointment requests
- Configure & manage their services, customers and available service hours from their app back-end.
- Check service stats such as appointments by day/price/service and customer loyalty.
- Automatically update Business contact & working hours information, displayed in the website, through the app back-end.
An Online Booking app that allows SMBs & service professionals to offer online service booking to their customers, as well as a back-end to manage their services, work-hours, prices, appointments and customers. It also offers a dynamic, responsive and beautiful website integrated with the backend.
App features for business' customers:
- Select the desired service, day & hour on available service time slots.
- Automatically register in the Business' customer list when requesting an appointment.
App features for businesses:
- Offer automated online booking on their website
- Manage their service appointments on the app back-end:
- Confirm, change, cancel or reject appointments
- Sort by status, customer or service
- Configure services and working hours:
- Create & edit services
- Define & change service prices and duration
- Manage website information from the back-end:
- Set business contact information
- Set website brand details such as name and tagline
- Check service & appointment statistics
- Visualize appointments in real-time by status and for each service
- Build a customer list automatically
- Register name & phone number of each person that has requested an appointment
- Search a customer by name or phone number
The app runs on a Django backend and uses React for the frontend. To install the app follow these steps:
-
Open the
shellterminal -
Go to your CS50-Codespaces or server root directory
-
Install the latest version of
django, a python framework that greatly reduces backend development time and complexitypip install django
-
Install
pytz, a python library to manage time zonespip install pytz
-
Make sure you have node, npm and webpack installed in your server, before continuing.
-
Move to the app folder, and then run the following command to install the frontend app:
npm install
Now the app dependencies should be installed. The next step is to setup django migrations and a superadmin user to be able to access the admin area of the app. Do the following:
-
Make sure you're in the app main folder.
-
Create Django migrations by executing the following code in the
shell:python manage.py makemigrations eventcalendar python manage.py makemigrations python manage.py migrate -
Create a Super Admin:
python manage.py createsuperuser
-
Follow the prompts to provide a username, password and email. Keep those credentials in a safe place and use them to log into the admin area.
First, compile the frontend react and scss source files, by running the following command in the main app folder once:
npm run build- This will compile the source files and generate production
javascriptandcssfiles - You may close this
shellif desired
Now the app should be able to run, for that simply command Django to start the server, by executing the following steps:
-
Go to the app main folder
-
In the
shellstart a Django server:python manage.py runserver
-
You may now access the webapp in the
urlprovided by the Django server. -
If you're running a local server, the typical url for the webapp is
http://127.0.0.1:8000/, however it's better that you use theurlDjango provided you after starting the server. -
The admin area is accessed on
<url>/adminwhere<url>is the root web url for the app, that Django generate.- Log here with the super user credentials you created in the last step.
If you want to be able to modify react or scss source files, then start a development server for the frontend, by doing the following:
-
Open a new shell.
-
Navigate to the main app folder.
-
Start a development frontend server, that will compile React and SCSS files if any of the source files are changed:
npm run dev
-
You may close this
shellwindow once you're done modifying source frontend files, the app will still run as long asdjango's server is running.
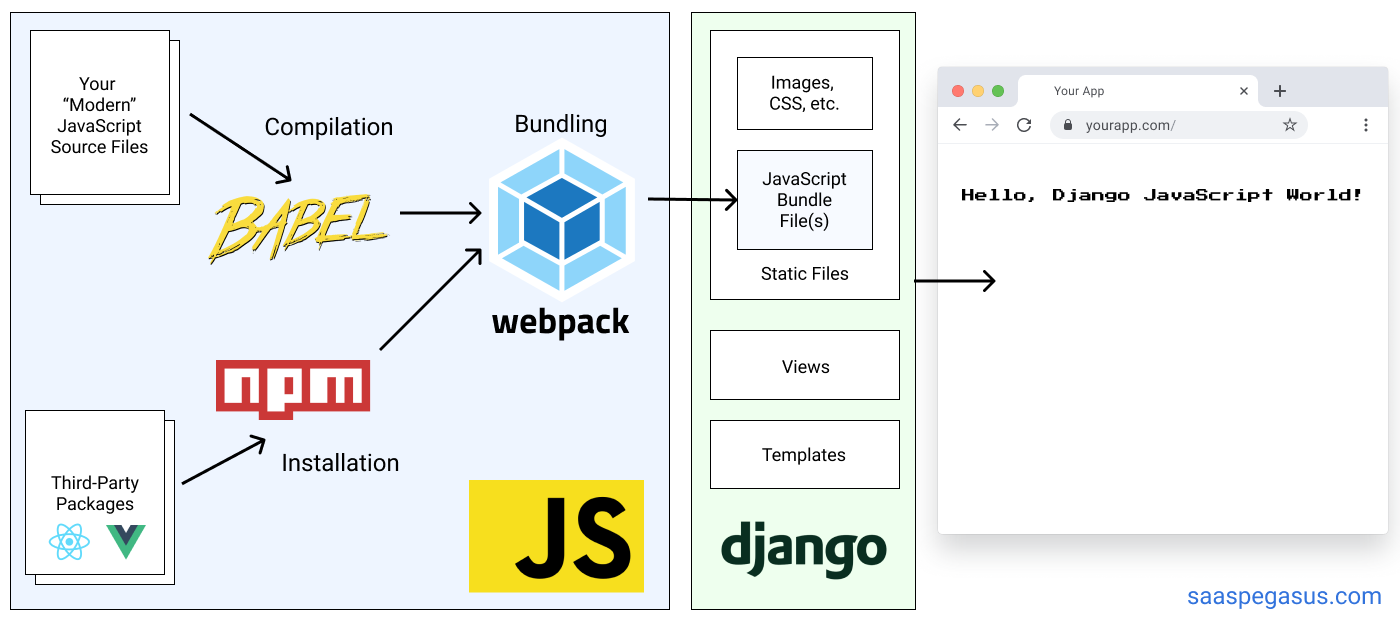
The app is running on a Django backend with a React + Sass/SCSS frontend. The frontend uses a modern JavaScript pipeline managed by Webpack, to allow using modern javascript and css frameworks.
The JavaScript pipeline (for React & Sass/SCSS) is setup in our Django project and uses the output compiled files as static assets in Django's template system.
This stack was chosen due to the ease of coding complex & dynamic frontends that React offers, and Sass/SCSS was used to streamline the styles coding process allowing using modular *.scss files for each React component.
By integrating React + modular *.scss files, styling each component was easier and the scope was properly managed.
The frontend source files are comprised of React's *.jsx and Sass *.scss files, together with a main javascript file that functions as a unique entry point for JSX & SCSS compilers.
This is the frontend file & folder structure, starting from the app root folder:
package.json:npmpackage configuration file, where all the app dependencies are specified, as well as development and production scripts to compile the frontend files. You may modify this if you want to add more compiling steps such as minifying, prefixing and such.webpack.config.js:webpacksetup file, that tells webpack which programs to run and where to output the final compiled.jsand.cssfiles. For this app, the output compiling folder is the/static/folder used by Django to serve static files./static/: Contains all static files such as the final compiled.jsand.cssfiles./images/: The website images are stored and served from this folder, by Django.main.js: This is the final compiledjavascriptfile that webpack generates fromReact's source files.main.css: This is the final compiledcssfile that webpack generates fromSCSSsource files.
/front-end/: this folder contains the source code for the frontend, includingReactandSCSSsources./index.js: this is the entry point for the compiler and the mainReactsAppcomponent is rendered here./components/: Contains allReactcomponents, with their*.jsxand.scssmodular style filesApp.jsx: Contains the main app frontend codeAppContext.jsx: This is the app context that is shared throughout app's children components. It works like a centralized source of truth for the most important app variables.App.module.scss: App global styles, modular*.scssfile/Button/: A button component, that receives theonClickfunction, icon and text through props/Calendar/: Contains all the components to render the month day picker and time block picker, to select the desired appointment block & day./Modal/: Component that allows the "pop-up" full screen effect, for the appointment booking wizard./Website/: Renders the static website, it contains all of the website's sections/WizardForm/: Renders a Wizard-type form, where each field is contained on its own page, and it has a summary page at the end.
/sass/: App global styles, that are applied by default. For this app, the styles are mainly applied at the component level by the.module.scssfiles, however you may set global brand styles here, if you prefer that angle.main.scss: Consolidates all of the global app partial.scssfiles_variables.scss: Defines global variables, such as colors, typography, margins, etc._base.scss: Sets global styles for common components such as thehtml,body
The main app for django is booking, however all the functionalities for online appointments is performed by eventcalendar. I've chosen to keep all of the appointment booking functionalities inside an individual django app, to allow a more modular approach in case future apps are added, such as a dashboard, crm or notification modules.
The backend source files are the ones used by Django, except for helpers.py which was added for custom functions.
This is the backend file & folder structure, starting from the app root folder:
db.sqlite3: App'sSQLitedatabase, if you downloaded the project there will be test data in there. If you have a fresh installation of the app and this file doesn't appear, don't forget to generate the model migrations first, then create a superuser and a main business for the app to start working.manage.py: Don't touch this file, this is automatically generated byDjangoand it's used to run and install the app usingDjango./booking/: This is the main app, it has no features other than integrating the modular apps, such aseventcalendar(which integrates all of the backend features of this projecy)-
settings.py: There are several configurations that were updated, for the app to be able to run:-
Add your localhost or codespaces domain inside
CSRF_TRUSTED_ORIGINS -
eventcalendarand thepytzpython library (for timezones) were added insideINSTALLED_APPS -
'DIRS': [BASE_DIR / 'templates']was set insideTEMPLATES, to define a single folder for all of the app templates. If you add more templates, make sure to save them inside the/templatesfolder, from the app root. -
STATIC_URL = 'static/'defines the folder to serve all static files. If you add images or any static asset, make sure to save them inside the/staticfolder, sinceDjangowill serve them from this unique folder. The following setting was also updated to define thestaticdirectory:STATICFILES_DIRS = [ BASE_DIR / 'static', ]
-
AUTH_USER_MODEL = "eventcalendar.User"was set to set theUsermodel insideeventcalendaras the main auth user model for the entire app.
-
-
urls.py: Defines the main app url routes,eventcalendarurls are added here./is routed to be managed byeventcalendar.
-
/eventcalendar/: This is the modular app that incorporates all of the features this app offers in this version.admin.py: The admin backend area is setup here. The main models fromeventcalendarwere added and configured here, so that the admin user could create, update and delete customers, services, appointments and even manage the Business general & contact information, as well as working hours. Modify this file if you want to tweek the admin backend area.helpers.py: A collection of functions were added on this file, to help generating time blocks and manipulating datetime objects.models.py: Theeventcalendarmodels (database objects) are defined here, as well as the fields for each model and validations.tests.py: This file isn't used for now, modify this file if you want to perform tests to make sure the app runs correctly after an update.urls.py: The API paths and website url are defined here.views.py: The main server logic is coded here, to process incoming requests, check and update the database, render the html templates and build server data responses to the frontend.
/templates/: Contains all the templates the app uses. Save any new template here, regardless if they belong to a new module app. You'll notice we have only 1 template and 1 layout; the reason is because the frontend is rendered almost 100% byReact, andDjangojust posts context variables in thehtml(such as theCSRF) thatReactgathers before rendering.-
index.html: Renders the main website. The initial context andCSRFis posted here by the backend, and thehtmlelement withid="app"is inserted here, so thatReactmay render the entire app in this template. -
layout.html: Defines the base html for any otherhtmltemplate in the app. The following lines link the templates with thejavascriptandcssfiles thatwebpackcompiled and saved inside/static:<!-- Bundled SCSS & CSS by Webpack (insert within the <head>) --> <link href="{% static 'main.css' %}" rel="stylesheet"> <!-- Bundled JS by Webpack (insert right before the </body> closing tag) --> <script src="{% static 'main.js' %}"></script>
-
- Django Best Practices
- Django Reusable Apps - Google Developers Video
- Built a React application in a Django project
- Django integration with React through templates
- Webpack Quick Guide (Spanish): check article 5 & 6 to setup CSS and Sass compilation with webpack.
- Adding React's SCSS & CSS Modules with Webdev
- Setting up CSS & Sass with Webpack: Goes into more detail for production-ready configurations.