Vulnscan is a suite of reporting and analysis tools built on top of anchore's syft utility (to create software bills of material) and grype utility (to scan those SBOMs for vulnerabilities). This suite is designed to be run on a kubernetes cluster, and scan all running containers. Once scanned and the vulnerability list has been generated (and stored in a local postgres database), a web UI is available to report on your containers, SBOMs and scanned vulnerabilities. In addition, you can create an "ignore list" at any desired level to ignore false positives from grype and/or ignore vulnerabilities which you may have resolved in other ways or aren't otherwise applicable.
The UI has a few tabs at the top to access a list of containers/images, a list of vulnerabilities, and a list of Software BOMs:

The vulnerability list allows you to filter at any desired level across the cluster or by severity, etc:

The SBOM list is similar, with details of every software component running in your landscape:

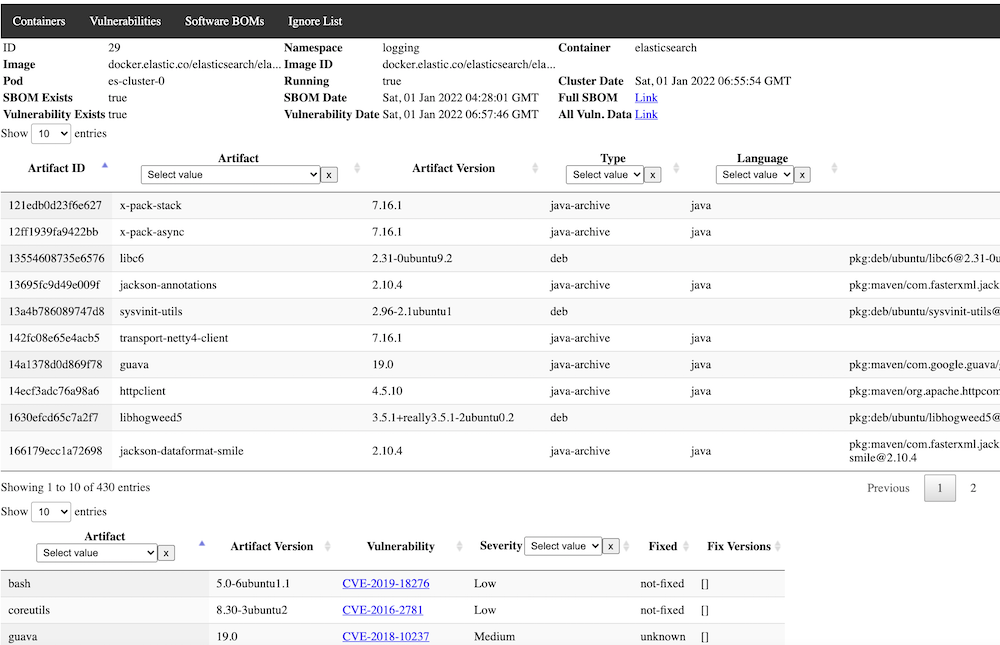
Clicking on a container provides a detailed view, including both SBOMs and Vulnerabilities for the selected image:
There are 4 main components to the suite:
- Podreader -- this application scans all available pods running in the database and adds any newly discovered pods to the database to be scanned. It optionally (recommended) expires older non-running pods from the database.
- Sbomgen -- this application looks for any newly available containers in the database that have not yet had a software BOM generated and generates one, storing the results in a json field in the database.
- Vulngen -- this application looks for any newly available containers in the database that have an SBOM generated but have not been scanned for vulnerabilities. Results are stored in a json field in the database and available for query and display. It optionally (recommended) can be set to always refresh the vulnerability scan, in case new vulnerabilities have been added to the database after the initial SBOM generation.
- Vulnweb -- this is the Web GUI for the application, with a backend application to serve and process requests, and the frontend files for viewing, as well as providing the "Ignore List" functionality.
- Jobrunner -- this is an optional component that can be used to run any set of containers in sequence in Kubernetes. In this use case, it can be used to run Podreader, Sbomgen, and Vulngen sequentially in order, and optionally only proceed to the next component if the last one succeeds. If you elect to not use this component, you can simply schedule the components as individual Cronjobs with enough time between them to allow for normal execution speed. Alternatively, you could use some other sort of DAG tool such as tekton-pipelines. This utility could also be useful outside of vulnscan and is written generically enough to be used for other purposes where sequential jobs are required.
If you don't currently have postgres installed, follow a guide elsewhere to create a postgres environment that you can use for Vulnscan. It doesn't technically have to be running in the cluster as long as your pods will have access to it. Once installed, create a new database such as "vulnscan" and a new user , i.e. "vulnscan-admin" that has all administrative privileges to the database. The database host, database name, user, and password are all passed to the pods as environment variables, and I would recommend you use a secret in order to load them.
The recommended deployment approach uses the Jobrunner component scheduled as one Cronjob, however frequently you would like (the example below uses daily). This will run Podreader followed by Sbomgen followed by Vulngen. Execution of these jobs will require a service account with permissions to list.watch all pods. The job runner itself also requires the ability to list/create jobs.
Separately, run a deployment and optionally ingress (recommended) to run vulnweb. As this application currently stands, no in-built security mechanisms are provided, so it is recommended to do this at the ingress level or otherwise provide another security mechanism to prevent unauthorized use.
Recommended YAML for deployment:
apiVersion: v1
kind: Namespace
metadata:
  name: vulnscan
---
apiVersion: v1
kind: ServiceAccount
metadata:
  name: vulnscan-serviceaccount
  namespace: vulnscan
---
apiVersion: rbac.authorization.k8s.io/v1
kind: ClusterRole
metadata:
  name: vulnscan-role
rules:
- apiGroups: ["extensions","apps","batch",""]
  resources: ["endpoints","pods","services","nodes","deployments","jobs"]
  verbs: ["get", "list", "watch", "create", "delete"]
---
apiVersion: rbac.authorization.k8s.io/v1
kind: ClusterRoleBinding
metadata:
  name: vulnscan-role-binding
  namespace: vulnscan
subjects:
- kind: ServiceAccount
  name: vulnscan-serviceaccount
  namespace: vulnscan
roleRef:
  kind: ClusterRole
  name: vulnscan-role
  apiGroup: rbac.authorization.k8s.io
---
Permissions could be less if you elect to not use the jobrunner.
Not shown here, but recommended to use a secret for providing access to your database, encoding both the username and password. The remaining examples below assume you have created a secret called 'vulnscan-db-auth' in the vulnscan namespace.
The job runner assumes the target container has a list of job YAML files in a configurable directory, i.e. /jobs. Multiple ways of doing this, but I've elected to put these job yaml's in a configmap and then mapping them into the directory as volumes. That approach is shown below.
apiVersion: v1
kind: ConfigMap
metadata:
  namespace: vulnscan
  name: vulnscan-jobs-config
  labels:
    app: vulnscan
data:
  1-podreader.yaml: |-
    apiVersion: batch/v1
    kind: Job
    metadata:
       namespace: vulnscan
       generateName: vulnscan-podreader-
       labels:
          app: vulnscan-podreader
    spec:
      ttlSecondsAfterFinished: 180
      template:
         metadata:
            labels:
               app: vulnscan-podreader
         spec:
           restartPolicy: OnFailure
           serviceAccountName: vulnscan-serviceaccount
           containers:
           - name: podreader
             image: davideshay/vulnscan-podreader:latest
             env:
             - name: DB_HOST
               value: 'postgres.postgres'
             - name: DB_NAME
               value: 'vulnscan'
             - name: DB_USER
               valueFrom:
                 secretKeyRef:
                   name: vulnscan-db-auth
                   key: DB_USER
             - name: DB_PASSWORD
               valueFrom:
                 secretKeyRef:
                   name: vulnscan-db-auth
                   key: DB_PASSWORD
             - name: EXPIRE_CONTAINERS
               value: 'true'
             - name: EXPIRE_DAYS
               value: "5"
             tty: true
             imagePullPolicy: Always
  2-sbomgen.yaml: |-
    apiVersion: batch/v1
    kind: Job
    metadata:
       namespace: vulnscan
       name: vulnscan-sbomgen
       labels:
          app: vulnscan-sbomgen
    spec:
      ttlSecondsAfterFinished: 180
      template:
         metadata:
            labels:
               app: vulnscan-sbomgen
         spec:
           restartPolicy: OnFailure
           serviceAccountName: vulnscan-serviceaccount
           containers:
           - name: sbomgen
             image: davideshay/vulnscan-sbomgen:latest
             env:
             - name: DB_HOST
               value: 'postgres.postgres'
             - name: DB_NAME
               value: 'vulnscan'
             - name: DB_USER
               valueFrom:
                 secretKeyRef:
                   name: vulnscan-db-auth
                   key: DB_USER
             - name: DB_PASSWORD
               valueFrom:
                 secretKeyRef:
                   name: vulnscan-db-auth
                   key: DB_PASSWORD
             tty: true
             imagePullPolicy: Always
             resources:
               requests:
                 memory: 12Gi
               limits:
                 memory: 16Gi
  3-vulngen.yaml: |-
    apiVersion: batch/v1
    kind: Job
    metadata:
       namespace: vulnscan
       name: vulnscan-vulngen
       labels:
          app: vulnscan-vulngen
    spec:
      ttlSecondsAfterFinished: 180
      template:
         metadata:
            labels:
               app: vulnscan-vulngen
         spec:
           restartPolicy: OnFailure
           serviceAccountName: vulnscan-serviceaccount
           containers:
           - name: vulngen
             image: davideshay/vulnscan-vulngen:latest
             env:
             - name: DB_HOST
               value: 'postgres.postgres'
             - name: DB_NAME
               value: 'vulnscan'
             - name: DB_USER
               valueFrom:
                 secretKeyRef:
                   name: vulnscan-db-auth
                   key: DB_USER
             - name: DB_PASSWORD
               valueFrom:
                 secretKeyRef:
                   name: vulnscan-db-auth
                   key: DB_PASSWORD
             - name: REFRESH_ALL
               value: 'true'
             - name: SEND_ALERT
               value: 'true'
             - name: ALERT_MANAGER_URL
               value: 'https://alert.prometheus:9093'
             - name: APP_URL
               value: '
             tty: true
             imagePullPolicy: Always
             resources:
               requests:
                 memory: 3Gi
               limits:
                 memory: 5Gi
---
A few comments on the batch job parameters included here:
- All of the programs (Podreader, Sbomgen, and Vulngen) all need the environment variables DB_HOST, DB_NAME, DB_USER, and DB_PASSWORD passed in order to access the postgres database.
- All of the programs also accept MIN_LOG_LVL which sets the minimum level of logs to print - "D"/"DEBUG", "I"/"INFO", "W"/"WARNING", "E"/"ERROR".
- Podreader takes two additional parameters:
- EXPIRE_CONTAINERS - set to "true" to have Podreader expire/delete containers which are not runnning after a certain number of days. Parameter defaults to true.
- EXPIRE_DAYS - expire containers which have not been active on the cluster for the specified number of days. Five (5) is also the default.
- Sbomgen takes one additional parameter:
- REFRESH_ALL - set to "true" to have Sbomgen refresh the software BOMS on all currently active pods/containers. Not normally needed since these are usually static. Might be occasionally useful if versions of syft add more accuracy/additional detail.
- Vulngen takes one additional parameter:
- REFRESH_ALL - set to "true" to have Vulngen refresh the vulnerability for all pods currently active in the cluster. If "false", will only scan for vulnerabilities those pods which haven't yet been scanned.
- SEND_ALERT - Vulngen can be configured to send a "summary" level alert message to your prometheus Alertmanager instance, with information on total number of vulnerabilities found and resolved, including links back to the web ui. Set to "true" to enable this.
- ALERT_MANAGER_URL - if SEND_ALERT is true, set ALERT_MANAGER_URL to the url to access your alert manager instance, including host and port.
- APP_URL - should be set to the URL where the web UI can be accessed. Used to construct appropriate links in the Alertmanager messages.
- Sbomgen may need high memory requirements if you have very large images in your cluster. Images that are nearly 1GB may take a substantial amount of memory to generate the SBOM. I had seen nearly 10GB of memory usage at some points. You may want to set this to a lower limit and assess as needed. Vulngen has lower resource requirements, but can also consume significant memory when processing those same SBOMs. One of the reasons this whole process was split into 3 was to allow jobs to run at the right place, resourcewise in the cluster.
apiVersion: batch/v1
kind: Job
metadata:
   namespace: vulnscan
   name: vulnscan-jobrunner
   labels:
      app: vulnscan-jobrunner
spec:
  ttlSecondsAfterFinished: 180
  template:
     metadata:
        labels:
           app: vulnscan-jobrunner
     spec:
       restartPolicy: Never
       volumes:
       - name: vulnscan-jobs-vol
         configMap:
           name: vulnscan-jobs-config
       serviceAccountName: vulnscan-serviceaccount
       containers:
       - name: jobrunner
         image: davideshay/jobrunner:latest
         env:
         - name: JOB_DIR
           value: '/jobs'
         - name: JOB_NAMESPACE
           value: 'vulnscan'
         - name: JOB_PROCEED_ON_FAIL
           value: 'FALSE'
         tty: true
         imagePullPolicy: Always
         volumeMounts:
         - name: vulnscan-jobs-vol
           mountPath: "/jobs"
---
The jobrunner also takes three additional parameters:
- JOB_DIR - the jobrunner will take all .yaml files in the directory and try to create batch jobs from them. Will be processed in alphabetical/numeric order.
- JOB_NAMESPACE - the namespace where the jobs will be created.
- JOB_PROCEED_ON_\FAIL - whether to keep running the next job if the previous one fails.
apiVersion: apps/v1
kind: Deployment
metadata:
   namespace: vulnscan
   name: vulnscan-vulnweb
   labels:
      app: vulnscan-vulnweb
spec:
  selector:
    matchLabels:
       app: vulnscan-vulnweb
  template:
     metadata:
        labels:
           app: vulnscan-vulnweb
     spec:
       serviceAccountName: vulnscan-serviceaccount
       containers:
       - name: vulnsrv
         image: davideshay/vulnscan-vulnweb:latest
         env:
         - name: DB_HOST
           value: 'postgres.postgres'
         - name: DB_NAME
           value: 'vulnscan'
         - name: DB_USER
           valueFrom:
             secretKeyRef:
               name: vulnscan-db-auth
               key: DB_USER
         - name: DB_PASSWORD
           valueFrom:
             secretKeyRef:
               name: vulnscan-db-auth
               key: DB_PASSWORD
         ports:
         - containerPort: 80
         tty: true
         imagePullPolicy: Always
---
apiVersion: v1
kind: Service
metadata:
  name: vulnscan-vulnweb
  namespace: vulnscan
spec:
  ports:
  - port: 80
    targetPort: 80
    name: vulnscan-vulnweb
    protocol: TCP
  selector:
    app: vulnscan-vulnweb
---
apiVersion: networking.k8s.io/v1
kind: Ingress
metadata:
   namespace: vulnscan
   name: vulnweb-ingress
   annotations:
      nginx.ingress.kubernetes.io/ssl-redirect: "true"
spec:
   ingressClassName: "nginx"
   tls:
      - hosts:
        - vulnscan.example.io
   rules:
   - host: vulnscan.example.io
     http:
       paths:
          - path: /
            pathType: Prefix
            backend:
               service:
                  name: vulnscan-vulnweb
                  port:
                    number: 80
You can use an ingress or provide access whichever way you desire. Sample ingress configuration included above - change host name and other parameters as required, for example to add authentication.
When you open the web UI, you will be presented with a screen like this:
Here you see the 5 primary screens/modes - Container List, Vulnerability List, SBOM List, Ignore List, and Resolved Vulnerabilities.
The container list shows a list of all "containers" in the database (A pod might have multiple containers). This is a specific, unique combination of the namespace, container "name" from the pod spec, image name, and the image id, or the specific sha256 of the image that is running.
Container specific sha256 images may change for any given ID if the image is updated in the central repository but the tag name remains the same. This obviously occurs when using tags like "latest" but can also occur in other circumstances, and the SBOM and vulnerabilities could potentially change, so every given image ID is added as a new entry. If you are using the expiration functionality, older container/image/imageID combinations will expire and disappear from view. The list shown only considers those where it is currently running in the cluster (this may be changed to a filterable field in a future release)
If you click on the indivudal container, you will see more detail on when it was last scanned and see the pertinent SBOM artifacts and vulnerabilities just for that container, allowing you to focus on security issues for just one container.
From this detail page, if you want extreme granular detail on the SBOM or Vulnerabilities, beyond what is typically shown in the data tables, go to the "Full SBOM" or "Full Vulnerability" link and you can browse or download the full JSON data returned by syft and grype.
This list looks at vulnerabilities across all running containers, and lists all vulnerabilities found across the cluster. From here, you can filter by severity or vulnerability ID (typically a CVE number), which could be useful when searching for recently announced vulnerabilities. Note that sometimes grype will categorize something with a CVE number as a GHSA number, so you might want to check both.
You can filter the list by the columns, and at the top additionally select vulnerabilities which have been added or updated in the recent past, by number of days/hours, or select a specific "run date" of the vulnerability scanner.
From the vulnerability list, you can actually find a link to more data on the specific vulnerability from the publishing sources, just be clicking on the vulnerability ID.
The vulnerability list also allows you to export the complete list in Excel format, in case you want to further filter and manipulate the data there.
You may find that some vulnerabilities you want to ignore, based on the specifics of that vulnerability and/or relative to your specific software environment. This can be helpful to allow you to focus on those you have not yet analyzed which may be of a higher priority.
To ignore an entry, from the vulnerability list, right click on the desired vulnerability and choose "Ignore Vulnerability XXXX".
After selecting to add an ignore list rule, you will be presented a screen which looks like this:
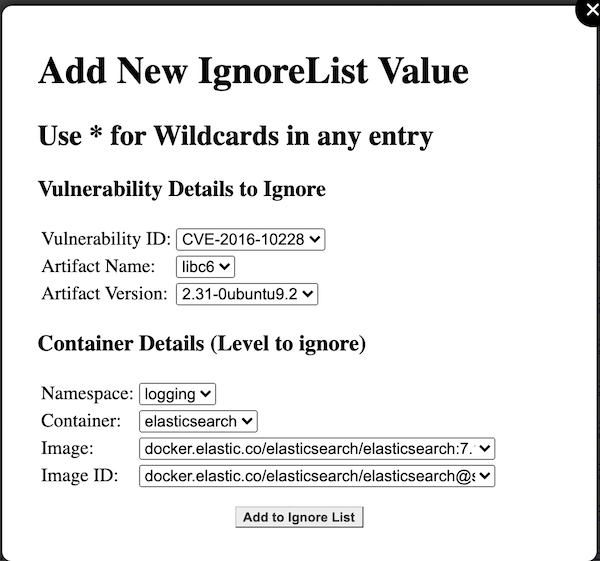
For every value other than the Vulnerability ID, you can select either the specific details of artifact, artifact version, namespace, container, image, and image ID, and ignore only these at this most-specific level; or, you may choose to "wildcard" and of these values (by selecting the asterisk "*" in the dropdown for that element).
Wildcards allow you to, for instance, ignore this vulnerability whenever it occurs cluster-wide, or maybe ignore it only in one namespace, or for one container name, but irregardless of the specific image or image ID. They provide substantial flexibility in tailoring the output.
Once you have added an ignore list rule, it will then automatically be filtered out from future displays of vulnerabilities (on the main vulnerability list, or on the container detail page).
There is extensive data available as well on every single software component for every container/image/image ID running in the cluster. This could be helpful for keeping track of which containers rely on other components, or if perhaps a vulnerability has very recently been announced and is not yet being flagged by grype, you could mitigate issues before they become real problems.
This can load extensive amounts of data, and is right now all processed locally, so this could take time to load and filter. This will be improved in a later release.
This keeps track of all your current ignore list rules, and allows you to delete entries if desired. No editing functionality is currently provided, as it is best to trigger these with all of the correct data from the vulnerabilities page to avoid input errors.
To delete any entries, select the rows as desired (including selecting ranges and/or multiples), then click the delete button at the top.
The system keeps track of vulnerabilities that are resolved, or no longer present in an image. This helps to mark progress against securing your cluster, by updating your images to later versions, or updating your own images to be more secure. This data can also be filtered by the column data, including when the vulnerability was resolved.
Updates global settings. The available settings are:
- Match Image without Tags: This option affects delta processing during the vulnerability scan. During this scan, for every image, for instance docker.io/elasticsearch:7.16.3, a reference scan is used to determine if new vulnerabilities have been found. When checked, the scanner will consider docker.io/elasticsearch:7.16.2 to be the reference image for 7.16.3, and only report new or resolved differences different from 7.16.2. When unchecked, 7.16.3 is considered a new image and all vulnerabilities for it will be reported as new.