The RisingWave operator is a deployment and management system of the RisingWave streaming database that runs on top of Kubernetes. It provides functionalities like provisioning, upgrading, scaling and destroying the RisingWave instances inside the Kubernetes cluster. It models the deployment and management progress with the concepts provided in Kubernetes and organizes them in a way called Operator Pattern. Thus we can just declare what kind of RisingWave instances we want and create them as objects in the Kubernetes. The RisingWave operator will always make sure that they are finally there.
The operator also contains several custom resources. Refer to the API docs for more details.
First, you need to install the cert-manager in the cluster before installing the risingwave-operator.
The default static configuration cert-manager can be installed as follows:
kubectl apply -f https://github.com/cert-manager/cert-manager/releases/download/v1.9.1/cert-manager.yamlMore information on this install cert-manager method can be found here.
Then, you can install the risingwave-operator with the following command:
kubectl apply -f https://github.com/risingwavelabs/risingwave-operator/releases/download/v0.2.0/risingwave-operator.yamlTo check if the installation is successful, you can run the following commands to check if the Pods are running.
kubectl -n cert-manager get pods
kubectl -n risingwave-operator-system get podsNow you can deploy a RisingWave instance with in-memory storage with the following command (be careful about the node arch):
# It runs on the Linux/amd64 platform. If you want to run on Linux/arm64, you need to run the command below.
kubectl apply -f https://raw.githubusercontent.com/risingwavelabs/risingwave-operator/main/examples/risingwave-in-memory.yaml

# Linux/arm64
curl https://raw.githubusercontent.com/risingwavelabs/risingwave-operator/main/examples/risingwave-in-memory.yaml | sed -e 's/ghcr.io\/risingwavelabs\/risingwave/public.ecr.aws\/x5u3w5h6\/risingwave-arm/g' | kubectl apply -f -
Check the running status of RisingWave with the following command:
kubectl get risingwaveThe expected output is like this:
NAME                    RUNNING   STORAGE(META)   STORAGE(OBJECT)   AGE
risingwave-in-memory    True      Memory          Memory            30s
By default, the operator will create a service for the frontend component, with the type of ClusterIP if not specified. It is not accessible from the outside. So we will create a standalone Pod of PostgreSQL inside the Kubernetes, which runs an infinite loop so that we can attach to it.
You can create one by following the commands below, or you can just do it yourself:
kubectl apply -f examples/psql/psql-console.yamlAnd then you will find a Pod named psql-console running in the Kubernetes, and you can attach to it to execute commands inside the container with the following command:
kubectl exec -it psql-console bashFinally, we can get access to the RisingWave with the psql command inside the Pod:
psql -h risingwave-in-memory-frontend -p 4567 -d dev -U rootIf you want to connect to the RisingWave from the nodes (e.g., EC2) in the Kubernetes, you can set the service type to NodePort, and run the following commands on the node:
export RISINGWAVE_NAME=risingwave-in-memory
export RISINGWAVE_NAMESPACE=default
export RISINGWAVE_HOST=`kubectl -n ${RISINGWAVE_NAMESPACE} get node -o jsonpath='{.items[0].status.addresses[?(@.type=="InternalIP")].address}'`
export RISINGWAVE_PORT=`kubectl -n ${RISINGWAVE_NAMESPACE} get svc -l risingwave/name=${RISINGWAVE_NAME},risingwave/component=frontend -o jsonpath='{.items[0].spec.ports[0].nodePort}'`

psql -h ${RISINGWAVE_HOST} -p ${RISINGWAVE_PORT} -d dev -U root
# ...
spec:
global:
serviceType: NodePort
# ...
For EKS/GCP and some other Kubernetes provided by cloud vendors, we can expose the Service to the public network with a load balancer on the cloud. We can simply achieve this by setting the service type to LoadBalancer, by setting the following field:
# ...
spec:
  global:
    serviceType: LoadBalancer
# ...
And then you can connect to the RisingWave with the following command:
export RISINGWAVE_NAME=risingwave-in-memory
export RISINGWAVE_NAMESPACE=default
export RISINGWAVE_HOST=`kubectl -n ${RISINGWAVE_NAMESPACE} get svc -l risingwave/name=${RISINGWAVE_NAME},risingwave/component=frontend -o jsonpath='{.items[0].status.loadBalancer.ingress[0].ip}'`
export RISINGWAVE_PORT=`kubectl -n ${RISINGWAVE_NAMESPACE} get svc -l risingwave/name=${RISINGWAVE_NAME},risingwave/component=frontend -o jsonpath='{.items[0].spec.ports[0].port}'`

psql -h ${RISINGWAVE_HOST} -p ${RISINGWAVE_PORT} -d dev -U rootCurrently, memory storage is supported for test usage only. We highly discourage you use the memory storage for other purposes. For now, you can enable the memory metadata and object storage with the following configs:
#...
spec:
  storages:
    meta:
      memory: true
    object:
      memory: true
#...
We recommend using the etcd to store the metadata. You can specify the connection information of the etcd you'd like to use like the following:
#...
spec:
  storages:
    meta:
      etcd:
        endpoint: risingwave-etcd:2388
        secret: etcd-credentials      # optional, empty means no authentication
#...
Check the examples/risingwave-etcd-minio.yaml for how to provision a simple RisingWave with an etcd instance as the metadata storage.
We support using MinIO as the object storage. Check the examples/risingwave-etcd-minio.yaml for details. The YAML structure is like the following:
#...
spec:
  storages:
    object:
      minio:
        secret: minio-credentials
        endpoint: minio-endpoint:2388
        bucket: hummock001
#...
We support using AWS S3 as the object storage. Follow the steps below and check the examples/risingwave-etcd-s3.yaml for details:
First, you need to create a Secret with the name s3-credentials:
kubectl create secret generic s3-credentials --from-literal AccessKeyID=${ACCESS_KEY} --from-literal SecretAccessKey=${SECRET_ACCESS_KEY} --from-literal Region=${AWS_REGION}Then, you need to create a bucket on the console, e.g., hummock001.
Finally, you can specify S3 as the object storage in YAML, like the following:
#...
spec:
  storages:
    object:
      s3:
        secret: s3-credentials
        bucket: hummock001
#...
Before getting started, you need to ensure that the helm is installed. Please follow the instructions in the Installing Helm chapter if you don't have one.
We encourage using the kube-prometheus-stack, a helm chart maintained by the community, to install the Prometheus operator into the Kubernetes. Follow the instructions below to install:
- Add
prometheus-communityrepo
helm repo add prometheus-community https://prometheus-community.github.io/helm-charts
helm repo update- Install or upgrade chart
helm upgrade --install prometheus prometheus-community/kube-prometheus-stack \
  -f ./monitoring/kube-prometheus-stack/kube-prometheus-stack.yaml
To check the running status, check the Pods with the following command:
kubectl get pods -l release=prometheusThe expected output is like this:
NAME                                                   READY   STATUS    RESTARTS   AGE
prometheus-kube-prometheus-operator-5f6c8948fb-llvzm   1/1     Running   0          173m
prometheus-kube-state-metrics-59dd9ffd47-z4777         1/1     Running   0          173m
prometheus-prometheus-node-exporter-llgp9              1/1     Running   0          169m
Prometheus has provided a functionality called remote-write, and AWS provides a managed Prometheus service, so we can write the local metrics to the Prometheus on the cloud.
Before getting started, you need to ensure that you have an account which has the permission to write the managed Prometheus, i.e., with the AmazonPrometheusRemoteWriteAccess permission.
Follow the instructions below to set up the remote write:
- Create a Secret to store the AWS credentials.
kubectl create secret generic aws-prometheus-credentials --from-literal AccessKey=${ACCESS_KEY} --from-literal SecretAccessKey=${SECRET_ACCESS_KEY}- Copy the prometheus-remote-write-aws.yaml file and replace the values of the these variables:
${KUBERNETES_NAME}: the name of the Kubernetes, e.g.,local-dev. You can also addexternalLabelsyourself.${AWS_REGION}: the region of the AWS Prometheus service, e.g.,ap-southeast-1${WORKSPACE_ID}: the workspace ID, e.g.,ws-12345678-abcd-1234-abcd-123456789012
- Install or upgrade the
kube-prometheus-stack.
helm upgrade --install prometheus prometheus-community/kube-prometheus-stack \
  -f https://raw.githubusercontent.com/risingwavelabs/risingwave-operator/main/monitoring/kube-prometheus-stack/kube-prometheus-stack.yaml \
  -f prometheus-remote-write-aws.yaml
Now, you can check the Prometheus logs to see if the remote write works, with the following commands:
kubectl logs prometheus-prometheus-kube-prometheus-prometheus-0The expected output is like this:
ts=2022-07-20T09:46:38.437Z caller=dedupe.go:112 component=remote level=info remote_name=edcf97 url=https://aps-workspaces.ap-southeast-1.amazonaws.com/workspaces/ws-12345678-abcd-1234-abcd-123456789012/api/v1/remote_write msg="Remote storage resharding" from=2 to=1
The RisingWave operator has integrated with the Prometheus Operator. If you have installed the Prometheus Operator in the Kubernetes, it will create a ServiceMonitor for the RisingWave object and keep it synced automatically. You can check the ServiceMonitor with the following command:
kubectl get servicemonitors -l risingwave/nameThe expected output is like this:
NAME                              AGE
risingwave-risingwave-etcd-minio   119m
Let's try to forward the web port of Grafana to localhost, with the following command:
kubectl port-forward svc/prometheus-grafana 3000:http-webNow we can access the Grafana inside the Kubernetes via http://localhost:3000. By default, the username is admin and the password is prom-operator.
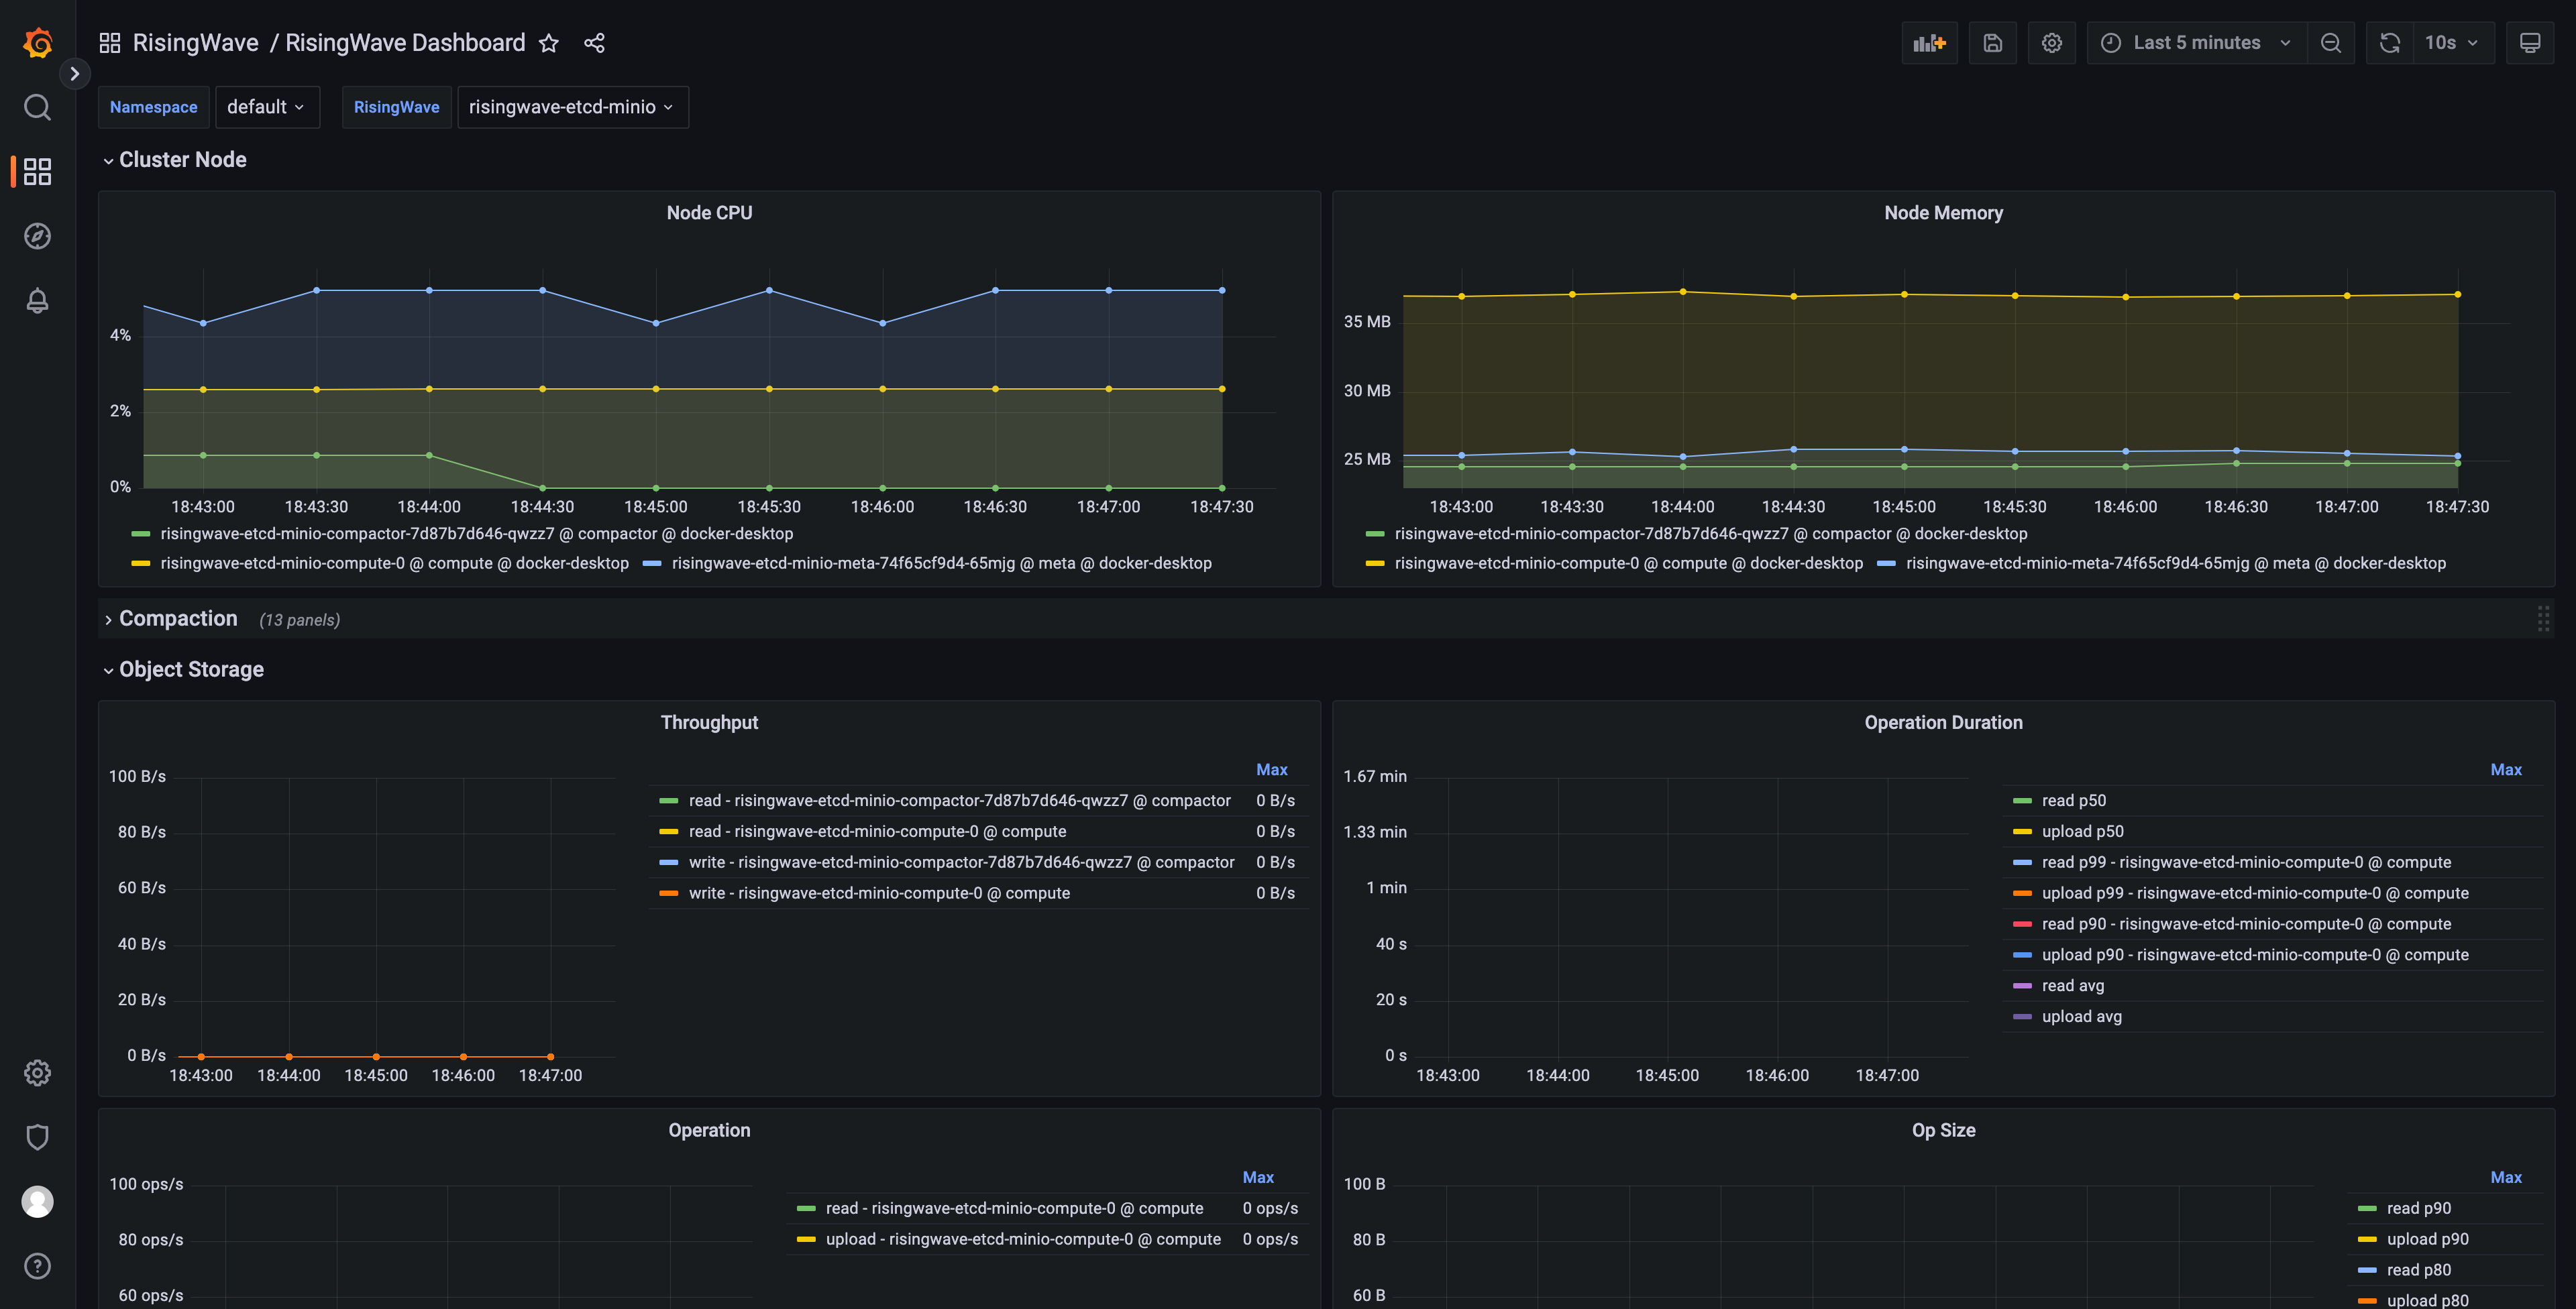
Let's open the RisingWave/RisingWave Dashboard and select the instance you'd like to observe, and here are the panels.
In addition to the metrics collection and monitoring, we can also integrate the logging stack into the Kubernetes. One of the famous open source logging stacks is the Grafana loki. Follow the instructions below to install them in the Kubernetes:
NOTE: this tutorial requires that you have the helm and the kube-prometheus-stack installed. You can follow the tutorials above to install them.
- Add the
grafanarepo and update
helm repo add grafana https://grafana.github.io/helm-charts
helm repo update- Install the
loki-distributedchart, including the components of loki
helm upgrade --install loki grafana/loki-distributed- Install the
promtailchart, which is an agent that collects the logs and pushes them into the loki
helm upgrade --install promtail grafana/promtail \
-f https://raw.githubusercontent.com/risingwavelabs/risingwave-operator/main/monitoring/promtail/loki-promtail-clients.yaml- Upgrade or install the
kube-prometheus-stackchart
helm upgrade --install prometheus prometheus-community/kube-prometheus-stack \
  -f https://raw.githubusercontent.com/risingwavelabs/risingwave-operator/main/monitoring/kube-prometheus-stack/kube-prometheus-stack.yaml \
  -f https://raw.githubusercontent.com/risingwavelabs/risingwave-operator/main/monitoring/kube-prometheus-stack/grafana-loki-data-source.yaml
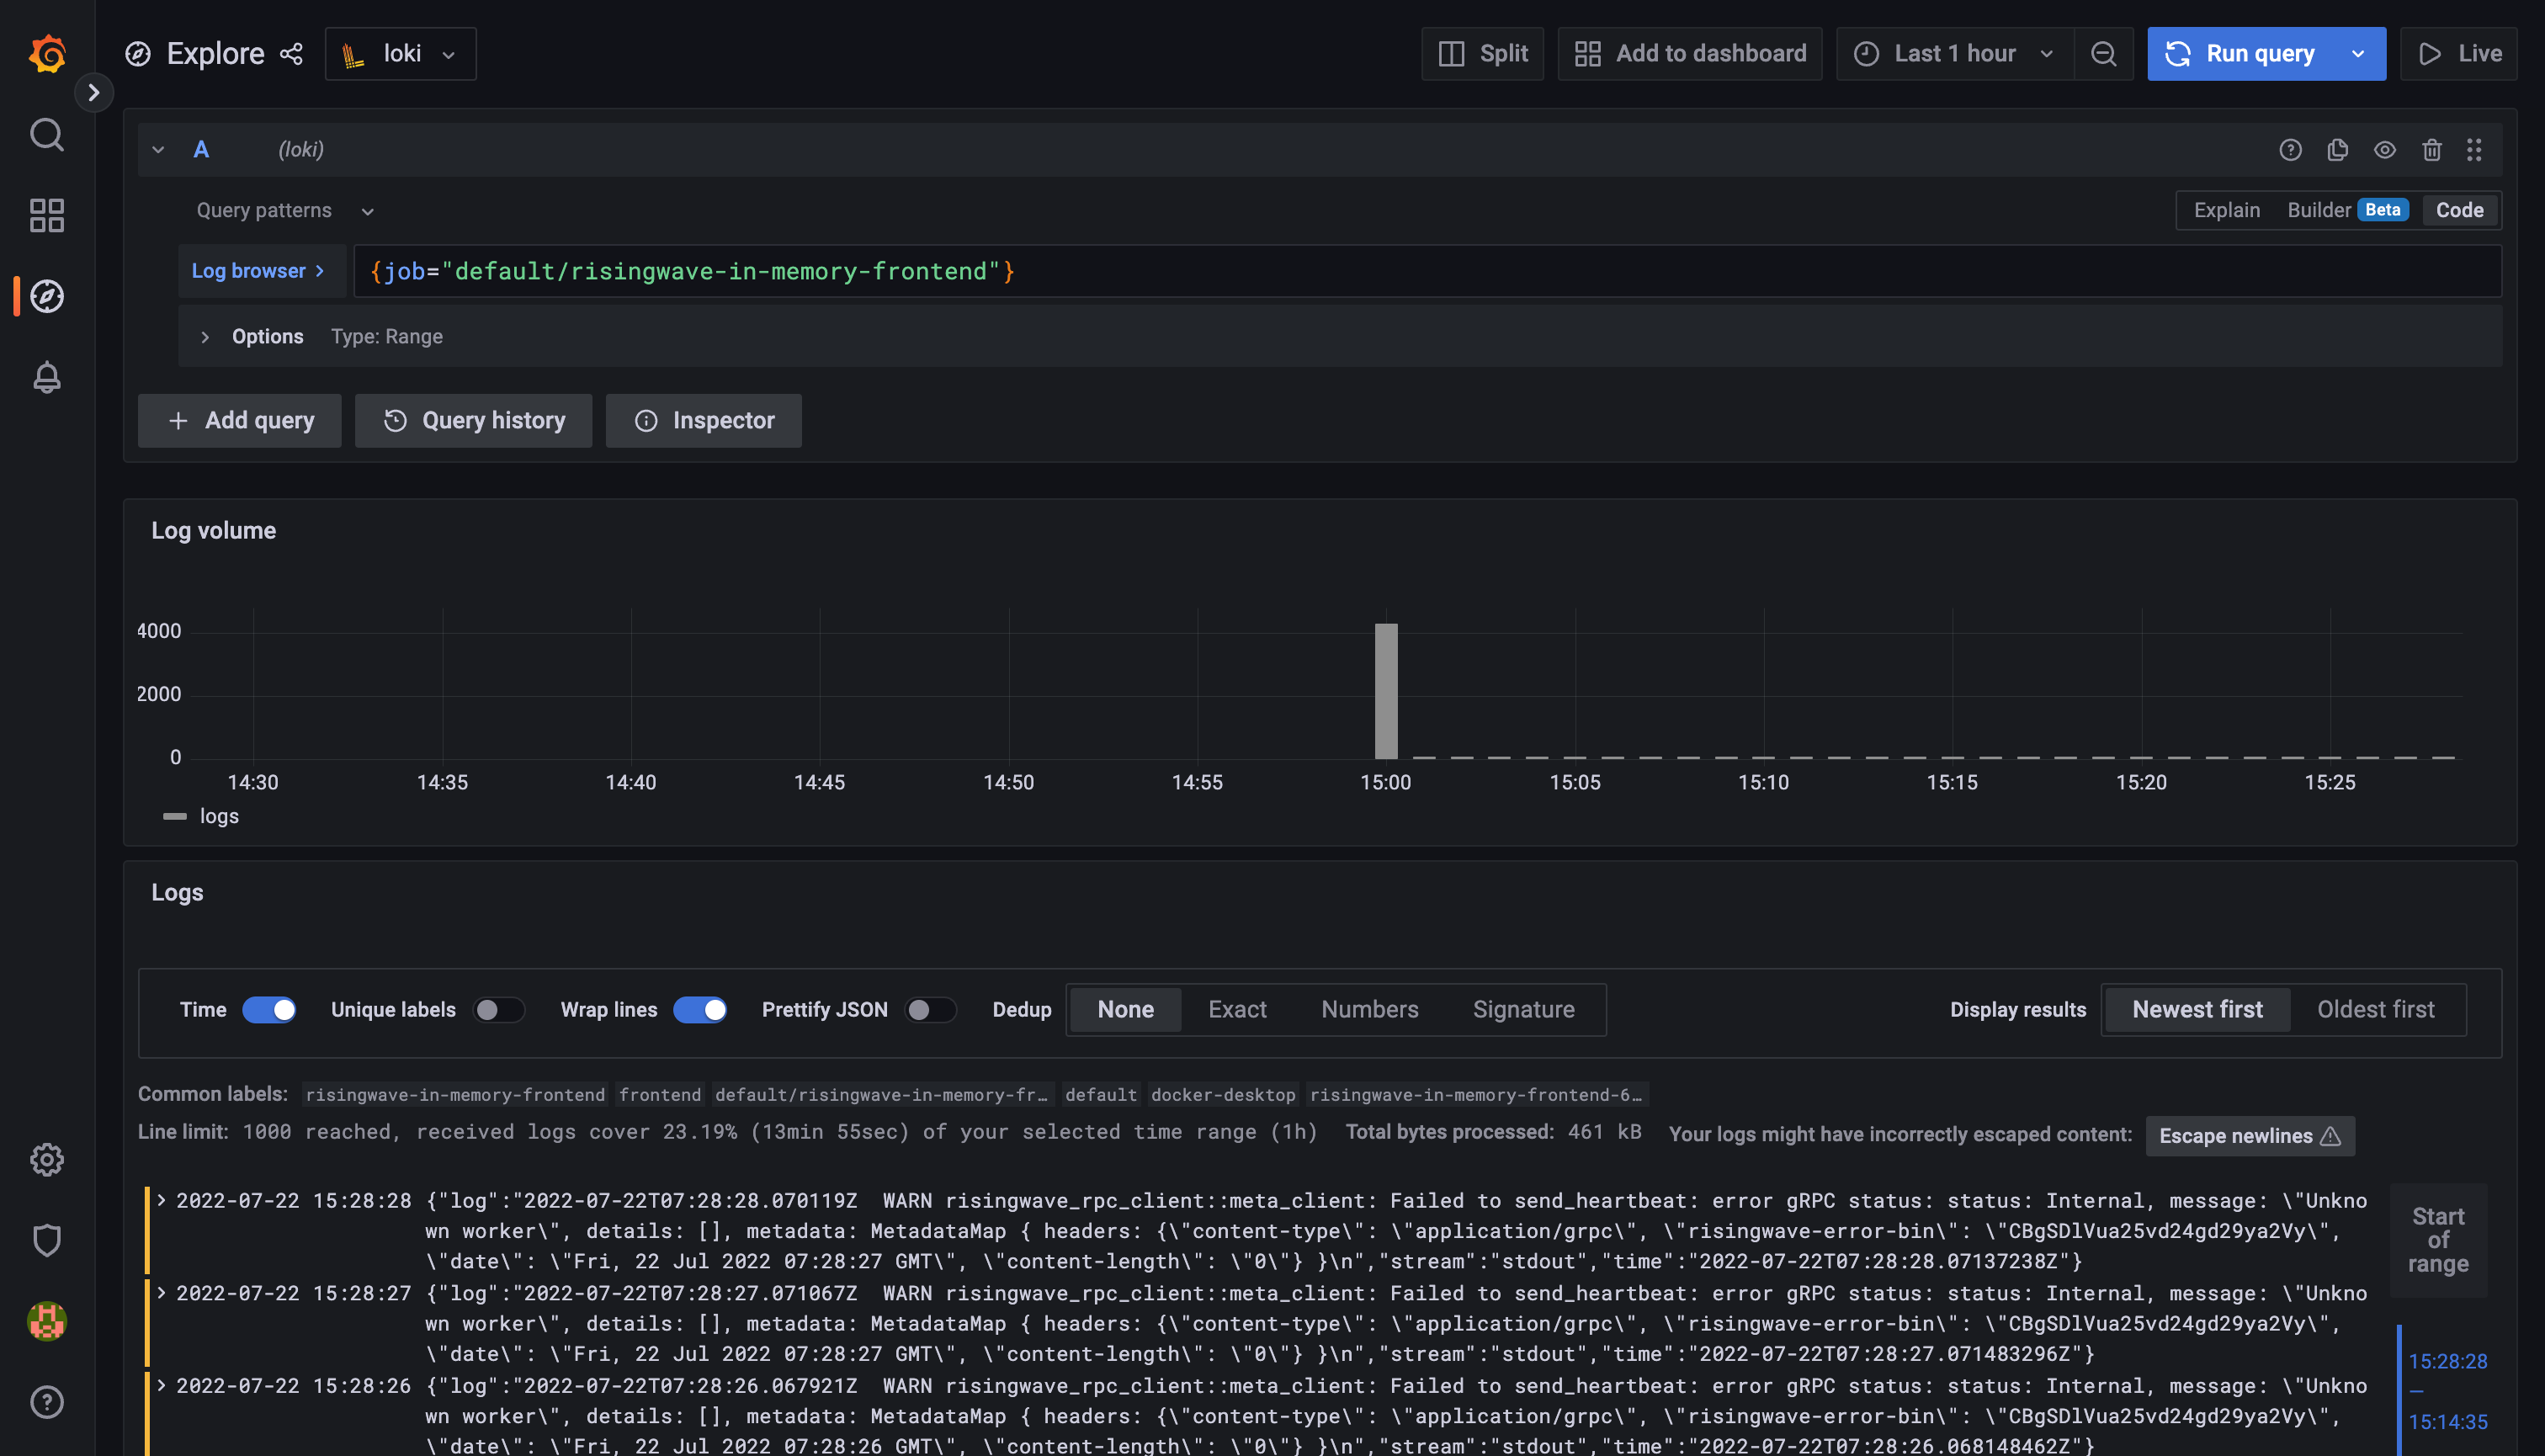
Now, we are ready to view the logs in Grafana. Just forward the traffics to the localhost, and open the http://localhost:3000 like mentioned in the
chapter above. Navigate to the Explore panel on the left side, and select the loki as data source. Here's an example:
The RisingWave operator is developed under the Apache License 2.0. Please refer to LICENSE for more information.
Thanks for your interest in contributing to the project! Please refer to the Contribution and Development Guidelines for more information.

