Learn how to use a Greengrass deployment as a gateway server, including client device authentication and MQTT broker features. Greengrass is configured to accept client device connections from ROS2 robots. This code was tested on an Ubuntu 22.04 system on ROS2 Humble.
This guide follows on from the ROS2 Robot Connectivity Sample Application. All of the tools and resources will be required from the MQTT sample application, including the AWS CLI with credentials and the IoT Thing and accompanying X.509 certificate.
Many of the environment variables will also be reused. Run the following commands to ensure that the variables are still set:
echo "Certificate folder: ${CERT_FOLDER_LOCATION}"
echo "IoT Config file: ${IOT_CONFIG_FILE}"
echo "AWS Region: ${AWS_REGION}"
echo "IoT Thing Name: ${THING_NAME}"
echo "IoT Thing ARN: ${THING_ARN}"
echo "IoT Certificate ARN: ${CERT_ARN}"This setup is to demonstrate the use of Greengrass on a hub device allowing connections to a number of client devices. This is simulated using Docker containers to disconnect the client devices from the internet.
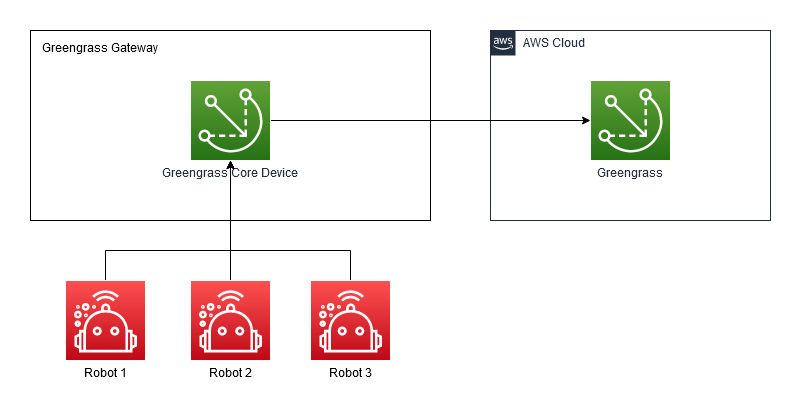
The lower left robots represent the client devices that are connecting to a central gateway. The gateway has software deployed to it using Greengrass, and bridges the connection between the robots and the cloud.
To use Docker, follow the installation instructions found here. Docker must be run without sudo to make sure that environment variables are used correctly, so ensure to follow the Linux postinstall steps from the previous link.
Docker Compose and jq are also used, which can be installed as follows:
sudo apt install -y docker-compose jqClone the repository into the home directory as follows:
export REPO="$HOME/git/aws-iot-greengrass-client-devices-ros2"
git clone --recurse-submodules https://github.com/aws-samples/aws-iot-greengrass-client-devices-ros2.git $REPO
Once this is complete, a new configuration file must be created similar to the previous IoT config file. Execute the following steps:
export IOT_DOCKER_CONFIG_FILE="$CERT_FOLDER_LOCATION/iot_docker_config.json"
cat $IOT_CONFIG_FILE > $IOT_DOCKER_CONFIG_FILE
sed -i "s|$CERT_FOLDER_LOCATION|/workspace/iot_certs_and_config/|g" "$IOT_DOCKER_CONFIG_FILE"
cat $IOT_DOCKER_CONFIG_FILE
The certificates folder is required for configuring the Docker containers on all runs, so it is recommended to write the environment variable into your shell configuration file for future use:
echo "export CERT_FOLDER_LOCATION=$CERT_FOLDER_LOCATION" >> ~/.bashrc
source ~/.bashrc
This ensures that any future bash session will still have this environment variable available.
There are a few steps to configure Greengrass as a hub for the client devices, which will be detailed below. At a high level, the steps are as follows:
- Ensure a Greengrass service role is available.
- Write the configuration for the Greengrass Nucleus software.
- Write the credentials that Greengrass will use for creating its Thing.
- Start Greengrass in a new terminal for first-time installation.
- Write the configuration for the Greengrass components to be deployed.
- Use the component configuration to create a deployment for Greengrass.
- Wait for the deployment to complete on the Greengrass core.
- Configure the client device to have permission to discover the Greengrass core.
- Associate the IoT Thing as a client device of the Greengrass Thing.
- Configure network and MQTT broker address.
After this, the Greengrass container will be fully configured and can be shut down ready to test the sample application.
Follow instructions here to ensure that Greengrass has a valid service role for execution.
The Greengrass Docker container can provision the Thing and Thing Group automatically, but it must be given particular details. To provide these, copy the greengrass_template.env file from the templates folder in this repository into client_device_workspace/greengrass.env, then modify the variables in the new file. Or, run the following commands to accomplish the same:
export GG_THING_NAME=MultiClientGreengrassCore
export GG_THING_GROUP_NAME=MultiClientGreengrassCoreGroup
export GREENGRASS_ENV_TEMPLATE="$REPO/templates/greengrass_template.env"
export GREENGRASS_ENV_FILE="$REPO/client_device_workspace/greengrass.env"
cat $GREENGRASS_ENV_TEMPLATE > $GREENGRASS_ENV_FILE
sed -i -e "s/MY_THING_NAME/$GG_THING_NAME/g" $GREENGRASS_ENV_FILE
sed -i -e "s/MY_THING_GROUP/$GG_THING_GROUP_NAME/g" $GREENGRASS_ENV_FILE
sed -i -e "s/MY_REGION/$AWS_REGION/g" $GREENGRASS_ENV_FILE
cat $GREENGRASS_ENV_FILE
This will allow Greengrass to provision a new Thing and Thing Group, or find it if it exists already.
If provision is set to True in the environment variables, Greengrass requires access keys to provision. However, if provision is set to False, the user can manually create the Thing and Thing Group.
If access keys are required, they must be created and downloaded from the AWS console. Copy the file templates/greengrass_credentials_template to client_device_workspace/greengrass-v2-credentials/credentials, then modify the file to contain the access key details. The file should contain these variables:
[default]
aws_access_key_id=
aws_secret_access_key=
Warning: if the same terminal is used, some variables that have been set so far will become unavailable. Be careful to open a new terminal.
Start Greengrass by itself to provision the Thing and Group, and install the Greengrass Nucleus. This should be done by opening a new terminal and executing:
cd "$REPO/client_device_workspace/"
docker-compose up greengrass
Wait until the logs show that the Nucleus has started. The logs showing that the Nucleus has started look similar to the following:
...
greengrass_1  | Nucleus options: --setup-system-service false
greengrass_1  | + trap 'echo Received SIGTERM; sigterm_received=1; kill -TERM ${child_pid}; wait ${child_pid}; echo Killed child PID' TERM
greengrass_1  | + child_pid=11
greengrass_1  | + wait 11
greengrass_1  | + java -Dlog.store=FILE -Dlog.level= -Dlog.store=FILE -Droot=/greengrass/v2 -jar /greengrass/v2/alts/current/distro/lib/Greengrass.jar --setup-system-service false
greengrass_1  | Launching Nucleus...
greengrass_1  | Launched Nucleus successfully.
Leave the container running, as the next steps will deploy software to the container.
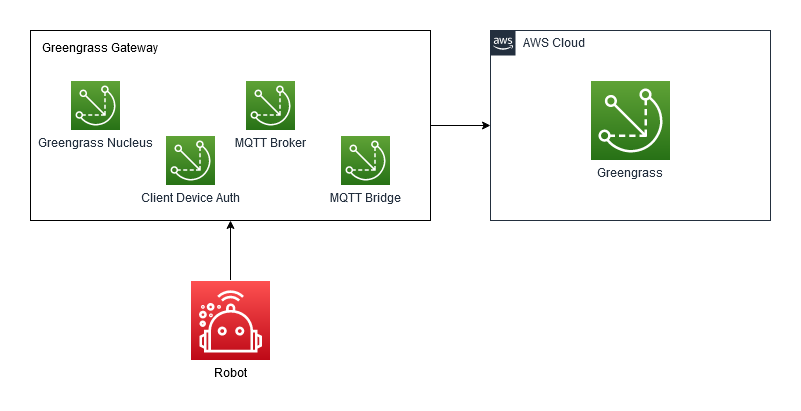
The Greengrass deployment is the process of deploying components to the Greengrass core device. In our case, this is the Greengrass container we just launched. The deployment lists the components to be deployed and the configuration for each component. Our deployment will use the following components:
- Greengrass Nucleus - the core software for managing deployments
- Client Device Auth - component allowing client devices to authenticate. We configure this to allow our IoT core device to authenticate, and set its permissions.
- Moquette - the MQTT broker to run on the Greengrass device.
- MQTT bridge - the component to bridge the MQTT link between the Greengrass device and the broker in the cloud. We configure this to allow our ROS topics to be forwarded to the cloud.
In this list, two of the components require configuration. The client device configuration can be created using the following template:
{
  "deviceGroups": {
    "formatVersion": "2021-03-05",
    "definitions": {
      "MyDeviceGroup": {
        "selectionRule": "thingName: UNKNOWN",
        "policyName": "MultiClientDevicePolicy"
      }
    },
    "policies": {
      "MultiClientDevicePolicy": {
        "AllowConnect": {
          "statementDescription": "Allow client devices to connect.",
          "operations": [
            "mqtt:connect"
          ],
          "resources": [
            "*"
          ]
        },
        "AllowPublish": {
          "statementDescription": "Allow client devices to publish to all topics.",
          "operations": [
            "mqtt:publish"
          ],
          "resources": [
            "*"
          ]
        },
        "AllowSubscribe": {
          "statementDescription": "Allow client devices to subscribe to all topics.",
          "operations": [
            "mqtt:subscribe"
          ],
          "resources": [
            "*"
          ]
        }
      }
    }
  }
}
This template allows Things matching the selection rule to connect, publish, and subscribe to all topics. The topic is restricted further by the MQTT permissions. If more than one client device is required, use OR to join them together; for example, ThingName1 OR ThingName2 OR ThingName3.
Information on more configuration options can be found here, which allows more restrictive access control depending on your use case.
NOTE: Here we allow all client devices and topics for demonstration purposes only; the policy should be updated for use in production per your functional and security requirements.
The template should be copied from this file or from templates/client_device_auth_template.json into $CERT_FOLDER_LOCATION/client_device_auth.json. Following this, the UNKNOWN value should be updated with the IoT Thing name. This can be accomplished with the following:
export CLIENT_DEVICE_AUTH_TEMPLATE="$REPO/templates/client_device_auth_template.json"
export CLIENT_DEVICE_AUTH_FILE="$CERT_FOLDER_LOCATION/client_device_auth.json"
cat $CLIENT_DEVICE_AUTH_TEMPLATE > $CLIENT_DEVICE_AUTH_FILE
sed -i -e "s/UNKNOWN/$THING_NAME/g" $CLIENT_DEVICE_AUTH_FILE
cat $CLIENT_DEVICE_AUTH_FILE
This configuration can now be inserted into the Greengrass deployment configuration. The configuration looks like this:
{
  "aws.greengrass.Nucleus": {
    "componentVersion": "2.9.5"
  },
  "aws.greengrass.clientdevices.Auth": {
    "componentVersion": "2.3.2",
    "configurationUpdate": {
      "merge": "UNKNOWN"
    }
  },
  "aws.greengrass.clientdevices.mqtt.Moquette": {
    "componentVersion": "2.3.1"
  },
  "aws.greengrass.clientdevices.mqtt.Bridge": {
    "componentVersion": "2.2.4",
    "configurationUpdate": {
      "merge": "{\"mqttTopicMapping\": {\"ForwardAllMapping\": {\"topic\": \"MY_TOPIC\",\"source\": \"LocalMqtt\",\"target\": \"IotCore\"} } }"
    }
  }
}
Here, the UNKOWN value of the Client Device Auth component must be updated with the newly created template. In addition, the MQTT Bridge component requires the MY_TOPIC field to be updated with the required topic name. All configurations in the deployment must be valid strings containing escaped JSON. This can be done by hand or by executing the following:
export TOPIC_NAME=ros2_mock_telemetry_topic
# Use jq to serialize JSON, then remove start quote, then end quote, then newline chars, then multiple spaces in a row. Then double-escape quotes for re-inserting into file.
export GG_AUTH_CONFIG=$(jq -Rs '.' "$CLIENT_DEVICE_AUTH_FILE" | sed 's/^"//' | sed 's/"$//' | sed 's/\\n//g' | sed -r 's/\s+/ /g' | sed 's/\\"/\\\\"/g')
echo "Greengrass Auth config: $GG_AUTH_CONFIG"

export DEPLOYMENT_CONFIG_TEMPLATE="$REPO/templates/greengrass_deployment_config_template.json"
export DEPLOYMENT_CONFIG_FILE="$REPO/client_device_workspace/greengrass_deployment_config.json"
cat $DEPLOYMENT_CONFIG_TEMPLATE > $DEPLOYMENT_CONFIG_FILE
sed -i "s/UNKNOWN/$GG_AUTH_CONFIG/g" $DEPLOYMENT_CONFIG_FILE
sed -i "s/MY_TOPIC/$TOPIC_NAME/g" $DEPLOYMENT_CONFIG_FILE
cat $DEPLOYMENT_CONFIG_FILE
Once this is complete, the Greengrass deployment is ready to be created in the cloud.
The deployment configuration file can now be used for deploying to Greengrass. Execute the following commands:
export GG_ARN=$(aws iot describe-thing --thing-name $GG_THING_NAME --query thingArn | tr -d '"')
aws greengrassv2 create-deployment --target-arn $GG_ARN --components "file://$DEPLOYMENT_CONFIG_FILE"
This command tells Greengrass that the Greengrass Core device has a new deployment, causing it to update itself with the new components and configuration.
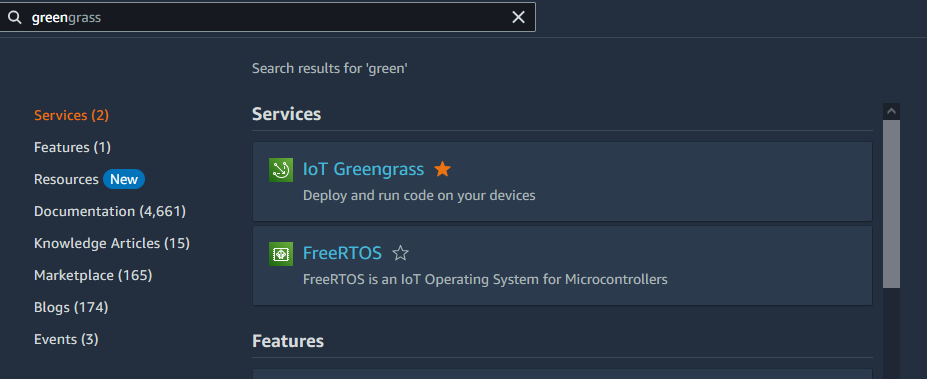
Monitor the AWS console to check that the deployment has completed successfully. This can be done by opening the Greengrass page, as follows:
Select the Deployments on the left navigation bar:
This shows the list of deployments. Watch the status of the deployment for your Greengrass device, as shown by the lower colored box. More frequent refreshing can be performed by clicking the refresh arrow of the table, shown by the upper colored box.
Once the deployment is complete, the Greengrass container can be closed by selecting its terminal and pressing Ctrl+C.
We must now configure the cloud to allow the client device to discover the Greengrass device. The policy template looks like the following:
{
  "Version": "2012-10-17",
  "Statement": [
    {
      "Effect": "Allow",
      "Action": [
        "greengrass:Discover"
      ],
      "Resource": [
        "THING_ARN"
      ]
    }
  ]
}
Copy the above policy template or the file templates/client_device_policy_template.json into $CERT_FOLDER_LOCATION/client_device_policy.json, then replacing THING_ARN with the IoT Thing ARN. The Thing ARN can be looked up from the AWS Console. This file is used to determine whether the specified client device is allowed to perform Greengrass discovery, and which devices it should be allowed to discover.
export CLIENT_DEVICE_POLICY_TEMPLATE="$REPO/templates/client_device_policy_template.json"
export CLIENT_DEVICE_POLICY_FILE="$CERT_FOLDER_LOCATION/client_device_policy.json"
cat $CLIENT_DEVICE_POLICY_TEMPLATE > $CLIENT_DEVICE_POLICY_FILE
sed -i -e "s|THING_ARN|$THING_ARN|g" $CLIENT_DEVICE_POLICY_FILE
cat $CLIENT_DEVICE_POLICY_FILE
This policy may now be used to create an IAM policy in the cloud, and attach it to the existing IoT Thing's certificate. Use the following commands to accomplish this.
export CLIENT_DEVICE_POLICY_NAME=ros2_client_devicy_policy
aws iot create-policy --policy-name $CLIENT_DEVICE_POLICY_NAME --policy-document file://$CLIENT_DEVICE_POLICY_FILE
aws iot attach-policy --policy-name $CLIENT_DEVICE_POLICY_NAME --target $CERT_ARNThe client device is now allowed to discover the Greengrass device, but is not yet allowed to connect to it as a client device. The next step is to associate the client device with the Greengrass Thing to allow the connection. This process must be performed for every client device attempting to discover the Greengrass core. This can be done by executing the following:
aws greengrassv2 batch-associate-client-device-with-core-device --core-device-thing-name $GG_THING_NAME --entries thingName=$THING_NAMEThis command should return an empty list of errors, meaning that no errors occurred, as follows:
{
  "errorEntries": []
}
To perform discovery, the client device will interrogate Greengrass for the MQTT broker endpoint address. In our case, this will be the greengrass hostname because the docker networks are set up to allow this direct connection. It is also possible to set the public IP of the Greengrass host, but in this case port 8883 must be allowed through the firewall.
To inform the client device to look for the greengrass host, we must update Greengrass with this name. This may be done by executing the following:
aws greengrassv2 update-connectivity-info --thing-name $GG_THING_NAME --connectivity-info id="dockerBroker",hostAddress="greengrass",portNumber=8883,metadata=""MQTT traffic should now flow correctly. This concludes the configuration steps.
This configuration should be enough to run the Docker containers. Execute the following:
cd "$REPO/client_device_workspace"
docker-compose up
A series of log messages should start appearing similar to the following:
...
iot_pub_1    | [INFO] [1679699629.306053573] [mqtt_publisher]: Received data on ROS2 {"battery": 87.64, "velocity": 3.12}
iot_pub_1    | Publishing to AWS IoT
iot_pub_1    | [INFO] [1679699629.806076367] [mqtt_publisher]: Received data on ROS2 {"battery": 86.02, "velocity": 3.72}
iot_pub_1    | Publishing to AWS IoT
iot_pub_1    | [INFO] [1679699630.306125767] [mqtt_publisher]: Received data on ROS2 {"battery": 86.28, "velocity": 3.35}
iot_pub_1    | Publishing to AWS IoT
...
Note that the first few sets of error messages from the iot_pub component will be errors as the Greengrass container has not fully started up yet. It takes around 10s for this to start working correctly.
Once the messages start appearing, the client devices has connected directly to the Greengrass container. It will continue sending traffic even if it loses public internet access. This can be simulated using the following command to disconnect the container from the network:
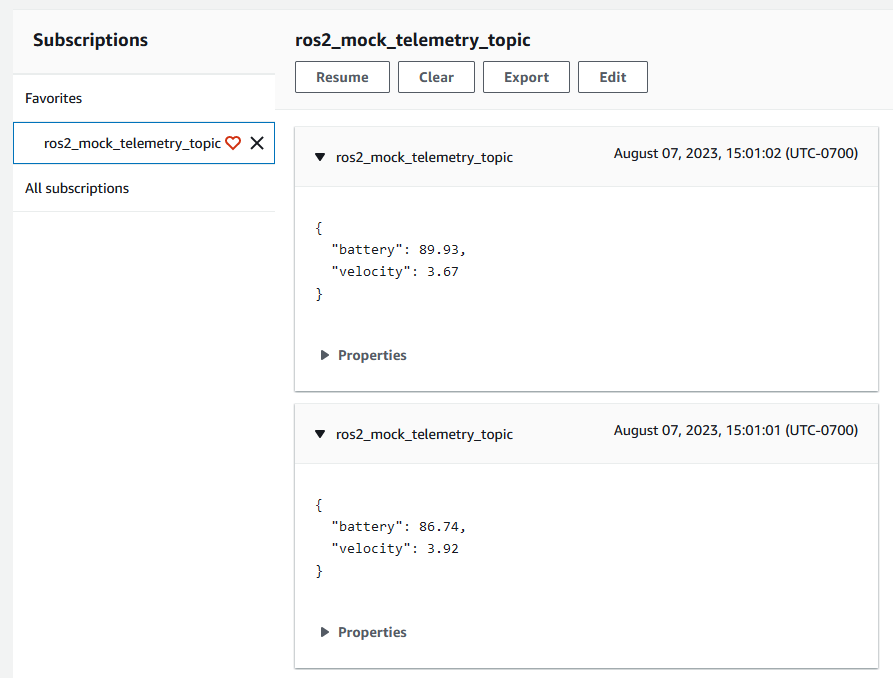
docker network disconnect client_device_workspace_aws_discovery client_device_workspace_iot_pub_1The container now no longer has public internet access, but should still transmit messages that can be viewed in AWS cloud using the MQTT test client:
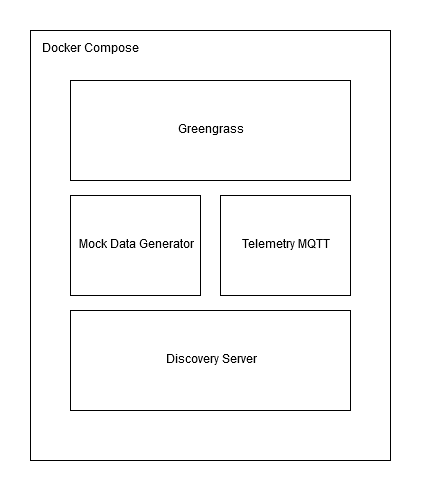
In this example, Docker Compose is used to run 4 containers:
greengrass: with folders for the Greengrass installation and credentials mounted, this container manages deployments. It has both public network access and access to the internalrosnetwork.discovery: this is a ROS2 container that allows other ROS2 containers to discover one another. It does not have internet access.iot_pub: this is a ROS2 container that listens for ROS2 messages and publishes MQTT messages. It has internet access for Greengrass discovery androsnetwork access tocommunicate with other containers. Note that its public internet connection can be disabled after Greengrass discovery is complete. This container also has required certificates mounted in.mock_pub: this is a ROS2 container generating and publishing fake telemetry data. It does not have internet access.
There are also 3 networks:
ros: internal network connecting containers together.aws: network connectinggreengrasscontainer to the cloud.aws_discover: network allowingiot_pubcontainer to discover Greengrass device. This is not required once discovery is complete.
Your ROS2 robot can now automatically discover the Greengrass server to allow a local connection instead of communicating directly to the cloud. This server could be extended to forward logs and metrics, or allow local shadow communication without a public network connection, by deploying additional Greengrass components.
See CONTRIBUTING for more information.
This library is licensed under the MIT-0 License. See the LICENSE file.
