
This custom component for Home Assistant allows you to generate text responses using OpenAI via MindsDB at no expense.
https://www.youtube.com/watch?v=T29k4qsXKPk&ab_channel=HassAssistant
1. You will need to create a free account on MindsDB. HERE
2. Once you have an account, head over to the MindsDB editor HERE
3. The SQL query you need to create your AI model.
- In this example, we're creating an OpenAI GPT4 model.
- The name I've given this model is gpt4hassio. Change this to whatever you want.
- You can change the model name if required from gpt-4.
CREATE  MODEL mindsdb.gpt4hassio
PREDICT response
USING
engine  =  'openai',
max_tokens =  6000,
model_name =  'gpt-4',
prompt_template =  '{{text}}';
When you're happy, click Run to execute the query. This will create your model.
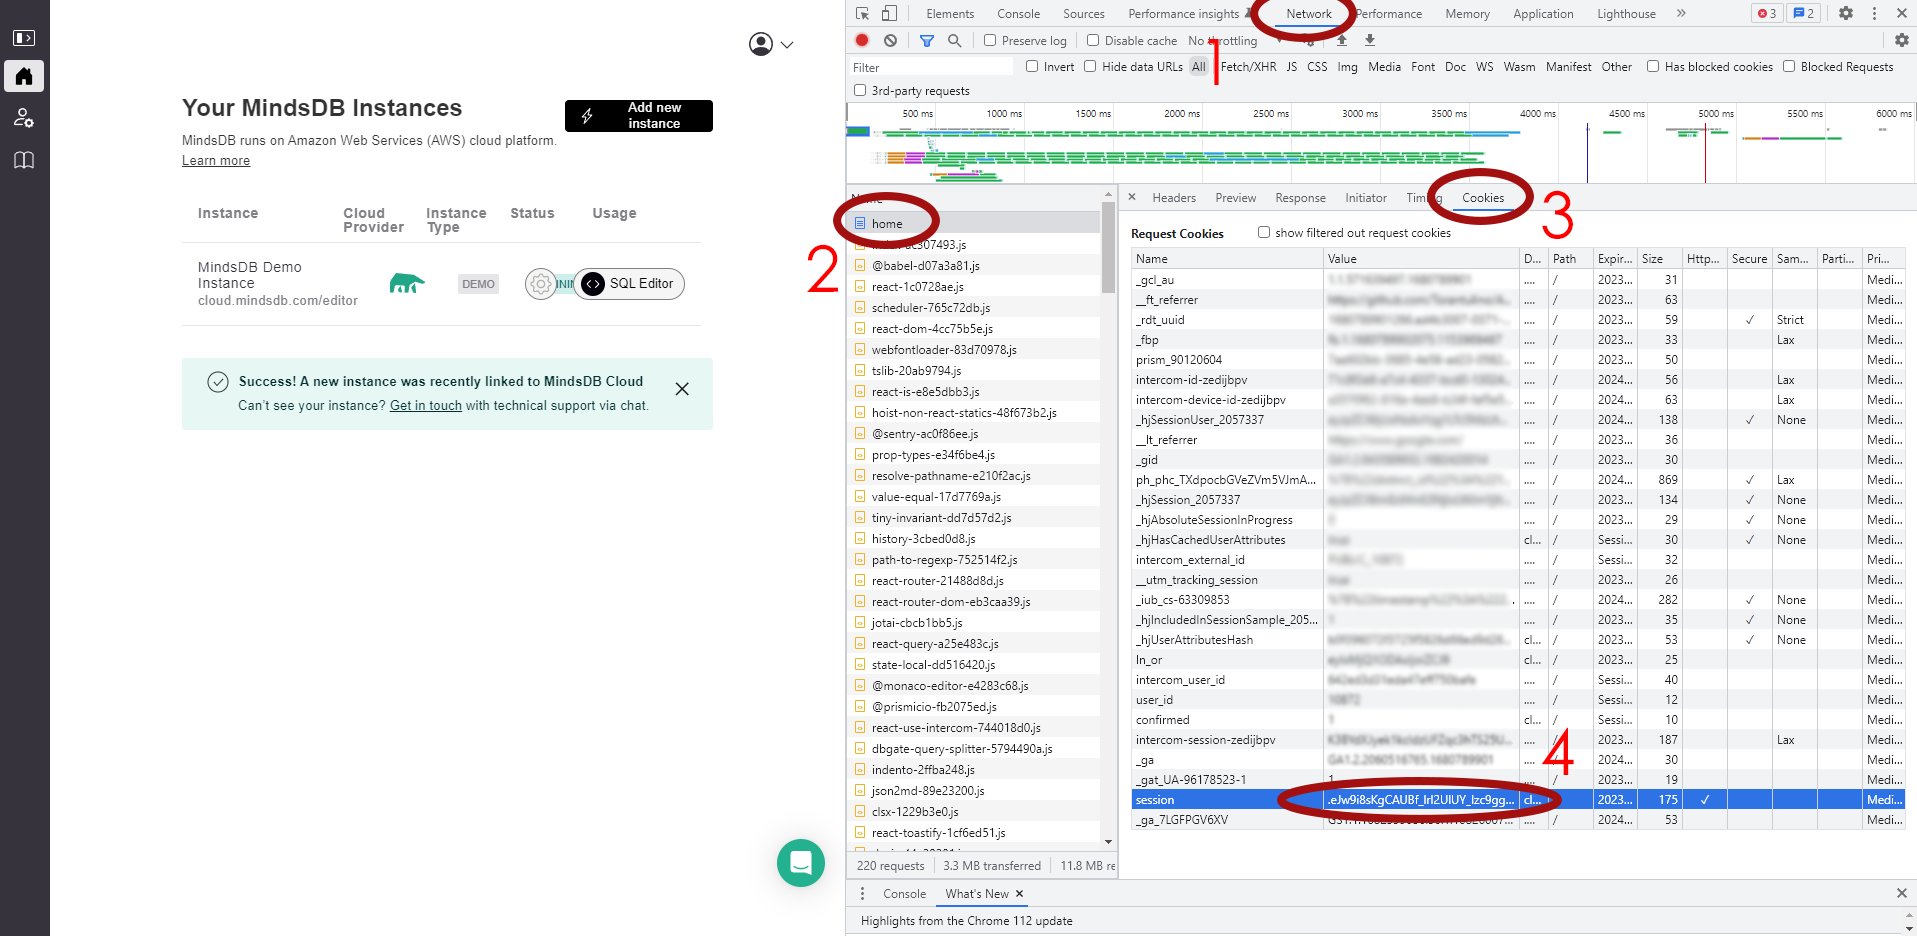
4. We need the Session Cookie for MindsDB authentication within Home Assistant.
- Head to Inspect Element on your web browser while logged into MindsDB
- Click the Network tab (Step 1).
- Refresh the webpage (F5)
- Look for the Home element (Step 2).
- Click on the cookies tab (Step 3)
- Copy the Session Cookie by double clicking the string, right click and press copy. (Step 4)

1. (Manual) Copy the OpenMindsAI folder to your Home Assistant's custom_components directory. If you don't have a custom_components directory, create one in the same directory as your configuration.yaml file.
(HACS) Add this repository to HACS. https://github.com/Hassassistant/openmindsai
2. Restart Home Assistant.
2. Add the following lines to your Home Assistant configuration.yaml file:
input_text:
  gpt_prompt:
    initial: ""
    max: 255
## This is the input_text entity you'll use to send prompts.

sensor:
  - platform: openmindsai
    name: "hassio_mindsdb_response"
## Optional. Defaults to hassio_mindsdb_response
    input_name: "gpt_prompt"
## Optional. Defaults to gpt_prompt. This is your input_text name
    session_cookie: ".eJw9i8sKgCAUBf_lrl2UlUY_..."
## Required. This is your MindsDB Session Cookie
    model: "gpt4hassio"
## Required. This is your MindsDB Model Name
3. Restart Home Assistant.
To generate a response from GPT-3, update the input_text.gpt_prompt entity with the text you want to send to the model. The generated response will be available as an attribute of the sensor.hassio_mindsdb_response entity.
To display the GPT-3 input and response in your Home Assistant frontend, add the following to your ui-lovelace.yaml file or create a card in the Lovelace UI:
type: grid
square: false
columns: 1
cards:
  - type: entities
    entities:
      - entity: input_text.gpt_prompt
  - type: markdown
    content: '{{ state_attr(''sensor.hassio_mindsdb_response'', ''response_text'') }}'
    title: OpenAI Response
Now you can type your text in the GPT Prompt Input field, and the generated response will be displayed in the response card.

This project is licensed under the MIT License - see the LICENSE file for details.
Disclaimer: This project is not affiliated with or endorsed by OpenAI. Use the GPT-4 API at your own risk.