OpenVPN Community for Amazon Linux 2 + 2FA with Google Authenticator
Table of contents
- Installing
- Additional setup
- Adding/removing/list users
- Paths
- Services
- Uninstall
- Client connection
- Credits & Licence
Installing
First, get the script and make it executable:
curl -O https://raw.githubusercontent.com/danilvalov/openvpn_amazon_linux_2fa/master/install-openvpn.sh
chmod +x install-openvpn.sh
Then run it as root:
./install-openvpn.sh
And the last step:
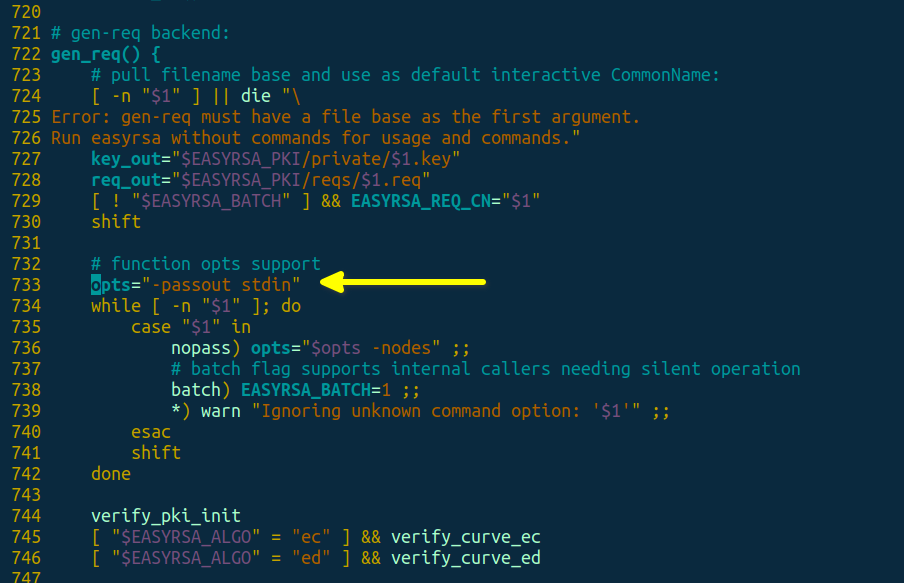
Open /etc/openvpn/easy-rsa/easyrsa file, find the function called gen_req() (should be around line 722, depending on your EasyRSA version) and change a parameter called opts= to opts="-passout stdin" like here:
Additional setup
OpenVPN config template
If you want to change OpenVPN user config template, just open /etc/openvpn/client-template.txt file and modify it.
Code name in Google Authenticator
You can change name of code in Google Authenticator in generating QR codes. Just modify ISSUER="OpenVPN" line in the top of manage-openvpn.sh file to ISSUER="Your Project Name".
Adding/removing/list users
Adding
Run a command
./manage-openvpn.sh create fred
to generate OpenVPN config for some Fred.
Important: save username, password and emergency scratch codes from your terminal! You won't be able to see it again in the future for generated user!
Removing
Run a command
./manage-openvpn.sh revoke fred
to revoke access to Fred
List of users
Run a command
./manage-openvpn.sh status
to see list of created OpenVPN users
Paths
You can find generated OpenVPN configs of users in the following directory: /opt/openvpn/clients.
You can find QR codes and secret keys for 2FA of users here: /opt/openvpn/google-auth.
Services
Installation script adds 2 daemons to the system:
openvpn@server- start/stop/status of OpenVPN server. You can manage it using systemctl:systemctl status openvpn@server.iptables-openvpn- adding/removing iptables configs for OpenVPN (sharing port and other), you can find detailed iptables rules here after installation:/etc/iptables/add-openvpn-rules.sh. You can manage this service using systemctl:systemctl status iptables-openvpn.
Uninstall
Run a command
./install-openvpn.sh
and select Remove OpenVPN option
Client connection
Mac OS
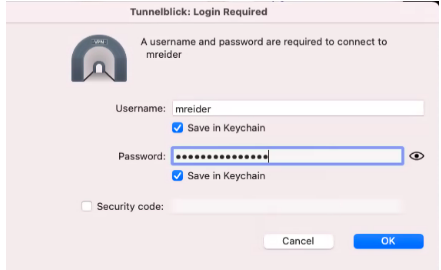
Add generated OpenVPN config from /opt/openvpn/clients/CLIENTNAME directory to your VPN client (ie, Tunnelblick, etc), enter username and password:
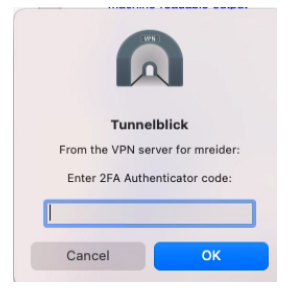
Next get a 2FA code from Authy or Google Authenticator apps:
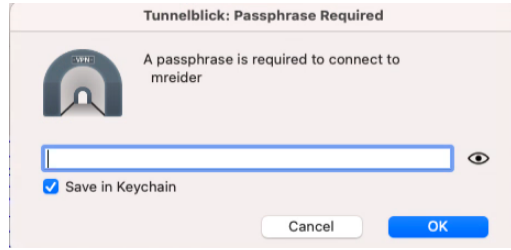
And finally enter a private key passphrase (same as password):
Linux
On an Ubuntu-based distro, there currently is no GUI for 2FA authentication with OpenVPN. If you try to use the Network Manager to create a new VPN connection, it won't be able to connect since it will get stuck waiting for 2FA code.
The only workable way is to connect via command line,
Place your .ovpn file into ~/vpn
Open your .ovpn profile and add these lines
auth-user-pass client.pass
askpass client.priv
script-security 2
up /etc/openvpn/update-resolv-conf
down /etc/openvpn/update-resolv-conf
down-pre
This will query the client.pass and client.priv files every time you connect w/out prompting you to constantly enter your VPN password.
Open up client.pass file and enter your username + password:
jsmith
xverDF8@9df:!
Change rules for this file:
chown $(whoami):$(whoami) && chmod 600 client.pass
Edit client.priv file, and enter just your password, ie:
xverDF8@9df:!
Run same chown and chmod on this file.
Now connect to VPN server form command line:
cd ~/vpn/
sudo openvpn --config jsmith.ovpn
The client will ask for your 2FA code:
Tue Apr 26 09:51:04 2022 OpenVPN 2.4.7 x86_64-pc-linux-gnu [SSL (OpenSSL)] [LZO] [LZ4] [EPOLL] [PKCS11] [MH/PKTINFO] [AEAD] built on Mar 22 2022
Tue Apr 26 09:51:04 2022 library versions: OpenSSL 1.1.1f  31 Mar 2020, LZO 2.10
CHALLENGE: Enter 2FA Authenticator code:
Enter the code from your Authy app, you should now be connected. VPN password and private key password are seamless as they are stored and read from client.pass and client.priv files.
Credits & Licence
Thank Mike Reider for his article about OpenVPN+2FA and his OpenVPN+2FA repository for Rocky Linux 8. I just modified it a bit to make this script and this README file.
Thank Stanislas for his OpenVPN repository.
Many thanks to Nyr's original work.
This project is under the MIT Licence


