uRaymarching
uRaymarching is a raymarching shader templates with uShaderTemplate (the latest version of uShaderTemplate is included in this asset).
- Create a raymarching object only by writting a distance function
- Supports both forward and deferred paths
- Can be mixed with polygon objects
- VR ready
- Standard / Unlit / Transparent
- Shadows for Directional / Spot / Point lights
- Full-screen / Object-space
Screenshots
The following shapes are rendered in a 12-polygon cube.
Check more examples here:
Install
Please download the latest version of .unitypackage from the Releases page and extract it in your project.
How to use
- Select Create > Shader > uShaderTemplate > Generator in the Project view.
- Input Shader Name and select Shader Template from Inspector.
- Edit items in Conditions, Variables, Properties, Distance Function, and Post Effect.
- Press Export button or Ctrl + R to create shader from the
Generator. - Create material in the Project view (or press Create Material button).
- Create Cube in the Hierarchy view.
- Apply the generated material to the cube.
Please also see uShaderTemplate to learn the detail of shader generation function.
Inspector
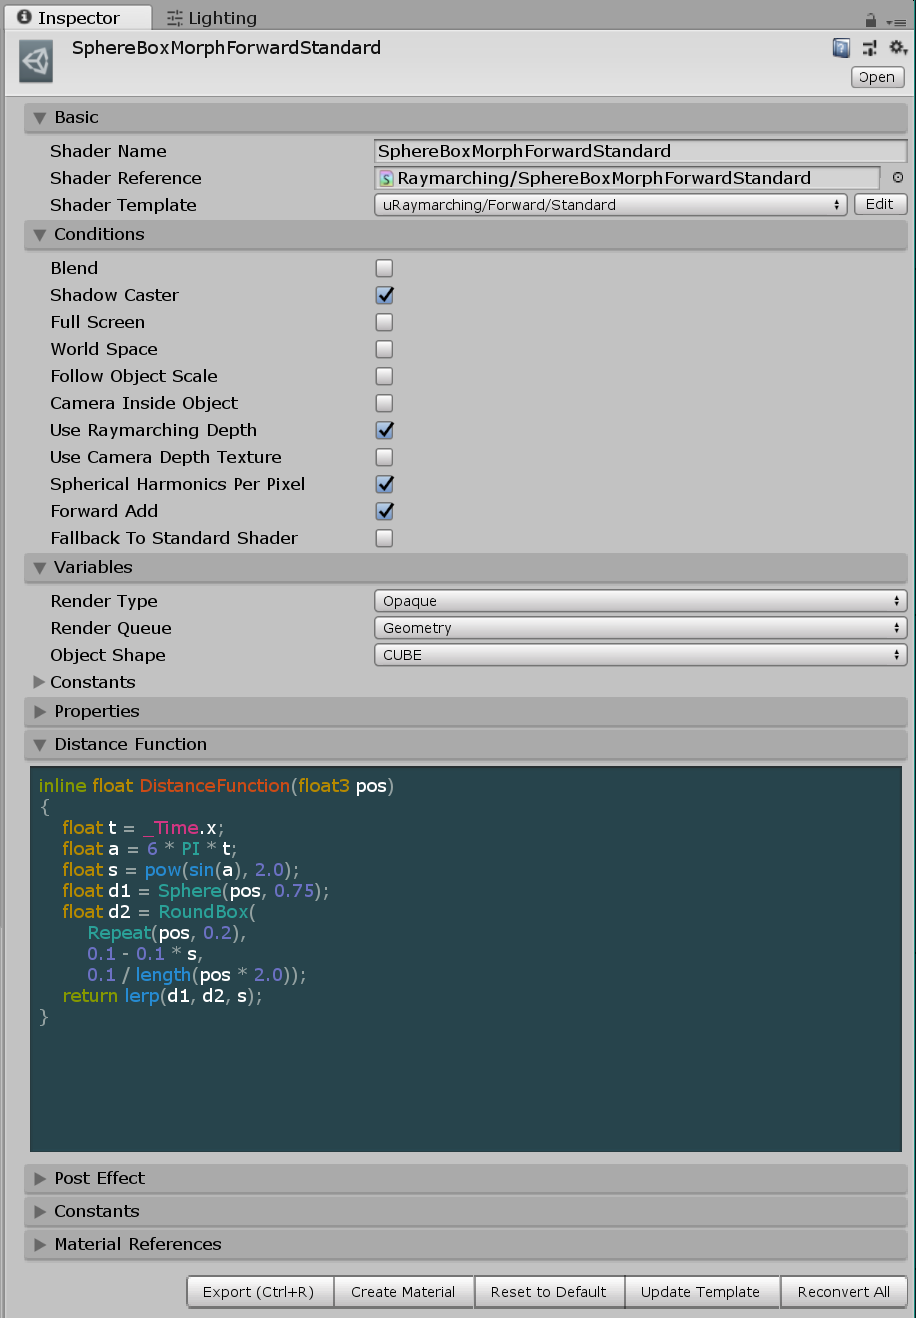
The UI is generated by uShaderTemplate automatically from template files located in the Assets/uRaymarching/Editor/Resources/ShaderTemplates.
Shader Templates
- Forward > Standard
- The lighting is done by the same method as a standard surface shader in ForwardBase/Add pass.
- Forward > Unlit
- No lighting by default so you have to write output colors manually.
- Deferred > Standard
- The lighting is done by the same method as a standard surface shader.
- Deferred > Direct GBuffer
- Write values directly into GBuffers without thinking the effect like GI or LightProbe.
The items in Conditions and Variables are different depending on the selected template.
Conditions
Blend- Create a
Blend X Xline. - Please check if you want to create a transparent shader.
- Create a
Shadow Caster- Create
ShadowCasterpass. - Please check if you want a shadow of a raymarching object.
- Create
Full Screen- Please check if you use
RamyarchingRendererto do fullscreen raymarching. - If checked, emit rays from a camera, if not, from a cube polygon surface.
- Please check if you use
World Space- The given
posin a distance function becomes world-space one.
- The given
Follow Object Scale- If checked,
posin a distance function is scaled by the object scale.
- If checked,
Camera Inside Object- Check if the camera position is inside the object, and then if so, emit ray from camera (not from a polygon surface).
- Please set the culling as
Cull Off.
Use Raymarching Depth- If checked, output a raymarching depth, and if not, output a polygon depth.
Use Camera Depth Texture- The occlusion with the other objects is calculated using the
CameraDepthTexture. - Please check in the case that you create a transparent shader and set
ZWrite Offto a material.
- The occlusion with the other objects is calculated using the
Disable View Culling- Please use this only for the fullscreen raymarching with Camera Inside Object option.
Spherical Harmonics Per Pixel- By default the SH calculation is done in a vertex shader (i.e. only 8 vertices of a cube) but if you create a complex shape and the calculation of the SH is bad, please check this flag to calculate it in a fragment shader (needs more cost than the unchecked case).
Use Grab Pass- If checked, insert
GrabPass {}line beforeForwardBasepass (see an example at uRaymarchingExample repository).
- If checked, insert
Forward Add- Create a
ForwardAddpass to calculate the effect from additional lights.
- Create a
Fallback To Standard Shader- Create a
Fallbackline. - If you want a shadow of the polygon object for the better performance, please uncheck Shadow Caster and check this.
- Create a
Variables
- Render Type
RenderTypetag value likeOpaque,Transparent, andTransparentCutout.
- Render Queue
Queuetag value likeGeometry,AlphaTest, andTransparent.
- Object Shape
- Clip the raymarching area inside cube or not (see below).
- CUBE
-
- NONE
-
Properties
This block is inserted into a Property section in a shader.
[Header(Additional Parameters)]
_Grid("Grid", 2D) = "" {}
Distance Function
Write a distance function here. The following code is the one generating the example of morphing sphere in Screenshots section in this document.
inline float DistanceFunction(float3 pos)
{
    float r = abs(sin(2 * PI * _Time.y / 2.0));
    float d1 = RoundBox(Repeat(pos, float3(6, 6, 6)), 1 - r, r);
    float d2 = Sphere(pos, 3.0);
    float d3 = Plane(pos - float3(0, -3, 0), float3(0, 1, 0));
    return SmoothMin(SmoothMin(d1, d2, 1.0), d3, 1.0);
}
Math.cginc and Primitives.cginc are included in the generated shader, so in this example some functions like RoundBox() and Repeat() come from these include files (of cource you can write them by yourself).
Post Effect
Post Effect is similar to a surface function in a surface shader. The following code is used in the hexagon-tile example in Screenshots section.
float4 _TopColor;

inline void PostEffect(RaymarchInfo ray, inout PostEffectOutput o)
{
    float3 localPos = ToLocal(ray.endPos);
    o.Emission += smoothstep(0.48, 0.50, localPos.y) * _TopColor;
    o.Occlusion *= 1.0 - 1.0 * ray.loop / ray.maxLoop;
}
RaymarchInfo is the input and the output of a raymarching calculation and this is defined in Struct.cginc.
struct RaymarchInfo
{
    // Input
    float3 startPos;    // start position of ray
    float3 rayDir;      // ray direction
    float3 projPos;     // ComputeScreenPos-applied position
    float3 polyNormal;  // normal on polygon surface
    float minDistance;  // minimum ray distance (comes from material setting)
    float maxDistance;  // maximum ray distance (changes by the raymarching setting)
    int maxLoop;        // maximum number of loop (comes from material setting)

    // Output
    int loop;           // total number of loop of the calculation (<= maxLoop)
    float3 endPos;      // last position (= surface of the distance function)
    float lastDistance; // the final distance of the raymarching
    float totalLength;  // total ray length
    float depth;        // depth (encoded)
    float3 normal;      // normal (encoded)
};
So ray.loop / ray.maxLoop is a normalized value and becomes close to 0.0 on the position where a ray reaches easily and becomes close to 1.0 when hard. So you can use it as a factor of a rechability or 1.0 - ray.loop / ray.maxLoop as an simple and a light-weight occlusion factor.
PostEffectOutput is defferent depending on the selected shader template. For example, it is an alias of SurfaceOutputStandard in Standard template. Please see each template file by clicking Edit button on the right side of the Shader Template drop-down list for more details.
Export

Press Export button or Ctrl + R to export shader. Then, press Create Material button to generate a material which uses the shader (or create a material manually from the Project pane).
Material
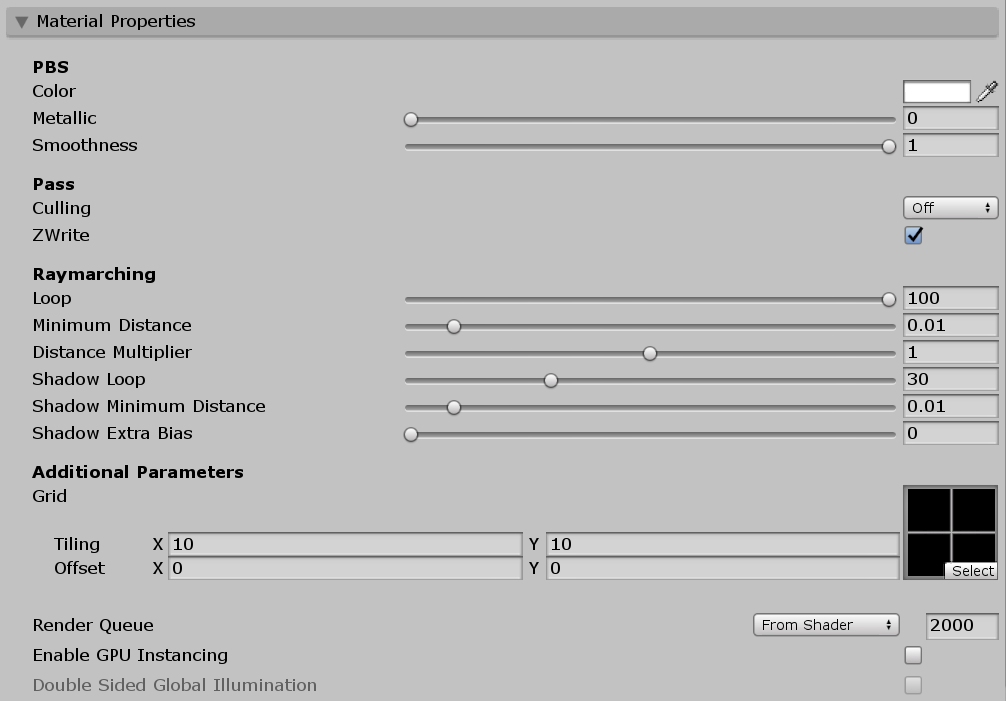
- Loop
- The maximum number of loops of raymarching in basic passes.
- Minimum Distance
- If the distance returned by a distance function becomes lower than this value, the loop finishes.
- Distance Multiplier
- This value is multiplied by the output of a distance function.
- Shadow Loop
- The maximum number of loops of raymarching in shadow pass.
- Shadow Minimum Distance
- Minimum Distance in shadow pass.
- Shadow Extra Bias
- Additional shadow bias.
Fullscreen
The RaymarchingRenderer component creates a quad plane and renders raymarching objects on it using CommandBuffer.

Attach a RayamarchingRenderer component to an arbitrary object, and create a material which selects a shader created by uRaymarching with the flag of Full Screen (please see the Conditions section in this document). Then, set it to the Material field, and select the rendering timing from the Pass drop-down list. You can see the raymarching world with the distance function you write, and it intersects polygon objects.
However, now this has some problems regarding lightings and VR. Please see the following Known Issues section regarding those limitations.
Known Issues
DepthNormalTexture in forward pass
In forward pass, DepthTexture is rendererd using the ShadowCaster pass but DepthNormalsTexture uses the built-in replacement shader.
This built-in shader outputs the depth of a polygon surface, so post effects which use DepthNormalsTexture like the ambient occlusion in PostProcessing generate wrong results. For now, I don't have any good idea to overwrite it with raymarching results.
No lighting with RaymarchingRenderer in forward path
In forward path, when rendering raymarching objects with RaymarchingRenderer, some shader keywords related to the lighting are not defined because it uses CommandBuffer. This causes wrong lighting result. So if you want to do fullscreen raymarching in forward path with lighting, please create a large box following the camera (as a child of camera), and set Cull Off or Cull Front flag, then activate Camera Inside Object.
In VR, both eyes output same image with RarymarchingRenderer
In VR, the cameras for two eyes seem to tell the same position in a shader when using RaymarchingRenderer. I'm not sure how to fix it now, so please do not use it for VR. Instead of using it, please create a shader which enables Camera Inside Object and Disable View Culling and set Cull flag as Off in the material inspector. Using Camera Inside Object with Cull Off allows you to enter raymarching objects. And Disable View Culling outputs faked z value in clip space and keeps the raymarching object always visible even if the outside cube polygon is very large. Please see the Mod World for VR scene as an example.
License
The MIT License (MIT)
Copyright (c) 2016 hecomi
Permission is hereby granted, free of charge, to any person obtaining a copy of this software and associated documentation files (the "Software"), to deal in the Software without restriction, including without limitation the rights to use, copy, modify, merge, publish, distribute, sublicense, and/or sell copies of the Software, and to permit persons to whom the Software is furnished to do so, subject to the following conditions:
The above copyright notice and this permission notice shall be included in all copies or substantial portions of the Software.
THE SOFTWARE IS PROVIDED "AS IS", WITHOUT WARRANTY OF ANY KIND, EXPRESS OR IMPLIED, INCLUDING BUT NOT LIMITED TO THE WARRANTIES OF MERCHANTABILITY, FITNESS FOR A PARTICULAR PURPOSE AND NONINFRINGEMENT. IN NO EVENT SHALL THE AUTHORS OR COPYRIGHT HOLDERS BE LIABLE FOR ANY CLAIM, DAMAGES OR OTHER LIABILITY, WHETHER IN AN ACTION OF CONTRACT, TORT OR OTHERWISE, ARISING FROM, OUT OF OR IN CONNECTION WITH THE SOFTWARE OR THE USE OR OTHER DEALINGS IN THE SOFTWARE.