Github Guide Contribute to earn
Table of Contents
1. How to contribute to Github Project
2. How to contribute to Rada content
What is RADA?
RADA is a Blockchain investment community operating on the DAO model. Rada.Network is the platform where all Raders operations are run. Rada.Network 1.0 will be the first MVP release of Rada.
What does Rada Investment Platform include?
Project: Rada will feature potential projects, projects that RADA decides to invest in
Rader: Content submitted by Raders
News: The latest important news on the market
Video: content under video format
1. How to contribute to Github Project
1.1. Why should you contribute?
- Improve software, product you rely on
- Improve existing skills
- Meet people who are interested in similar things
- Find mentors and teach others
- Build public artifacts that help you grow a reputation (and a career)
- It’s empowering to be able to make changes, even small ones
1.2. Steps to contribute to an existing project
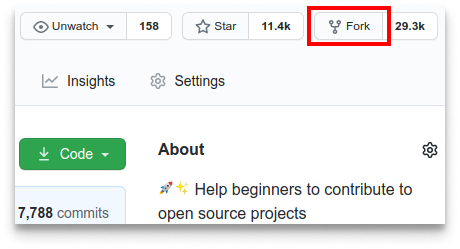
- Step 1: Fork the project repository Find the project's repository on GitHub, and then "fork" it by clicking the Fork button in the upper right corner:
- Step 2: Clone the repository
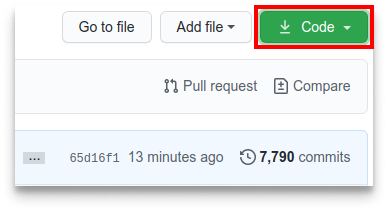
Now clone the forked repository to your machine. Go to your GitHub account, open the forked repository, click on the code button and then click the copy to clipboard icon.
- Step 3: Open Pycharm/Terminal and run the following git command:
git clone "url you just copied"
where "url you just copied" (without the quotation marks) is the url to this repository (your fork of this project). See the previous steps to obtain the url.

For example:
git clone https://github.com/this-is-you/rada.content.git
where this-is-you is your GitHub username. Here you're copying the contents of the first-contributions repository on GitHub to your computer.
- Step 4: Create a branch
Change to the repository directory on your computer (if you are not already there):
cd rada.content
Now create a branch using the git checkout command:
git checkout -b your-new-branch-name
For example:
git checkout -b rada contributor
(The name of the branch does not need to have the word add in it, but it's a reasonable thing to include because the purpose of this branch is to add your name to a list.)
- Step 5: Make necessary changes and commit those changes
Now open readme.md and make adjustment and edit as you want.
If you go to the project directory and execute the command git status, you'll see there are changes.
Add those changes to the branch you just created using the git add command:
git add --all
Now commit those changes using the git commit command:
git commit -m "Add <your-name> to Contributors list"
replacing <your-name> with your name.
- Step 6: Push changes to GitHub
Push your changes using the command git push:
git push origin <add-your-branch-name>
replacing <add-your-branch-name> with the name of the branch you created earlier.
- Step 7: Submit your changes for review
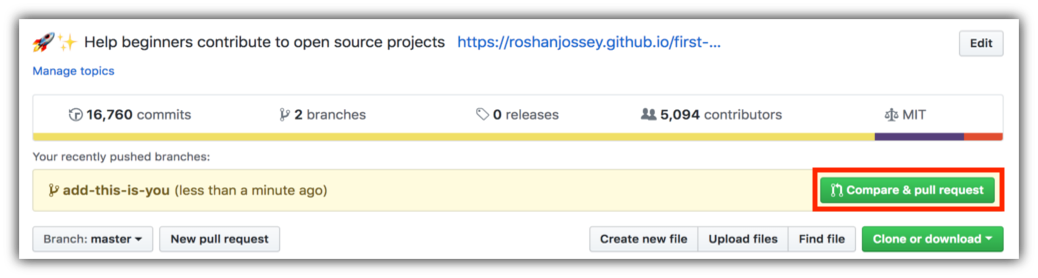
If you go to your repository on GitHub, you'll see a Compare & pull request button. Click on that button.
Now submit the pull request.

Soon I'll be merging all your changes into the master branch of this project. You will get a notification email once the changes have been merged.
- Step 8: Review/Discuss/Delete the pull request for another commit
You have now created a pull request, which is stored in the project's repository (not in your fork of the repository). It's a good idea to read through what you wrote, as well as clicking on the Commits tab and the Files changed tab to review the contents of your pull request:
You can continue to add more commits to your pull request even after opening it! For example, the project maintainers may ask you to make some changes, or you may just think of a change that you forgot to include:
If the project maintainers accept your pull request (congratulations!), they will merge your proposed changes into the project's master branch and close your pull request:
You should also delete the branch you created from your local repository, so that you don't accidentally start working in it the next time you want to make a contribution to this project.
First, switch to the master branch: git checkout master.
Then, delete the branch you created: git branch -D BRANCH_NAME. For example, I used git branch -D doc-fixes.
other to conclude
2. How to contribute to Rada content
Step 1: Writing a Readme file
You can use StackEdit to write a markdown project on Github
READMEs do more than explain how to use your project. They also explain why your project matters, and what your users can do with it.
In your README, try to answer the following questions:
What does this project do? Why is this project useful? How do I get started? Where can I get more help, if I need it? You can use your README to answer other questions, like how you handle contributions, what the goals of the project are, and information about licenses and attribution. If you don’t want to accept contributions, or your project is not yet ready for production, write this information down.
When you include a README file in the root directory, GitHub will automatically display it on the repository homepage.
Checking Rada content road map and your expertise to find your voice.
Step 2: Follow a contributing guideline
A CONTRIBUTING file tells your audience how to participate in your project. For example, you might include information on:
How to file a bug report (try using issue and pull request templates) How to suggest a new feature How to set up your environment and run tests In addition to technical details, a CONTRIBUTING file is an opportunity to communicate your expectations for contributions, such as:
The types of contributions you’re looking for Your roadmap or vision for the project How contributors should (or should not) get in touch with you Using a warm, friendly tone and offering specific suggestions for contributions (such as writing documentation, or making a website) can go a long way in making newcomers feel welcomed and excited to participate.
3. Structure of Rada content
3.1. Structure of database
[Rada.network] (http://Rada.network) is structured by database in each collection that we can understand each collection as a tab or an element in the rada network.
** Example: ** Team, News, Partner...etc
Therefore, to be able to contribute and synchronize data between rada.network and rada.content, the directory structure and database synchronization is crucial. Here we will structure the rada.content archive into folders where each folder will be a collection.
Here for now we will only be interested in the main collections News, Tokens ..

The image above is the current structure of rada.content, with 2 main collections, News and Tokens. In each folder there are smaller subfolders that are articles.
For example, in the token folder, there are 5 folders with 5 articles about 5 tokens, which are DareNFT, Elemon.vv
In each sub-folder, there are 2 files that are en.md and vi.md, which are 2 articles about tokens in Vietnamese and English languages. (These are the two contents that need everyone to contribute)
3.2. Structure of file:
Title: xxx

Slug: xxxxx (This is the url of the article on rada.network)

Tokens: xxxx

Description: xxxx
3.3. How to contribute to Rada content
First: Starting a new post. Then it will ask to create a subfolder in the appropriate folder. Then create an article according to the above template.
Second: Contribute of existing articles, if there is no vi.md or en.md file, you can create more and translate. No need to create a new folder.