Please read each section fully, especially anything bolded and marked with "(!)".
Grab a cup of tea, relax, and read through the whole thing.
These are important warnings in some of them that may cause you some headaches or confusion if missed.
-
This profile is more aggressive than most stock profiles, and some things may also need turning down if your printer is still teething. My printer has a handful of mods that may make it more capable of slightly higher speeds and accels, so your mileage may vary. There are certainly more aggressive profiles out there, but I've found this to be a good balance.
-
(!) This profile's speeds/accels are tuned for linear rail CoreXY (V2/V1/Trident/V0). For other printer types (Switchwire, Legacy, others), you will likely need to turn down some speeds and accelerations.
I actually use the same print settings on my Ender 3, just with speeds and accelerations toned down (max 180mm/sec, max 2500mm/s2 without input shaper) with good results. -
Unfortunately, using the custom accleration controls in this profile can make the predicted print times less accurate. Hopefully these accleration controls we be coming natively to SuperSlicer soon.
For now you will just have to play with "time estimation compensation" setting under printer settings -> machine limits.
See my tuning guide for more generalized tuning information (primarily for Vorons running Klipper).
You can find bed the models and textures I am using in Hartk's GitHub repo. The bed texture I am using is an older one from him in VoronUsers.
Thank you to Stephan for the acceleration controls and post-processing script. Those are both adapted from his profile.
(!) = has important warning
- (!) Profile Change Log
- How to Download
- How to Import
- (!) Start G-code
- (!) Volumetric Speed / Auto Speed
- (!) Acceleration Control
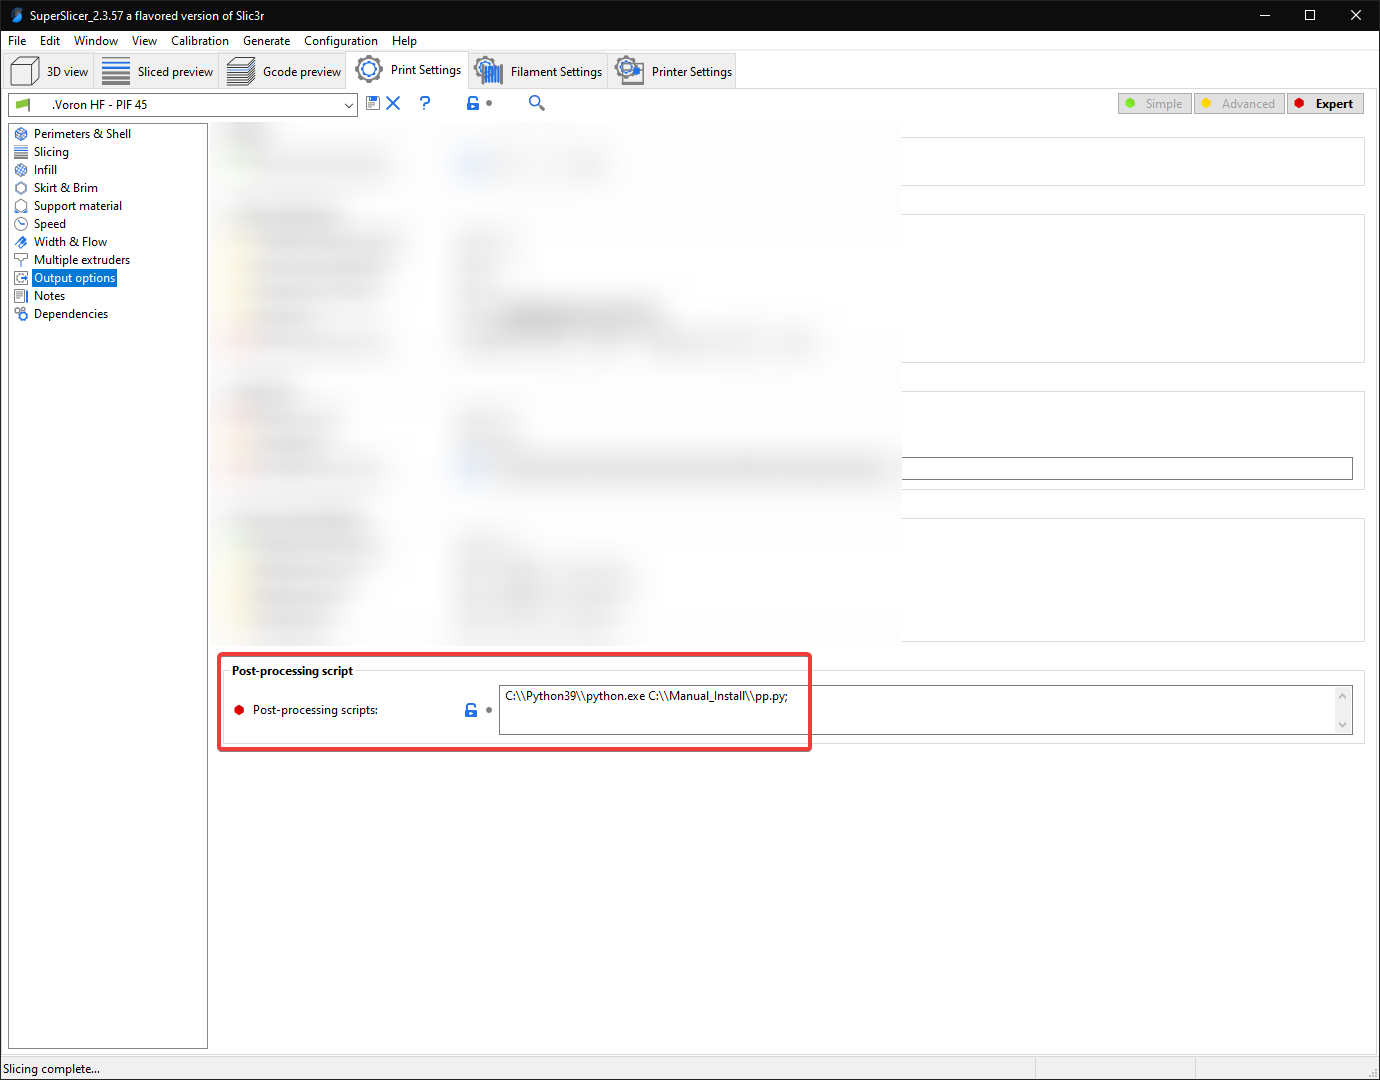
- (!) Post Processing (Travel Accels)
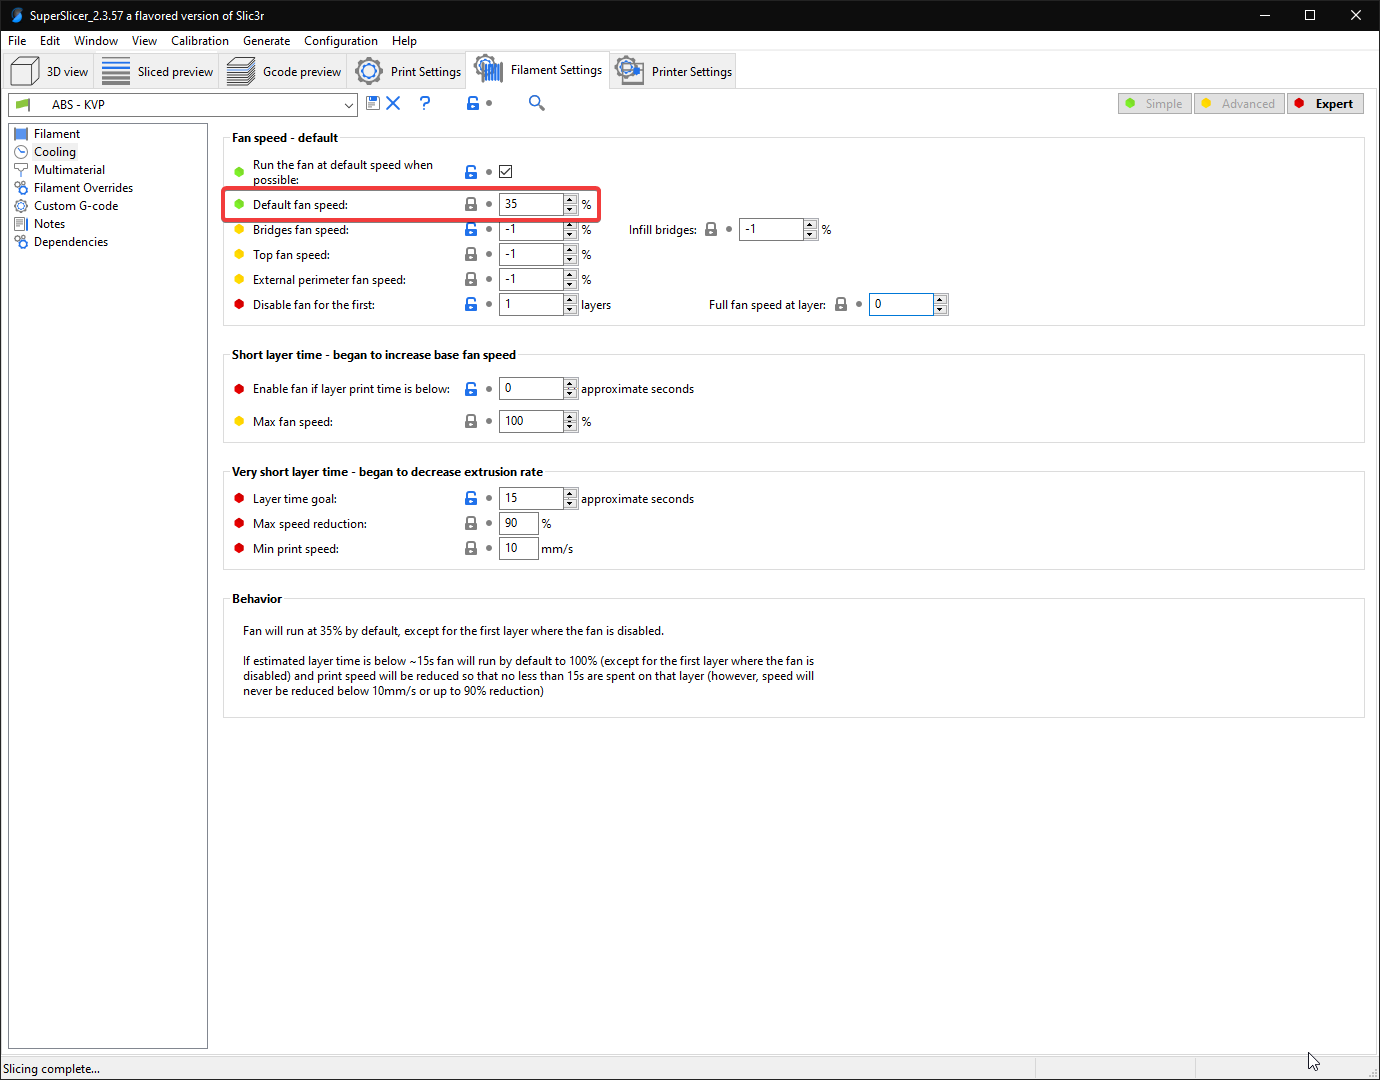
- Cooling
- "45 Degree" Profile vs Standard Profile
- Passing Variables to PRINT_START
- Tips and Tricks
- Determining Max Volumetric Flow Rate
- How Volumetric Flow Rate Relates to Print Speed
Rather than having to re-import the profiles when updates are made, please check the change log occasionally to grab important settings changes / bug fixes.
Use ctrl + f in SuperSlicer to find these settings by their internal names below.
- 2021-10-24: Change time_estimation_compensation to 133%.
- Previously set to 87%.
- This should make the time estimates a bit closer to reality, at least with Voron parts. As mentioned above, they will still only be so accurate with the custom acceleration controls, however.
- 2021-10-24: Disable only_one_perimeter_first_layer.
- This was causing SS to crash when slicing first layer test patches.
- I also just changed my mind about the aesthetics.
- (!) 2021-10-31: Change overhangs_width_speed to 0.
- This completely disables applying bridge settings to overhangs.
- This setting was causing issues for some people, essentially setting overhangs to use 85% flow and high speeds.
- 2021-10-31: Reduce retract_length[0] to 0.4mm
- Previously set to 1mm, which was a bit too aggressive to start with.
- 2021-11-07: Added quotes around post_process paths.
- This fixes an issue where it would error if trying to use a path with a space.
- 2021-11-07: Fix various support material settings.
- Supports are disabled in this profile, but the disabled settings had some unnecessary leftovers.
- 2021-11-11: Reduce seam_gap to 5%
- Previously 15% internally. A new SS update now allows control over it. This should prevent seam gaps that occasionally cropped up previously.
- 2021-11-11: Change max_layer_height[0] to 75%.
- Previously 0.3mm. Support for nozzle size based percentages was added.
- 2021-11-11: Change fill_pattern to grid.
- Previously adaptive cubic. Caused occasional pillowing.
1) Navigate to the .ini file.
2) Right click "Raw" and click "Save link as"
If you do not use the "Raw" button, you will get errors trying to import.
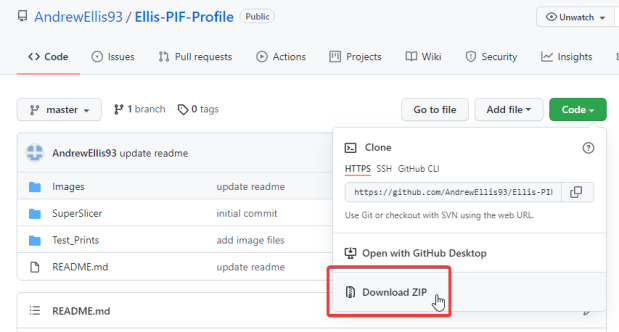
Alternatively, download the whole repository as .zip:
If you downloaded the whole repository as .zip, you will have to unzip it first.
Select the .ini file.
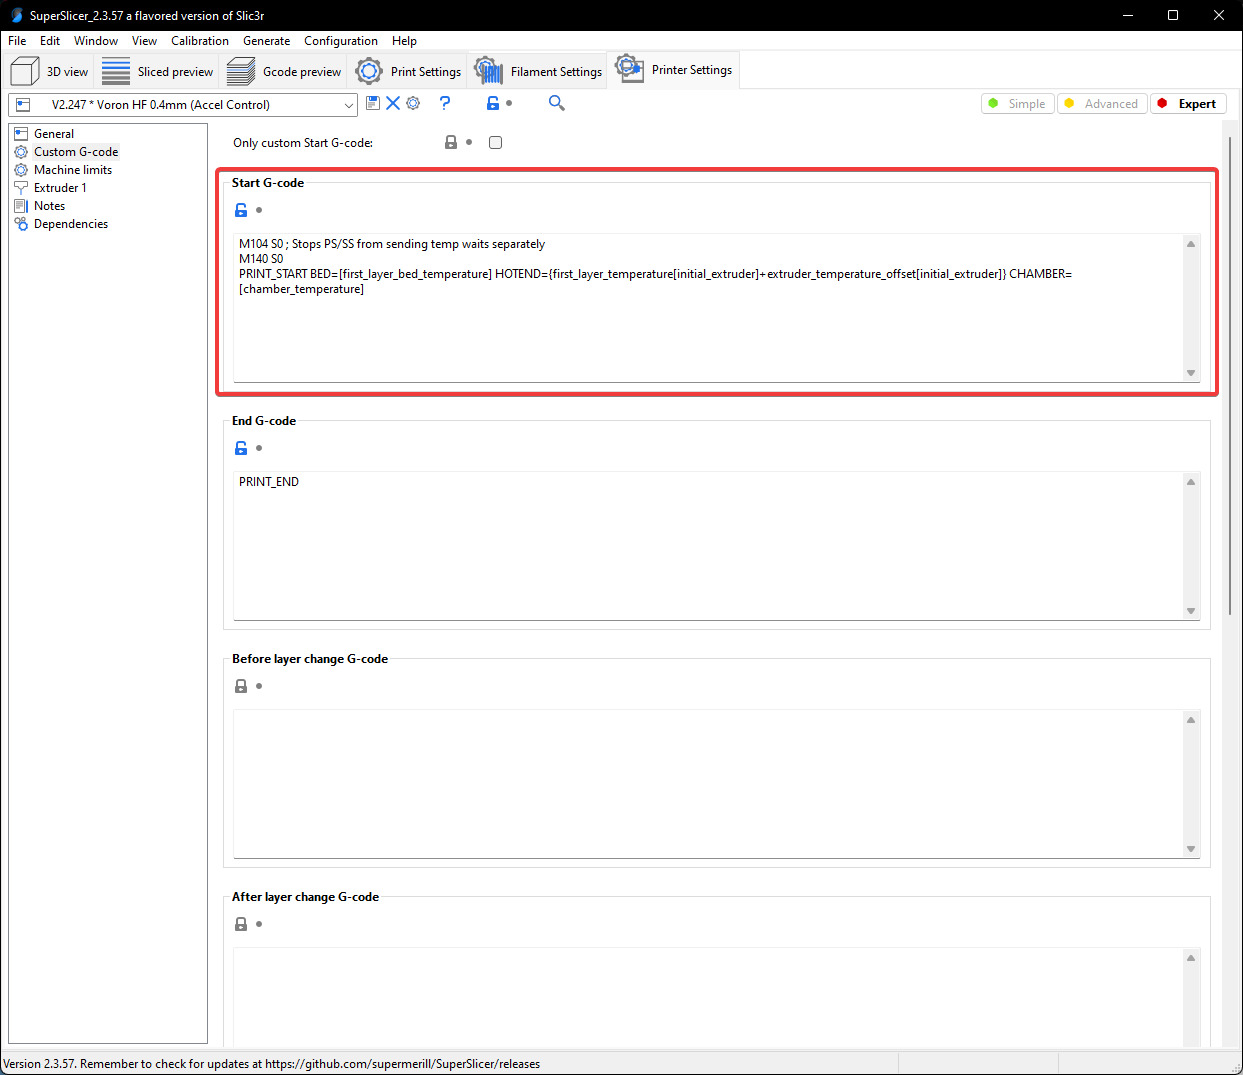
(!) If you have are not yet passing variables to PRINT_START, replace everything in this box with PRINT_START on its own.
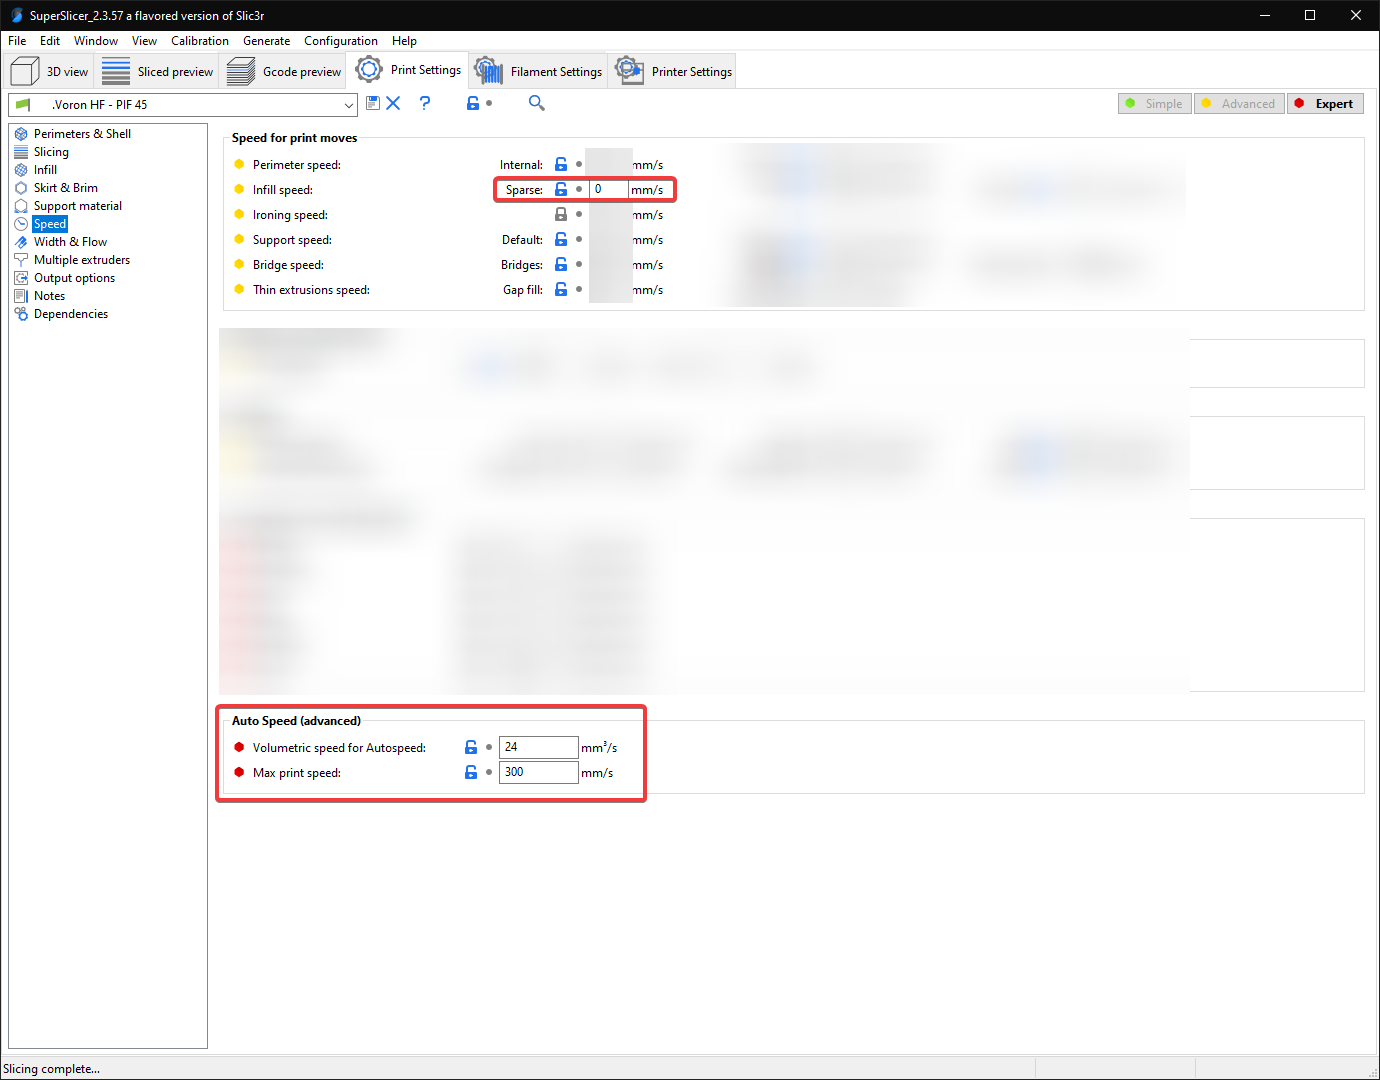
(!) It is very important that you update the volumetric speed setting, otherwise you may have extruder skipping and/or grinding.
These bottom two settings in this screenshot serve as universal "speed limits". No matter how much you push speeds, layer heights, or line widths, it will never allow you to exceed these thresholds.
This is important because I keep my infill speed set to 0. This means it will print infill as fast as the hotend will allow, or up to the 300mm/sec, whichever comes first.
| Hotend | Flow Rate (mm3/sec) |
|---|---|
| E3D V6 | 11 |
| E3D Revo | 15 |
| Dragon SF | 15 |
| Dragon HF | 24 |
| Mosquito | 20 |
| Mosquito Magnum | 30 |
You should be okay using an approximate value and just lowering it if you have any issues.
These are approximate values assuming a standard brass 0.4mm nozzle.
Nozzle properties may affect these numbers. For example:
- Larger diameter nozzles will have higher flow rates
- Hardened steel has a lower thermal conductivity and you may get lower flow rates unless you compensate with higher temperatures.
- Plated copper and tungsten carbide have higher thermal conductivity and might allow a bit higher flow rate.
- Bondtech CHT nozzles use a different internal geometry that allows higher flow rates.
If you want to get more scientific, test with a specific nozzle or setup, or your hotend just isn't listed, see the last section ("Determining Max Volumetric Flow Rate") for more details.
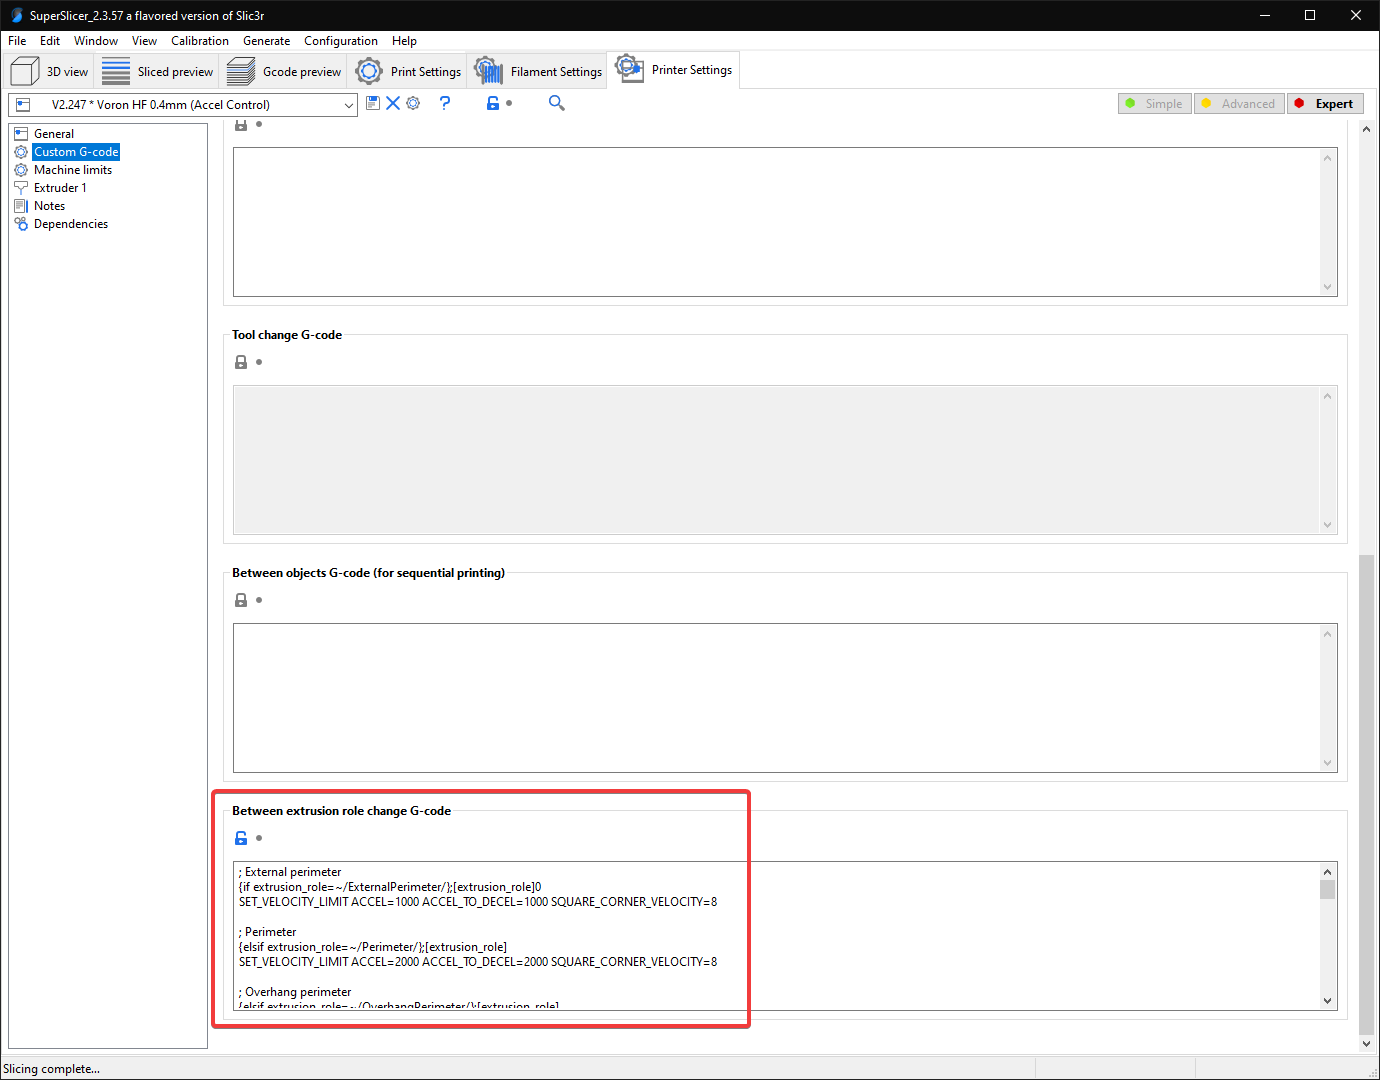
This profile uses a custom acceleration control setup. Acceleration would typically be done directly in the speed settings, but currently SuperSlicer does not allow setting accelerations for every extrusion type (for example internal vs external perimeters).
This should be coming natively to SuperSlicer soon.
I advise leaving the accelerations conservative for anything visible, particularly for perimeters. While you can push the accels higher, even with input shaper I have found that it can cause bizarre bulging issues, at least for me. I now only push high accelerations for things like infill and travels.
I use 8 square corner velocity because I have found it to make corners slightly crisper.
(!) If you have not yet tuned input shaper, consider reducing these accelerations to 5000 and below.
(!) These gcodes override the maximum values in your printer.cfg.
I am still not 100% sure if this was only a "me" problem, but thought I would include it anyway.
I spent ages trying to fix these bulges, and the only thing that fixed it was to lower my perimeter accelerations to 2k internal / 1k external.
(!) This is optional and will error if you don't set it up or remove it. In fact I would suggest starting with it disabled and come back to it later.
The sole purpose of this post processing script is to set accels/square corner velocity for travel moves, as it is not supported by the above accel controls.
This should be coming natively to SuperSlicer soon.
I use the script from Stephan*: https://github.com/Stephan3/Schnitzelslicerrepo/blob/master/superslicer/pp.py
Install Python on your computer. Swap the python exe path and the script path accordingly.
Adjust your desired accel, accel to decel, and square corner velocity at the top of the script file:
* Some people have been reported issues getting this script working, even though they appear to have it set up correctly. VintageGriffin (yak#0417) on Discord has posted a version that some are reporting better success with, but I have not yet tried it myself: Link. His version moves all of the accel controls outside of the slicer, and supports travel accels. The instructions are in the comments of the macros.
This profile uses static fan speeds. The community has found that varying fan speeds, particularly with high-shrinkage materials, can cause layer inconsistencies. Essentially some areas will cool and contract faster than others.
The exact fan speed will vary based on your fan, material, layer times, and chamber temps. You may need to play with this.
I use BadNoob's AB-BN-30 duct with the Sunon fan, and my chamber temp is around 63C. The stock fan setup may need more cooling as the airflow is weaker.
My primary profile is the "45 degree" profile. This means that I print all of my parts at 45 degrees, with the seams set to "rear". I orient my desired seam edge towards the rear of the plate.
This makes it much easier to align the seams where I want them, as otherwise SuperSlicer tends to place them oddly.
The differences with the "45 degree" profile are:
- Print Settings > Perimeters & Shell > Seam:
Rear (rather than cost-based) - Print Settings > Infill > Angle > Fill:
0 degrees (rather than 45 degrees)
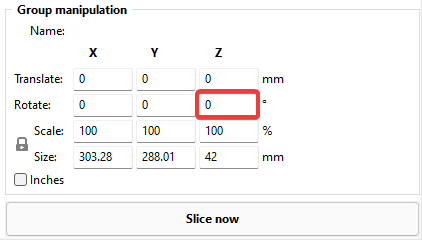
Press ctrl+a to select all objects.
Type the rotation amount in "Z" the box at the bottom right:
I would recommend starting with a standard PRINT_START and setting this up later.
By default, slicers will put heating commands either entirely before or after PRINT_START. You have to pass the temps TO PRINT_START in order to control when they happen.
For example I don’t want my nozzle to heat until the very end so it’s not oozing during QGL, mesh etc.
If you don’t use a chamber thermistor, just remove the chamber stuff.
[gcode_macro PRINT_START]
gcode:
    # Parameters
    {% set bedtemp = params.BED|int %}
    {% set hotendtemp = params.HOTEND|int %}
    {% set chambertemp = params.CHAMBER|default(0)|int %}

    # <insert routines>
    M190 S{bedtemp}                                                              ; wait for bed temp
    TEMPERATURE_WAIT SENSOR="temperature_sensor chamber" MINIMUM={chambertemp}   ; wait for chamber temp
    # <insert routines>
    M109 S{hotendtemp}                                                           ; wait for hotend temp
    # <insert routines / nozzle clean>
    G28 Z                                                                        ; final z homing with hot nozzle
This would now be run like PRINT_START BED=110 HOTEND=240 CHAMBER=50.
Chamber defaults to 0 if not specified.
Don't split any of these gcodes to separate lines.
(3 lines)
M104 S0 ; Stops PS/SS from sending temp waits separately
M140 S0
PRINT_START BED=[first_layer_bed_temperature] HOTEND={first_layer_temperature[initial_extruder]+extruder_temperature_offset[initial_extruder]} CHAMBER=[chamber_temperature]
(3 lines)
Prusa Slicer doesn’t support chamber temp.
M104 S0 ; Stops PS/SS from sending temp waits separately
M140 S0
PRINT_START BED=[first_layer_bed_temperature] HOTEND={first_layer_temperature[initial_extruder]+extruder_temperature_offset[initial_extruder]}
(1 line)
PRINT_START BED={material_bed_temperature_layer_0} HOTEND={material_print_temperature_layer_0} CHAMBER={build_volume_temperature}
The above section is the preferable way to set it up, as it allows you the most control.
If your slicer is putting heating g-codes AFTER PRINT_START and you want them to happen before (or the inverse, or you want to split it), this would be a simpler way to control the ordering. This method only allows you to send temperature g-codes before or after PRINT_START, but at least allows you to control the order.
To force the g-code ordering, place any of the following g-codes from the following lists in your start gcode where you desire:
M140 S[first_layer_bed_temperature] ; set bed tempM190 S[first_layer_bed_temperature] ; wait for bedM104 S{first_layer_temperature[initial_extruder]+extruder_temperature_offset[initial_extruder]} ; set hotend tempM109 S{first_layer_temperature[initial_extruder]+extruder_temperature_offset[initial_extruder]} ; wait for hotend
M140 S{material_bed_temperature_layer_0} ; set bed tempM190 S{material_bed_temperature_layer_0} ; wait for bedM104 S{material_print_temperature_layer_0} ; set hotend tempM109 S{material_print_temperature_layer_0} ; wait for hotend
- These are just lists of available commands, they don't have to be in this order, nor do you have to use all of them. Place them as you like.
- Each bullet point is only ONE line. Do not split them into multiple lines.
- There are many other variables available in each slicer, and you can pass whatever variables you like to whatever g-codes you like. The available variables are not always documented.
Forces both bed and hotend to heat up fully before executing PRINT_START (SS):
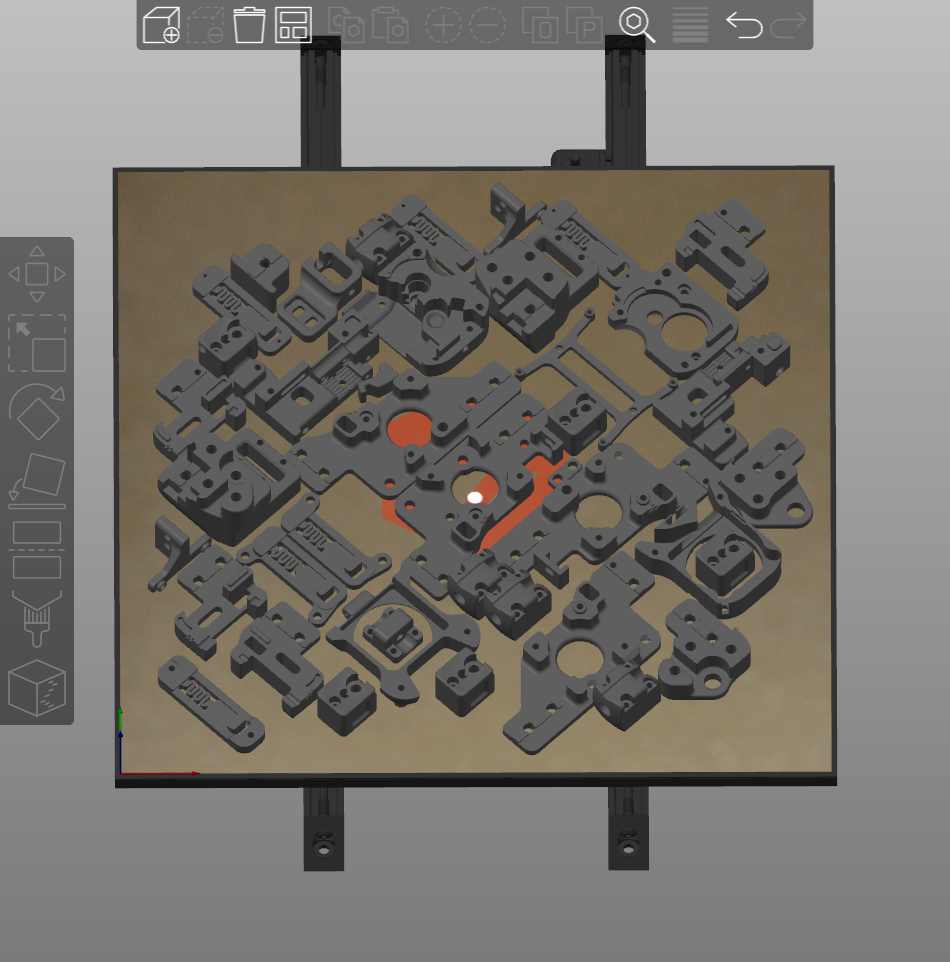
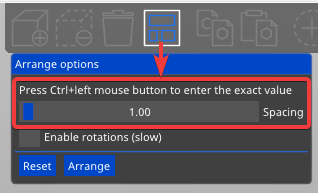
Right click the "arrange" button to change part spacing.
Then click the arrange button (or press A), to automatically arrange everything.
As mentioned at the beginning, this probably isn't necessary if you can find a "safe" value that others are using for your particular hotend. If you have a different setup affecting flow, such as a CHT nozzle or unlisted hotend, or if you just want to take the scientific approach, here is the process.
Remember - this is a rough calculation. Maximum volumetric flow rate can change with a number of factors, like temperatures, material, and nozzle type. You should set your limit slightly lower in the slicer for margin of safety, and to avoid having to tune for different filaments that don't flow as nicely.
Volumetric flow is expressed in mm3/sec (cubic millimeters per second)
- volume = mm / 0.416
Or, inversely,
- mm = volume * 0.416
For example, if you extrude at 5mm/sec, that comes out to ~12mm3/sec. (5mm / 0.416)
* For 2.85mm filament, use 0.157 instead of 0.416.
* These fomulas are simplified versions of the cylinder volume equation (V=πr2h) given r and h or V, rounded to 3 significant figures. This is more than enough accuracy for our purposes (down to the thousandths). Calculator
You will follow a similar process to extruder calibration.
1) Heat your hotend.
2) Extrude a little bit to ensure your E motor is energized and holding.
3) Mark a 120mm length of filament going into your extruder.
4) Extrude at increasing speeds. At each interval, measure to ensure that exactly 100mm entered the extruder.
For example, the gcode to extrude at 5mm/sec is:
M83 ; Relative extrusion mode
G1 E100 F300 ; Extrude 100mm at 5mm/sec
Remember the the F speed is in mm/min, not mm/sec, so multiply your desired speed by 60.
5) Keep increasing speeds and extruding until it starts dropping below 100mm. This is your max flow rate.
6) Convert your extrusion speed to volumetric speed using the above formulas.
7) Enter a slightly lower volumetric speed into the slicer.
Working out how quickly you can print at a given volumetric flow rate is quite simple:
- speed = volumetric flow / layer height / line width
Or, inversely,
- volumetric flow = speed * line width * layer height
For example, if your hotend is capable of 24mm3/sec, and you are printing with 0.4mm line width, at 0.2mm layer height:
- 24 / 0.4 / 0.2 = Maximum print speed of 300mm/sec


