
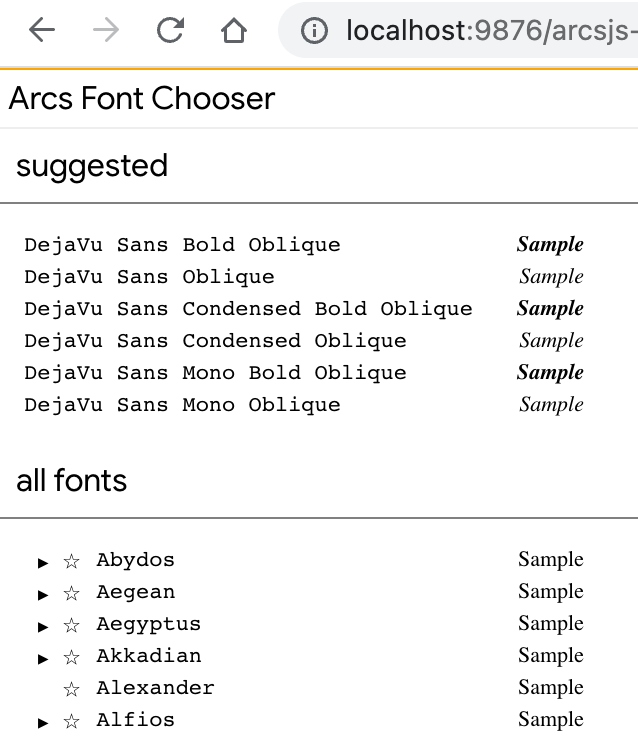
This is a prototype implementation of a picker API for Chrome built on ArcsJs that allows permission-less access to fingerprintable resources while being extensible, and fingerprint resistant. This allows developers to create custom font pickers like the one shown below without accessing the full set of local fonts.
The general mechanism for achieving our goal of non-fingerprintability is to restrict the code that is processing the list of fonts:
- Only one font can ever be seen by the code at a time
- The code is pure functional. It can only receive inputs and return outputs. No access to writable global state is permitted.
- Rendering is done via templates. No access to DOM is permitted.
- Only a single datum, the selected font, may be returned to the host page.
Despite those restrictions, font pickers can be built with rich functionality including arbitrary grouping, mixing of local and web fonts, search and sort functionality, and even the ability to create and store new per-font metadata like a personal rating or favoriting mechanism.
The full system is very flexible, but for the purposes of this tutorial, we will only be modifying Recipes and Particles to customize the system.
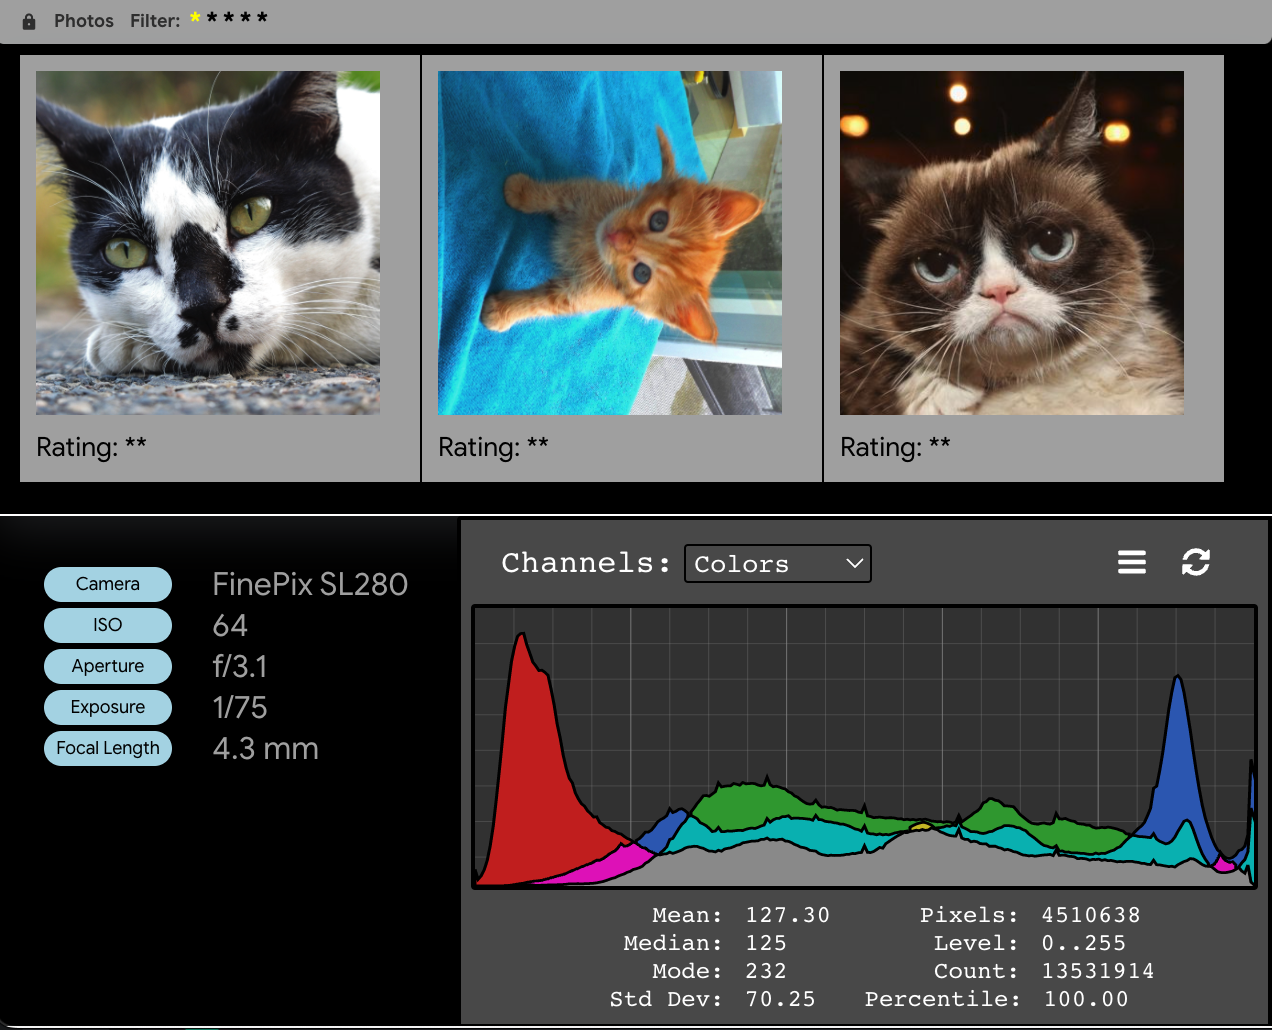
As a demonstration of flexibility, below is a screenshot of a Lightroom-style photo picker built using the same techniques.
The host page is the page that will launch the font picker. This is your application, for example, an editor application. Here you must provide a DOM element into which the IFRAME containing the font chooser will be rendered, e.g.
<div id="chooser"></div>
Next you create an app.js file (or a name of your liking), which sets up the
request for the picker, and invokes it when desired. A picker request is
initiated by invoking FontChooser.requestFont(request) with a JSON object
containing the following key parameters:
- chooser: The root DOM element to contain the picker dialog.
- webFonts: Additional host-page (not local) supplied fonts.
- kind: A reference to the Recipe file containing your custom picker code.
As an example
const FamilyRequest = {
  // custom recipe
  kind: '$local/FontsByFamilyRecipe',
  // custom fonts
  webFonts: fonts,
  // custom container
  chooser: window.chooser
};

FontChooser.requestFont(FamilyRequest);
Note: The $local variable is a special substitution provided by the
runtime that refers to the Library directory in your app that contains the
recipes and particles.
Rather than delve into the workings of the recipe file, at this point, just
accept that it tells the runtime which Particle (code) to load and which data
the code can read and write externally. We'll loop back and explain it in more
detail later. Right now, let's examine the meat of the simplest font picker,
the LocalFonts.js file which is referenced by LocalFontsRecipe.js.
The ArcsJs system refers to code it loads from recipes as Particles and in the font picker system, we use a special variant of these called a Non-Permissive Particle. The key difference is that a non-permissive particle is just a JSON dictionary of pure functions. It cannot define classes or top level globals. As a simple example:
({
   add: function(a,b) { return a + b },
   mul: function(a,b) { return a * b }
})
We can make this look nicer with ES6 format:
({
  add(a,b) { return a + b },
  mul(a,b) { return a * b }
})
The minimum Particle for a font picker must specify a render function and
a template variable. Here's an example of the simplest possible
local font picker.
{
render({fonts}) {
  return {
    myfonts: {
      models: fonts,
      $template: 'font_t',
    }
  };
},

template: html`
<div>{{myfonts}}</div>

<template font_t>
  <div>
    <span flex name>{{name}}</span>
    <span sample style$="{{displayStyle}}">Sample</span>
  </div>
</template>
`
The render function is given an opaque reference to a list of fonts. This is
not an object you can iterate or inspect -- it is simply passed around the system
and expanded internally by the runtime as needed. The goal of the render
function is to return an object which associates these opaque fonts handles
to templates for rendering.
In the example above, the render function return an object with
a key called myfonts with two properties: models and $template. Models
points to the input fonts opaque reference. Similarly $template points to font_t
which is how the system knows to stamp the <template font_t> element in the template
for each font in the input. In the template, the <div>{{myfonts}}</div> triggers the
application of the <template> div to the opaque font list. (Note that in templates,
double curly brace {{x}} is template interpolation.)
However, there's something missing in the above example. Where do {{name}}
and {{displayStyle}} come from? That's where Decorator functions come
in.
A Decorator function is a pure function which maps a piece of font data into additional variables for rendering. A decorator is given associated font data, and returns a new set of variables which are to be used in later operations, such as filtering, sorting, and rendering. Here is the simplest possible decorator:
myDecorator(fontData) {
  return {};
}
This just maps the fields of the font directly to the output without change, but it isn't very useful. A more useful example:
myDecorator({family, fullName, weight, style}) {
  const fweight = style.includes('Bold') ? 'bold' : weight;
  const fstyle = style.includes('Italic') ? 'italic' : style.includes('Oblique') ? 'oblique' : '';
  return {
    key: fullName,
    sortKey: `family`,
    // Here are the definitions of the name and displayStyle references we saw above.
    name: fullName,
    displayStyle: `font-family: "${family}"; font-weight: ${fweight}; font-style: ${fstyle};`
  };
},
Here you see the {{name}} and {{displayStyle}} references from earlier are
pointing to fullName and CSS formatting respectively. There are also two new fields,
key and sortKey.
After the decorator has been applied to every item in
the font model, there is an implicit sort which uses the sortKey field as
the field to sort on. These decorator fields are merged with the font data
before the template is applied, so technically we don't need the {{name}}
field and reference and could have just wrote {{fullName}}.
In order to use a decorator you must reference it in your render function:
render({fonts}) {
  return {
    myfonts: {
      models: fonts,
      $template: 'font_t',
      decorator: `myDecorator`
    }
  };
},
Note: References are by name, not by JS reference, because the particle code is pure. It cannot reference global variables, including other functions in the file.
See a Simple Decorator example and its recipe definition. If you have remixed this project and are using Glitch, you can click the "Simple Decorator" button on the right to see the results of this code.
Sometimes you want to apply a filter to a list to obtain a subset. This is supported, and filters are applied after decorators. As a result, filters can use the data from the decorator. As an example, here's a filter for only bold fonts to be shown.
boldFilter({style}) {
  return style?.toLowerCase().includes('bold');
},
To use a filter, it must also be specified in the render function.
render({fonts}) {
  return {
    myfonts: {
      models: fonts,
      $template: 'font_t',
      decorator: `myDecorator`,
      filter: `boldFilter`
    }
  };
},
See a FilterBold example and its recipe definition If you have remixed this project and are using Glitch, you can click the "Filter Bold" button on the right to see the results of this code.
So far we can take an opaque reference to a list of fonts and apply decoration, filtering, and rendering, but we cannot interact with a font UI. The final piece of the puzzle is to use event handlers to allow a font to be clicked on and returned to the host page.
An event handler is just a function referenced by special attributes in a
template. These attributes always begin with on- and have a suffix corresponding
to a typical DOM UI Event name. (For example: on-click.)
The difference between event handling in our templates and in regular Web applications
is that the DOM event data is scrubbed, and instead the referenced function will
receive an eventlet and a key or value of your own choice supplied in the template.
Let's look at a simple example:
<template font_t>
  <div on-click="onFontClick" key="{{key}}">
    <span>{{name}}</span>
    <span style$="{{displayStyle}}">Sample</span>
  </div>
</template>

onFontClick({eventlet: {key}}, {}) {
  return {pickedFont: key};
},
In this sample, when the user clicks on the DIV containing the
font, onFontClick is invoked and given an eventlet. This may include event
specific information, but the interesting bit for this example is the key
value. This comes from the key attribute in the <template>, which references
the {{key}} decorated model data. In our decorator above, this turns out to
be fullName. Therefore, this event handler returns {pickedFont: fullname},
the name of the font you clicked on.
Note: If an event handler returns a value, this ends the choosing process, the chooser is closed, and control is returned to the Host Page.
See the EventHandling example and its recipe definition. If you have remixed this project and are using Glitch, you can click the "Event Handling" button on the right to see the results of this code.
So far, we've been able to map values ("decorate"), filter values, and sort
values. But what about grouping? What if we want to group fonts by San Serif vs
Not? There's a special built-in for that too, the collateBy reference.
Collation creates new sub-lists of opaque fonts, grouped by the collation field.
First, let's create a "sans vs non-sans" decoration:
myDecorator({family, fullName, weight, style}) {
  const fweight = style.includes('Bold') ? 'bold' : weight;
  const fstyle = style.includes('Italic') ? 'italic' : style.includes('Oblique') ? 'oblique' : '';
  return {
    key: fullName,
    sortKey: `family`,
    name: fullName,
    displayStyle: `font-family: "${family}"; font-weight: ${fweight}; font-style: ${fstyle};`,
    sansType: fullName.includes('Sans') ? 'sans' : 'notsans',
    header: fullName.includes('Sans') ? 'The Sans' : `"The Not Sans`,
  };
},
In our render function, we specify which field to use for grouping:
render({fonts}) {
  return {
    myfonts: {
      models: fonts,
      $template: 'sans_not_sans_t',
      decorator: `myDecorator`,
      filter: `boldFilter`,
      mysublist: {
        collateBy: 'sansType'
      }
    }
  };
},
Then in our template, we would write:
<template sans_not_sans_t>
<div>{{header}}</div>
<div repeat="font_t">{{mysublist}}</div>
</template>

<template font_t>
  <div on-click="onFontClick" key="{{key}}">
    <span>{{name}}</span>
    <span style$="{{displayStyle}}">Sample</span>
  </div>
</template>
Note: The sans_not_sans_t template renders either 'The Sans' or 'The Not
Sans'. Then it invokes template
font_t from before with {{mysublist}} which is a group of either all the
sans fonts, or all the not sans fonts. You can specify which template to use
either in the render function, or by a special repeat attribute shown here.
See the Collation example and its recipe definition. If you have remixed this project and are using Glitch, you can click the "Collation" button on the right to see the results of this code.
Sometimes in our UI we need to allow the user to customize rendering based on UI state, like allowing the user to specify filtering. But given the way the existing decorator and filter works, this doesn't seem possible. As it turns out, these functions have extra parameters to permit referencing immutable global state that can only be altered by event handlers. The true set of parameters passed to the decorator looks like this:
myDecorator(modelItem, inputs, state)
modelItem is the list of font metadata fields provided by the underlying local
fonts (or web fonts). inputs and state
are specific to the ArcsJs system. Inputs are data provided by a ArcsJs _
Store_ connected to your Particle by the Recipe. state is an object
maintained by the ArcsJs system that allows you to store and reference global
data. The ArcsJs system is reactive, so anytime inputs or state changes,
your particle is re-executed to update the UI.
Ordinarily, state is globally mutable and readable, however this would be
dangerous in a Non-Permissive Particle because it could accumulate global font
data and create a fingerprint. So this 'state' variable is not modifiable by
decorators and other functions in its callchain -- it is effectively frozen.
It is however, modifiable by user interaction. This can be used to create a field for filtering fonts by name:
<div>Search: <input type="text" on-change="onChange" value="{{searchFilter}}"></div>

onChange({eventlet: {value}}, state) {
  assign(state, { searchFilter: value});
},
This will modify the state.searchFilter field when the user updates the
textfield, triggering the particle to be re-rendered. We can update
the myDecorator and searchFilter function to use this new state field.
myDecorator({family, fullName, weight, style}, inputs, {searchFilter}) {
  const fweight = style.includes('Bold') ? 'bold' : weight;
  const fstyle = style.includes('Italic') ? 'italic' : style.includes('Oblique') ? 'oblique' : '';
  return {
    key: fullName,
    sortKey: `family`,
    name: fullName,
    myFilter: searchFilter,
    displayStyle: `font-family: "${family}"; font-weight: ${fweight}; font-style: ${fstyle};`
  };
},

searchFilter({name, myFilter}, ) {
  return name?.toLowerCase().includes(myFilter);
},
The searchFilter variable is now destructured from the third argument
of myDecorator and stashed in the output as myFilter, which is picked up in
the filter function.
Whenever you use UI state, it's a good idea to initialize it to something. Here
we do this in a special function called initialize invoked on particle
startup.
initialize({}, state) {
    assign(state, {
      searchFilter: ''
    });
  },
See a UI State example and its recipe definition.
The previous section demonstrated global mutable UI state being utilized by a filter function, but what if the user needs to update state that is associated with each font? A typical example would be something like favoriting or _ bookmarking_ a font. We'd want these fonts to sort to the top in a special section, or perhaps allow the user to set a filter like "Show only favorites".
We started off this document by declaring that our functions are
pure-functional and unable to mutate global state (although they can access the
inputs and state objects). But there is one exception to this rule: _
privateData_. Hidden in each modelItem given to a decorator there is an
extra field, privateData, which acts like a memoized computation. It is an
immutable variable whose value is whatever value the function last returned.
The runtime simply hands the privateData object back to the function on next
invocation. A very important property of this is that
each invocation of a decorator on an individual font has a unique
privateData. It is a 1-to-1 mapping, and there is no ability for two model
items to mix their privateData.
Let's try to allow 'favoriting' fonts. First, the UI:
<template font_t>
  <div on-click="onFontClick" key="{{key}}">
    <span>{{name}}</span>
    <span style$="{{displayStyle}}">Sample</span>
  </div>
  <button on-click="onFavorite" value="{{privateData}}">Fav It</button>
</template>
Note: We're binding the value attribute directly to the privateData
value from the decorator.
Now update myDecorator to use it:
myDecorator({family, fullName, weight, style, privateData}) {
  const fweight = style.includes('Bold') ? 'bold' : weight;
  const fstyle = style.includes('Italic') ? 'italic' : style.includes('Oblique') ? 'oblique' : '';
  const favorite = privateData?.favorite || false;
  return {
    key: fullName,
    sortKey: `family`,
    name: fullName,
    displayStyle: `font-family: "${family}"; font-weight: ${fweight}; font-style: ${fstyle};`,
    privateData: {
      favorite
    }
  };
},
Note: The privateData field is returned in the decorator, and given a
default value if it was empty before.
Now, we'd probably want to display the favorites in a separate section. We can do that with template bound to a filter like:
favoriteFilter({privateData}) {
   return privateData?.favorite || false;
},

render({fonts}) {
    return {
      favorites: {
        models: fonts,
        $template: 'favorite_t',
        decorator: 'myDecorator',
        filter: 'favoriteFilter'
      },
      fonts: {
        models: fonts,
        $template: 'font_t',
        decorator: 'myDecorator',
      }
    };
  },
The last piece of the puzzle is how do we write the onFavorite method.
onFavorite({eventlet: {value}}) {
    value.favorite = true;
},
We can also add an onUnfavorite method.
onUnfavorite({eventlet: {value}}) {
    value.favorite = false;
},
Note: This is likely to change because it relies on this privateData
object passed in to be mutable during an event handler. Most likely, we will
change this to allow the event handler to somehow return a new privateData
object.
See the Per Item UI State example and its recipe definition.
One of the core principles of ArcsJs is composition -- that is, computations can be broken up into a graph of particles, connected by bindings specified in a recipe. This explicit dataflow provides a safety mechanism wherein all of the data that one particle can read from another can be defined by a policy in the recipe. The power of this to provide privacy guarantees is the subject of another document, but this mechanism also allows for UI composition through a mechanism known as slots.
A slot is a placeholder in the UI rendered by a particle that can be filled in by another particle. You can create a slot just by providing the slot attribute on an element, for example:
<div slot="boldfonts"></div>
This slot can be filled by wiring up another particle's output in the recipe, for example:
const BoldFonts = {
  $kind: '$local/3-FilterBold',
  $inputs: ['fonts'],
  $outputs: ['pickedFont'],
};

main: {
  $kind: `$local/8-Slots`,
  $bindings: {
    fonts: 'fonts',
    pickedFont: 'pickedFont'
  }
  $slots: {
    // The slot this particle's UI will be bound to
    boldfonts: {
      // The particle specification
      BoldFonts
    }
  }
}
So now someone can write a particle that custom renders a list of font with a
specific property (e.g. bold) and slot it into another particle that wants to
provide a section for it. In this case, we are effortlessly reusing the
particle we wrote earlier, 3-FilterBold.js, to add a special section to our
picker.
Note: Slots are bi-directionally secure. A parent particle that provides a slot does not have access to the UI that is rendered by the provider of the slot, and the provider of the slot cannot access the UI into which it has been inserted. Thus in a composed ecosystem of untrusted third party particles, UI component data sharing is strictly controlled by the dataflow graph in the recipe and any policies or restrictions imposed on it.
See the Slots example and its recipe definition.
There are two ways to break out of the sandboxed security model: Services and Custom Elements. Both require explicit trust because they will be given the full power of the Javascript environment. Typical examples of Services are those they need to access the network, use Web APIs, or run beefy libraries like Tensorflow. The Photo Picker prototype for example, uses a service to read EXIF metadata from an image for display.
Custom Elements are normally used when you need rendering power not provided by built-in template markup. Examples of this include rendering to Canvas or WebGL, or using third party custom elements that might encapsulate things like embedded YouTube players, Maps, etc.
Not Written Yet See How to write Services and How to write Custom Elements for more information.
For now, let's utilize a pre-existing service that's been written for us. The simplest service to use is Geo-Location, which we will use to pick suggested fonts based on your geo-location.
Services in ArcsJs are based on asynchronous message passing. You may send an
arbitrary JSON object to a service, specified by a kind field of the name of
the service, and usually by convention a msg field specifying the name of the
method on the service you'd like to invoke, which returns a Promise that is
fullfilled with the return value of the service.
On particle startup, you are given a reference to a service function, which
you can store (e.g. in the provided state object) and use for later.
initialize({}, state, {service}) {
    assign(state, { service });
},
Now we might want to define a helper function for geo-location:
async reverseCoords(coords, service) {
    return await service({kind: 'GeoLocation', msg: 'reverseCoords', coords);
},
This service would convert a location specified by coords into an object
containing fields like address, city, state, zip.
We could then do interesting things with it, like show fonts that are specific to a locale (eg "San Francisco" font for San Francisco, or Chinese fonts if you are located in China.)
Under Construction See the Services example and its recipe definition.
The complete runtime behind the picker, ArcsJs, offers far more powerful idioms for computing not discussed or exposed here. ArcsJs has an underlying storage system based on CRDTs. It is not browser/DOM specific and abstracts away rendering surfaces to support arbitrary device outputs. It includes a privacy policy model for verifying data flows in recipes. These mechanisms open up additional integration points for applications, like tying ArcsJs Stores to application stores or native browser stores. Custom surfaces could be used in applications that might need to control rendering in custom ways, like a font editor that needed to display actual font outlines. The sky's the limit.
You may be asking, what's all of this ArcsJs stuff and why are we using it, instead of just handling the user a simple library function or custom web element?
The ArcsJs team has been exploring computing concepts around composing untrusted third party code safety via application of privacy policies, dataflow analysis, and isolation mechanisms. We have an existing codebase that enables us to rapidly prototype solutions like those shown here with flexible security properties.
While it is true that a simpler API could be built on top of ArcsJs to hide it from the end user, it would also hide some of the power available. Since we don't know yet how much flexibility various use cases may desire, this explainer documents the stack in greater detail.
However, it is not required that all of this complexity is exposed, and a simpler wrapper can be designed, depending on what users want.
ArcsJs isolates both Javascript and UI.
Javascript is run in a locked down environment with most capabilities removed, with a goal toward defense in depth. The initial layer can be run inside of an IFRAME or a Worker or Worklet. The second layer of isolation is running JS in an environment like SES or FrozenRealms/ShadowRealms. And the third layer is sanitizing the Javascript to consider of only pure-top level functions, with no capability to mutate global state.
Likewise, for UI, there are layers of protection. All UI rendering is done through the template system, with no access given to things like DOM, and no direct access to events. Surfaces are isolated through both IFRAMEs and ShadowDom layers. Additional filtering may also be done to limit what elements and/or CSS can be used.
In addition, the Slot system allows two untrusted 3rd party pieces of code to be composed together in UI without being able to known anything about the UI each other has rendered.
There is ongoing research in ArcsJs-affiliated teams on reasoning about dataflow graphs and providing policy enforcement. What this means is that particle outputs might have claims or types associated with them, and after they are assembled in a dataflow graph, the system may assert checks that some claims hold or do not hold. As an example, specific to the font case, a given local font might be safe to egress, if it is known to be among an extremely common group of fonts everyone has installed, thus providing no entropy. The system could provide a 1st-party trusted particle which can return a list of such fonts with such a claim.
These fonts can then be mixed-and-matched into a complex font recipe, which could contain particles that egress fonts to a remote service call, so long as the inputs to the particle that uses this service are checked to have this common-font egress property.
See Raksha for more on research in progress.
Particles are the foundation of ArcsJs - understanding how to use and work with them is critical to developing projects with ArcsJs. To begin, we present the following definition of a particle.
Particle - Modular component of functionality that is run in isolation.
Particles work asynchronously (they may receive input and send output at any time) and can operate on data through stores (explained below). The simplest Particle acts like a function. More complex Particles can generate UX experiences and manage entire applications.
Each particle must declare it's expected input and output types and is only allowed to read and write in accordance with this declaration. The particle can only interact with the external world through supervised services. This is what enables the isolation to ensure user privacy.
Stores are where particles can access (input/output) data. We present a definition of a store below.
Store - managed location where data can be sent and/or retrieved.
Each store must declare the type of data it expects; this could be a primitive type (int, char, etc.) or a user-defined type (Address, Name, etc.). Stores can also be setup for a single item or a collection.
Recipes are the "glue" that holds particles and stores together. We present a definition of a recipe below.
Recipe - a description of components that allows for instantiation.
Within a recipe, particle inputs/outputs are declared and stores are defined. This allows ArcsJs to instantiate your project and connect the correct stores to particles.
Surfaces allow for interaction (input/output) between ArcsJs and the real world. We present a definition of a surface below.
Surface - a primitive ArcsJs component that can render audio/visual and map inputs from sensors.
Surfaces can be run on different devices (phone, watch, smart speaker, etc.) and render templates visually or auditorily based on the device's features and user's preferences.
Surfaces are more primitive than particles. Particles often have a surface, but they are not required to have one.
Slots allow ArcsJs components to delegate functionality. We present a definition of slots below.
Slots are locations where particles or surfaces can be connected.
Within a recipe, slots allow components like particles to provide space for other components. This could be used when a particle wants to have another surface render or to bring in another recipe with additional functionality.