A set of utilities for face detection for the biometrics classes at the Faculty of Informatics, Masaryk University based on deep learning and OpenCV.
Use the python script detect_faces.py to detect faces using deep learning in OpenCV.
python3 detect_faces.py [-h] (-i IMAGE | -w WEBCAM)
                        [-o OUTPUT] [-v] [-c CONFIDENCE]
                        [-p PROTOTXT] [-m MODEL]
Optional arguments:
-h/--help
show this help message and exit-i IMAGE/--image IMAGE
path to input image-w WEBCAM/--webcam WEBCAM
webcam stream number (try 0, 1, 2, ...)-o OUTPUT/--output OUTPUT
image output directory-v/--verbose
display debugging output-c CONFIDENCE/--confidence CONFIDENCE
threshold to display face detections (default: 0.2)-p PROTOTXT/--prototxt PROTOTXT
path to a different Caffe 'deploy' prototxt file-m MODEL/--model MODEL
path to a different Caffe pre-trained model
- Python (preferably version 3)
- python package numpy (optimized library for mathematical operations)
- opencv-python (unofficial pre-built CPU-only OpenCV packages for Python)
- imutils (set of utility functions for OpenCV by Adrian Rosebrock)
Note: Installing OpenCV separately is not necessary as opencv-python should ship with pre-build OpenCV.
- Install Python (version 3) if you don't have it. Don't forget to install
pip. - Create a virtual environment
virtwithpython3 -m venv virt. Activate it. virt/bin/activate(assuming Bash). - Install Python dependencies with
pip3 install -r requirements.txtor usemake installfor convenience. - You can test the installation with
python3 detect_faces.py --image images/example.jpgor usemake demofor convenience.
The setup was tested on Linux (Fedora 33, Ubuntu 20.04), MacOS and Windows with local Python installation (running via PowerShell). Note that Windows WSL is not recommended as detect_faces.py is a graphical application. Use within a virtual machine is possible, though extra configuration may be necessary to get webcams working.
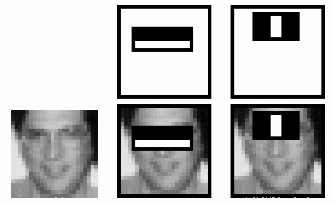
The face detector used by the utility uses the technique of Haar Cascades. A nice brief explanation can be found directly in the OpenCV-Python Tutorials. Haar Cascades are a machine learning approach based on comparing pixel intensities in adjacent regions. For example, consider the image below. Top row shows two good features. The first feature focuses on the region of the eyes being often darker than the region of the nose and cheeks. The second feature relies on the eyes being darker than the bridge of the nose.
To find out which features work well, we use machine learning: we induce (train) good features from a lot of images classified manually. After having trained the set of features, face detection works by "brute-forcing" the regions on all possible location of the image (a very nice slowed illustration of the process can be seen in this video). There are some more tricks to make this more efficient but those are not that important here.
The trained detector is pretty versatile – and therefore comes bundled with OpenCV. That means you don't need to do any training/machine learning yourself, just use the model available in OpenCV.
The utilities are based on the excellent tutorials at pyImageSearch by Adrian Rosebrock.