Install the plugin via Crafter Studio's Plugin Management UI under "Project Tools" > "Plugin Management" > "Search & install".
You'll enter your key on the plugin configuration form, and it will end up on a file on your CrafterCMS project:
{sandbox}/config/plugins/org/craftercms/openai/config.xml
You may update the configuration at any time using the Plugin Management function of Crafter Studio.
<?xml version="1.0" encoding="UTF-8"?>
<config>
	<key>sk-abcdefghijklmnopqrstuvwxyz</key>
</config>
If you're contributing and want to install from local sources, you can install the plugin
using the CrafterCMS CLI, or using the /studio/api/2/marketplace/copy API in Postman or similar.
Either way, you can use the following JSON body:
{
  "siteId": "YOUR_SITE_ID",
  "path": "/Users/your/path/to/this/repo/chatgpt-plugin",
  "parameters": { "key": "sk-abcdefghijklmnopqrstuvwxyz" }
}On your ui.xml, find the widget id "craftercms.components.TinyMCE". Inside of it, you'll find the tinymceOptions.
<widget id="craftercms.components.TinyMCE">
	<configuration>
		<setups>
			<setup id="generic">
				<tinymceOptions>
Merge the JSON below with your tinymceOptions:
Notice you must replace YOUR_SITE_ID to your actual site id.
{
...
"toolbar1": "... | chatgptdialog openaishortcuts openai",
...
"icons": "ai",
"icons_url": "/studio/1/plugin/file?siteId=YOUR_SITE_ID&pluginId=org.craftercms&type=openai&name=tinymce&filename=tinymce-icon-pack.js",
"external_plugins": {
...
"craftercms_openai": "/studio/1/plugin/file?siteId=YOUR_SITE_ID&pluginId=org.craftercms&type=openai&name=tinymce&filename=craftercms_openai.js"
},
"craftercms_openai": {
...config options for the plugin
}
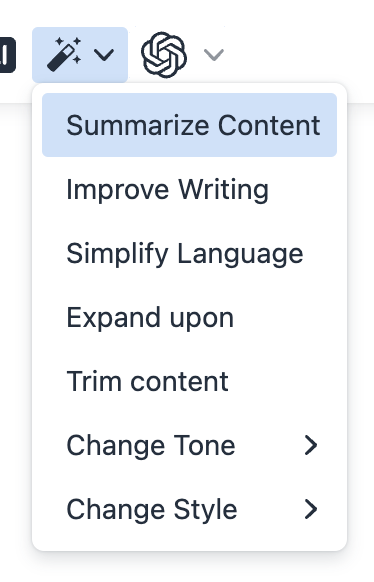
}The plugin exports certain TinyMCE buttons that you can use in your editor toolbar(s). You don't need to use all of them, choose the one that suits you best.
A simple button that will update the Chat window for a free-form chat experience. The chat window will provide a button to insert the generated text into the editor. If there's a selection before clicking the button, the selection will be passed as "context" to the API so people can speak with the assistant referring to said context.
A split button that provides a list of shortcuts. These can be configured by passing a shortcuts property to the TinyMCE plugin config via the craftercms_openai key.
Shortcuts should be an array of objects with label and messages properties, or, in TypeScript notation: Array<{ label: string; messages: ChatCompletionMessageParam[] }>
The openaishortcuts and openai toolbar buttons are configured by the same shortcuts property.
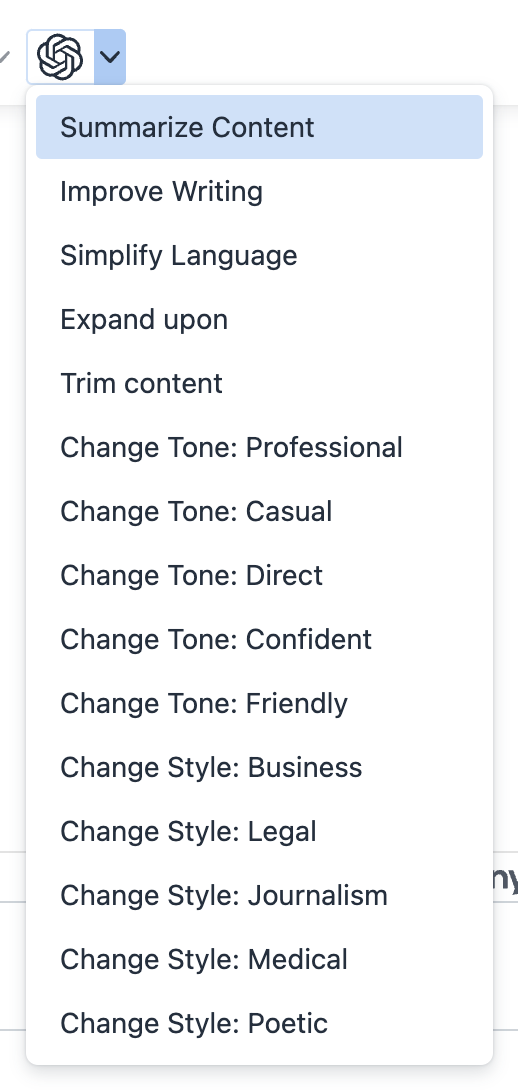
A split button that provides both a list of shortcuts and direct access to free-form chat. It is
a combination of the openaishortcuts and chatgptdialog buttons.
Shortcuts can be configured by passing a shortcuts property to the TinyMCE plugin config via the craftercms_openai key.
The openaishortcuts and openai toolbar buttons are configured by the same shortcuts property.
The icon would open the free-form chat window by clicking the main button area.
Clicking the down-pointing caret would open a list of shortcuts to select one from.
To configure the behavior of the Chat window that's opened via the rich text editor, add a craftercms_openai
property to your tinymceOptions (as described above). For instance, to change the shortcuts, you can add the following:
"craftercms_openai": {
  "shortcuts": [
    {
      "label": "Summarize Content",
      "messages": [
        {
          "role": "user",
          "content": "Provide the key points in this content. Context: \"\"\"{context}\"\"\""
        }
      ]
    }
  ]
}
This configuration allows you to create your custom shortcuts. The shortcut has two properties:
label, which is what the user sees as the name of the shortcutmessages, which is an array ofChatCompletionMessageParam
Use prompt engineering strategies (https://platform.openai.com/docs/guides/prompt-engineering) for better results.
Review CrafterCMSOpenAIConfig and BASE_CONFIG on the tiny plugin source for more options and examples.
The helper component enables ChatGPT to work with XB's RTE.
The ChatGptHelper component must be added to your ui.xml to either the sidebar (craftercms.components.ToolsPanel) or the
toolbar (craftercms.components.PreviewToolbar).
This is done automatically by the plugin installation process (see craftercms-plugin.yaml > installation property). By
default, the helper is added to the sidebar, and it doesn't render anything visible to the user; it is there to attend XB's
requests to the plugin.
If desired, the helper can render a button to open the Chat window on demand. This is done by adding a ui
property to the widget configuration with a value of "IconButton" or "ListItemButton".
- Use "IconButton" to display the button on the toolbar.
- Use "ListItemButton" to display the button on the sidebar.
The example below shows how to add the helper to the toolbar and display a button to open the Chat window.
<widget id="craftercms.components.ToolsPanel">
	<configuration>
		<widgets>
			<widget id="craftercms.components.openai.Helper">
			<plugin
				id="org.craftercms"
				type="openai"
				name="components"
				file="index.js"
			/>
			<configuration ui="IconButton" />
		</widget>
		...
	</configuration>
</widget>
...- Clone this repository.
- Run
yarn installto install dependencies.- If everything is installed correctly, the
postinstallscript should have copied the TinyMCE directory topublic/tinymce. If not, you can manually runyarn postinstallornode postinstall.cjs.
- If everything is installed correctly, the
- Run
yarn startfor a dev server. Navigate tohttp://localhost:3000/. The app will automatically reload if you change any of the source files. - Run
yarn packageto create the CrafterCMS plugin build. See local installation instructions above for instructions on continually deploying and testing locally. - Fork and create a pull request to contribute.
Got questions? Post a question on CrafterCMS community Slack.