Behaviorial Cloning Project
The goals / steps of this project are the following:
- Use the simulator to collect data of good driving behavior
- Build, a convolution neural network in Keras that predicts steering angles from images
- Train and validate the model with a training and validation set
- Test that the model successfully drives around track one without leaving the road
- Summarize the results with a written report
Rubric Points
Here I will consider the rubric points individually and describe how I addressed each point in my implementation.
Files Submitted & Code Quality
1. Submission includes all required files and can be used to run the simulator in autonomous mode
My project includes the following files:
- model.py containing the script to create and train the model
- drive.py for driving the car in autonomous mode
- model.h5 containing a trained convolution neural network
- writeup_report.pdf summarizing the results
2. Submission includes functional code
Using the Udacity provided simulator and my drive.py file, the car can be driven autonomously around the track by executing
python drive.py model.h53. Submission code is usable and readable
The model.py file contains the code for training and saving the convolution neural network. The file shows the pipeline I used for training and validating the model, and it contains comments to explain how the code works.
Model Architecture and Training Strategy
1. An appropriate model architecture has been employed
My model essentially the NVIDIA architecture with some minor modifications. It consists of five convolution layers with three 5x5 and two 3x3 filter sizes. The convolution layer depths are 24, 36, 48, 64, 64 (model.py lines 161-191). There is a stride of 2x2 for the first 3 convolution layers.
The original architecture can be found at this link: http://images.nvidia.com/content/tegra/automotive/images/2016/solutions/pdf/end-to-end-dl-using-px.pdf
The model includes ELU layers to introduce nonlinearity (for each convolution and dense layer), and the data is normalized in the model using a Keras lambda layer (code line 165). The last layer is a dense layer of 1 with a linear activation function.
2. Attempts to reduce overfitting in the model
The model contains dropout layers after every convolutional and dense layer in order to reduce overfitting. The dropout layers used a keep probability of 30%. One pooling layer of 3x3 size is implemented in between the convolutional and dense layers.
3. Model parameter tuning
The model used an ADAM optimizer (model.py line 194). The default learning rate was used (0.001).
4. Appropriate training data
The Udacity sample data set was used as part of the data set. The center, left, and right camera views were used from this data set.
Model Architecture and Training Strategy
1. Solution Design Approach
The overall strategy for deriving a model architecture was to first start with a known architecture and then modifying it dropouts to prevent over-fitting.
I used the NVIDIA architecture as it was proven for learning to drive on a road.
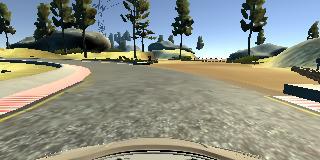
I used the center camera images at first and also used a generator for training the model. Unfortunately, it did not handle the steep curves very well. The curve after the bridge in track 1 was the most problematic as the car would just drive into the dirt instead of executing a steep turn to the left.
The left and right images were also used with a offset to the angle data as well as flipping all the center images and angles.
Then I tried to collect more data - driving on center of track 1 & 2, driving on both left & right shoulders of the road. None of the combinations of data worked well by themselves.
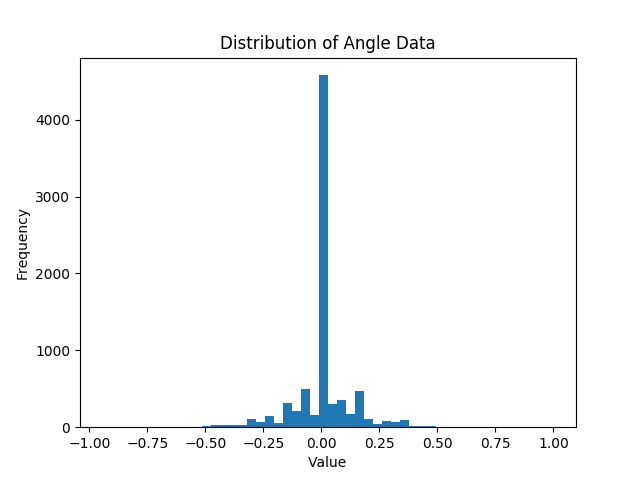
The next step was to focus on the original sample data set provided by Udacity and see the distribution of angles of the data. It showed a significant bias towards zero angles. This was cleaned up by normalizing the data, which meant creating a histogram of the data and only collecting a maximum of a certain amount of data per bin. This helped the model navigate the curve after the bridge correctly.
The final step was to run the simulator to see how well the car was driving around track 1.
At the end of the process, the vehicle is able to drive autonomously around the track without leaving the road.
2. Final Model Architecture
The final model architecture (model.py lines 161-191) consisted of a convolution neural network with the following layers and layer sizes:
3. Creation of the Training Set & Training Process
The Udacity sample training set was used with no additional data added. For all images, 50 pixels off the top and 20 pixels were taken off the bottom of the image. Each image had the pixel values normalized from 0 to 1.
The sample data set had 8036 data points of image and steering angles. A histogram was generated of the original dataset. It was heavily weighted towards low or zero angles:

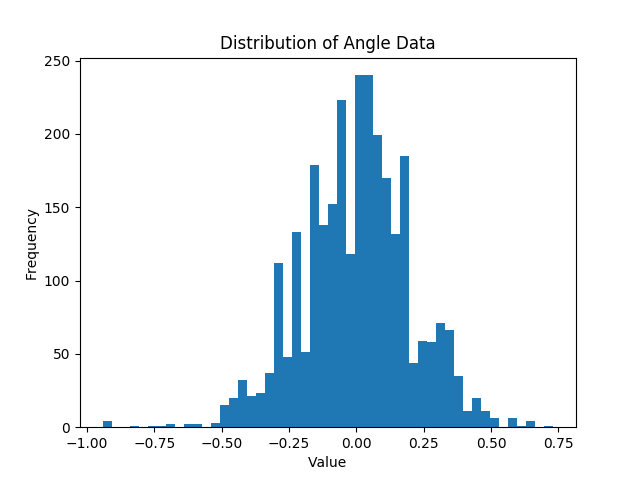
The data was normalized with 100 bins and a max of 120 samples per bin, which reduced the number of low angle samples. There was a total of 2877 samples after this step:

To augment the data set, I also flipped images and angles so that the data was more generalized. This was done for all the center images. Left and right camera images were incorporated into the dataset with a 0.24 correction to the center angle value.
I finally randomly shuffled the data set and put 20% of the data into a validation set.
The validation set helped determine if the model was over or under fitting. The number of epochs used for training was 20, but 10 to 15 would have also been sufficient. The loss was mean squared error loss was graphed for both training and validation sets to see if they converged. The accuracy was around 96% for both training and validation.

The total number of samples was 9206 for training and 2302 samples for validation.
4. Conclusion
Most of the effort in this project was processing and filtering the data. An alternative might have been to record more steep curves, but due to the linear nature of the simulator, this was not easy. The car is able to navigate track 1 successfully after the crucial data processing step. Here are the two runs recorded using different capture methods:
Run 1 - recorded with provided video.py: https://youtu.be/o7dMiFPRsjY
Run 2 - recorded with recordMyDesktop: https://youtu.be/tTR98fg1Tmo


