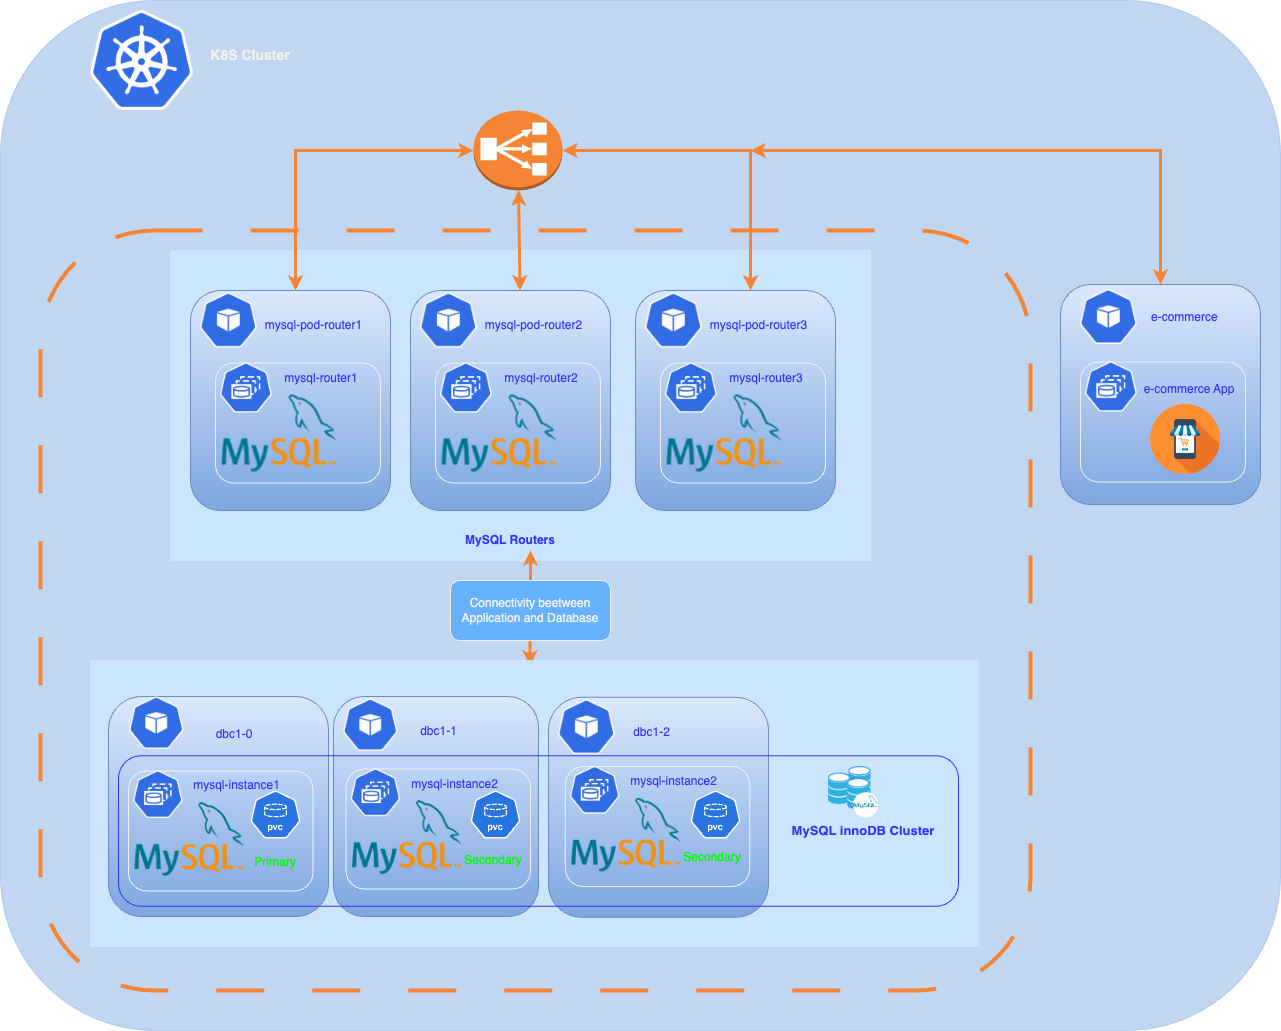
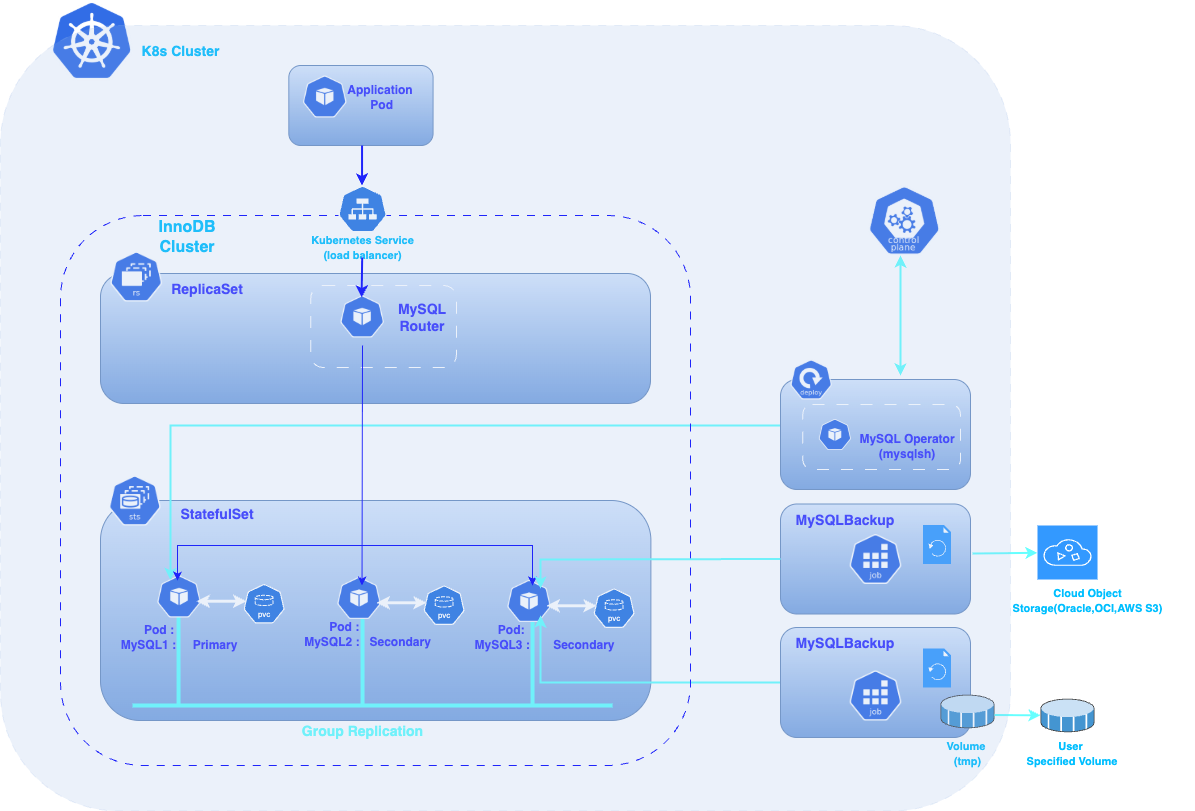
Today’s cloud-native applications, the demand for scalable and resilient databases is higher than ever. MySQL, one of the most popular relational database management systems, provides high availability and robust performance through its InnoDB Cluster feature. However, managing MySQL InnoDB Clusters can be complex, especially in dynamic environments like Kubernetes.
Kubernetes has become the standard for orchestrating containerized applications, allowing teams to automate deployment, scaling, and management of applications. To streamline the management of MySQL clusters within Kubernetes, the MySQL Operator offers a powerful solution. An Operator is a method of packaging, deploying, and managing a Kubernetes application, providing the capability to automate complex tasks and improve operational efficiency.
This document will guide you through the deployment process of a MySQL InnoDB Cluster on Kubernetes using the MySQL Operator. By following this guide, you will learn how to set up, configure, and manage your MySQL clusters within a Kubernetes environment, leveraging the benefits of automation to ensure high availability and fault tolerance.
When you deploy an InnoDBCluster, the Operator automatically creates a ClusterSet with the same name as the cluster.
Implications
- You may see a
ClusterSetresource even if you only asked for a single cluster.- Deleting the ClusterSet will also delete the associated InnoDBCluster.
- Plan your naming accordingly and avoid removing the ClusterSet unless you intend to remove the cluster as well.
Why this happens (at a high level)
- The Operator prepares for future scale‑out (adding replica clusters) without extra steps.
Recommendation
- If you want a standalone setup, simply keep the auto‑created ClusterSet and operate your single cluster as usual. If you plan multi‑site later, you can attach additional clusters to this ClusterSet.
Before you get started, you’ll need to have these things:
- An operational Kubernetes cluster.
- Installed kubectl command-line tool.
- A Oracle container registry account .
- bash version 4+
- mysqlshell or mysql client installed
When you install the application using Kubernetes manifes or Helm, use a Kubernetes secret to provide the authentication details to pull an image from the remote repository.
The Kubernetes Secret contains all the login details you provide if you were manually logging in to the remote Docker registry using the docker login command, including your credentials.
Create a secret by providing the credentials on the command-line by using the following command :
ora-cont-secret.yaml:
apiVersion: v1
kind: Secret
metadata:
  name: oracle-registry-secret
type: kubernetes.io/dockerconfigjson
data:
 .dockerconfigjson:XXXXXXXXXXXXX
dockerconfigjson corresponds to these JSON entries encoded in base64 :
{
    "auths":{
          "container-registry.oracle.com": {
        "username":"USERNAME",
        "password":"XXXXXXXX",
        "email":"EMAIL"
         }
        }
}
- container-registry.oracle.com: Name of Oracle container registry.
- USERNAME: User name to access the remote Oracle container registry. The format varies based on your Kubernetes platform.
- PASSWORD: Password to access the remote Oracle container registry.
- EMAIL: Email ID for your Docker registry.
We will encode the JSON string with the following command:
:> echo -n '{"auths":{"container-registry.oracle.com":{"username":"xxxx","password":"xxxx","email":"xxx@xxx"}}}' | base64
You should get something like:
eyJhdXRocyI6eyJjb250YWluZXItcmVnaXN0cnkubUse the encoded output in your Secret: Then, insert this encoded code into your secret definition. The YAML file should look like this:
apiVersion: v1
kind: Secret
metadata:
  name: oracle-registry-secret
type: kubernetes.io/dockerconfigjson
data:
 .dockerconfigjson: eyJhdXRocyI6eyJjb250YWluZXItcmVnaXN0cnkub3JhY2xlLmNvbSI6eyJ1c2VybmFtZSI6Im1jb2
Create a namespace:
kubectl create namespace mysql-operator
Apply the Secret to Kubernetes:
kubectl -n mysql-operator apply -f scripts/ora-cont-secret.yaml
You can also create a secret based on existing credentials. See Create a Secret based on existing credentials or Install MySQL Operator for Kubernetes from a Private Registry.
We will also apply this secret in our namespace where our MySQL instances will be deployed. We could also have used an external-secret method to share this secret across different namespaces, or extensions like:
- reflector with support for auto secret reflection
- kubernetes-replicator secret replication
There are several methods for deploying the MySQL Operator: through manifest files or via HELM, which is the package manager for Kubernetes. We will use the first method, using manifest files.By default, the manifest deploys the community version of the operator.
If you want to use Helm, please follow the instructions here. For deploying the Enterprise version (which is the case in this document), you need to create a values.yaml file to specify the Enterprise image or modify the deploy-operator.yaml file to set the correct image, in the section:
containers:
  - name: mysql-operator
    image: community-operator or enterprise-operator
and configure your Docker registry (or Oracle's one).Here is an example using the Oracle registry, referencing the secret we previously created :
containers:
   - name: mysql-operator
     image: container-registry.oracle.com/mysql/enterprise-operator:latest
....
imagePullSecrets:
        - name: oracle-registry-secret
An example of the values.yaml :
image:
  registry: container-registry.oracle.com
  repository: mysql
  name: enterprise-operator  # Use 'enterprise-operator' for enterprise image
  pullPolicy: IfNotPresent
  tag: "latest"
  pullSecrets:
    enabled: true
    secretName: oracle-registry-secret  # Replace with the name of your secret
Add the Helm repository:
helm repo add mysql-operator https://mysql.github.io/mysql-operator/ helm repo update
Install MySQL Operator for Kubernetes :
helm install my-mysql-operator mysql-operator/mysql-operator --namespace mysql-operator -f values.yaml
There is a known issue with the Oracle MySQL Operator where it often fails to detect the Kubernetes cluster domain automatically.
If you encounter an error like Failed to detect cluster domain, you need to explicitly specify the domain in the operator deployment.
Edit the deploy-operator.yaml file and add the following environment variable under the env: section of the Deployment:
- name: MYSQL_OPERATOR_K8S_CLUSTER_DOMAIN
  value: "your_cluster_domain"
If you’re deploying the operator using Helm, you can set the cluster domain via the following parameter:
--set env.MYSQL_OPERATOR_K8S_CLUSTER_DOMAIN=your_cluster_domain
First deploy the Custom Resource Definition (CRDs):
flowchart TD
  subgraph User
    U1[Run: kubectl apply -f deploy-crds.yaml]
    U2[Run: kubectl apply -f deploy-operator.yaml]
  end

  subgraph K8s_API
    CRD_Def[Create CustomResourceDefinitions]
    Operator_Deploy[Deploy Operator + RBAC]
  end

  subgraph Namespace[NS: mysql-operator]
    Deployment[Deployment: mysql-operator]
    Pods[Pod - mysql-operator]
  end

  U1 --> CRD_Def
  U2 --> Operator_Deploy

  CRD_Def --> K8s_API
  Operator_Deploy --> K8s_API

  K8s_API --> Deployment
  Deployment --> Pods
kubectl apply -f https://raw.githubusercontent.com/mysql/mysql-operator/9.4.0-2.2.5//deploy/deploy-crds.yaml
Verify CRDs deployment :
:> kubectl get crds|grep innodb
NAME                                         CREATED AT
innodbclusters.mysql.oracle.com              2024-10-30T16:58:31Z
:>
Then deploy MySQL Operator for Kubernetes:
kubectl -n mysql-operator apply -f scripts/deploy-operator.yaml
By default, the deployment creates a namespace called mysql-operator and deploys the operator in this namespace.
Verify a deploiement :
kubectl get deployment -n mysql-operator mysql-operator
The result of the command should look like this :
NAME             READY   UP-TO-DATE   AVAILABLE   AGE
mysql-operator   1/1     1            1           54s
Now that our operator is deployed, we will be able to deploy our InnoDB cluster.
flowchart TD
    subgraph User
        U1[Apply InnoDBCluster CRD YAML]
    end

    subgraph K8s_API
        R1[Register InnoDBCluster resource]
    end

    subgraph MySQL_Operator
        C1[Detect InnoDBCluster resource]
        C2[Create StatefulSet for MySQL Pods]
        C3[Create Deployment for MySQL Routers]
        C4[Create Services and ConfigMaps]
    end

    subgraph Namespace["Namespace: mysql"]
        SS[StatefulSet - MySQL Instances]
        Pods[MySQL Pods - mysqld]
        Routers[Deployment - MySQL Routers]
        Services[Cluster Services]
    end

    U1 --> R1
    R1 --> C1
    C1 --> C2 --> SS --> Pods
    C1 --> C3 --> Routers
    C1 --> C4 --> Services
✅ Step1: Create a namespace
kubectl create namespace mysqldb01
✅ Step2: Create the MySQL secret and Apply Oracle Container Registry secret: :
kubectl -n mysqldb01 create secret generic mysql-secret \
  --from-literal=rootUser=root \
  --from-literal=rootHost=% \
  --from-literal=rootPassword=YourMySQLUserPassword
❗️ Replace the value of MYSQL_PASSWORD with your root user’s password
The password is used by management scripts and commands for MySQL InnoDB Cluster and ClusterSet deployment in this tutorial.
Apply Oracle Container Registry secret:
kubectl -n mysqldb01 apply -f scripts/ora-cont-secret.yaml
✅ Step3: Deployment MySQL InnoDB Cluster
The MySQL Operator has three types of resources :
- InnoDBCluster
- MySQLBackup
- ClusterSet
In this document, we will cover only the InnoDBCluster type. To learn the details of each type, I encourage you to check this link: MySQL Operator Custom Resource Properties
❗️ For the Enterprise Edition only: MySQL Operator for Kubernetes now supports creating backups to cloud storage using the MySQL Enterprise Backup tool, and restoring such backups to server instances in InnoDB Clusters. Backups can be one-off or scheduled, and both full and incremental backups are supported. MySQL Operator for Kubernetes now supports the creation of InnoDB ClusterSet, which consists of a primary InnoDB Cluster and zero or more replica clusters.
We will use this manifest file to deploy 3 MySQL database instances and 3 MySQL Router instances,also defines storage requirements for a PersistentVolumeClaim (PVC) set.
05-deploy.yaml:
apiVersion: mysql.oracle.com/v2
kind: InnoDBCluster
metadata:
  name: dbcluster01
spec:
  secretName: mysql-secret
  tlsUseSelfSigned: true
  instances: 3
  version: 9.4.0
  imagePullSecrets:
    - name: oracle-registry-secret
  router:
    instances: 3
  datadirVolumeClaimTemplate:
    accessModes: [ "ReadWriteOnce" ]
    resources:
      requests:
        storage: 5Gi
Then deploy MySQ LInnoDB Cluster :
kubectl -n mysqldb01 apply -f scripts/05-deploy.yamlWe can monitor the deployment of our cluster with the following command :
kubectl get innodbcluster --watch -n mysqldb01
NAME          STATUS   ONLINE   INSTANCES   ROUTERS   AGE
dbcluster01   PENDING   0        3           3         18s
After a few minutes, our cluster is operational :
kubectl get innodbcluster --watch -n mysqldb01
NAME          STATUS   ONLINE   INSTANCES   ROUTERS   AGE
dbcluster01   ONLINE   3        3           3         4m
We can check the status of the pods in our namespace:
kubectl get pods -n mysqldb01

NAME                                  READY   STATUS    RESTARTS      AGE
dbcluster01-0                         2/2     Running   6 (18m ago)   28m
dbcluster01-1                         2/2     Running   0             12m
dbcluster01-2                         2/2     Running   6 (18m ago)   28m
dbcluster01-router-77ff89bf79-bb7nt   1/1     Running   0             13m
dbcluster01-router-77ff89bf79-g6lks   1/1     Running   0             13m
dbcluster01-router-77ff89bf79-vlb96   1/1     Running   0             13m
We can see that we have our 3 database instance pods and the 3 router pods running properly.
To inspect the placement of your Pods on our cluster :
:> kubectl get pods -o custom-columns="NAME:.metadata.name,NODE:.spec.nodeName" -n mysqldb
dbcluster01-0                         k8sdemos-worker2
dbcluster01-1                         k8sdemos-worker
dbcluster01-2                         k8sdemos-worker3
dbcluster01-router-77ff89bf79-bb7nt   k8sdemos-worker2
dbcluster01-router-77ff89bf79-g6lks   k8sdemos-worker
dbcluster01-router-77ff89bf79-vlb96   k8sdemos-worker3
:>
We can see that our 3 DB instances and 3 routers are properly distributed across each node
❗️By default, no LoadBalancer service is initialized by the deployment with the Operator.We will then patch the MySQL Router service to use a LoadBalancer service.
We will connect directly to the pod of the first instance (dbcluster01-0) and execute the various commands.
Connect to the pod of the first instance (dbcluster01-0) :
kubectl -n mysqldb01 exec -it dbcluster01-0 -- /bin/bash
Connect to the first MySQL instance:
mysqlsh --uri root@dbcluster01 -p --js
Please provide the password for 'root@dbcluster01': *********************
MySQL Shell 9.1.0-commercial

Copyright (c) 2016, 2024, Oracle and/or its affiliates.
Oracle is a registered trademark of Oracle Corporation and/or its affiliates.
Other names may be trademarks of their respective owners.

Type '\help' or '\?' for help; '\quit' to exit.
Creating a session to 'root@dbcluster01'
Fetching schema names for auto-completion... Press ^C to stop.
Your MySQL connection id is 0
Server version: 9.1.0-commercial MySQL Enterprise Server - Commercial
No default schema selected; type \use <schema> to set one.
 MySQL  dbcluster01:3306 ssl  JS >
Using root@dbcluster01 connection assumes the default namespace is used,the long form is :
{innodbclustername}.{namespace}.svc.cluster.local.*
If your Kubernetes cluster uses a custom Cluster domain, replace cluster.local with your cluster’s domain. For example, if your cluster domain is k8sdemos2.local, the full hostname becomes:
{innodbClusterName}.{namespace}.svc.k8sdemos2.local.*
You can check your cluster’s DNS domain by inspecting the clusterDomain setting, if configured, or checking your CoreDNS config:
kubectl -n kube-system get configmap coredns -o yaml
Verify the cluster's status:
MySQL  dbcluster01:3306 ssl  JS > var cluster = dba.getCluster()
MySQL  dbcluster01:3306 ssl  JS > cluster.status()
This command shows the status of the cluster. The topology consists of three hosts, one primary and two secondary instances. Optionally, you can call cluster.status({extended:1}).
{
    "clusterName": "dbcluster01",
    "defaultReplicaSet": {
        "name": "default",
        "primary": "dbcluster01-0.dbcluster01-instances.mysqldb01.svc.cluster.local:3306",
        "ssl": "REQUIRED",
        "status": "OK",
        "statusText": "Cluster is ONLINE and can tolerate up to ONE failure.",
        "topology": {
            "dbcluster01-0.dbcluster01-instances.mysqldb01.svc.cluster.local:3306": {
                "address": "dbcluster01-0.dbcluster01-instances.mysqldb01.svc.cluster.local:3306",
                "memberRole": "PRIMARY",
                "mode": "R/W",
                "readReplicas": {},
                "replicationLag": "applier_queue_applied",
                "role": "HA",
                "status": "ONLINE",
                "version": "9.1.0"
            },
            "dbcluster01-1.dbcluster01-instances.mysqldb01.svc.cluster.local:3306": {
                "address": "dbcluster01-1.dbcluster01-instances.mysqldb01.svc.cluster.local:3306",
                "memberRole": "SECONDARY",
                "mode": "R/O",
                "readReplicas": {},
                "replicationLag": "applier_queue_applied",
                "role": "HA",
                "status": "ONLINE",
                "version": "9.1.0"
            },
            "dbcluster01-2.dbcluster01-instances.mysqldb01.svc.cluster.local:3306": {
                "address": "dbcluster01-2.dbcluster01-instances.mysqldb01.svc.cluster.local:3306",
                "memberRole": "SECONDARY",
                "mode": "R/O",
                "readReplicas": {},
                "replicationLag": "applier_queue_applied",
                "role": "HA",
                "status": "ONLINE",
                "version": "9.1.0"
            }
        },
        "topologyMode": "Single-Primary"
    },
    "groupInformationSourceMember": "dbcluster01-0.dbcluster01-instances.mysqldb01.svc.cluster.local:3306"
}As mentioned previously, the deployment does not create a LoadBalancer service but an internal service within the Kubernetes cluster:
:> kubectl -n mysqldb01 get svc dbcluster01
NAME          TYPE        CLUSTER-IP      EXTERNAL-IP   PORT(S)                                                                    AGE
dbcluster01   ClusterIP   10.96.149.158   <none>        3306/TCP,33060/TCP,6446/TCP,6448/TCP,6447/TCP,6449/TCP,6450/TCP,8443/TCP   1h
:>
To access our InnoDB Cluster service externally, several solutions are possible:
- Using an Ingress Controller
- Using Port Forwarding
- Using a LoadBalancer My architecture has a LoadBalancer, so I will use this solution, but we will need to patch our service to utilize an external address in addition to its internal address.
Patch service :
kubectl -n mysqldb01 patch service dbcluster01 -p '{"spec": {"type": "LoadBalancer"}}'
If you have a cloud infrastructure (AWS, Azure, etc.), there are specific requirements for using the LoadBalancer provided by those providers, so the command will need to be adapted accordingly
Verify if the patch has been applied correctly :
kubectl -n mysqldb01 get svc dbcluster01
NAME          TYPE           CLUSTER-IP      EXTERNAL-IP   PORT(S)                                                                                                                    AGE
dbcluster01   LoadBalancer   10.96.149.158   10.89.0.100   3306:30197/TCP,33060:32305/TCP,6446:31222/TCP,6448:30122/TCP,6447:31028/TCP,6449:31895/TCP,6450:32630/TCP,8443:31304/TCP   1h
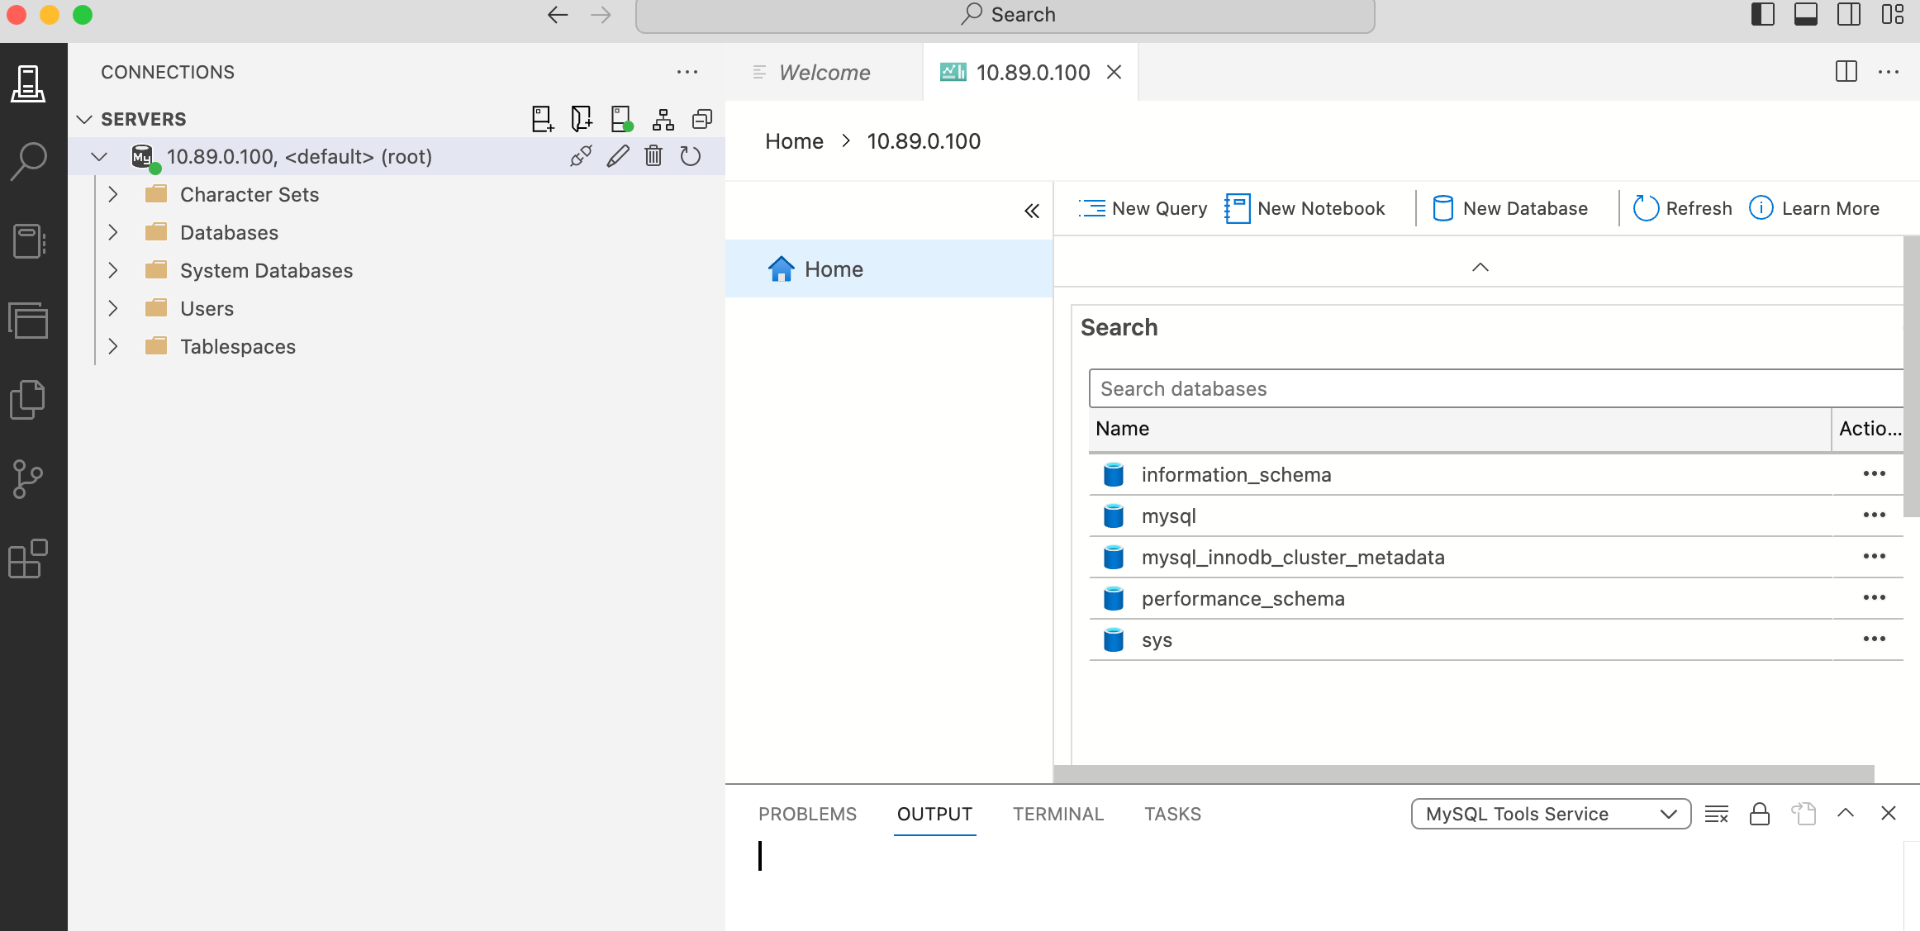
That’s great 😀 ! We now have an external address, and I can access it from outside using tools like Azure Data Studio, DBeaver, or others, especially through an application external to the Kubernetes cluster.
Your MySQL InnoDB cluster is operational. You can now deploy an application either outside the Kubernetes cluster or within it. If you want to deploy a simple application, here is an example. We could also explore the MySQLBackup resource of the Operator,this will likely be covered in a future article.
In conclusion, deploying a MySQL InnoDB cluster using the MySQL Operator for Kubernetes significantly simplifies the process. We have outlined the various steps involved, highlighting the ease of use and efficiency gained through leveraging an Operator. However, it's important to acknowledge that our Operator is not without its limitations – there are still some functionalities that need to be addressed for a more robust deployment experience. We are committed to continuously evolving the Operator, with the aim of enhancing its capabilities and addressing user feedback. Your input is invaluable as we work towards improving the deployment experience for everyone.


