Coforma Acme Tech Challenge
This is Coforma's response to the technical challenge for Phase 3 of RFQ 75FCMC21Q0013. Publicly deployed version with Github actions is available here http://coforma-acme-challenge-dev-lb-1419214536.us-east-1.elb.amazonaws.com/swagger-ui/index.html
Deployment instructions
The below instructions walk through how to deploy and test this project. The instructions assume that they are being ran on an EC2 instance running the latest amazonlinux 2 AMI, and that the instructions are being ran from within a copy / clone of this git repository on that instance.
We also assume that the amazonlinux2 instance running the below steps has an IAM Role attached to the instance, with a policy matching the policy provided in infracode/deploy-runner-policy.json
You can download a zip of this git repository to your machine and perform an scp command to place it in the instance. Alternatively you can install git in the instance and clone the repository directly.
All of the following scripts assume you are in the EC2 instance and at the root directory of the repository.
** Alternate Instructions **
- Copy the contents of scripts/00-install-clone.sh to a file on the ec2 instance
- Grant the created file the necessary permissions and run it with .
chmod 755 <script_name>
. <script_name>
Step 1: Install Necessary Tooling
The below instructions require specific tools (mostly terraform, docker, and the aws cli) already be installed on the box.
To ensure they are installed, please run as a one time action
./scripts/01-install-deps.shTo complete the docker cli setup, please log out and log back into the EC2 instance, navigating back to the root of the repo. This is due to a group change made by the docker install.
OR
sudo su $(whoami)Step 2: Bootstrap Terraform / AWS Environment
Additionally, some initial AWS environment bootstrapping is required to ensure that an appropriate ECR repository (for docker) and S3 bucket (for terraform) are available for the build and deploy code to use.
As a one-time action, please run
./scripts/02-bootstrap.shStep 3: Build and Deploy
The build and deployment infrastructure is designed to be able to deploy multiple copies within the same AWS account. To distinguish between copies, we use a notion of environments.
To build and deploy the solution with an environment of submission, please run
./scripts/03-deploy.sh --environment submissionAdditional environment copies can be deployed as desired by varying the value after the --environment option.
Note: This script takes a minute to run. Now is a good time for ☕
Step 4: Test and Verify
Allow about 5-10 minutes between finishing the Build and Deploy step and running the test script, more ☕. This time allows the service to warm up.
./scripts/04-test.sh --environment submissionchanging submission to the environment you wish to test
Step 5: Tear Down Environment
Note: Before doing this please check out API verification instructions you will need the aaplication URL from the previous step.
When down, each environment can be torn down by running the following,
./scripts/05-teardown-app.sh --environment submissionchanging submission to the environment you wish to tear down
Tear Down Bootstrap
When done with the entire solution, the terraform and ecr bootstrap can be torn down with
./scripts/99-teardown-bootstrap.shThis should only be ran after tearing down each environment per above.
When prompted and you are sure you want to remove the bootstrap code, enter yes.
API verification instructions
API verification happened in an automated fashion as part of Step 4.
For usage information please see user.md
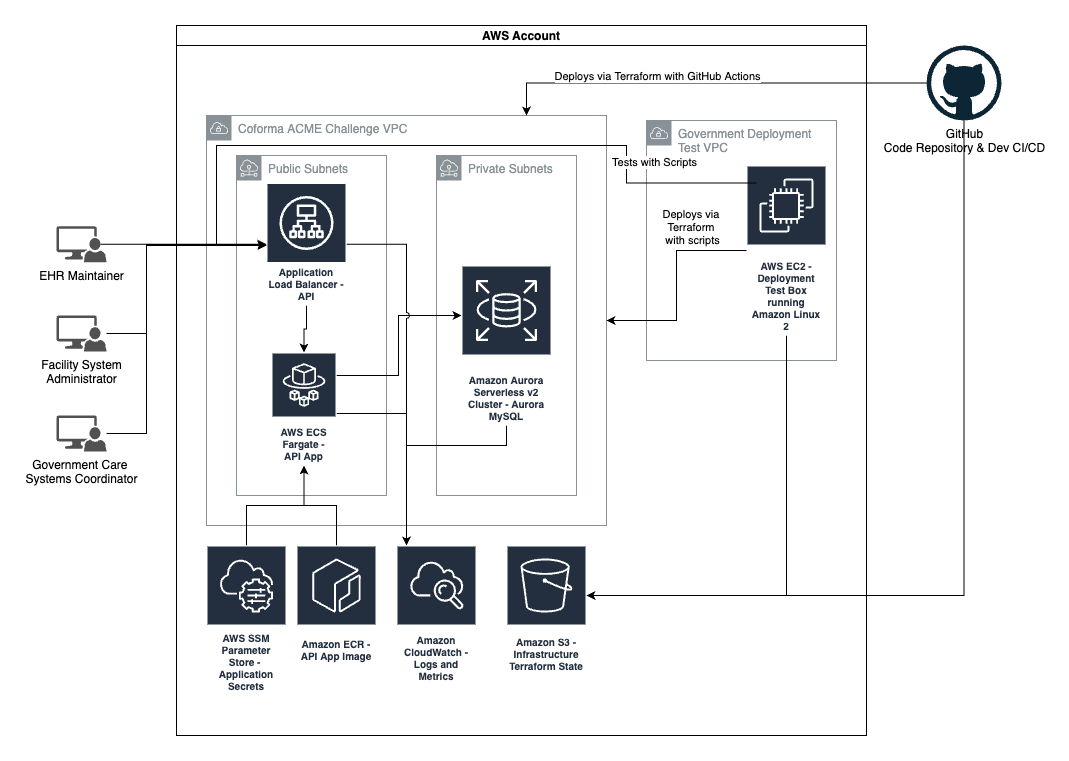
Architecture Diagram
Local Project Setup
Instructions assume user is running community edition of intelliJ
- Create local MySql server or stand one up in AWS. Will need connection string, user name, and password
- clone repo
- In intellij set values in acme/src/main/resources/application.properties for database information
- In same file create a JWT secret -- can be any string
- From the maven window run clean
- From the maven window run install
- Create a run configuration for Java 15 to run com.acme.AcmeApplication see run profile
- Run the project -- this will create schema and seed database
