This repo is a fork of Niklas Fauths Hoverboard Hack Firmware for some of the newer mainboards with the AT32F403RCT6 controller. In order to keep the code mostly compatible the HAL libraries were adapted to fit the AT32 naming scheme and registers. This is possible as the AT32F403 is a mostly compatible device to the STM32F103 used on older and other Hoverboard mainboards.
The code was compiled with GNU arm-none-eabi-gcc 5.4.1 under windows and should be compilable with other version of the arm-gcc.
The makefile supports both controllers, STM32 and AT32. The controller is selected by an additional command to the makefile
make AT32
or
make STM32
it defaults to AT32. The makefile creates a file in the build directory to detect plattform change and to clean up all the necessary files.
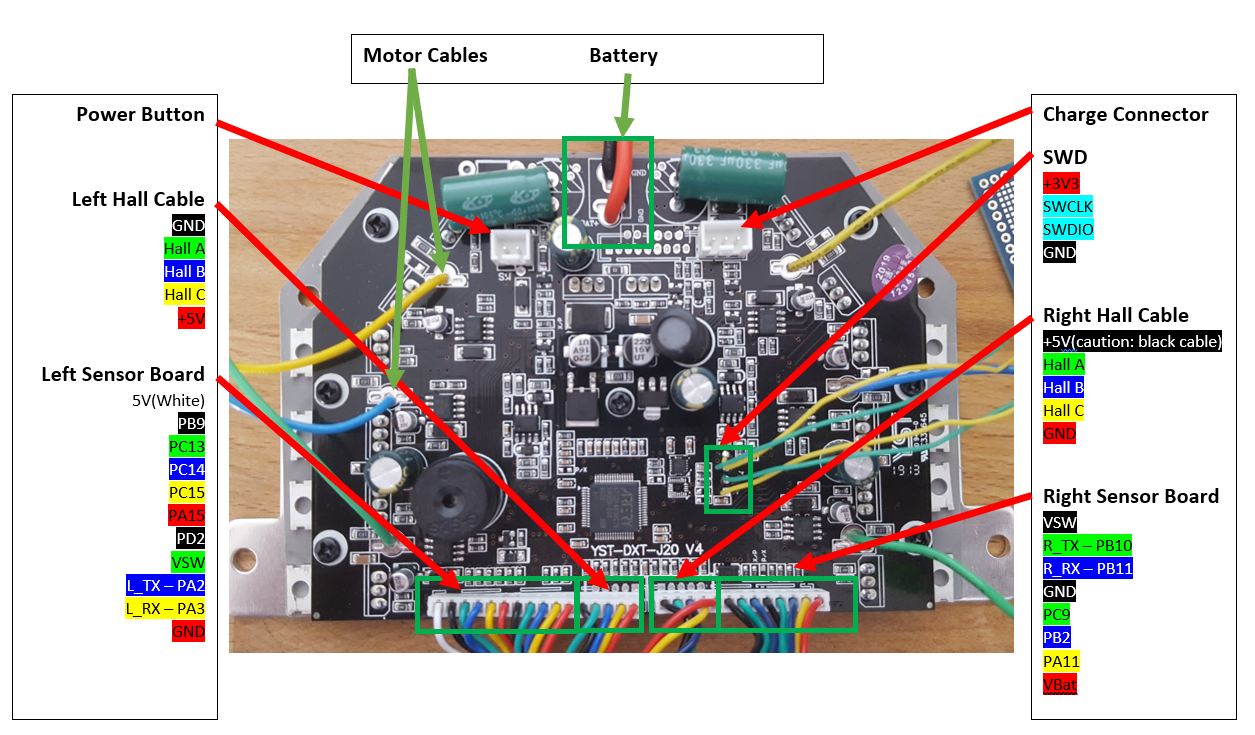
The main difference of the AT32 board is the use of dedicated gate drivers (IR2108 clones) and featuring less capacitors. Also there is no current sense resistor for each motor anymore but some overcurrent trigger on one GPIO pin. Lastly the connectors are a bit different from other versions of the hoverboard controllers.
These boards see a lot of small changes over the years to make them cheaper or to implement certain functions. Your board might not be quite the same as the board shown here.
The reverse-engineered schematics of the mainboard can be found here: http://vocke.tv/lib/exe/fetch.php?media=20150722_hoverboard_sch.pdf
To build the firmware, just type "make". Make sure you have specified your gcc-arm-none-eabi binary location in the Makefile ("PREFIX = ...") (version 7 works, there is a version that does not!) (if the ons in linux repos do not work, use the official version: https://developer.arm.com/open-source/gnu-toolchain/gnu-rm/downloads). Right to the STM32, there is a debugging header with GND, 3V3, SWDIO and SWCLK. Connect GND, SWDIO and SWCLK to your SWD programmer, like the ST-Link found on many STM devboards.
Do not power the mainboard from the 3.3V of your programmer! This has already killed multiple mainboards.
Make sure you hold the powerbutton or connect a jumper to the power button pins while flashing the firmware, as the STM might release the power latch and switches itself off during flashing. Battery > 36V have to be connected while flashing.
I flashed my AT32 with a Segger J-Link mini using the SWD connector.
As there is no direct flash access via SWD a flash loader has to be used. The appropriate flashloader was taken from the Keil uVision support package and is in a CMSIS Pack format. Using Segger OpenLoader feature one can add his own support for the AT32F403.
For this add following code to your <Segger Installation Dir>\JLinkDevices.xml
<Device>
	<ChipInfo Vendor="Artery" Name="AT32F403RCT6" WorkRAMAddr="0x20000000" WorkRAMSize="0x38000" Core="JLINK_CORE_CORTEX_M4" />
	<FlashBankInfo Name="Internal Flash Bank 1" BaseAddr="0x08000000" MaxSize="0x80000" Loader="Devices/AT32F403_1024.FLM" LoaderType="FLASH_ALGO_TYPE_OPEN" />
</Device>
and copy the "AT32F403_1024.FLM" from the folder flash to <Segger Installation Dir>\Devices
Flashing with ST-Link needs some patching of OpenOCD to detect the processor as described here bipropellant/bipropellant-hoverboard-firmware#67 (comment)
After that it should be possible to flash with the flash comand for STM32: To flash the STM32, use the ST-Flash utility (https://github.com/texane/stlink).
If you never flashed your mainboard before, the STM is probably locked. To unlock the flash, use the following OpenOCD command:
openocd -f interface/stlink-v2.cfg -f target/stm32f1x.cfg -c init -c "reset halt" -c "stm32f1x unlock 0"
If that does not work:
openocd -f interface/stlink-v2.cfg -f target/stm32f1x.cfg -c init -c "reset halt" -c "mww 0x40022004 0x45670123" -c "mww 0x40022004 0xCDEF89AB" -c "mww 0x40022008 0x45670123" -c "mww 0x40022008 0xCDEF89AB" -c "mww 0x40022010 0x220" -c "mww 0x40022010 0x260" -c "sleep 100" -c "mww 0x40022010 0x230" -c "mwh 0x1ffff800 0x5AA5" -c "sleep 1000" -c "mww 0x40022010 0x2220" -c "sleep 100" -c "mdw 0x40022010" -c "mdw 0x4002201c" -c "mdw 0x1ffff800" -c targets -c "halt" -c "stm32f1x unlock 0"
openocd -f interface/stlink-v2.cfg -f target/stm32f1x.cfg -c init -c "reset halt" -c "mww 0x40022004 0x45670123" -c "mww 0x40022004 0xCDEF89AB" -c "mww 0x40022008 0x45670123" -c "mww 0x40022008 0xCDEF89AB" -c targets -c "halt" -c "stm32f1x unlock 0"
Or use the Windows ST-Link utility.
Then you can simply flash the firmware:
st-flash --reset write build/hover.bin 0x8000000
First, check that power is connected and voltage is >36V while flashing. If the board draws more than 100mA in idle, it's probably broken.
If the motors do something, but don't rotate smooth and quietly, try to use an alternative phase mapping. Usually, color-correct mapping (blue to blue, green to green, yellow to yellow) works fine. However, some hoverboards have a different layout then others, and this might be the reason your motor isn't spinning.
Nunchuck not working: Use the right one of the 2 types of nunchucks. Use i2c pullups.
Nunchuck or PPM working bad: The i2c bus and PPM signal are very sensitive to emv distortions of the motor controller. They get stronger the faster you are. Keep cables short, use shielded cable, use ferrits, stabilize voltage in nunchuck or reviever, add i2c pullups. To many errors leads to very high accelerations which triggers the protection board within the battery to shut everything down.
Most robust way for input is to use the ADC and potis. It works well even on 1m unshielded cable. Solder ~100k Ohm resistors between ADC-inputs and gnd directly on the mainboard. Use potis as pullups to 3.3V.
Have a look at the config.h in the Inc directory. That's where you configure to firmware to match your project. Currently supported: Wii Nunchuck, analog potentiometer and PPM-Sum signal from a RC remote. A good example of control via UART, eg. from an Arduino or raspberryPi, can be found here: https://github.com/p-h-a-i-l/hoverboard-firmware-hack
If you need additional features like a boost button, have a look at the while(1) loop in the main.c
- breakout/interconnect boards Breakout/Interconnection boards for hoverboard hacking.
- bobbycar-optimized firmware based on this one with driving modes, acceleration ramps and some other features
- wheel chair controlled with a joystick or using a CC2650 sensortag to control it over bluetooth with pitch/roll.
- TranspOtterNG TranspOtter is an open source semi self driving transportation platform based on hoverboard hardware
- BiPropellant - fork which focusses on reliable machine control, but also retains HoverBoard functionality if desired.