React Workshop by Kintone - Version 3
Thank you for attending our Kintone x React workshop!
- Get Started
- Overview of the Repo
- Kintone Web Database & Credentials
- Expected Results
- Want the Slide Deck?
- Guide on Installing Node.js & npm
- Debugging - Let's Fix Those Problems!
First, let's download the ahandsel/React_Workshop_by_Kintone Repo and go inside the folder.
cd Downloads

git clone https://github.com/ahandsel/React_Workshop_by_Kintone

cd React_Workshop_by_Kintone
ls
README.md Slides.pdf backend frontendInside there should be two folders (frontend & backend) and a README file & Slides PDF.
Open the React_Workshop_by_Kintone folder in VS Code
code .Let's open a terminal per folder.
Then inside the folders, download the required packages with npm install.
| Terminal 1 - Frontend | Terminal 2 - Backend | |
|---|---|---|
| Go inside the folder | cd ~/Downloads/React_Workshop_by_Kintone/frontend |
cd ~/Downloads/React_Workshop_by_Kintone/backend |
| What is inside? | Code for the React App | Code for the Express server |
| Install packages | npm install |
npm install |
| To run the scripts | npm start |
npm start |
⚡ React requires Node ≥ 10.16 & npm ≥ 5.6 ⚡
- Check the versions inside the
React_Workshop_by_Kintonefolder:node –vnpm –v
- Not the correct versions or Confused? 🤔 → Check out the Guide on Installing Node.js & npm Section
⚡ Note: Please ignore the package deprecation warnings ⚡
🔎 The npm install command installs the required dependencies defined in the package.json files (in both the frontend & backend folders) and generates a node_modules folder with the installed modules.
| File | Path | Purpose | Need to Modify? |
|---|---|---|---|
| index.js | frontend/src/index.js |
Renders React code & passes it to index.html; ReactDOM.render(...); |
Nope |
| index.html | frontend/public/index.html |
Homepage of the React App; <div id="root"></div> |
Nope |
| App.js | frontend/src/App.js |
Parent component - Combines the list & form components | Yes! - Append POST |
| getRecords.js | frontend/src/requests/getRecords.js |
Fetches Kintone records, transforms response, & returns array of list items | Nope |
| ListRecords.js | frontend/src/components/ListRecords.js |
List component - Creates a list from the list items array | Nope |
| .env | backend/.env |
Holds your Kintone credentials | Yes! - Create |
| server.js | backend/server.js |
Sets up the Express server routes API requests from the frontend to Kintone | Yes! - Append POST |
| postRecord.js | frontend/src/requests/postRecord.js |
Passes the POST API request from React to Express server | Yes! - Code it |
| InputForm.js | frontend/src/components/InputForm.js |
Form component - Create a form that submits a POST request | Yes! - Code it |
Built for teamwork, designed by you
- bit.ly/KDP_signup
- ⚠ Do NOT use Safari
- ⚡ Accept Cookies First
- ✅ Use Chrome & Firefox
- bit.ly/K_DevLic
- ⚡ Only use lowercase, numbers, & hyphens in your subdomain
- ⚠ Do not use uppercase nor special characters
Let's create a Kintone App to list off your favorite mangas!
Here are the required fields & their configurations for our workshop:
| Field Type | Field Name | Field Code | Note |
|---|---|---|---|
| Text | Title | title |
The manga's title |
| Text | Author | author |
The manga's author |
| Record number | Record number | recordID |
Auto-generated ID for each entry |

To generate an API Token for a Kintone App:
- Go to the Kintone App
- Go to the Gear icon ⚙️ (top right corner) > Open the App Settings page
- Click on the App Settings Tab > Click on API Token settings
- Click the
Generatebutton to generate a token - Click the
Savebutton (top left corner) to save the token setting - Finally, click the
Update Appbutton (top right corner) to implement the token setting change.
In the backend folder, create a .env file.
Follow the template below and input your Kintone credentials.
SUBDOMAIN = ""
APPID = ""
APITOKEN = ""
Here is an example .env file.
SUBDOMAIN = "devevents"
APPID = "1"
APITOKEN = "dXNlckBleGFLtcGxlmNvbTpzZWNyZXQe9q3IhtcG"Here are the expected results after running the npm start in both the terminals.
| Terminal 1 - Frontend | Terminal 2 - Backend | |
|---|---|---|
| View Results | localhost:3000 | On the Terminal |
| Expected Results |  |
 |
| Terminal 1 - Frontend | Terminal 2 - Backend | |
|---|---|---|
| View Results | localhost:3000 | localhost:5000/getData |
| Expected Results | |
|
| Terminal 1 - Frontend | Terminal 2 - Backend | |
|---|---|---|
| View Results | localhost:3000 | n/a |
| Expected Results |  |
n/a |
Check it out at Slides.pdf
- macOS with nodenv
- Windows with nvm-windows
- 📺 YouTube Quick Videos Going Over the Node Install & Create-React-App
React requires Node ≥ 10.16 & npm ≥ 5.6
Go inside the React_Workshop_by_Kintone folder.
$ node -v
$ npm -v
If Node & npm are missing, let's install them!
Options:
macOS with nodenv
We recommend installing Node.js using nodenv to manage node versions. This allows your computer to have a specific Node.js version per project.
Having different Node.js installations can lead to conflict issues.
Step 1: Install nodenv with Homebrew
-
Update Homebrew:
brew update && brew upgrade -
Install nodenv:
brew install nodenv
Step 2: Set up nodenv shell integration
-
Run the initialization command:
nodenv init
-
Do as instructed by appending the following line into your shell's rc/profile file:
eval "$(nodenv init -)"
-
For Zsh users:
$ echo 'eval "$(nodenv init -)"' >> ~/.zshrc
$ cat < ~/.zshrc
-
For Bash users:
$ echo 'eval "$(nodenv init -)"' >> ~/.bash_profile
$ cat < ~/.bash_profile
-
Step 3: Implement the changes
Close & open a new Terminal window for the changes to take place.
Optional: Verify that nodenv is properly set up using nodenv-doctor script.
-
For those using Z shell (Zsh) shell:
curl -fsSL https://github.com/nodenv/nodenv-installer/raw/master/bin/nodenv-doctor | bash -
Expected result:
Checking for `nodenv' in PATH: /usr/local/bin/nodenv
Checking for nodenv shims in PATH: OK
Checking `nodenv install' support: /usr/local/bin/nodenv-install (node-build 3.0.22-4-g49c4cb9)
Counting installed Node versions: none
  There aren't any Node versions installed under `~/.nodenv/versions'.
  You can install Node versions like so: nodenv install 2.2.4
Auditing installed plugins: OK
Step 4: Install Node.js inside the React Workshop folder (React_Workshop_by_Kintone)
-
Now you're ready to install specific Node.js versions!
-
Inside
React_Workshop_by_Kintonefolder, install Node.js version14.5.0:$ cd React_Workshop_by_Kintone/ $ nodenv install 14.5.0 $ nodenv local 14.5.0
Alright! Your Mac is now armed with Node.js!
Download the required packages by going opening a terminal inside the frontend folder & backend folder & running the npm install command!
Windows with nvm-windows
The following steps are straight from the Microsoft Docs on Set up NodeJS on native Windows. We recommend installing and managing Node.js with nvm-windows
Having different Node.js installations can lead to conflict issues.
Step 1: Go to the windows-nvm's latest release.
Step 2: Download the nvm-setup.zip file for the most recent release.
Step 3: Once downloaded, open the zip file, then open the nvm-setup.exe file.
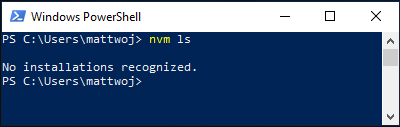
Step 4: The Setup-NVM-for-Windows installation wizard will walk you through the setup steps, including choosing the directory where both nvm-windows and Node.js will be installed.

Step 5: After the installation is complete, open PowerShell & enter nvm ls
nvm lslists out installed Node versions (should be none at this point)
Step 6: Install Node.js inside the React Workshop folder (React_Workshop_by_Kintone)
-
Now you're ready to install specific Node.js versions!
-
Inside
React_Workshop_by_Kintonefolder, install Node.js version14.5.0:$ cd .\Documents\React_Workshop_by_Kintone $ nvm install 14.5.0 $ nvm use 14.5.0
Alright! Your Windows is now armed with Node.js!
Download the required packages by going opening a terminal inside the frontend folder & backend folder & running the npm install command!


Here is a rundown of problems & solutions that may occur during our workshop
- Verify the Node.js & npm versions inside the
React_Workshop_by_Kintonefolder - Just installed Node.js? Verify you configured Node.js versions inside the
React_Workshop_by_Kintonefolder
- Mac:
nodenv local 14.5.0 - Windows:
nvm use 14.5.0
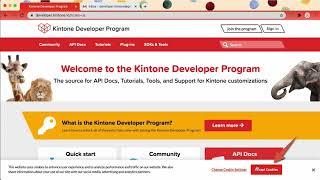
It might be a bit confusing since you need to sign-up for Developer Program Account (Website) 🌐 BEFORE creating your Kintone Subdomain (Database) 📂.
Check out our Sign up for Kintone Developer Program & Developer License YouTube video:
After making changes to server.js, be sure to restart the Express server On the Terminal 2 - backend!
- Stop the server:
ctrl + c - Start the server:
npm start
Then reload the browser showing the React App: localhost:3000
Do you see an error on .../React_Workshop_by_Kintone/backend/node_modules/node-fetch/lib/index.js:272 like the following?
return Body.Promise.reject(new FetchError(`invalid json response body at ${_this2.url} reason: ${err.message}`, 'invalid-json'));
                           ^
FetchError: invalid json response body at https://r.kintone.com/notfound/subdomain.html reason: Unexpected token < in JSON at position 0
    at /Users/g001494/Downloads/React_Workshop_by_Kintone/backend/node_modules/node-fetch/lib/index.js:272:32
    at processTicksAndRejections (node:internal/process/task_queues:96:5)
    at async /Users/g001494/Downloads/React_Workshop_by_Kintone/backend/server.js:43:24 {
  type: 'invalid-json'
}
This error is related to your Kintone credentials.
- Verify that you have created a
.envfile with your Kintone credentials inside thebackendfolder - Verify the Kintone credentials are correct: Subdomain, App ID, and API Token
- Verify that the Kintone App is configured as done in the Create a Kintone Web Database App section
- Verify that the Kintone Web Database App is updated after generating the Kintone API Token
Make sure you are inside the backend folder when starting the Express server.
cd ~/Downloads/React_Workshop_by_Kintone/backend

npm start(node:5379) UnhandledPromiseRejectionWarning: FetchError: request to https://.kintone.com/k/v1/records.json?app= failed, reason: getaddrinfo ENOTFOUND .kintone.com
- It looks like Kintone API credentials are missing
- Be sure to enter your Subdomain, App ID, and API Token in the
.envfile - Confused? 🤔 → Check out the 🔐 Securely input your credentials in a
.envfile section
- Enter the App's API Token in
.envfile asAPITOKEN = "" - Be sure to hit the
savebutton & theUpdate Appbutton to implement the API Token change.