This repository documents the process of setting up a secure VPN using WireGuard on a Vultr cloud instance. It is part of my cybersecurity portfolio and provides detailed instructions, scripts, and configuration samples for deploying a fully functional VPN.
- Overview
- Project Structure
- Requirements
- Installation & Setup
- Testing & Verification
- Screenshots
- Troubleshooting
- License
- Acknowledgments
This project demonstrates the deployment of a self-hosted VPN using WireGuard on a Vultr cloud instance. It showcases automated deployment, firewall security, and full traffic encryption for privacy and secure remote access.
✅ Automated Deployment: Bash script automates installation and configuration.
✅ Full-Tunnel Routing: All internet traffic is routed through the VPN.
✅ Cloud-Based VPN: Hosted on Vultr Debian 12 with key-based authentication.
✅ Firewall & NAT Rules: Configured iptables for NAT masquerading and security.
✅ Auto-Start on Boot: WireGuard is configured to start automatically.
✅ Cross-Platform Support: Mac, Linux, iOS, and Android supported.
✅ Testing & Debugging Steps: Connectivity and security verification included.
vpn-wireguard-vultr/
├── README.md
├── docs/
│ ├── outline.md # Detailed project roadmap and step-by-step instructions.
│ └── usage.md # Deployment and usage guide for the VPN.
├── scripts/
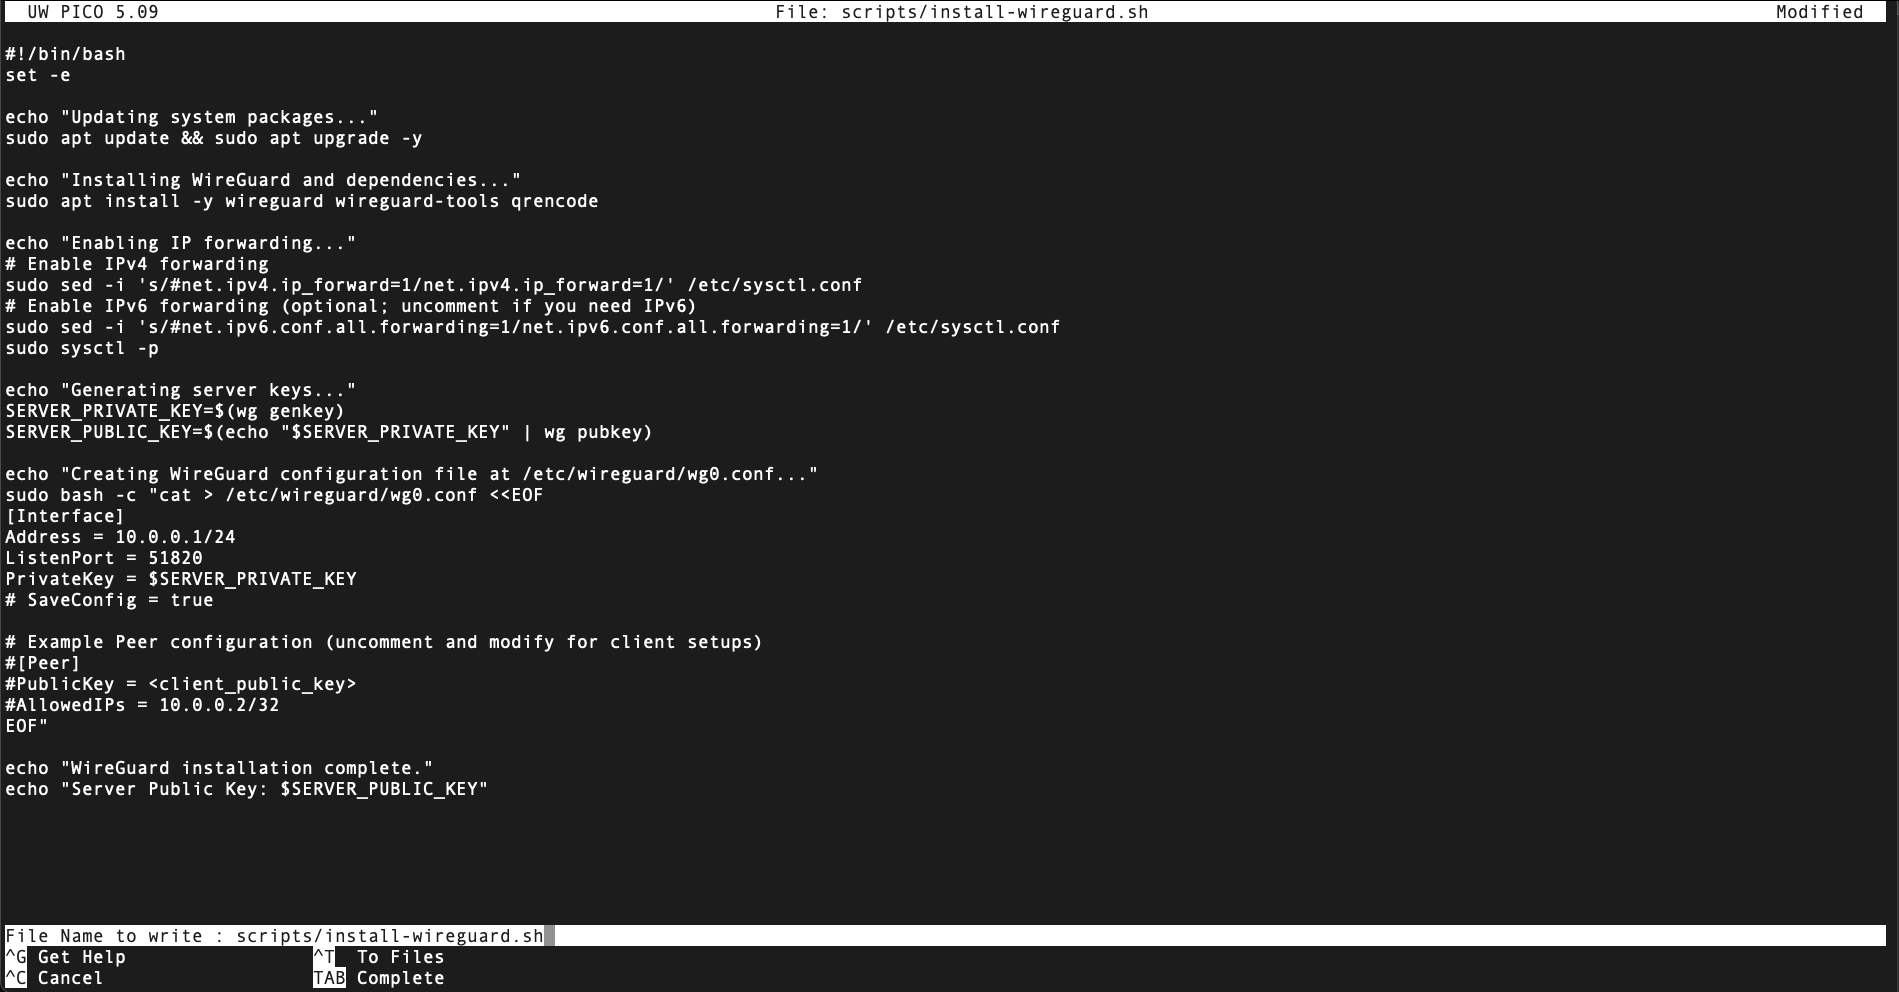
│ └── install-wireguard.sh # Script to install and configure WireGuard on the server.
├── config/
│ ├── wg0.conf.sample # Sample server configuration file.
│ └── wg0-client.conf.sample # Sample client configuration file.
└── screenshots/
├── Various setup and testing screenshots.
- Vultr Account with a Debian-based instance (Debian 12 recommended).
- SSH Access and sudo privileges on the server.
- Basic Networking & Linux CLI Knowledge.
- WireGuard Client installed on macOS, Linux, or mobile.
- Provision the Vultr Instance:
- Deploy a Debian 12 instance.
- Minimum specs: 1 vCPU, 1 GB RAM, 25 GB SSD.
- Add an SSH key for secure authentication.


- Connect to the Server via SSH:
ssh root@<server-ip>

- Update & Upgrade System Packages:
sudo apt update && sudo apt upgrade -y

- Install Required Networking Tools:
sudo apt install curl net-tools traceroute -y

-
Clone the Repository:
git clone https://github.com/chetflowers/vpn-wireguard-vltr.git cd vpn-wireguard-vultr/scripts -
Run the WireGuard Installation Script:
./install-wireguard.sh
-
Script Actions:
- Installs WireGuard and dependencies.
- Enables IP forwarding.
- Generates server public/private keys.
- Creates and applies
/etc/wireguard/wg0.conf. - Starts and enables WireGuard to launch on boot:
sudo systemctl enable wg-quick@wg0
sudo systemctl start wg-quick@wg0

-
Enable IP Forwarding:
echo "net.ipv4.ip_forward=1" | sudo tee -a /etc/sysctl.conf
sudo sysctl -p
-
Configure NAT Masquerading for Internet Access:
sudo iptables -t nat -A POSTROUTING -o enp1s0 -j MASQUERADE

-
Generate Client Keys:
wg genkey | tee client_private.key | wg pubkey > client_public.key
-
Configure the WireGuard Client (
wg0-client.conf):[Interface] PrivateKey = <your client private key> Address = 10.0.0.2/32 DNS = 8.8.8.8 [Peer] PublicKey = <server public key> Endpoint = <server-ip>:51820 AllowedIPs = 0.0.0.0/0, ::/0 PersistentKeepalive = 25

- Restart WireGuard on the Client:
wg-quick down wg0
wg-quick up wg0
-
Ping Test:
ping 8.8.8.8
-
Traceroute Test:
traceroute 8.8.8.8
-
Public IP Verification:
curl https://api.ipify.org

Below are relevant screenshots capturing various stages of the VPN setup process:
- Provisioning Vultr Instance
- Installing & Configuring WireGuard
- Firewall & NAT Configuration
- Client Connectivity & Testing
(Screenshots included in screenshots/ folder)
-
WireGuard Not Starting on Boot?
sudo systemctl enable wg-quick@wg0 sudo systemctl restart wg-quick@wg0 -
No Internet Access from VPN Client?
sudo iptables -t nat -A POSTROUTING -o enp1s0 -j MASQUERADE
-
Verify Server Configuration:
wg show
-
Check Server Logs for Errors:
sudo journalctl -u wg-quick@wg0 --no-pager | tail -20
This project is licensed under the MIT License.