Lovelace Lightalarm Card
This card provides a frontend for entities being used to control a light alarm. It does not implement any lightalarm logic! For more information on how I implemented the logic skip to Lightalarm Logic
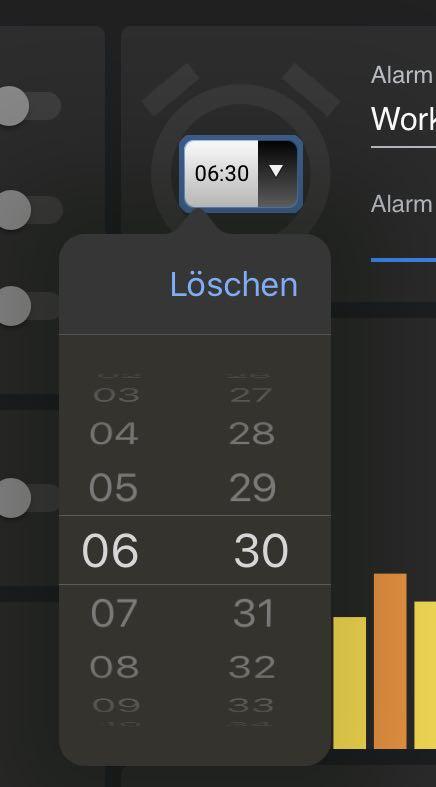
If you have an iOS Device and would like to use the builtin time picker, have a look at Force Native Timepicker.
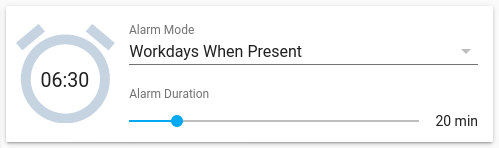

It displays three entities: an input_datetime as the time, an input_select as the alarm mode and an input_number as the fade duration the alarm should take.
Installation
HACS
- Install the Home Assistant Community Store if you do not have it already.
- Go to the Community Store.
- Click on the Plugins tab.
- Search for Lightalarm Card and install it.
- HACS will ask you to add it to your lovelace, click on yes.
Manual Installation
- Download and copy the
dist/lightalarm-card.jsfile into yourconfig/wwwdirectory. - Add a reference to
lightalarm-card.jsinside your ui-lovelace.yaml or at the top of the raw config editor UI:
resources:
  - url: /local/lightalarm-card.js
    type: module
Options
| Name | Type | Requirement | Description |
|---|---|---|---|
| type | string | Required | custom:lightalarm-card |
| name | string | Optional | Card title |
| time_entity | string | Required | input_datetime entity to select alarm time |
| override_time_entity | string | optional | sensor entity to override the alarm time |
| mode_entity | string | Required | input_select entity to select alarm mode |
| duration_entity | string | Required | input_number entity to set fade duration |
Force Native Timepicker
In the visual editor of the lovalace card, you have an additional option to Force use of the native time picker. By default when tapping the alarm time, the card tries to open the native timepicker popup, and but also falls back to two input fields, for browsers, who don't have a popup time picker interface. This works very well on Android devices, however on iOS devices, the focus is overwritten by the fallback input fields, hiding the time picker right away. If you are certain, that your browser offers a better timepicker, you can switch this switch on, to enforce using the browser native time picker. This setting will be saved in the local storage (similar to cookies), so it can be a different value per separate browser instance.
Lightalarm Logic
If you do not have your custom lightalarm logic, here is how I implemented mine. Your lamp will need to support the transition property for this to work.
Fist you'll need to add four new entities into your configuration.yaml:
(If you set an initial for the inputs, it will be set to this value on every Home Assistant restart!)
input_datetime:
  lightalarm_time:
    name: Alarm Time
    has_date: false
    has_time: true

input_number:
  lightalarm_duration:
    name: Alarm Duration
    unit_of_measurement: min
    min: 0
    max: 60
    step: 1

input_select:
  lightalarm_mode:
    name: Alarm Mode
    icon: mdi:alarm-plus
    options:
      - 'Off'
      - 'Workdays When Present'
      - 'Once Only'
      - 'Every Day'
      - 'When Present'

sensor:
  - platform: template
    sensors:
      lightalarm_time_start:
        value_template: >-
          {{ (strptime(states("input_datetime.lightalarm_time"), "%H:%M:%S") - timedelta(minutes=(states("input_number.lightalarm_duration") | int) )).strftime("%H:%M") }}
Then with these entities we can create a new automation which triggers, when all conditions are met.
But for the following automation to work, you will have to verify, that a sensor.time is present, and if it isn't, add tis to your sensor: or your sensors.yaml:
- platform: time_date
  display_options:
    - 'time'
I would also recommend excluding the time from recorder, so it doesn't spam your history. Check out the recorder integration page for more information.
Add the following automation through the user interface by going to Configuration > Automations > Add Automation (and switch to YAML mode in the upper right three dots):
alias: Lightalarm
description: ''
trigger:
  - platform: template
    value_template: "{{ states('sensor.time') == states('sensor.lightalarm_time_start') }}"
condition:
  - condition: or
    conditions:
      - condition: state
        entity_id: input_select.lightalarm_mode
        state: Every Day
      - condition: and
        conditions:
          - condition: state
            entity_id: input_select.lightalarm_mode
            state: When Present
          - condition: state
            entity_id: person.chaptergy
            state: home
      - condition: state
        entity_id: input_select.lightalarm_mode
        state: Once Only
      - condition: and
        conditions:
          - condition: state
            entity_id: input_select.lightalarm_mode
            state: Workdays When Present
          - condition: time
            weekday:
              - mon
              - tue
              - wed
              - thu
              - fri
          - condition: state
            entity_id: person.chaptergy
            state: home
action:
  - data_template:
      duration: "{{ states('input_number.lightalarm_duration') }}"
    service: script.trigger_lightalarm
mode: single
If you want to get even fancier, you could replace the {{ now().weekday() < 5 }} condition with a workday sensor to not trigger the automation on holidays.
When the condition succeeds, we run a script script.trigger_lightalarm which we'll also need to create now. So switch to the Scripts tab and add the following YAML:
alias: Trigger the lightalarm
fields:
  duration:
    description: Number of minutes for the light alarm transition period
    example: 20
sequence:
  - service: light.turn_on
    data_template:
      entity_id: light.bedside_lamp
      rgb_color:
        - 255
        - 91
        - 36
      brightness: 255
      transition: '{{ duration | float | multiply(60) }}'
  - event: lightalarm_triggered
  - condition: state
    entity_id: input_select.lightalarm_mode
    state: Once Only
  - service: input_select.select_option
    data:
      option: 'Off'
    entity_id: input_select.lightalarm_mode
mode: single
This script then switches on the lap to full brightness, while the transition property will make it fade in slowly. The duration is converted from minutes to seconds, because the transition expects the number of seconds it should take to transition.
Then a custom event lightalarm_triggered is fired, so we could create more automations listening for this event, like the bathroom heater switching on. You can remove this line if you do not plan on triggering anything else.
Now the last thing to check is if the mode was set to Once Only and if it was, set it to Off. A condition in a script exits the script if the condition fails, and the following things are only executed if it succeeds.
As a final touch you can also set your phones alarm time to override the manual alarm time. You can create a sensor which has the automatic alarm time, which is either your phones next alarm if available, otherwise the manual alarm time.
template:
  - trigger:
    - platform: time_pattern
      minutes: 0
    - platform: state
      entity_id:
        - sensor.app_next_alarm
        - input_datetime.lightalarm_time
    - platform: homeassistant
      event: start
    sensor:
      - name: Automatic Lightalarm Time
        unique_id: "automatic_lightalarm_time"
        state: >-
          {% set nextAlarm = states("sensor.app_next_alarm") | as_datetime %}
          {% if nextAlarm != None and nextAlarm - now() < timedelta(hours=16) %}
          {{ (nextAlarm | as_local).strftime("%H:%M:%S") }}
          {% else %}
          {{ states("input_datetime.lightalarm_time") }}
          {% endif %}
You can use this entity as the override entity in your card, and make sure to update the other template sensor (lightalarm_time_start) to use this value instead of the manual value.