LoRa-APRS firmware for Lilygo T-Echo
This is a custom firmware for the T-Echo devices made by Lilygo.
With this firmware the T-Echo becomes a LoRa-APRS tracker. The LoRa transmissions are compatible with the popular LoRa-APRS-iGate firmware for some ESP32-based devices usually used as iGates.
One particular focus of this firmware is to use the low-power capabilites of the T-Echo. With the standard 800 mAh battery, it achieves more than 10 hours of active tracking, multiple days of lora reception and 1 to 4 months of standby (reachable via BLE; standby time depends on hardware configuration).
Please note: if you have questions regarding the usage of this firmware, check the FAQ section below before opening an issue.
Features
- Ultra low power usage:
- At any point, only the necessary modules are powered.
- nRF52840 is in deep sleep most of the time.
- Achieves down to 100 μA standby current with full BLE connectivity (depending on hardware assembly variant).
- Tracker/transmitter:
- Smart beacon: transmissions depend on movement.
- Configurable TX power up to +22 dBm.
- Receiver:
- Tries to decode received packets and
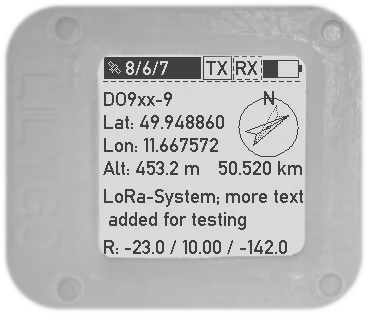
- Displays remote station call sign, location, distance and direction on success.
- Undecodable packets are displayed as raw text.
- E-Paper display:
- Support for partial refresh (no flickering; 0.3 s refresh time).
- Force full refresh (with flickering) every 1 hour to remove artifacts and prevent burn-in.
- GNSS warmup mode:
- Keeps the GNSS module powered without transmitting LoRa packets.
- Can be used to achieve a good position fix before enabling the transmitter (which might interefere with the GNSS receiver).
- Bluetooth Low Energy:
- Configure source call sign, APRS symbol, and comment.
- Notification support for received APRS messages.
- Secured by BLE 4.0 passkey pairing.
APRS protocol support
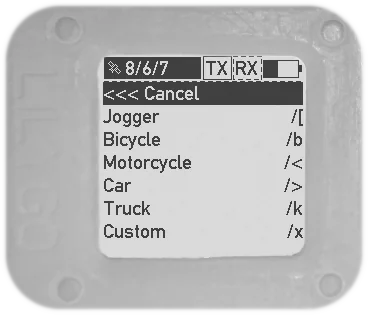
- Configurable symbol (through on-screen menu and BLE)
- Human-readable (standard) format support:
!DAO!for improved latitude/longitude precision (see APRS 1.2 specification)- altitude
- Compressed format support (see APRS 1.0 specification)
- Encodes latitude, longitude, altitude and symbol in only 13 characters
- Everything above can be transmitted and received/decoded!
Screenshots
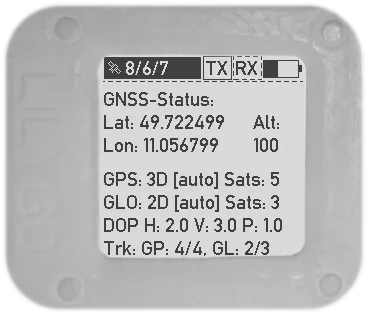
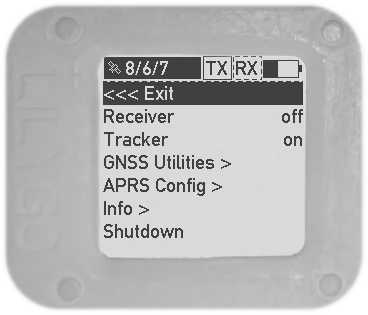
Here are some screenshots of version 0.8+ from the display simulator I use to develop the display layout. The data shown is obviously fake, but the screen layout on the device is identical.
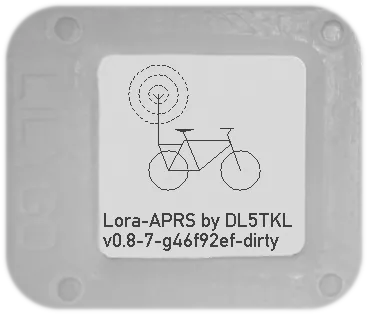
The startup screen:
GNSS and tracker status:
Screen shown when a packet is successfully received and decoded. It shows the course and distance to the other station:
Impressions from the menu system:
Disclaimer
I provide this firmware in the hope that it will be useful. However I can not guarantee that it will work on your device.
It may even break your device if you have a different hardware version with a different pin assignment or power distribution network or other LoRa/GNSS/display modules. You are using this on your own risk.
Before you try this firmware, make sure that the pinout in config/pinout.h
matches your device!
Hardware support
This firmware should support T-Echos with the following components:
- BLE SoC nRF52840
- ePaper display GDEH0154D67 with controller SSD1681
- GNSS module L76K (other NMEA-via-UART capable modules should also work)
- LoRa transceiver SX1262
Usage
The device is operated using the two free buttons: the touch button on the top of the device and the push button on the bottom left. The top left button is the hardware reset button for the SoC.
In any state, the touch button enables the display backlight for three seconds and refreshes the display.
In normal state (the state entered after firmware boot), a short press on the lower-left push button switches to the next display state (i.e. tracker state, GNSS state, received and decoded messages). A long press on this button opens the menu.
The menu is operated as follows:
- Use the touch button to cycle through the menu items. The selected item is displayed in inverted colors (black background and white text).
- A short press on the lower-left push button activates the selected item.
Changes are applied immediately. Activations means:
- on/off-type items are toggled
- Submenus are entered (for items with
>) or left (items starting with<<<) - Selected values are applied (for example in the symbol selection submenu)
Building the firmware
Please note: pre-built binaries are also available and strongly recommended. Skip this section if you are using those.
To compile the firmware you need to set up the toolchain for Nordic
Semiconductor’s nRF5 SDK. See the SDK
documentation
for setup instructions. Only compilation via GCC is supported. If you can build
any example from the SDK (located in nrf5-sdk/examples/) you should be good
to go.
To compile the firmware, simply run
makeThis will give you firmware binaries (ELF and HEX files) that you can use to
directly flash a device via SWD and debug the firmware. All outputs are stored
in a new directory called _build.
To generate UF2 files that can be used with the preinstalled bootloader the following commands are available.
make uf2_sdThis generates a complete installation image
(_build/nrf52840_xxaa_with_sd.uf2) that can be used to flash devices
currently running a different firmware.
Alternatively, you can create a simple update image with
make uf2The resulting image (_build/nrf52840_xxaa.uf2) can only be used to upgrade
devices that run different versions of this LoRa-APRS firmware. However, it is
much smaller and therefore faster to download and flash.
Just for the sake of completeness: The pre-built binaries are generated with an
additional make target that copies the UF2 images above to new names
including the version number (like t-echo-lora-aprs-v0.6.uf2). Run it as
follows:
make releaseFlashing the firmware
This firmware is compatible with the T-Echo’s preinstalled bootloader, so you can simply install it like an regular firmware update (tested with the Meshtastic version, not sure about the SoftRF version).
Short reminder: to invoke the bootloader, double-press the reset button and
connect the T-Echo to your PC via USB-C. It should appear as a mass-storage
device called TECHOBOOT.
Initial installation
Back up your current firmware before installing this firmware. To do so,
copy the CURRENT.UF2 from the T-Echo’s mass storage device TECHOBOOT to
your PC.
When you first install the LoRa-APRS firmware, you must also install the
correct SoftDevice (Bluetooth stack). Therefore, download the latest
t-echo-lora-aprs-with-sd-vX.Y.uf2 from the Releases
page (or use the one you
built yourself) which contains both the SoftDevice and the regular firmware
build. Copy t-echo-lora-aprs-with-sd-vX.Y.uf2 to the TECHOBOOT. When the
copy operation is complete, the device should disconnect, reset, and boot the
LoRa-APRS firmware.
After initial installation, you have to configure your call sign to be able to transmit LoRa packets (see Configuring the firmware below).
Normal updates
If the SoftDevice is unchanged, only the firmware part needs to be updated. To
do so, download or build
t-echo-lora-aprs-vX.Y.uf2. Copy that file to TECHOBOOT and you are done.
Configuring the firmware
There are two ways to configure certain aspects of the firmware: via Bluetooth LE and via the on-screen menu.
Via the menu
The following aspects are configurable via the menu:
- Status of tracker, receiver and GNSS warmup
- APRS symbol (limited selection)
- Transmission power
Via Bluetooth LE
Via BLE you can set the following:
- Source call sign
- APRS symbol (free selection of symbol table and icon)
- APRS comment (free text)
The source call sign must be set to be able to transmit APRS packets.
All settings (characteristics in the Bluetooth jargon) of the LoRa-APRS
firmware are gathered in a custom APRS service with UUID
00000001-b493-bb5d-2a6a-4682945c9e00. The following characteristics are
available:
| UUID | Description | Encoding | Value length | Access | Example |
|---|---|---|---|---|---|
00000101-b493-bb5d-2a6a-4682945c9e00 |
APRS source call sign | Text | 0-16 characters | Read, write | DE0ABC-5 |
00000102-b493-bb5d-2a6a-4682945c9e00 |
APRS comment | Text | 0-64 characters | Read, write | T-Echo on tour |
00000103-b493-bb5d-2a6a-4682945c9e00 |
APRS symbol (Table + Icon selector) | Text | 2 characters | Read, write | /. (red X on the map) |
00000104-b493-bb5d-2a6a-4682945c9e00 |
Raw received message | Binary | 1-247 bytes | Read, notify | <\xff\x01DE0ABC-5>APZTK1:… |
Python-based client
A simple Python script based on the Bleak BLE library is available for configuring the device. It should work on any platform that Bleak works on, but I can only test it on Linux.
To use the script, first install the correct version of Bleak (consider using a Python Virtual Environment):
pip install -r tools/ble_client/requirements.txtThen, run the script:
cd tools/ble_client/
./techo_client.py
The script provides a simple menu system with indexed entries. To select an entry, just type the corresponding index when prompted to do so.
When started, the script will first scan for T-Echos and list all that were found. You pick one and the script connects to it. You can then select from various actions, including listing and changing the current settings.
Generic configuration options
If you cannot use the Python script described above, you can try a generic BLE exploration/debugging app like nRF Connect for Mobile to write the available BLE characteristics.
Frequently Asked Questions
How to I switch to another/the original firmware?
If you tried to flash another firmware, but it does not boot after you had my
firmware installed, please flash your backup of CURRENT.UF2 first. That
reliably resets the flash contents to whatever was delivered with your T-Echo
and should always restore it to a working state.
If you don’t have the backup file, well, that’s a problem. You can try using the one I created from one of my devices (see this comment, but I cannot guarantee anything.
I cannot connect via Bluetooth anymore. / The T-Echo refuses BLE connections.
Probably the BLE security keys are messed up. The T-Echo refuses any connection with a wrong or missing key. Try the following:
- Remove the T-Echo from your phone’s or computer’s Bluetooth device list. That removes the keys on that side. Then try to connect again.
- If it still does not work, clear the keys on the T-Echo as follows:
- Press the reset button once.
- When the startup screen starts flickering, press and hold the bottom button. Hold the bottom button until the menu screen appears.
- Release the bottom button. The keys should now be erased and you should be able to connect.
Please note that if you remove the keys from the T-Echo, any other device you used to connect before will no longer be able to connect. You have to remove the T-Echo connection from all other devices.
License
For license information, see COPYING.
