Node.js
Node.js is an open-source, cross-platform, back-end JavaScript runtime environment that runs on the V8 engine and executes JavaScript code outside a web browser.
Node.js is primarily used to create non-blocking, event-driven servers, due to its single-threaded nature. It's used for traditional web sites and back-end API services, but was designed with real-time, push-based architectures in mind.
Documentation about how to use and install Node.js can be found here.
Node Version Manager (nvm)
nvm is a version manager for Node.js. Instructions to download the latest version can be found in the nvm repository on GitHub here.
Once nvm is installed on the machine, execute nvm install node to download the latest version of Node.js. Specific versions of Node.js can also be downloaded by specifying the version number with the nvm install command. Example: nvm install 10.19.0.
To switch between using different versions of Node.js use the 'nvm use' command and specify the version. Example: nvm use 10.19.0
npm
npm is a package manager for Javascript. All npm packages can be found on the npm website here. npm is installed by default when Node.js is installed on the local machine.
The following are some of the most common npm commands:
-
To check the npm version
npm --version -
To install a package
npm i [-g] [-D] <packageName>. The '-D' flag is optional and used to specify if the package is a development dependency. -
To install the dependencies in a package.json file
npm i -
To view outdated packages
npm outdated [-g] -
To update a package
npm up [-g] <packageName> -
To uninstall a package
npm un [-g]<packageName> -
View globally installed packages
npm list -g -
Create the manifest file called package.json
npm init -y
The '-g' flag is optional and can be used to execute the command globally. If it is omitted, the command will be executed locally. This can be useful when working with multiple project on the machine.
Useful packages
Development:
- nodemon - automatically restarts the node application when file changes in the directory are detected.
npm i -D nodemon - dotenv - DotEnv is a lightweight npm package that automatically loads environment variables from a . env file into the process. env object.
npm i -D dotenv
Production:
- joi - validates any kind of data and ensures that it is in the required format. Full documentation can be found here.
npm -i joi
package.json file
The package. json file is the heart of any Node project. It records important metadata about a project which is required before publishing to NPM, and also defines functional attributes of a project that npm uses to install dependencies, run scripts, and identify the entry point to our package.
This is a sample package.json file:
{
  "name": "express",
  "version": "1.0.0",
  "description": "## Modules",
  "main": "app.js",
  "scripts": {
    "test": "echo \"Error: no test specified\" && exit 1"
  },
  "keywords": [],
  "author": "",
  "license": "ISC"
}
Scripts can be created inside the "scripts" property that can then be executed by using the npm run command. Example:
"scripts": {
    "start": "node app.js"
    "dev": "nodemon app.js"
},
If the npm run dev command is executed in the terminal, nodemon will start running the application.
Modules
There are two ways to import a Node.js built-in module into your app:
Option 1 - Import the export object and then execute a function using the dot notation:
// Import
const http = require('http')
// Execution
http.functionName()
or
Option 2 - Import the export object and use object destructuring to get the invidivual functions:
// Import
const {functionName} = require('http')
// Execution
functionName()
Create a module
- Create a new javascript file
- Insert your functions
- Export the functions from the javascript file by entering
module.exports = {functionName}at the bottom of the file - Import the module where it is needed and call it. Since this is a local module, put the path to the module inside the require method. Example:
const module = require('./module.js')
Simple Node.js server
A simple Node.js web server can be created with the http module as presented in the code snippet below.
const http = require('http')
const dotenv = require('dotenv').config()
const hostname = '127.0.0.1'
const port = 3000

const server = http.createServer((req, res) => {

  // Homepage
  if (req.url === '/'){
    res.statusCode = 200
    res.setHeader('Content-Type', 'text/html')
    res.end('<h1>Homepage</h1>')
    return
  }

  // About page
  if (req.url === '/about'){
    res.statusCode = 200
    res.setHeader('Content-Type', 'text/html')
    res.end('<h1>About Page</h1>')
    return
  }

  // Error page
  res.statusCode = 404
  res.setHeader('Content-Type', 'text/html')
  res.end('<h1>Page does not exist</h1>')
});

server.listen(port, hostname, () => {
  console.log(`Server running at http://${hostname}:${port}/`);
})
Once this code is executed, two pages will be created and the web server will start listening on port 3000 of the localhost. If the user visits the correct page, a message with the title of the page will be returned, else it will give an error.
Event loop
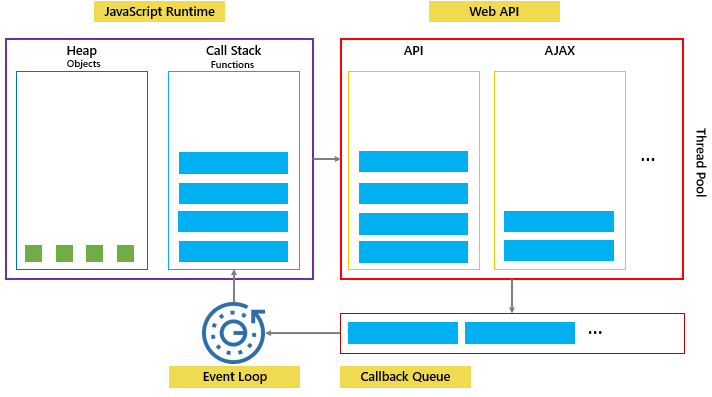
JavaScript is a single-threaded programming language; this means that JavaScript can only execute synchronously, one line of code at a time. The JavaScript engine executes a script from the top of the file and works its way down while pushing, and popping functions onto and off the call stack.
If a function takes a long time to execute, the web page will hang and all interaction with it will be blocked. These type of functions are called blocking functions and they block all interactions with the page, including mouse clicks.
To prevent web pages from hanging while blocking functions are executing, callback functions can be used. The blocking functions are passed into async functions as callback functions so that they are executed at a later time, thus allowing the rest of the code to continue executing.
An example of an async function is the setTimeout() function, this is a function provided by the Web API and any code in it is passed to the qeueu after a timeout period in the browser API.
Other events/functions that are asynchronous are DOM events, fetch requests, and ajax().
How it works
- Heap: A region of memory where objects and variables are allocated.
- Stack: When the program starts executing, functions are pushed and popped here. Any asynchronous function inside the call stack is pushed to the web API.
- Web API container: The async function is executed and then the blocking function inside it is forwarded to the queue.
- Callback Queue: Functions are pushed here to wait for execution after the call stack finishes executing the script. It is a FIFO (first in, first out) data structure.
- Event Loop: Runs continously to monitor both the call stack and the callback queue. If it notices that the call stack is empty, it pops async code from the queue and pushes it to the call stack.
Async Patterns
Callbacks work fine for simple cases, however, when the program has multiple callbacks, the code will start becoming complicated. This is because every callback adds a level of nesting, this problem is called "callback hell".
To solve this issue, Promises and Async/Await are used.
Promises
A promise can be defined as a proxy for a value that will eventually become available.
fileLoaded = true

let checkIfLoaded = new Promise((resolve, reject) => {
  if (fileLoaded) {
    resolve('Successfully loaded file')
  } else {
    reject('File not loaded yet')
  }
})

checkIfLoaded
  .then(message => console.log('This is the \'then\' message: ' + message))
  .catch(message => console.log('This is the \'catch\' message:' + message))
Once a promise has been called, it will start in a pending state and the calling function will continue to execute. When the promise ends, the data requested will be passed to the calling function.
Promises can either end in the resolved or the rejected state. If a promise resolves, the then method is called, if it is rejected, the catch method is called.
Promises are used widely in modern Javascript, some popular Web APIs that use promises are the Fetch API and Service Workers. In the example below, an API call to the Pokemon API was made using fetch.
fetch('https://pokeapi.co/api/v2/pokemon/ditto')
  // Handle the resolve, get the response and then convert it to json
  .then((res) => res.json())
  // The res.json() is now the data
  .then((data) => console.log(data))
  // Handle the reject
  .catch((err) => console.error(err))
A detailed explanation about promises can be found in the Node.js documentation here.
Async/Await
Promises did a good job at solving the "callback hell" problem, however, they introduced some complexity of their own. For this reason, async functions were built to reduce the complexity of promises.
Async functions were built on the concept of promises and use them behind the scenes. In fact, an async function returns a promise. It is also a best practice to put the code inside the async function in a try-catch block to catch the error.
const doSomethingAsync = () => {
  return new Promise(resolve => {
    setTimeout(() => resolve('I did something'), 3000)
  })
}

const doSomething = async () => {
  try {
      const something = await doSomethingAsync()
      console.log(something)
  } catch (error) {
      console.error(error)
  }
}

console.log('Before')
doSomething()
console.log('After')
The code snippet below has the same functionality as the Pokemon API code written in the promises section, however, this snippet uses async/await:
const fetchPokemon = async (id) => {
    try {
        const res = await fetch(`https://pokeapi.co/api/v2/pokemon/${id}`)
        const data = await res.json()
        console.log(data)
    } catch (err) {
        console.error(err)
    }
}
fetchPokemon()
Events Emitter
This is the process of listening for specific events and creating callback functions that execute once the event is triggered. These are used extensively by various builtin core modules in Node.js, such as the http module.
To create events, first import the events module into a constant called EventEmitter. This creates the EventEmitter class which can be used to create a custom emitter as an instance of it.
const EventEmitter = require('events')
const customEmitter = new EventEmitter()
There are many methods inside this object, two of the most commonly used are the on and emit methods.
The emitter.on(eventName, listener) method takes two arguments, a string which names the event and a callback function. This method adds the callback function to the end of an array that contains all callback functions passed to the event with that event name.
This means that multiple calls passing the same combination of eventName and listener will result in the listener being added multiple times. These listeners can then all be called using the emitter.emit method.
Below is a simple example:
customEmitter.on('response', () => {
  // Callback function 1
  console.log('First message')
})

customEmitter.on('response', () => {
  // Callback function 2
  console.log('Second message')
})

customEmitter.emit('response')
Output:
First message
Second message
Detailed documentation about the Events module can be found here.

