
The Handwritten Page Recognition Test is a command-line program that invokes HTR (handwritten text recognition) services on images of document pages. It can produce annotated images showing the results, compare the recognized text to expected text, save the HTR service results as JSON and text files, and more.


- Introduction
- Installation and configuration
- Usage
- Getting help
- Contributing
- License
- Authors and history
- Acknowledgments
Handprint (Handwritten Page Recognition Test) is a tool for comparing alternative services for offline handwritten text recognition (HTR). It was developed for use with documents from the Caltech Archives, but it is completely independent and can be applied to any images of text documents.
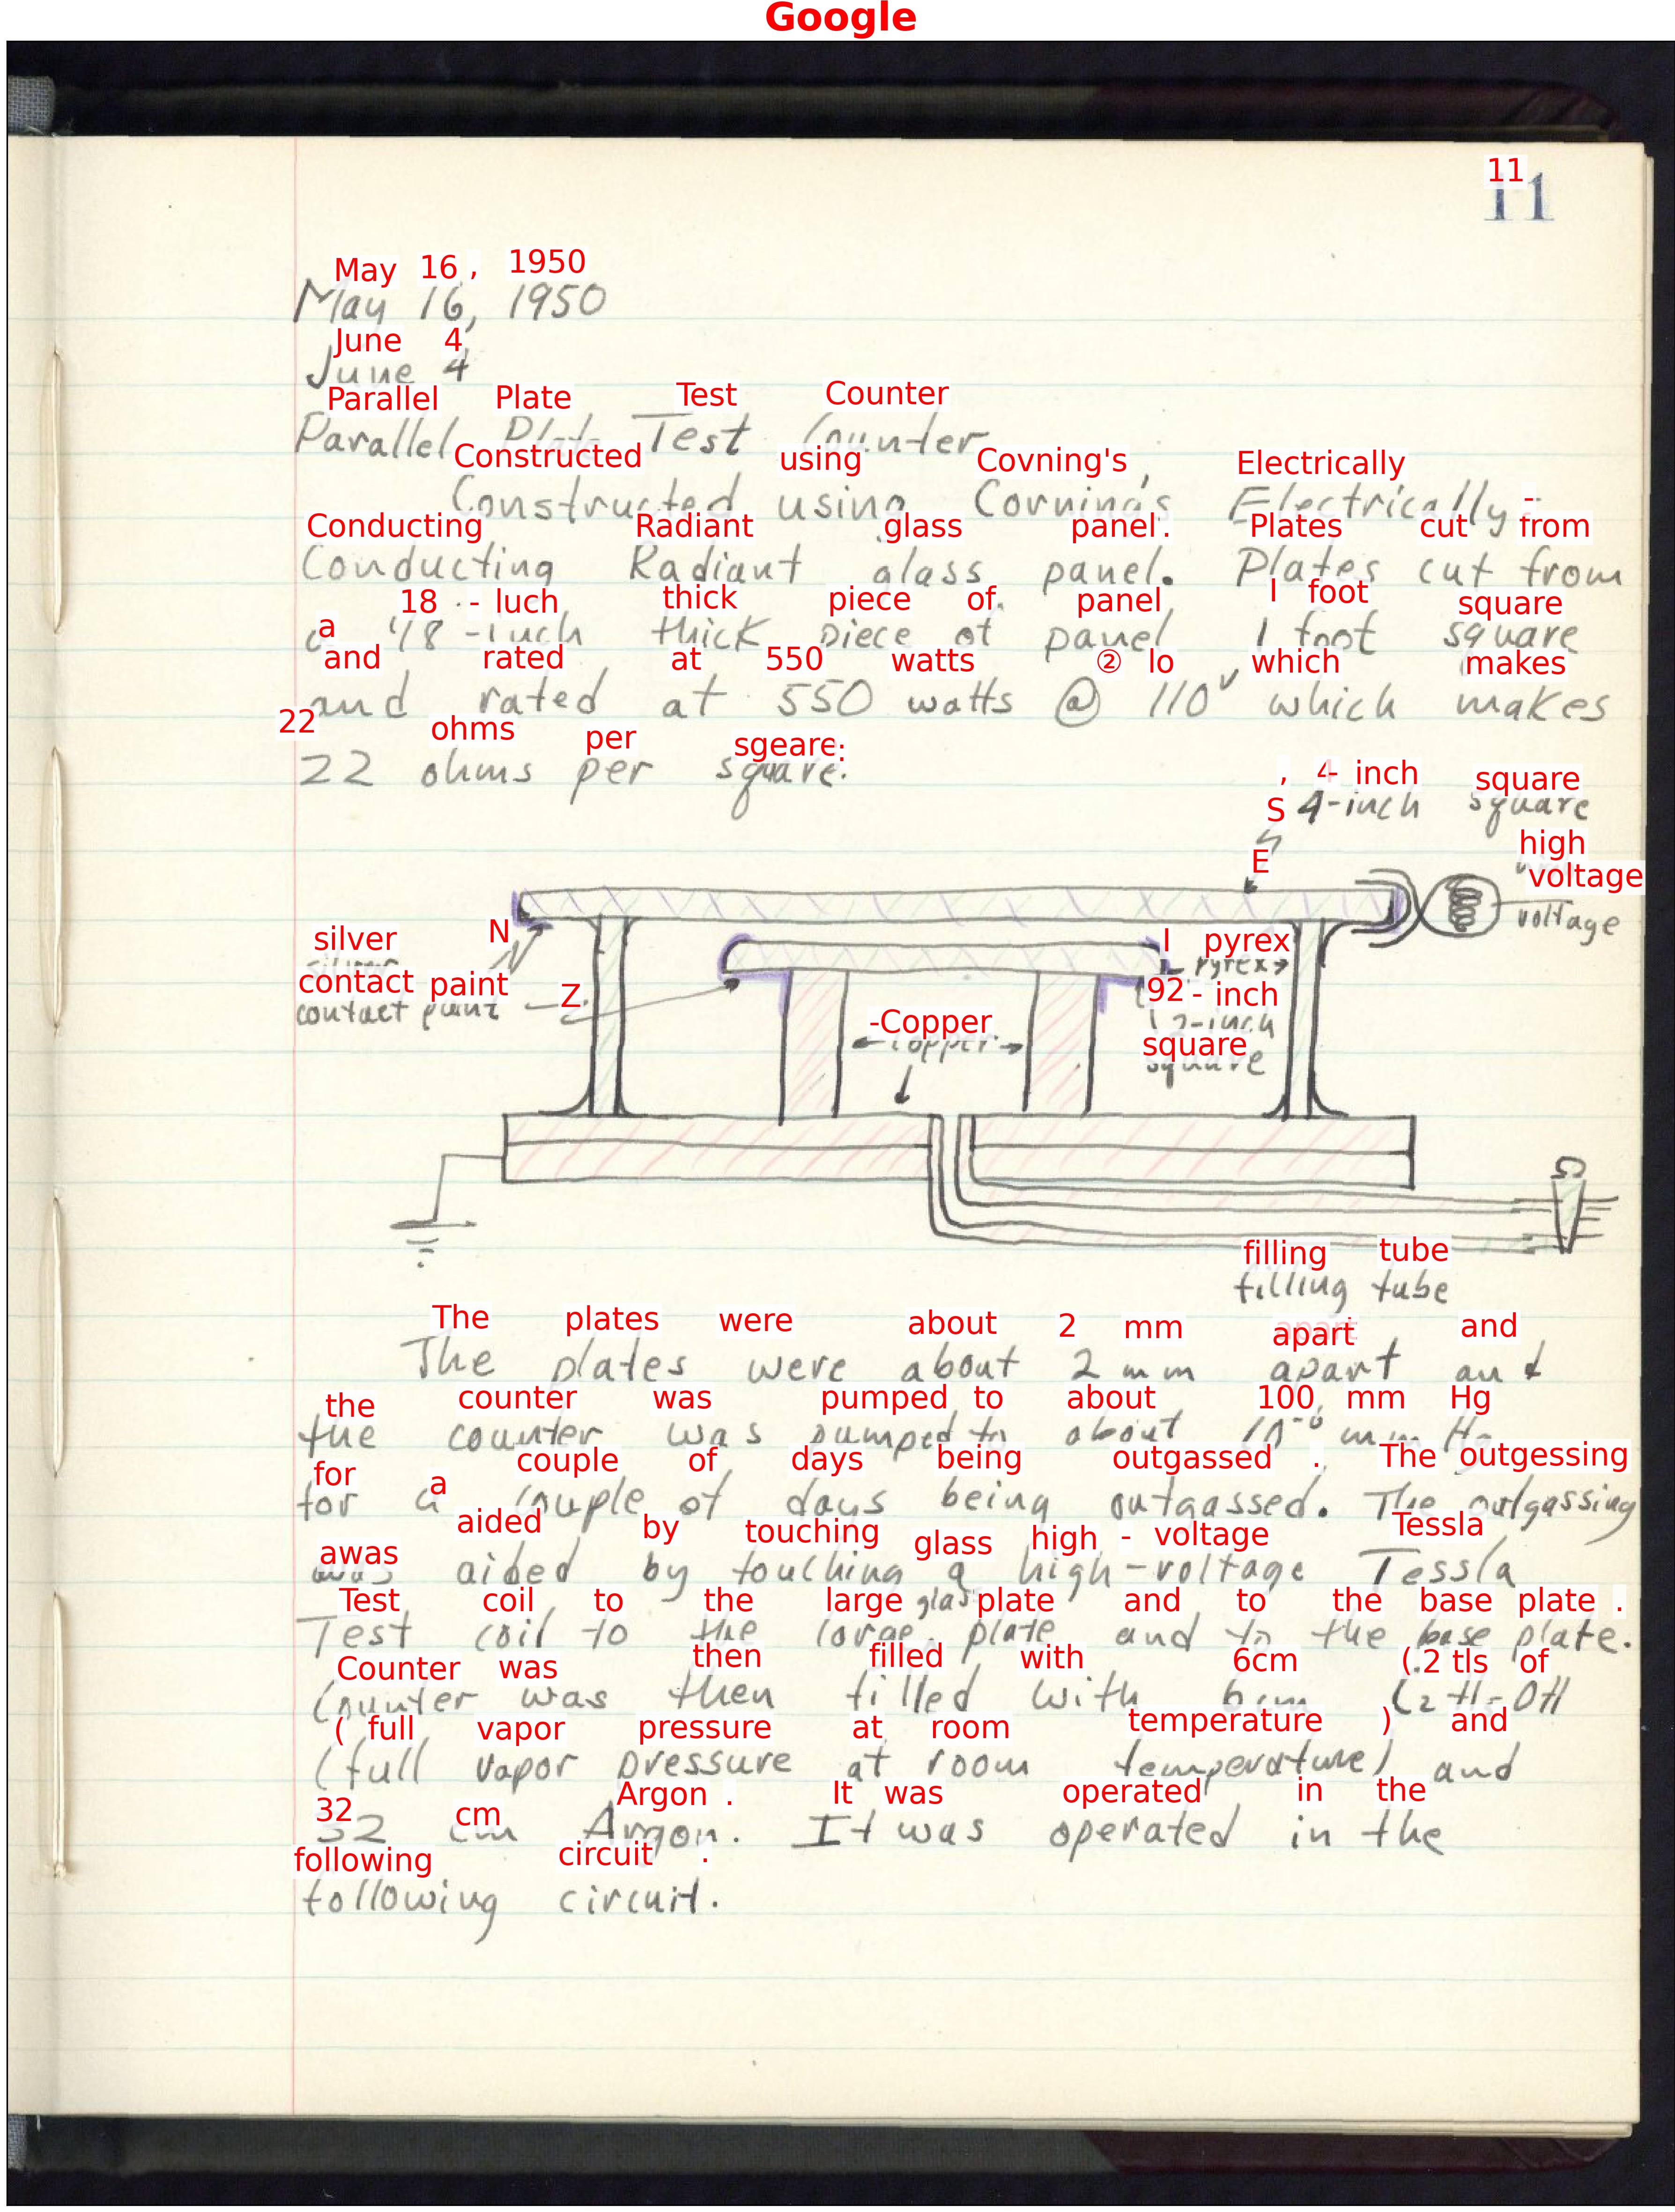
Handprint can generate images with recognized text overlaid over them to visualize the results. The image at right shows an example. Among other features, the software can also display bounding boxes, threshold results by confidence values, compare full-text results to expected/ground-truth results, and output the raw results from an HTR service as JSON and text files. It can work with individual images, directories of images, and URLs pointing to images on remote servers. Finally, Handprint can use multiple processor threads for parallel execution.
Services supported include Google's Google Cloud Vision API, Microsoft's Azure Computer Vision API, and Amazon's Textract and Rekognition. The framework for connecting to services could be expanded to support others as well (and contributions are welcome!).
The instructions below assume you have a Python interpreter version 3.8 or higher installed on your computer; if that's not the case, please first install Python and familiarize yourself with running Python programs on your system. If you are unsure of which version of Python you have, you can find out by running the following command in a terminal and inspecting the results:
# Note: on Windows, you may have to use "python" instead of "python3"
python3 --version
Note for Mac users: if you are using macOS Catalina (10.15) or later and have never run python3, then the first time you do, macOS will ask you if you want to install the macOS command-line developer tools. Go ahead and do so, as this is the easiest way to get a recent-enough Python 3 on those systems.
Handprint includes several adapters for working with cloud-based HTR services from Amazon, Google, and Microsoft, but does not include credentials for using the services. To be able to use Handprint, you must both install a copy of Handprint on your computer and supply your copy with credentials for accessing the cloud services you want to use. See below for more.
Beginning with version 1.5.1, runnable self-contained single-file executables are available for select operating system and Python version combinations – to use them, you only need a Python 3 interpreter and a copy of Handprint, but do not need to run pip install or other steps. Please click on the relevant heading below to learn more.
 macOS
macOS

Visit the Handprint releases page and look for the ZIP files with names such as (e.g.) handprint-1.5.4-macos-python3.8.zip. Then:
- Download the one matching your version of Python
- Unzip the file (if your browser did not automatically unzip it for you)
- Open the folder thus created (it will have a name like
handprint-1.5.4-macos-python3.8) - Look inside for
handprintand move it to a location where you put other command-line programs (e.g.,/usr/local/bin)
 Linux
Linux

Visit the Handprint releases page and look for the ZIP files with names such as (e.g.) handprint-1.5.4-linux-python3.8.zip. Then:
- Download the one matching your version of Python
- Unzip the file (if your browser did not automatically unzip it for you)
- Open the folder thus created (it will have a name like
handprint-1.5.4-linux-python3.8) - Look inside for
handprintand move it to a location where you put other command-line programs (e.g.,/usr/local/bin)
 Windows

Standalone executables for Windows are not available at this time. If you are running Windows, please use one of the other methods described below.
You can use pipx to install Handprint. Pipx will install it into a separate Python environment that isolates the dependencies needed by Handprint from other Python programs on your system, and yet the resulting handprint command wil be executable from any shell – like any normal application on your computer. If you do not already have pipx on your system, it can be installed in a variety of easy ways and it is best to consult Pipx's installation guide for instructions. Once you have pipx on your system, you can install Handprint with the following command:
pipx install handprintPipx can also let you run Handprint directly using pipx run handprint, although in that case, you must always prefix every Handprint command with pipx run. Consult the documentation for pipx run for more information.
If you prefer, you can install Handprint with pip. If you don't have pip package or are uncertain if you do, please consult the pip installation instructions. Then, to install or upgrade Handprint from the Python package repository, run the following command:
python3 -m pip install handprint --upgradeA one-time configuration step is needed for each cloud-based HTR service after you install Handprint on a computer. This step supplies Handprint with credentials to access the services. In each case, the same command format is used:
handprint -a SERVICENAME CREDENTIALSFILE.jsonSERVICENAME must be one of the service names printed by running handprint -l, and CREDENTIALSFILE.json must have one of the formats discussed below. When you run this command, Handprint copies CREDENTIALSFILE.json to a private location, and thereafter uses the credentials to access SERVICENAME. (The private location is different on different systems; for example, on macOS it is ~/Library/Application Support/Handprint/.) Examples are given below.
Microsoft's approach to credentials in Azure involves the use of subscription keys. The format of the credentials file for Handprint needs to contain two fields:
{
 "subscription_key": "YOURKEYHERE",
 "endpoint": "https://ENDPOINT"
}
The value "YOURKEYHERE" will be a string such as "18de248475134eb49ae4a4e94b93461c", and it will be associated with an endpoint URI such as "https://westus.api.cognitive.microsoft.com". To obtain a key and the corresponding endpoint URI, visit https://portal.azure.com and sign in using your account login. (Note: you will need to turn off browser security plugins such as Ad Block and uMatrix if you have them, or else the site will not work.) Once you are authenticated to the Azure portal, you can create credentials for using Azure's machine-learning services. Some notes all about this can be found in the Handprint project Wiki pages on GitHub.
Once you have obtained both a key and an endpoint URI, use a text editor to create a JSON file in the simple format shown above, save that file somewhere on your computer (for the sake of this example, assume it is myazurecredentials.json), and use the command discussed above to make Handprint copy the credentials file:
handprint -a microsoft myazurecredentials.jsonCredentials for using a Google service account need to be stored in a JSON file that contains many fields. The overall format looks like this:
{
  "type": "service_account",
  "project_id": "theid",
  "private_key_id": "thekey",
  "private_key": "-----BEGIN PRIVATE KEY-----anotherkey-----END PRIVATE KEY-----\n",
  "client_email": "emailaddress",
  "client_id": "id",
  "auth_uri": "https://accounts.google.com/o/oauth2/auth",
  "token_uri": "https://oauth2.googleapis.com/token",
  "auth_provider_x509_cert_url": "https://www.googleapis.com/oauth2/v1/certs",
  "client_x509_cert_url": "someurl"
}
Getting one of these is summarized in the Google Cloud docs for Creating a service account, but more explicit instructions can be found in the Handprint project Wiki pages on GitHub. Once you have downloaded a Google credentials file from Google, save the file somewhere on your computer (for the sake of this example, assume it is mygooglecredentials.json), and use the command discussed above to make Handprint copy the credentials file:
handprint -a google mygooglecredentials.jsonAmazon credentials for AWS take the form of two alphanumeric strings: a key id string and a secret access key string. In addition, the service needs to be invoked with a region identifier. For the purposes of Handprint, these should be stored in a JSON file with the following format:
{
    "aws_access_key_id": "YOUR_KEY_ID_HERE",
    "aws_secret_access_key": "YOUR_ACCESS_KEY_HERE",
    "region_name": "YOUR_REGION_NAME_HERE"
}
Getting this information is, thankfully, a relatively simple process for Amazon's services. Instructions can be found in the Handprint project Wiki pages on GitHub. Once you have obtained the two alphanumeric keys and a region identifier string, use a text editor to create a JSON file in the simple format shown above, save that file somewhere on your computer (for the sake of this example, assume it is myamazoncredentials.json), and use two commands to make Handprint copy the credentials file for the two different Amazon services currently supported by Handprint:
handprint -a amazon-textract myamazoncredentials.json
handprint -a amazon-rekognition myamazoncredentials.jsonPlease see the documentation site for detailed documentation for Handprint.
If you find an issue, please submit it in the GitHub issue tracker for this repository.
I would be happy to receive your help and participation with enhancing Handprint! Please visit the guidelines for contributing for some tips on getting started.
If you plan on doing any development on Handprint, you may want to install the package dependencies listed in requirements-dev.txt, e.g., using a command such as the following. This will install dependencies necessary to run pytest.
python3 -m pip install -r requirements-dev.txt
Software produced by the Caltech Library is Copyright © 2018–2022 California Institute of Technology. This software is freely distributed under the BSD 3-clause OSI license. Please see the LICENSE file for more information.
Mike Hucka designed and implemented Handprint beginning in mid-2018.
The vector artwork of a hand used as a logo for Handprint was created by Kevin for the Noun Project. It is licensed under the Creative Commons CC-BY 3.0 license.
Handprint benefitted from feedback from several people, notably from Tommy Keswick, Mariella Soprano, Peter Collopy and Stephen Davison.
Handprint makes use of numerous open-source packages, without which it would have been effectively impossible to develop Handprint with the resources we had. I want to acknowledge this debt. In alphabetical order, the packages are:
- aenum – advanced enumerations for Python
- appdirs – module for determining appropriate platform-specific directories
- boltons – package of miscellaneous Python utilities
- boto3 – Amazon AWS SDK for Python
- bun – a set of basic user interface classes and functions
- CommonPy – a collection of commonly-useful Python functions
- fastnumbers – number testing and conversion functions
- google-api-core, google-api-python-client, google-auth, google-auth-httplib2, google-cloud, google-cloud-vision, googleapis-common-protos, google_api_python_client – Google API libraries
- grpcio – open-source RPC framework
- humanize – make numbers more easily readable by humans
- imagesize – determine the dimensions of an image
- ipdb – the IPython debugger
- matplotlib – a Python 2-D plotting library
- numpy – package for scientific computing in Python
- Pillow – a fork of the Python Imaging Library
- plac – a command line argument parser
- psutil – cross-platform package for process and system monitoring in Python
- PyMuPDF – Python bindings for the MuPDF rendering library
- requests – an HTTP library for Python
- Rich – library for writing styled text to the terminal
- setuptools – library for
setup.py - Sidetrack – simple debug logging/tracing package
- StringDist – library for calculating string distances
- textdistance – compute distances between text sequences
- urllib3 – Python HTTP library
- Validator Collection – Python library of 60+ commonly-used validator functions
- wheel – setuptools extension for building wheels
Finally, I am grateful for computing & institutional resources made available by the California Institute of Technology.