ng-apimock 


Node plugin that provides the ability to use scenario based api mocking:
- for local development
- for protractor testing
Plugins that use ng-apimock
- grunt-ng-apimock is a plugin that makes ng-apimock available for Grunt
- gulp-ng-apimock is a plugin that makes ng-apimock available for Gulp
Getting Started
npm install ng-apimock --save-dev
Once the plugin has been installed, you can require it with this line of JavaScript:
var ngApimock = require('ng-apimock')();The "ngApimock" process mocks
Overview
In order to use the available mocks, you need to call the run function with this line of JavaScript:
ngApimock.run({
  "src": "test/mocks",
  "outputPath", "path/to/outputDir",
  "done": function() {
  // async
  }
});
The run function will process the mock data provided in the configuration and make it accessible for connect as middleware.
Howto write mocks
There are a couple of rules to follow.
- For each api call create a separate file
- Each file needs to follow the format below.
{
  "expression": "your expression here (ie a regex without the leading and trailing '/' or a string)",
  "method": "the http method (ie GET, POST, PUT or DELETE)", // supports JSONP as well
  "name": "identifiable name for this service call"  // if non is provided, expression$$method will be used
  "isArray": "indicates if the response data is an array or object",
  "responses": {
    "some-meaningful-scenario-name": {
      "default": true, // if false or not provided this response will not be used as default
      "status": 200, // optional - defaults to 200
      "headers": {}, // optional - defaults to {}
      "data": {}, // optional
      "file": "path/to/file.ext" // optional, when provided don't forget the matching content-type header as it will result in a file download instead of data
      "statusText": "" // optional
    },
    "some-other-meaningful-scenario-name": {
      "data": {}
    }
  }
}
Howto use global variables
If for instance, you have date sensitive information in you mocks, mock data is not flexible enough. You can use global variables for this. By surrounding a value in the response.data with %%theVariableName%%, you can make your data more flexible, like this:
"responses": {
    "some-meaningful-scenario-name": {
        "data": {
            "today": "%%today%%"
        }
    }
}
For local development you can use the web interface to add, change or delete variables. For protractor you can use the following commands
     ngApimock.setGlobalVariable(name, value); // to add or update
     ngApimock.deleteGlobalVariable(name); // to delete
Howto serve selected mocks
To be able to use the selected mocks you need to do two things:
- Add the connect middleware
- Add the mocking interface to your connect configuration
Add the connect middleware
When running connect you can do add the following middleware block to your configuration
var app = connect();
app.use(require('ng-apimock/lib/utils').ngApimockRequest);
app.use(function middleware2(req, res, next) {
  // middleware 2
  next();
});
Add the mocking interface to your connect configuration
When running grunt-contrib-connect you can do add the following staticServe block to your configuration
var app = connect();
app.use('/mocking', require('serve-static')('path/to/the/generated/mocking/index.html'));
app.use(function middleware2(req, res, next) {
  // middleware 2
  next();
});
Howto use for local development
As you have configured both the connect middleware and the mocking interface, everything should work out of the box. By default all the responses configured as default, will be returned if the expression matches.
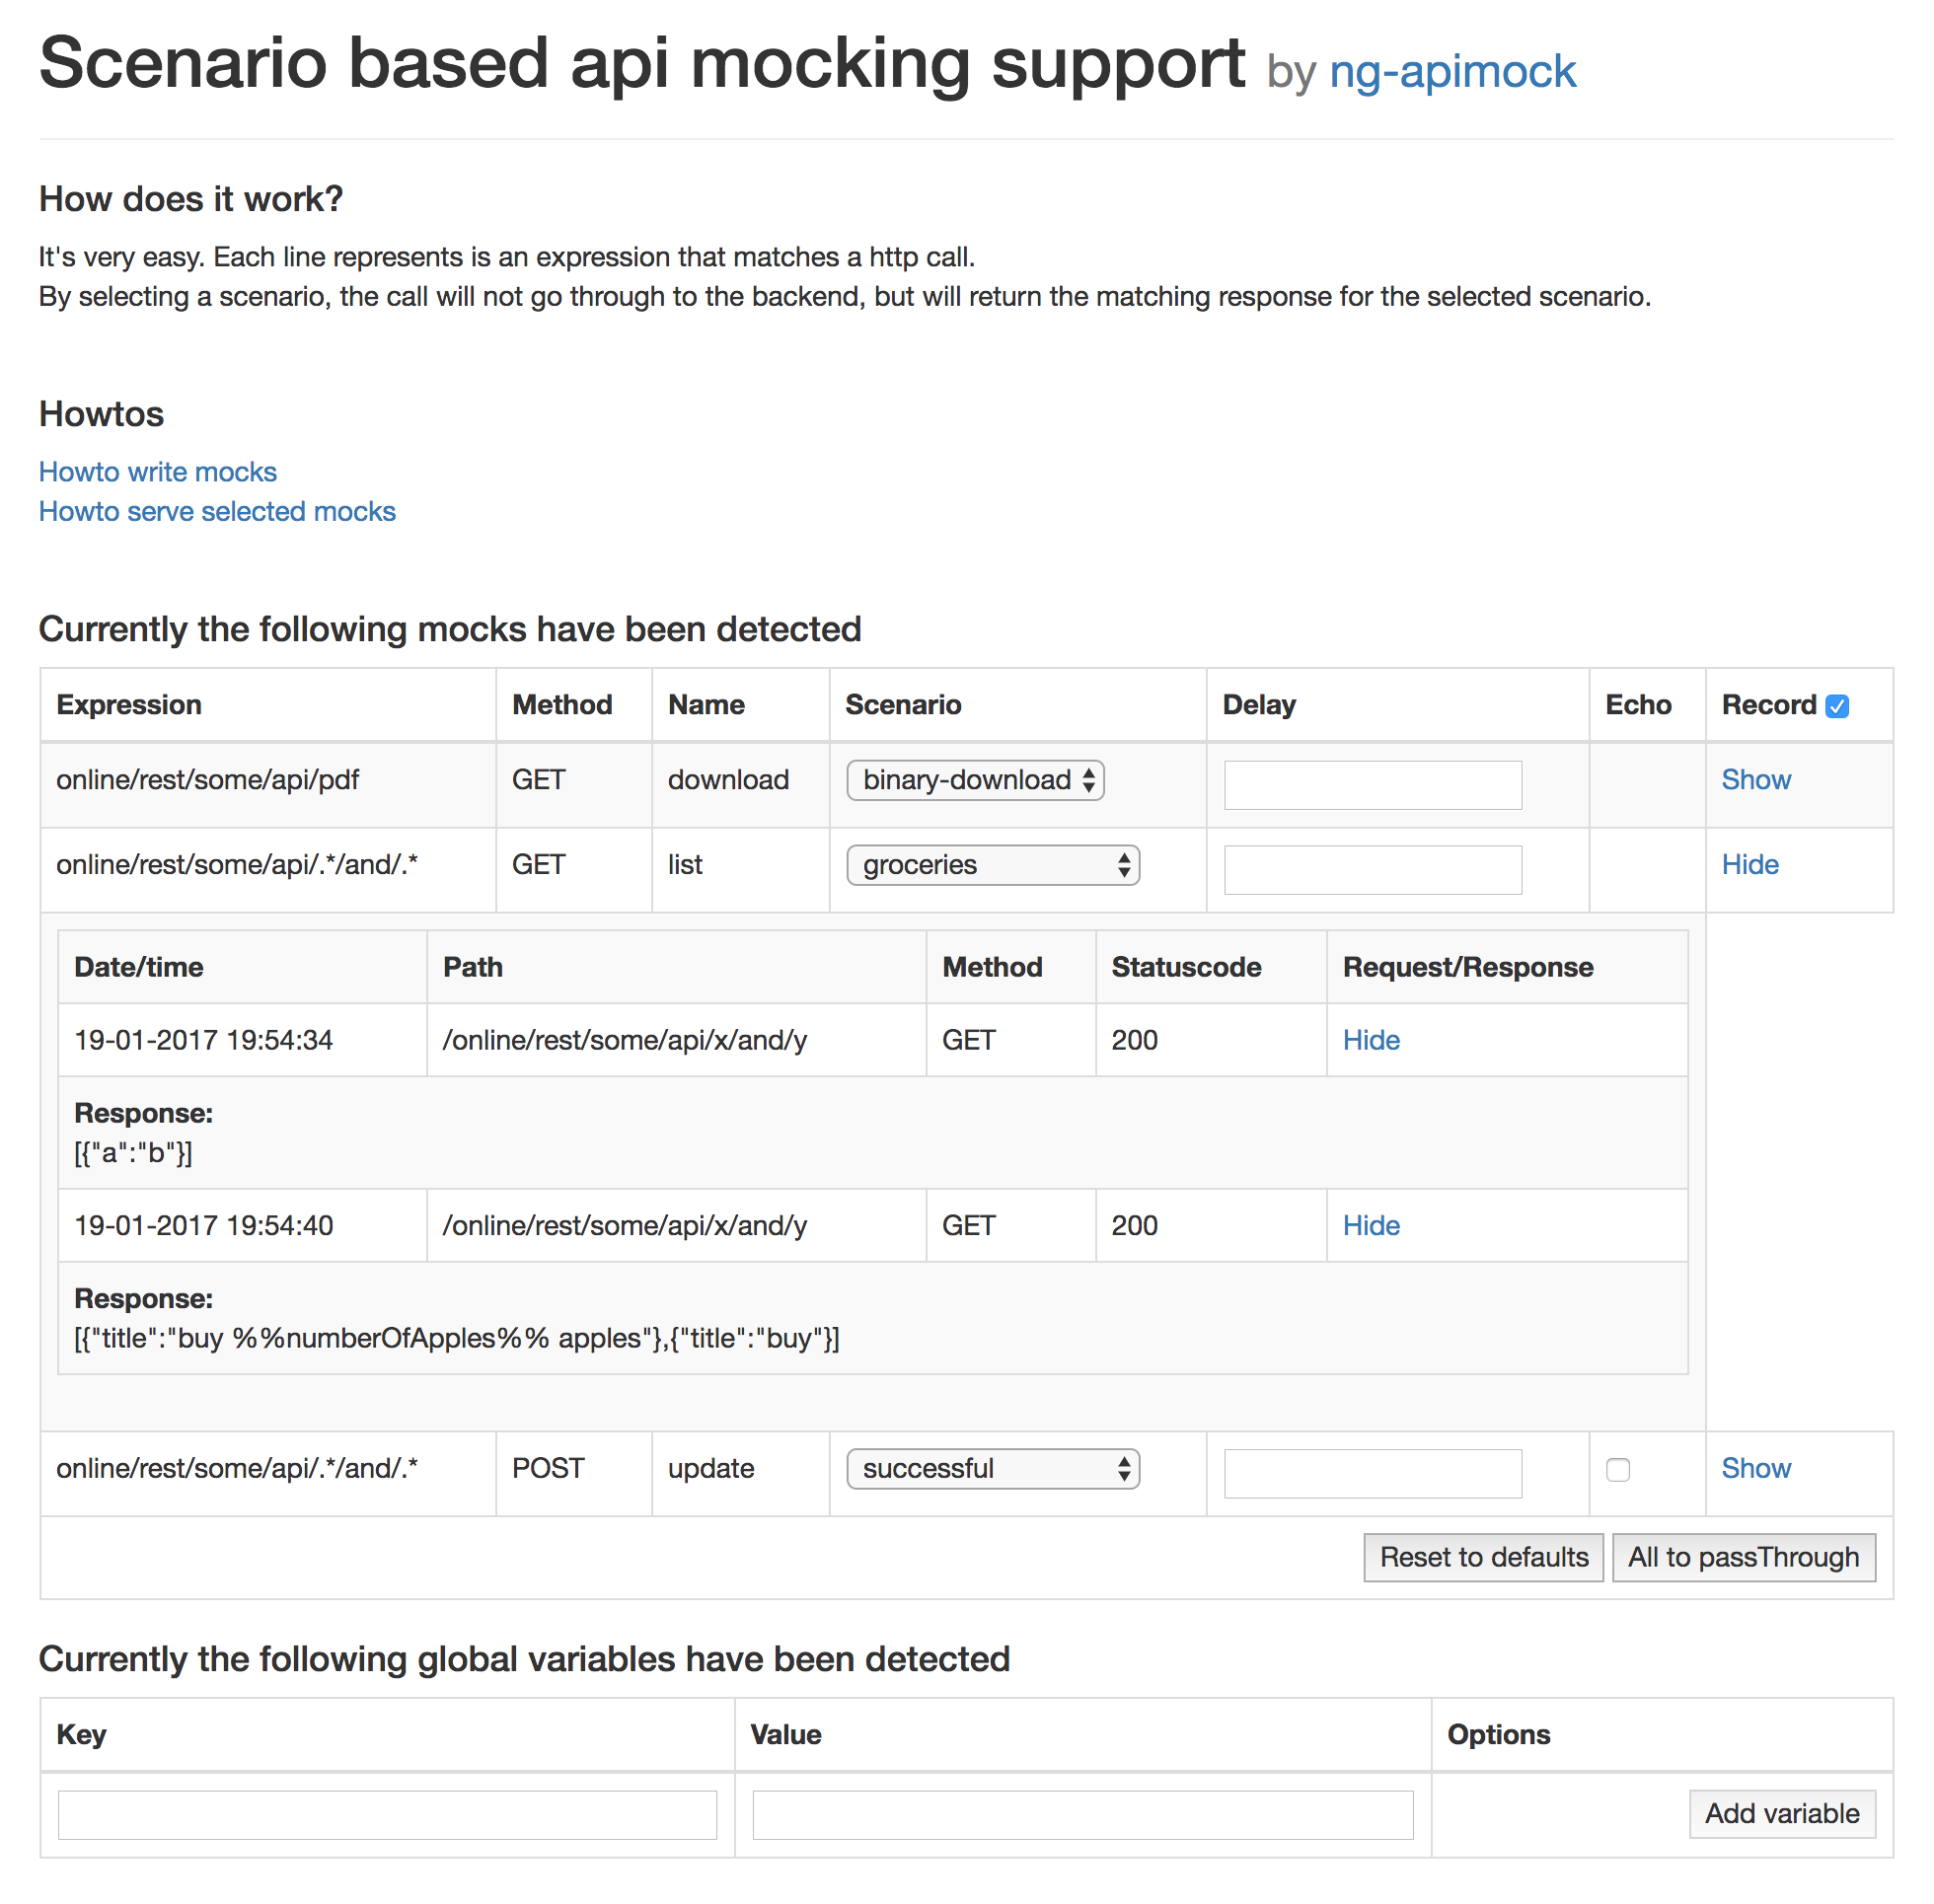
If you would like to change the selected scenario, you can go to http://localhost:9000/mocking and use the interface to change the selected scenario or variables
The interface looks like this:
Howto use for your protractor tests.
As you are building an AngularJS application you will probably use Protractor for testing your UI.
Protractor provides the ability to inject a mock module in your application by adding the following to your protractor test.
describe('Some test', function () {
    browser.addMockModule('modName', function() {
        angular.module('modName', []).value('foo', 'bar');
    });
});
To serve the mock data from the json files that we created for running our application locally with mock data, you can replace the block above with this
describe('Some test', function () {
    var ngApimock = require('.tmp/mocking/protractor.mock'); // or the path/to/protractor.mock.js
    ngApimock.selectScenario(require('path/to/mocks/some.json'), 'nok'); // nok is the name of the scenario
    ngApimock.selectScenario('name attribute in mock.json', 'ok'); // ok is the name of the scenario
    ngApimock.setGlobalVariable('someKey', 'someValue'); // add or update a global variable which will be used to replace in the response data.

    it('should do something', function() {
        ngApimock.selectScenario('name of some api', 'another'); // at runtime you can change a scenario
    });
 });
By default all the scenario's marked as default will be returned if the expression matches. So you only need to add ngApimock.selectScenario in case your test need other scenario data to be returned.
NgApimock also works when running multiple tests concurrent, by using the protract session id of the test. This ensures that changing a scenario in one test, will not effect another test.
Available functions
All these functions are protractor promises, so they can be chained.
selectScenario(json, scenarionName, options)
Selects the given scenario (when calling this function without a scenario or with 'passThrough' as scenario name, the call will be passed through to the actual backend)
Supported options
hold
When set to true the subsequent mock-calls will not be immediately returned, but stored in a session. Use releaseMock(mockName) (see below) to trigger the mock call to finish.
Very usefull for testing loading states of your UI.
releaseMock(mockName)
Release a mock the was hold using the options object in selectScenario (see above)
Trying to release a mock the was not hold will result in a error and failing test.
setAllScenariosToDefault()
Resets all mocks to the default scenarios
setAllScenariosToPassThrough
Resets all mocks to use passthroughs
setGlobalVariable(key, value)
Adds or updates the global key/value pair
deleteGlobalVariable(key)
Remove the global variable matching the key
Howto use recording functionality
You can record API calls in NgApimock. This is usefull if you have a live API, and want to create mocks for them. You turn on Recording in the header Record (checkbox), and start calling the API. Requests are recorded for each mock. You can zoom in up to Request Response information. The response data can be used in mock files, described earlier.
Contributing
In lieu of a formal styleguide, take care to maintain the existing coding style. Add unit tests for any new or changed functionality. Lint and test your code committing.