
apify NPM package enables development of web scrapers, crawlers and web automation projects
either locally or running on Apify Actor -
a serverless computing platform that enables execution of arbitrary code in the cloud.
The package provides helper functions to launch web browsers with proxies, access the storage etc. Note that the usage of the package is optional, you can create acts on Apify platform without it.
For more information about the Apify Actor platform, please see https://www.apify.com/docs/actor
Complete documentation of this package is available at https://www.apify.com/docs/sdk/apify-runtime-js/latest
Main goal of this package is to help with implementation of web scraping and automation projects. Some of the most common use-cases are:
- If you want to crawl a website using for example Request package then take a look at BasicCrawler in combination with RequestList for fix list of urls or RequestQueue for recursive crawl.
- If you want to crawl a website using a real browser. Then use PuppeteerCrawler which uses Puppeteer (headless/non-headless Chrome browser). PuppeteerCrawler supports both RequestList for fix list of urls or RequestQueue for recursive crawl.
- If you need to process high volume of asynchronous tasks in parallel then take a look at AutoscaledPool. This class executes defined tasks in a pool which size is scaled based on available memory and CPU.
- If you want to automate filling of forms or any other web interaction then you can use Puppeteer (headless/non-headless Chrome browser).
If you deploy your code to Apify platform then you can set up scheduler or execute your code with web API.
To use Apify SDK you must have Node JS (version 7.0.0 or newer) and NPM installed. If you have both then the easiest way how to start is to use Apify CLI (command line tool).
Install the tool with:
npm -g install apify-cliand create your project with:
apify create my-hello-world

cd my-hello-world
Apify CLI asks to you choose a template and then creates a directory my-hello-world containing:
package.jsonwith Apify SDK as dependencymain.jscontaining basic code for your projectapify_localdirectory containing local emultation of Apify storage types- files needed for optional deployment to Apify platform (
Dockerfile,apify.json) node_modulesdirectory containing all the required NPM packages
If you chose template Puppeteer then the main.js file looks like:
const Apify = require('apify');

Apify.main(async () => {
    const input = await Apify.getValue('INPUT');

    if (!input || !input.url) throw new Error('INPUT must contain a url!');

    console.log('Launching Puppeteer...');
    const browser = await Apify.launchPuppeteer();

    console.log(`Opening page ${input.url}...`);
    const page = await browser.newPage();
    await page.goto(input.url);
    const title = await page.title();
    console.log(`Title of the page "${input.url}" is "${title}".`);

    console.log('Closing Puppeteer...');
    await browser.close();

    console.log('Done.');
});
It simply takes a url field of its input opens that page using
Puppeteer in Chrome browser and prints its title.
Input is always stored in default key-value store of run. Local emulation of this store you can find in directory
apify_local/key-value-stores/default. To create an input simply create a file apify_local/key-value-stores/default/INPUT.json
containing:
{
  "url": "https://news.ycombinator.com"
}
Now can then run you code with:
apify runand see following output:
Launching Puppeteer...

Opening page https://news.ycombinator.com...

Title of the page "https://news.ycombinator.com" is "Hacker News".

Closing Puppeteer...

Done.
Check examples below to see what you can do with Apify SDK. After you are done with your code you can deploy your project to Apify platform with following 2 steps:
apify login
apify pushFor those who are using Puppeteer (headless/non-headless Chrome browser) we have few helper classes and functions:
- launchPuppeteer() function starts new instance of Puppeteer browser and returns its browser object.
- PuppeteerPool helps to mantain a pool of Puppeteer instances. This is usefull when you need to restart browser after certain number of requests to rotate proxy servers.
- PuppeteerCrawler helps to crawl a RequestList or RequestQueue in parallel using autoscaled pool.
const url = 'https://news.ycombinator.com';

const browser = await Apify.launchPuppeteer();
const page = await browser.newPage();
await page.goto(url);
const title = await page.title();

console.log(`Title of the page "${url}" is "${title}".`);
For more information on Puppeteer see its documenation.
Apify package provides 3 storage types for commons use cases both locally and on Apify platform.
Key value store is simple storage that can be used for string or file (buffer) records.
// Save value to key-value store.
await Apify.setValue('my-key', { foo: 'bar' });

// Get value from key-value store.
const value = await Apify.getValue('my-key');
For more information see complete documentation.
The dataset is a storage that enables saving and retrieval of sequential data objects — typically results of some long running operation such as scraping or data extraction. Dataset is immutable and allows only storing and retrieving of its items.
// Push some data to dataset.
await Apify.pushData({ foo: 'bar' });
await Apify.pushData({ myArray: [1, 2, 3] });
For more information see complete documentation.
Request queue is used to manage a dynamic queue of web pages to crawl.
const queue = await Apify.openRequestQueue('my-queue-id');

await queue.addRequest(new Apify.Request({ url: 'http://example.com/aaa'});
await queue.addRequest(new Apify.Request({ url: 'http://example.com/bbb'});

// Get requests from queue to be processed.
const request1 = queue.fetchNextRequest();
const request2 = queue.fetchNextRequest();

// Mark one of them as handled.
queue.markRequestHandled(request1);

// If processing fails then reclaim it back to the queue.
request2.pushErrorMessage('Request failed for network error!');
queue.reclaimRequest(request2);
For more information see complete documentation.
This class manages a pool of asynchronous resource-intensive tasks that are executed in parallel. The pool only starts new tasks if there is enough free memory and CPU capacity. The information about the CPU and memory usage is obtained either from the local system or from the Apify cloud infrastructure in case the process is running on the Apify Actor platform.
const pool = new Apify.AutoscaledPool({
    maxConcurrency: 50,
    runTaskFunction: () => {
        // Run some resource-intensive asynchronous operation here and return a promise...
    },
});

await pool.run();
For more information see complete documentation.
Provides a simple framework for parallel crawling of web pages from a list of URLs managed by the RequestList class or dynamically enqueued URLs managed by RequestQueue.
For examples on how to use it see examples section below and also check documentation.
Provides a simple framework for parallel crawling of web pages using the Chrome with Puppeteer. The URLs of pages to visit are given by Request objects that are provided by the RequestList class or a dynamically enqueued requests provided by the RequestQueue class.
For examples on how to use it see examples section below and also check documentation.
Provides way to handle a list of URLs to be crawled. Each URL is reprented using an instance of the Request class.
const requestList = new Apify.RequestList({
    sources: [
        { url: 'http://www.example.com/page-1' },
        { url: 'http://www.example.com/page-2' },
    ],
});

// Get requests from list to be processed.
const request1 = requestList.fetchNextRequest();
const request2 = requestList.fetchNextRequest();

// Mark one of them as handled.
requestList.markRequestHandled(request1);

// If processing fails then reclaim it back to the queue.
request2.pushErrorMessage('Request failed for network error!');
requestList.reclaimRequest(request2);
For more information see complete documentation.
Provides a pool of Puppeteer (Chrome browser) instances. The class rotates the instances based on its configuration in order to change proxies.
const puppeteerPool = new PuppeteerPool({ groups: 'some-proxy-group' });

// Open browser pages.
const page1 = await puppeteerPool.newPage();
const page2 = await puppeteerPool.newPage();
const page3 = await puppeteerPool.newPage();

// ... do something with pages ...

// Close all the browsers.
await puppeteerPool.destroy();
For more information see complete documentation.
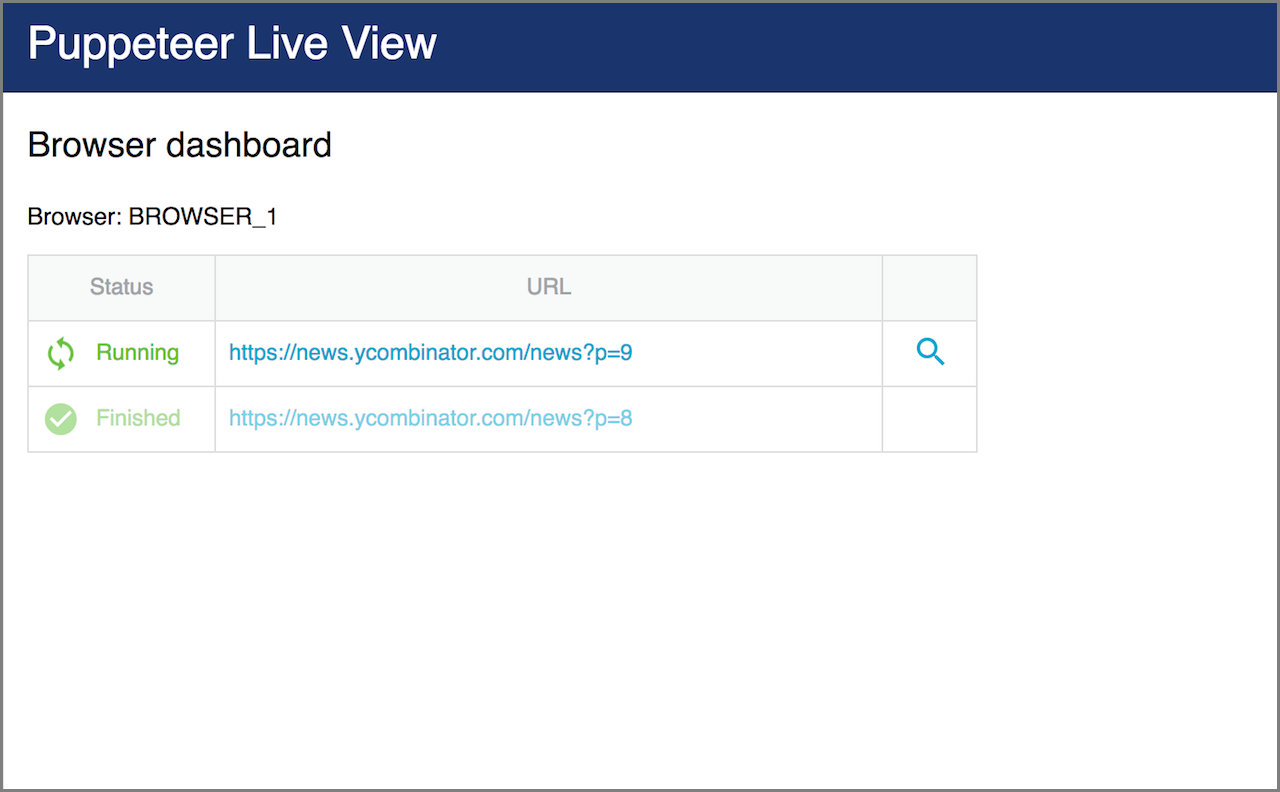
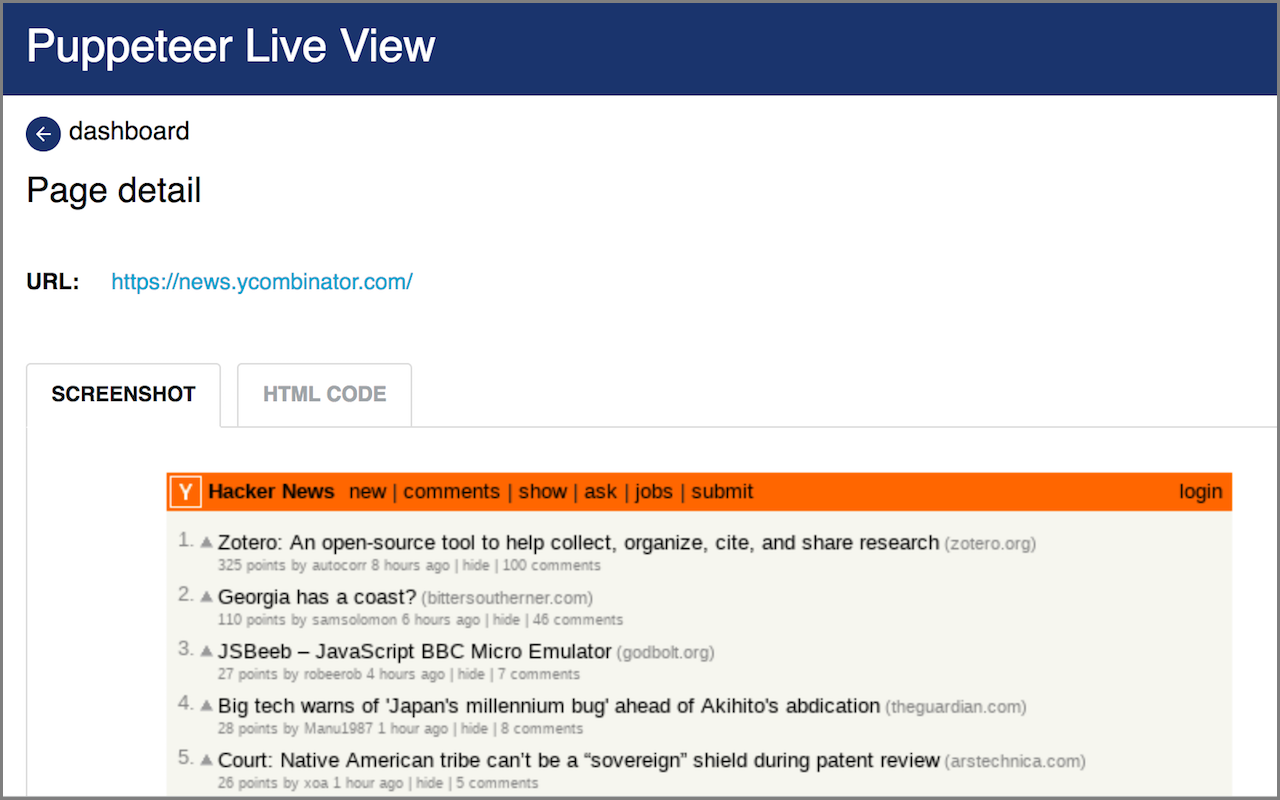
Enables real time inspection of individual Puppeteer browser instances by starting a web server @ localhost:4321. This is especially useful when using headless mode or a remote instance.
Puppeteer Live View provides the user with a dashboard listing all active browser instances and their active page details. The details show a page screenshot and raw HTML.
You can use Puppeteer Live View, either directly:
const browser = Apify.launchPuppeteer({ liveView: true });or while using PuppeteerCrawler:
const crawler = new PuppeteerCrawler({
    launchPuppeteerOptions: { liveView: true },
    // other options
})
For debugging, you may want to add another option: { slowMo: 300 } (see Puppeteer documentation).
After you connect to localhost:4321 (the port is configurable using APIFY_CONTAINER_PORT environment variable),
Puppeteer Live View will present you with the following screen:
Click on the magnifying glass icon will take you to a page detail, showing its screenshot and raw HTML:
For more information see complete documentation.
The easiest way how to use apify locally is with Apify CLI as shown in quick start section. Other way is to manually define required environment variables:
| Environment variable | Description |
|---|---|
APIFY_LOCAL_EMULATION_DIR |
Directory where apify package locally emulates Apify storages - key-value store and dataset.
Key-value stores will be emulated in directory
[APIFY_LOCAL_EMULATION_DIR]/key-value-stores/[STORE_ID]
and datasets in directory
[APIFY_LOCAL_EMULATION_DIR]/datasets/[DATESET_ID].
|
APIFY_DEFAULT_KEY_VALUE_STORE_ID |
ID of default key-value store. |
APIFY_DEFAULT_DATASET_ID |
ID of default dataset. |
APIFY_DEFAULT_REQUEST_QUEUE_ID |
ID of default request queue. |
Apify will then store key-value store records in files named [KEY].[EXT] where [KEY]
is the record key and [EXT] is based on the record content type. Dataset items will be stored
in files named [ID].json where [ID] is sequence number of your dataset item.
*
If you want to use Apify Proxy locally
then you must define an environment variable PROXY_PASSWORD with password you find at
https://my.apify.com/proxy.
By default, all asynchronous functions provided by this package return a promise. But Apify uses a Bluebird promise implementation so you can easily convert any function that returns a Promise into callback style function. See Bluebird documentation for more information.
Directory examples of this repository demonstrates different usages of this package.
Following 2 examples demonstrate recursive crawling of https://news.ycombinator.com. Crawler starts at https://news.ycombinator.com and in each step enqueues a new page linked by "more" button at the bottom of the page and stores posts from the opened page in a Dataset. As a queue crawler uses Request Queue.
Former example crawls page simply using NPM Request and Cheerio packages and former one uses Puppeteer that provides full Chrome browser.
These examples show how to scrape data from a fix list of urls using Puppeteer or Request and Cheerio.
This example shows how to call another act on Apify platform - in this case apify/send-mail
to send email.
This example shows an act that has short runtime - just few seconds. It opens a webpage http://goldengatebridge75.org/news/webcam.html that contains webcam stream from Golden Gate bridge, takes a screenshot and saves it as output. This makes act executable on Apify platform synchronously with a single request that also returns its output.
Example is shared in library under https://www.apify.com/apify/example-golden-gate-webcam
so you can easily run it with request to
https://api.apify.com/v2/acts/apify~example-golden-gate-webcam/run-sync?token=[YOUR_API_TOKEN]
and get image as response. Then you can for example use it directly in html:
<img src="https://api.apify.com/v2/acts/apify~example-golden-gate-webcam/run-sync?token=[YOUR_API_TOKEN]" />