The purpose of the exercises in this session is to build on the git basics you learned in the first part of the session to apply them to your projects. This section will also utilize .md files to reinforce the concepts without adding the complexity of code. The instructions in this session will be less detailed giving you the opportunity to work through issues with your team.
Ask our mentors for help. They are here to help you out with understanding these concepts. Ask mentors and they can help you solve the problem or at least point you in the right direction.
This will be a brief overview on how to set up your repository for this exercise. If you need additional help refer to the instructions from the previous session or create a ticket on the discord channel and we will help you.
- One person on the team will fork this repository to their own github and add each team member as a collaborator.
- Each team member will clone the forked repository to their machine
- Each member should create a branch using the format
bio/<member-name>
One of the biggest challenges with collaboratively coding that can be overcome is conflicts between different versions of code. However, it can become difficult to review these conflicts and fix them within a command line interface and basic text editor. We suggest you use an Integrated Development Environment (IDE). Our preferred IDE is VSCode.
-
To start this exercise each team member should make a branch to add their name to the main file. To keep things organized use the naming convention
feat/<yourname>/teamfilefor this branch. -
Make sure that you are editing on the branch that you just created
git checkout feat/<yourname>/teamfile
-
Get each member of your group to add their name to the
introductions.mdfile and commit the changes.Hint: Remember you can use the
git addcommand to track files andgit commitcommand to commit your changes. -
We recommend screensharing this step with your team Each team member will merge their changes with the main branch. Start by checking out the main branch using the
git checkoutcommand. Then pull the latest version of the main branch from Github using thegit pullcommandgit checkout main git pull main
-
Once you have pulled the latest version of main you need to merge the changes from your branch to main. You can do this by using the command
git merge <your branch from step 1>
When running the merge command git will add conflict markers to show you where the conflict is. These are identified using conflict markers
<<<<<<<,=======,>>>>>>>. Fix the conflicts, remove the conflict markers and make another commit. -
Once you have made your commit you can push it to main
git push origin main
-
You should now see the changes you made visible on the repo hosted on Github. Now get each team member to repeat steps 4-6 to integrate their changes.
Imagine you are working on a big project. It is a big site that has some bugs in the front-end and needs to be fixed. You created a branch named “signup_form_branch”, you changed some parts of the code but you are not done yet! In the meantime, one of your colleagues that is working on the database, is facing a bug and needs your help. All you have to do is to checkout on their branch and see what the problem is:
-
To start this exercise each team member should make a branch to add their personal file to the team folder. To keep things organized use the naming convention
feat/<yourname>/myfilefor this branch. -
In your branch create a file in the
yourteamfolder called<yourname>.md. In the file type your name for now. Save the changes. -
In order to link the main team bio to your page switch back to the
mainbranch usinggit checkout main -
You will encounter an error because you have local changes that haven't been committed just yet. In order to save these changes while you add your link use the command
git stash -
Now you should be able to successfully checkout the main branch
-
Add the link to your page on your team's main introduction page. Save the change, commit it, and then push it.
Hint: Review some of the previous documentation if you forget which commands to use for this
-
Move back to the branch you were working on before using the
git checkoutcommand, and recover your stashed changes usinggit stash pop
This exercise is a continuation of exercise 3. This means you can use the same branch and don't need to make any commits or merge anything from your branch.
On all Github repositories a README.md file will will be displayed just below the main folder structure. Having good readme files is just as important as having good documentation for public or open source projects. Additionally, when employers look at your Github account they can see what each project is about. If you want to see a list of great readme documents check out this repo by Matias Singers on Github.
Hint: If you are looking for some hints on how markdown is formatted, you can always view the source code for this readme file
This exercise is less structured compared to some of the other ones in this session. This is because we want you to experiment with markdown to make your markdown your own. In order to preview your markdown file you can the built in preview feature in VSCode or use a markdown previewer like [https://markdownlivepreview.com/]
Once you have created your personal markdown file you can proceed onto the next exercise.
In this exercise we will look at incorporating the changes you made into the larger repository using Github instead of merging the files manually.
- Make sure you have tracked all of the files that you have changed.
- Commit your branch and push it to Github using the command
git push origin <your branch> - Navigate to the repository page on github and the pull requests tab and click new pull request
- Set the
base:as the main branch - Set the
compare:to the branch you just pushed - Click create pull and wait a moment
- A green button will appear allowing you to merge. This will close the pull request and merge the changes you made into the main branch,
Ever wonder how large projects keep repositories open while still ensuring that the code works? Similarly to how you are using
- Once you have completed all of the exercises and your team bio and information is accurate make sure that your
mainbranch has all of the changes merged. - On GitHub on the main page of your repository, click the pull request button.

- When you are creating your pull requests ensure the base repository is the Hack-Your-Learning repository and the head repository is your forked repository
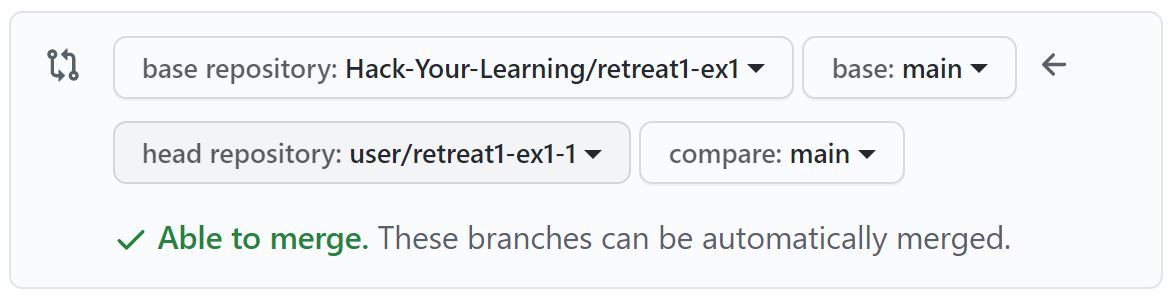
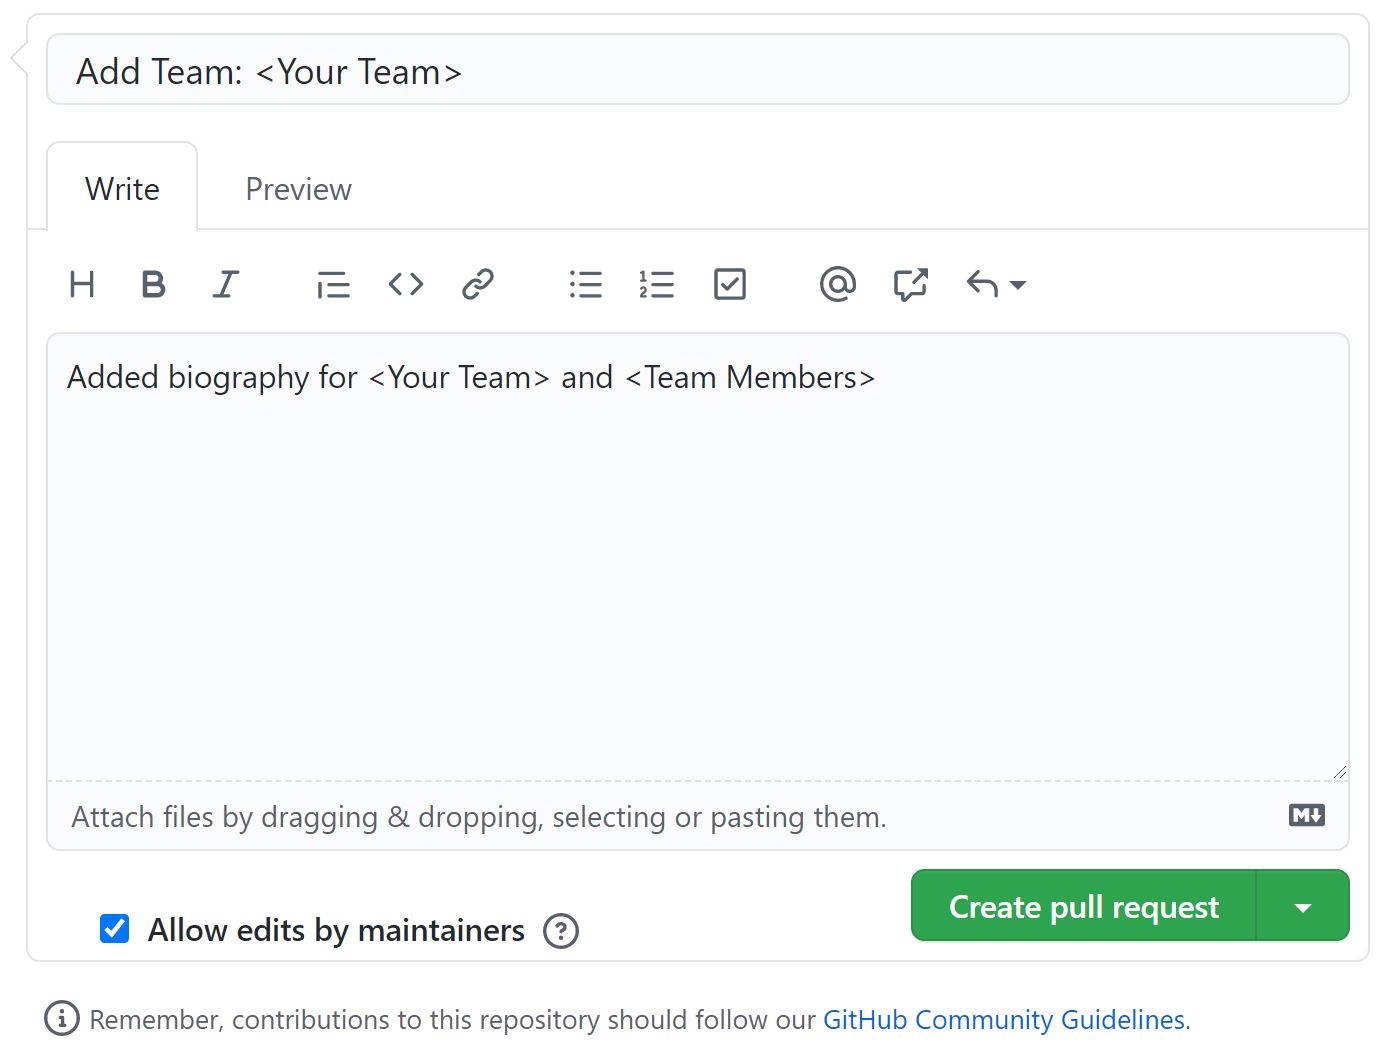
- Click the "Create pull request" button and ensure you are adding a message similar to the one shown in order to keep things organized. You must also make sure "Allow edits by maintainers is checked". All content must follow rules and standards outlined by Hack Your Learning as well as GitHub


We hope you found the exercises in the first two sessions helpful. We designed the content for these sessions with all levels of experiences in mind. If you finish early or just want to come back later and look at some other things feel free to check out some of the concepts below.
When making a pull request to merge files in Exercise 5 it was fairly straight forward to merge because the code was fairly simple. On larger projects with big teams it might be hard to go through everyone's changes and merge them together. In this case it may be easier to rebase merge. This means that you would rebase your branch to the most up to date main branch. During the rebase it would be on the creator of the branch to fix any merge conflicts before creating the pull request.
As you start to use git more in your projects you may encounter some abnormal behavior from git that is restricting you from being able to push your work. In this case you can force push your changes which will ignore any warnings from git. This may seem like an easy solution to challenges you may be facing. Be mindful that force pushing is the git equivalent of unplugging your computer while it's running. It may solve one issue but could cause more as a result.
When using Github you can customize the restrictions on your repositories. The most basic way of securing a repository is by making it private. Github requires you to have a paid account for access to this feature. As a student you are eligible for a free premium account among other perks. You can view more information on Github Education here.