Development to Production workflow + multi-stage builds + docker compose
contain all of the steps we need to customize an image
# Dockerfile
FROM node:19-alpine3.16
WORKDIR /app
COPY package.json .
RUN yarn install
COPY . .
EXPOSE 3000
CMD ["yarn", "start"]
FROM node:19-alpine3.16- we specify a node image so anytime you're customizing an image we have to give it a image that we want to customize
WORKDIR /app- working directory of the container
- anytime we copy any files it's going to run those commands and copy those files into this directory
so we know that anything related to our app is going to be stored in that directory - so technically we don't need this command for anything
COPY package.json .- take the package.json file and copy it into the image
- right and then that way once we copy the package.json file,
- we can do an npm/yarn install to install all of our dependencies
- work directory is specified, so either
/appor.
RUN yarn install- the next thing that we want to do is run an npm install
COPY . .- next thing that you want to do is now copy the rest of all of our code or the rest of all of our files into our container
- an optimization for Docker to build the image faster for future buildsk
- installing dependencies is a very expensive operation
- each line represents a layer, so above codes represents 5 different layers
- Docker builds these images based on these layers
- on build, Docker caches these the result of each layer
- package.json doesn't change that often unless we add a new dependency, we can cache the result of two layers,
- and then when we build the image again, Docker will use the cached result
- Docker would have no idea whether we changed our source code or we changed the dependencies in our packages.json so every time we ran a copy we would have to then do a full npm install regardless of whether or not the dependencies change so we would be unable to take the cache result
- therefore, by splitting up the COPY into two, we can ensure that only when we change our package.json, we have to run an npm install
EXPOSE 3000
CMD ["yarn", "start"]- The app listens on port 3000 so we want to expose port 3000 and then finally we need to do an yarn start to actually start the development server so we'll type in cmd
docker build -t react-image .- outside of containers can't talk to containers by default'
- so
EXPOSE 3000doesn't really do anything else than just exposing the port inside the container
docker run -d -p 3001:3000 --name react-app react-image-
-d: run in detached mode (run in the background) -
-p: port forwarding (forwarding port from the host machine to the container) -
--name: name of the container -
3001: port on the host machine (poked hole for outside world)
-
3000: port on the container (what port we're going to send traffic to our container')
stateDiagram-v2
    state OutsideOfHostMachine {
        direction RL
        [*] --> HostMachine: Port 3001
        [*] --> HostMachine: Localhost 3000
        state HostMachine {
            direction RL
            yswsii:React\nContainer
            [*]-->yswsii: Port 3000
        }
    }
stateDiagram-v2
    Chrome
    state DockerReactContainer {
        state ReactDevServer {
            index.html
            CSS
            JS
        }
    }
    direction LR
    Chrome --> DockerReactContainer: Port 3000
    DockerReactContainer --> Chrome: Port 3000
prevent unnecessary files from being copied into the image
Let's check the files inside the container first,
docker exec -it react-app sh # or bash if sh doesn't work

ls -a
docker exec: run a command in a running container-it: interactive terminalreact-app: container nameshorbash: shell (not every image is using the bash shell)
You will see a bunch of files that are unnecessary to keep inside.
Let's create .dockerignore in the root folder of your local environment.
# .dockerignore
node_modules
Dockerfile
.git
.gitignore
.dockerignore
.envdocker stop react-app
docker rm react-app # `-f` to force remove if don't skip stop
docker build -t react-image .
docker run -d -p 3001:3000 --name react-app react-imagedocker exec -it react-app shls -aNow Docker runs the container named react-appwith the image that we created. However, the local changes won't apply to the app inside the container. We're gonna look into that.
By default, all files created inside a container are stored on a writable container layer. This means that:
-
The data doesn’t persist when that container no longer exists, and it can be difficult to get the data out of the container if another process needs it.
-
A container’s writable layer is tightly coupled to the host machine where the container is running. You can’t easily move the data somewhere else.
-
Writing into a container’s writable layer requires a storage driver to manage the filesystem. The storage driver provides a union filesystem, using the Linux kernel. This extra abstraction reduces performance as compared to using data volumes, which write directly to the host filesystem.
Docker has two options for containers to store files on the host machine, so that the files are persisted even after the container stops: volumes, and bind mounts.
Docker also supports containers storing files in-memory on the host machine. Such files are not persisted. If you’re running Docker on Linux, tmpfs mount is used to store files in the host’s system memory. If you’re running Docker on Windows, named pipe is used to store files in the host’s system memory.
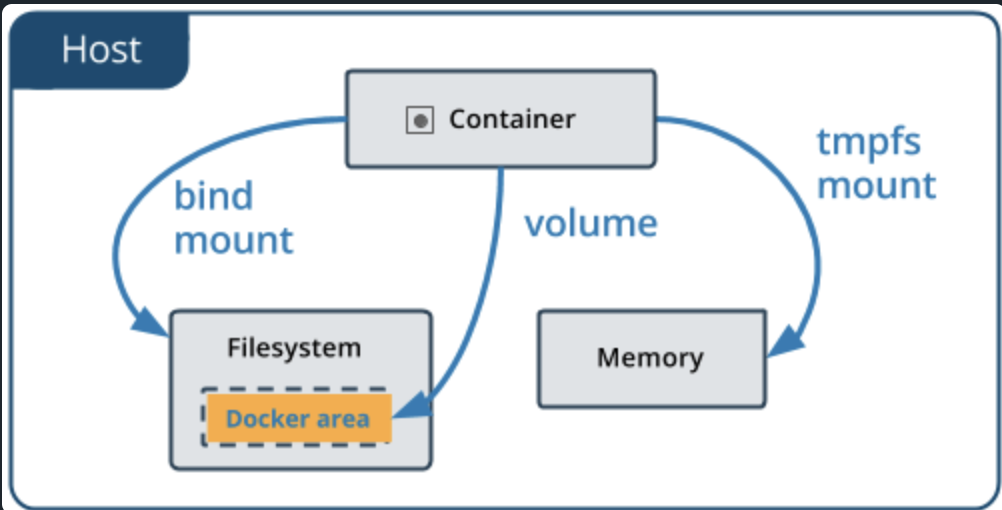
Volumes are the preferred mechanism for persisting data generated by and used by Docker containers. While bind mounts are dependent on the directory structure and OS of the host machine, volumes are completely managed by Docker.

Bind mounts have been around since the early days of Docker. Bind mounts have limited functionality compared to volumes. When you use a bind mount, a file or directory on the host machine is mounted into a container. The file or directory is referenced by its absolute path on the host machine.
By contrast, when you use a volume, a new directory is created within Docker’s storage directory on the host machine, and Docker manages that directory’s contents.

If you’re running Docker on Linux, you have a third option: tmpfs mounts. When you create a container with a tmpfs mount, the container can create files outside the container’s writable layer.
As opposed to volumes and bind mounts, a tmpfs mount is temporary, and only persisted in the host memory. When the container stops, the tmpfs mount is removed, and files written there won’t be persisted.
To make your local development environment communicate with the container you created, you need to use bind mounts method.
Stop container
docker rm react-app -fAnd run the container with bind mounts
docker run -v $(pwd):/app -d -p 3001:3000 --name react-app react-image-
-v: bind mount (also can be volumes depending on the first field)-v dirlocaldirectory:containerdirectory-v $(pwd):/app: bind mount the current working directory to the/appdirectory in the container- you can only sync
srcfolder
-
Official document recommend new users use
--mountinstead of--volume | -vwhen bind mounts because it give a way clear readability.
docker run --mount type=bind,source="$(pwd)",target=/app -d -p 3001:3000 --name react-app react-image- the documentation shows Volumes and Bind mounts both use
-vflag, only the difference is the first field:- for Volumes: In the case of named volumes, the first field is the name of the volume, and is unique on a given host machine. For anonymous volumes, the first field is omitted.
- for Bind mounts: In the case of bind mounts, the first field is the path to the file or directory on the host machine.
*(update 01.26.2022) I found that HMR works without setting up CHOKIDAR_USEPOLLINGvalue. I followed the implementation right below and HMR works perfectly. Please leave a comment if it doesn't work.
To enable hot reload,
add CHOKIDAR_USEPOLLING=true as ENV to your Dockerfile
What is chokidar anyway?: Minimal and efficient cross-platform file-watching library
...
...
ENV CHOKIDAR_USEPOLLING=true
COPY . .
...
or you can add it to your docker run command with -e flag
docker run -e CHOKIDAR_USEPOLLING=true -v $(pwd):/app -d -p 3001:3000 --name react-app react-image*(update 01.26.2022) I found that HMR works without setting up CHOKIDAR_USEPOLLING value on MacOS. I followed the implementation right below and HMR works perfectly. Please leave a comment if it doesn't work.
-
Create
setup.jsfile in the root directory// setup.js const fs = require('fs'); const path = require('path'); if (process.env.NODE_ENV === 'development') { const webPackConfigFile = path.resolve( './node_modules/react-scripts/config/webpack.config.js' ); let webPackConfigFileText = fs.readFileSync(webPackConfigFile, 'utf8'); if (!webPackConfigFileText.includes('watchOptions')) { if (webPackConfigFileText.includes('performance: false,')) { webPackConfigFileText = webPackConfigFileText.replace( 'performance: false,', "performance: false,\n\t\twatchOptions: { aggregateTimeout: 200, poll: 1000, ignored: '**/node_modules', }," ); fs.writeFileSync(webPackConfigFile, webPackConfigFileText, 'utf8'); } else { throw new Error(`Failed to inject watchOptions`); } } }
the setup.js will find the webpack.config.js file and add watchOptions to it.
-
Change
startscript inpackage.json"scripts": { "start": "node ./setup && react-scripts start", ... },
-
Set
WDS_SOCKET_PORTto the current port as ENV on Dockerfile... ENV WDS_SOCKET_PORT=3001 COPY . . ...or you can add it to the
docker runcommand with-eflagdocker run -e WDS_SOCKET_PORT=3001 -v $(pwd):/app -d -p 3001:3000 --name react-app react-image- otherwise, you'll see
WebSocketClient.js:16 WebSocket connection to 'ws://localhost:3000/ws' failed:error on your console
- otherwise, you'll see
-
Remove the running container and re-run it.
docker rm react-app -f

docker run -v $(pwd):/app -d -p 3001:3000 --name react-app react-image
because the current setting won't stop the container write to the host machine(local machine), and this is not necessary, so we can make the bind mount readonly
# using volume flag: insert `:ro` after destination directory
docker run -e CHOKIDAR_USEPOLLING=true -v $(pwd)/src:/app/src:ro -d -p 3001:3000 --name react-app react-image
# using mount flag: add `,readonly` in type
docker run -e CHOKIDAR_USEPOLLING=true --mount type=bind,source="$(pwd)"/src,target=/app/src,readonly -d -p 3001:3000 --name react-app react-image
Now container can't write to the host machine.
One thing to notice is that the readonly has set to files inside the src folder. It is because if you include node_modules, you will see the eslint cache error inside the node_modules folder once you run docker run command.
[eslint] EROFS: read-only file system, open '/app/node_modules/.cache/.eslintcache'➜ docker exec -it react-app sh
$ cd src
$ touch hello
touch: hello: Read-only file systemCompose is a tool for defining and running multi-container Docker applications. With Compose, you use a YAML file to configure your application’s services. Then, with a single command, you create and start all the services from your configuration.
- as you keep working with docker some of your docker run commands will start to get even longer than this
- generally when you're working with a dockerized application you're going to have multiple containers that you need to spin up to actually do all of your testing and to do your development
- imagine having to remember five or six of these long commands for you to have to run just to bring up your development environment and then imagine having to kill all those containers one by one 😅
# version of docker
# https://docs.docker.com/compose/compose-file/compose-file-v3/
version: '3.8'
services:
  # service represent container
  react-app:
    build: .
    ports:
      - '3001:3000'
    volumes:
      - ./src:/app/src
    environment:
      - CHOKIDAR_USEPOLLING=true # if you're on Windows
docker-compose upto start the container. (if you havedocker-compose.ymlfile in the current directory)- Docker will create a network for the containers to communicate with each other.
⠿ Network practice-dockerize-react-app_default Created
- Docker will create a new image for the container and the container itself.
=> exporting to image⠿ Container practice-dockerize-react-app-react-app_1 Created- check the image with
docker image ls
- I found it's no longer needed to feed the
WDS_SOCKET_PORTenvironment variable
When you make changes to the Dockerfile and rerun docker-compose up, Docker won't rebuild the image and just restart the container.
It because Docker only looks for a docker image with a specific name based of your project directory and the service name it has no idea if this is the latest image if this is a stale image it just looks for an image with that name and if it sees it it's not going to rebuild it
so you have to tell docker compose when you want to rebuild
docker-compose up -d --buildif you sent a couple thousand connections it would probably destroy it
you have to change the React Dev Server to a production grade server such as NGINX Server (can be Apache)
stateDiagram-v2
    Chrome
    state Docker_React_Container {
        state NGINX_SERVER {
            index.html
            CSS
            JS
        }
    }
    direction LR
    Chrome --> Docker_React_Container: Port 3000
    Docker_React_Container --> Chrome: Port 3000
the NGINX server will serve the static files when you run yarn build
what enabled this process is by having multi-stage docker builds
stateDiagram-v2
    state Stage_1 {
      s1:Use Node 19
      s2:Copy package.json file
      s3:Install Dependencies
      s4:Copy rest of files(src code)
      s5:Run build (npm run build | yarn build)
      s1 --> s2
      s2 --> s3
      s3 --> s4
      s4 --> s5
    }
    direction LR
    Stage_1 --> Build
    state Stage_2 {
      s6:Use NGINX
      s7:Copy build folder from Stage_1
      s8:Start NGINX
      s6 --> s7
      s7 --> s8
    }
    Build --> Stage_2
To create production environment, we're going to specify the current Dockerfile as Dockerfile.dev and create a new Dockerfile for production.
Now you need a new command to build the image using Dockerfile.dev on development.
docker build -f Dockerfile.dev .Also the command on the docker-compose.yml file should be changed to
build:
  context: .
dockerfile: Dockerfile.dev# Dockerfile.prod
# Stage 1
FROM node as build
WORKDIR /app
COPY package.json .
RUN yarn install
COPY . .
# EXPOSE 3000 - no need to expose port in prod
RUN ["yarn", "build"]
# Stage 2
FROM nginx
# from /app/build folder to the nginx folder where it serves the static files
COPY --from=build /app/build /usr/share/nginx/htmlcheck out this link for more information about NGINX
docker build -f Dockerfile.prod -t react-image-prod .docker run --env-file ./.env -d -p 8080:80 --name react-app-prod react-image-prod- no need to bind the volume because we're not going to make any changes to the production image
- the default port for NGINX is 80, and you can change
8080:80to80:80or whatnot if you want
Now go to localhost:8080 and you should see the production build of the React App
Let's create 3 different docker-compose files, one for development, one for production, and one for backup.
touch docker-compose.dev.yml docker-compose.prod.yml docker-compose.backup.yml# version of docker
# https://docs.docker.com/compose/compose-file/compose-file-v3/
version: '3.8'
# service represent container
services:
react-app:
build:
# either a path to a directory containing a Dockerfile, or a url to a git repository.
context: .
dockerfile: Dockerfile.dev
# port mapping
ports:
- '3001:3000'
# bind mount
# volume mapping
volumes:
- ./src:/app/src:ro
# environment variables
environment:
- WDS_SOCKET_PORT=3001
- NODE_ENV=development
- REACT_APP_NAME=brandonwie-devFor now, let's just copy and paste the docker-compose.dev.yml file to docker-compose.backup.yml
# version of docker
# https://docs.docker.com/compose/compose-file/compose-file-v3/
version: '3.8'
# service represent container
services:
  react-app:
    build:
      # either a path to a directory containing a Dockerfile, or a url to a git repository.
      context: .
      dockerfile: Dockerfile.prod
    # port mapping
    ports:
      - '8080:80'
    # no bind mount
    # environment variables
    environment:
      - REACT_APP_NAME=brandonwie-prod
The differences between docker-compose.dev.yml and docker-compose.prod.yml are the bind mount, the port mapping, and WDS_SOCKET_PORT environment variable for hot reload.
(*important) WDS_SOCKET_PORT variable is only for the development, and it doesn't need to be configured if you set the TCP port(3000) and the Docker host port(3001) to be the same. I intentionally set the Docker host port to be 3001 just to show you how it actually works.
checkout this page for more for the precedence of the environment variables on Docker
-
inside
Dockerfile- docs linkENV REACT_APP_NAME=myApp -
inside
docker-compose.yml- docs linkreact-app: # Array syntax environment: - REACT_APP_NAME=myApp # Map syntax environment: REACT_APP_NAME: myApp
-
in separate
.envfile, and add it insidedocker-compose.yml- docs linkREACT_APP_NAME=myAppreact-app: env_file: - .env
- Environment variables in
Dockerfileaffectdocker buildanddocker run- TMI: use
--build-argif persistence is not what you want
- TMI: use
- Environment variables in
docker-composecould overridedocker run - Environment variables in
docker-composehave precedence overenv_file
docker-compose -f docker-compose.yml -f docker-compose-dev.yml up -d --buildNow go to localhost:3001 and you should see the development build of the React App
docker-compose -f docker-compose.yml -f docker-compose-prod.yml up -d --buildNow go to localhost:8080 and you should see the production build of the React App
This project was bootstrapped with Create React App. In the project directory, you can run:
Runs the app in the development mode.
Open http://localhost:3000 to view it in the browser.
The page will reload if you make edits.
You will also see any lint errors in the console.
Launches the test runner in the interactive watch mode.
See the section about running tests for more information.
Builds the app for production to the build folder.
It correctly bundles React in production mode and optimizes the build for the best performance.
The build is minified and the filenames include the hashes.
Your app is ready to be deployed!
See the section about deployment for more information.
Note: this is a one-way operation. Once you eject, you can’t go back!
If you aren’t satisfied with the build tool and configuration choices, you can eject at any time. This command will remove the single build dependency from your project.
Instead, it will copy all the configuration files and the transitive dependencies (webpack, Babel, ESLint, etc) right into your project so you have full control over them. All of the commands except eject will still work, but they will point to the copied scripts so you can tweak them. At this point you’re on your own.
You don’t have to ever use eject. The curated feature set is suitable for small and middle deployments, and you shouldn’t feel obligated to use this feature. However we understand that this tool wouldn’t be useful if you couldn’t customize it when you are ready for it.
You can learn more in the Create React App documentation.
To learn React, check out the React documentation.