Made in Unity v.2020.03.18f1
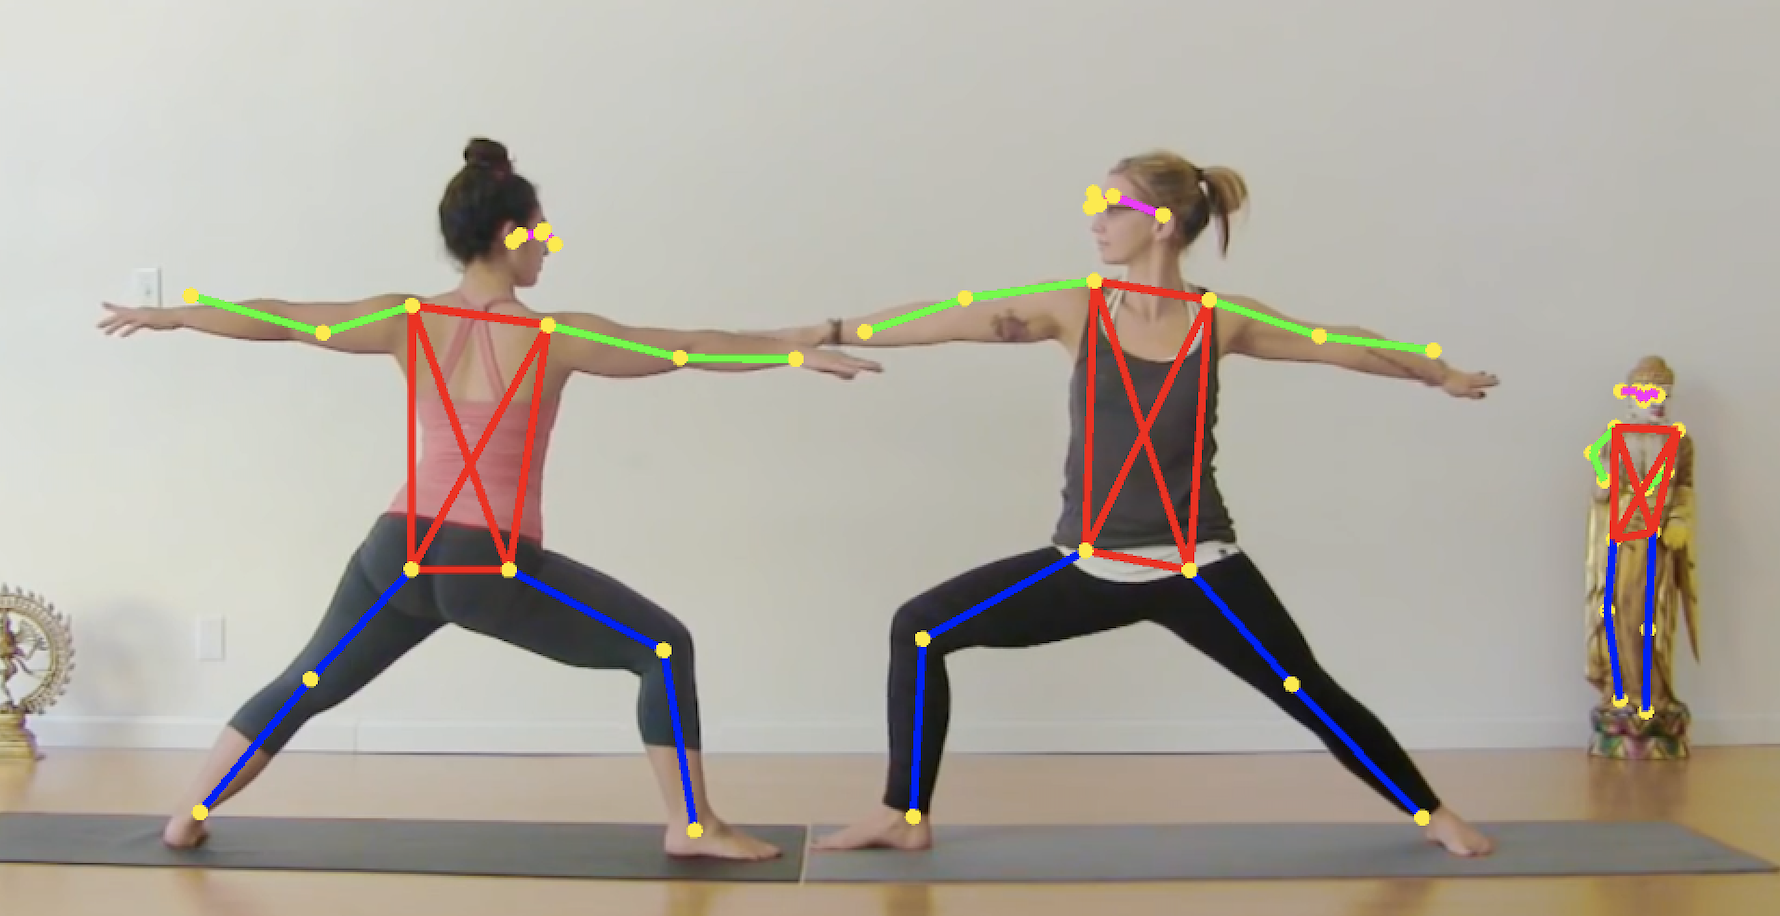
UML_posenet_multi is a ML-based multi-pose estimation made in Unity using barracuda, relying on precomputed models (onnx).
The project consists of posenet implementations, currently containing 4 working models:
- MobileNet
- ResNet50
- DeepMobileNet (more layers added to MobileNet) -> This one is the best of all four
- OpenPose (works only in single-pose estimation)
DeepMobileNet was computed from a pytorch-based checkpoint: https://awesomeopensource.com/project/Daniil-Osokin/lightweight-human-pose-estimation.pytorch The code to generate the DeepMobileNet is in "Assets/Models/pytorch_to_onnx".
There is a post-processing involved to temporarily smooth the predictions using a kalman filter applied on the keypoints to reduce the jitters. This can be tuned-up on the fly.
Most models performances could not be evaluated on GPU (only CPU), but should support it. On a good note, it works surprisingly fine on a macbook pro (SSD).
. Kalman effect demonstrated by deactivating or varying the parameters (using MobileNet):
3_kalman_single_demo.mp4
. Single-pose (using DeepMobileNet with the Kalman filter activated) -> Best model:
skate_single_kal.mov
. Single-pose (using OpenPose with the Kalman filter activated) -> Worst model:
openpose.mp4
. Single-pose (using ResNet50 with the Kalman filter activated):
skate_resnet50.mov
. Single-pose (using MobileNet) - The Kalman filter is activated mid-point:
skate_mobilenet.mov
. Multi-pose (ResNet50 with the Kalman filter activated):
Multi_yoga_resnet50.mov
. Multi-pose (MobileNet with the Kalman filter activated) -> This one did not work well:
multi_yoga_mobilenet.mov
. Multi-pose (DeepMobileNet with the Kalman filter activated):
multi_yoga_deepmobilenet.mov
4_multi_lightmobile_kalman.mov
1.mov
-
Download/clone the repo locally, install Unity and Barracuda.
-
Download the models from here, and put them in the 'Assets/Models' folder.
https://drive.google.com/file/d/11Ry-VCO-epLli8cgFH_GPjVz6-HqU4xb/view?usp=sharing
-
Drag the "ImRickJames" from the ""Assets/Scene" folder to the Hierarchy view.
-
Choose a video from "Assets/Videos", and drag it to the "VideoScreen" game object ('Video Player/Video Clip')
-
Drag the "PoseEstimation.cs" from "Assets/Script" and drag it to the "PoseEstimator" game object (where it says 'missing script').
This should open the other fields to fill:
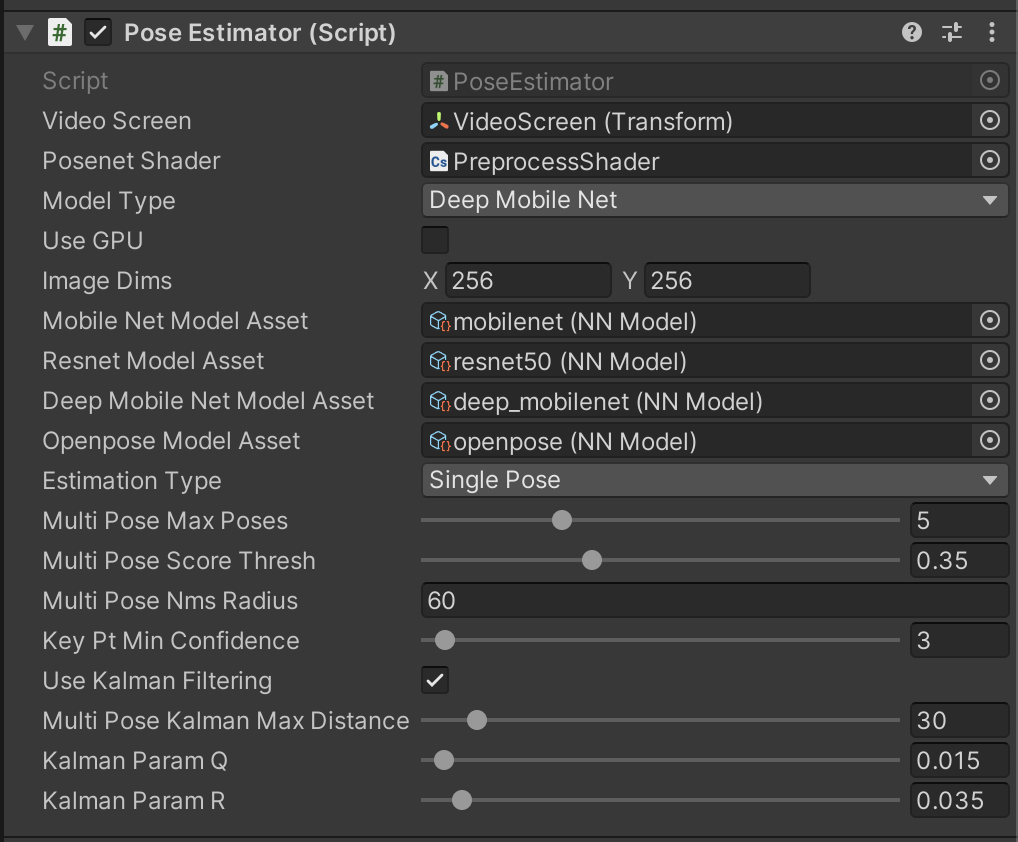
- Fill the missing information to be similar to the screenshot
- Video Screen: Choose Video Screen (duh)
- PoseNet shader: Choose PreprocessShader
- Assets: The ONNX files from the "Assets/Models" folder.
Set the parameters below, press play, enjoy! You can adjust most of the parameters as the video plays.
For all experiments:
- Model Type: Choose one of the four models proposed (OpenPose does not support multi-pose)
- Use GPU: Flag to select if the computation will be made on the GPU or CPU (mainly tested on a macos SSD CPU)
- ImageDims: How the original images will be resized before feeding it to the model. High means more processing power, but better results. The aspect ratio will be adjusted based on the model automatically.
- Estimation Type: Single pose or Multi-Pose. Multi-Pose with a single target works but is less reliable (jittery).
- Key-point Min Confidence: Score that determines if we trust the location of the detected keypoint (if below, the keypoint is hidden)
When using 'multi-pose':
- Multi-pose Max poses: maximum number of objects to track
- Multi-pose Score Threshold: for the heatmaps to determine how many hotspots are present
- Multi-pose NMS: Non-Maximum score radius -> determine if two humans detected are too close together (reduce the case of multiple skeletons put on the same human)
When using 'Kalman filtering' (Q and R are codependent but affect the results differently):
- Multi-pose Kalman distance: (activated only with multi-pose) It remove the Kalman correction if a movement greater than X pixels was detected (in case the skeleton shift place with another)
- Kalman Q: Importance of the observation compared to the prediction (the lower it is, the more we rely on the prediction)
- Kalman R: Covariance of the observation of the keypoint position (the higher it is, the less we trust the measure)
This is a summary of how the project came to life after 5 days.
I started off intending to use resnet34 with 3D heatmap and 3 subsequent frames as the input (the model is included in the project, but unused). I figured that it would be easier to handle it, but the code became a mess. The keypoints order was never constant and I was puzzled with how to handle this inside Unity. Then I took a step back, completed the tutorial from the assignment, and used the code from the tutorial to build up the rest of the project without shortcuts (i.e. start from single 2D pose estimation and build up). This is why I started a new branch from the tutorial, and it later became my master branch (like my cactus at home).
My main difficulty was the limitation in hardware; I could not use my work computer and thus everything was computed on my macos laptop. I was puzzled at first because nothing was working correctly until I remembered that I have a Radeon graphic card (not GeForce), and consequently need to stick to the CPU. Now knowing this, I adapted the code to handle the computation on the CPU, and I was surprised that at my first test it worked fine! I kept the GPU portion, of course, with the hope of testing it on a real computer.
My main plan was:
- Add the multi-pose detection (I adapted the code from the tutorial, which solved most of my problems) -> Here the only thing remaining is adding a "memory" (or Kalman) of the position of a human (not the keypoint). I did not have time to finish this aspect. this would have solved the 'jumping' skeletons in the 'dance' video included.
- Add other models and allow to change it on the fly for testing (I added OpenPose and lost A LOT of time to understand that the number of keypoints and ordering was different).
- Compute a onnx file from a precomputed model -> the thing I called DeepMobileNet, because it is MobileNet with extra steps.
- Add a temporal "memory" of some sort to reduce the jittering -> Here comes the Kalman filter. I could have kept more frames in memory and have a more complex filter, but for the purpose of this assignement, I think it worked well.
- Add a mesh on extracted keypoint -> I never did this
- Add the support for 3D keypoints and resnet34 -> go back to my initial plan!.. but I did not have time to do it.
Sadly, I did not have time to finish the two last points..
If I had more time, I would have explored way more options:
- Preprocess the frame with the shader to remove noise and optimize the contrast
- Postprocess the heatmap before adding the sigmoid layer
- Accumulate heatmaps in memory (like, 8 frames), and perform classic mean-shift approaches to have more stability
- ..or add a small pretrained network the use the 8 heatmaps to produce a "denoised" or more "consistent" one
- Adjust or Add more constraints on the skeleton; I did not spend a lot of time on this.
- and of course, I would have liked to have trained from scratch a different version of mobilenet with more frames as input.. on a GPU.
Please use it freely for research.

