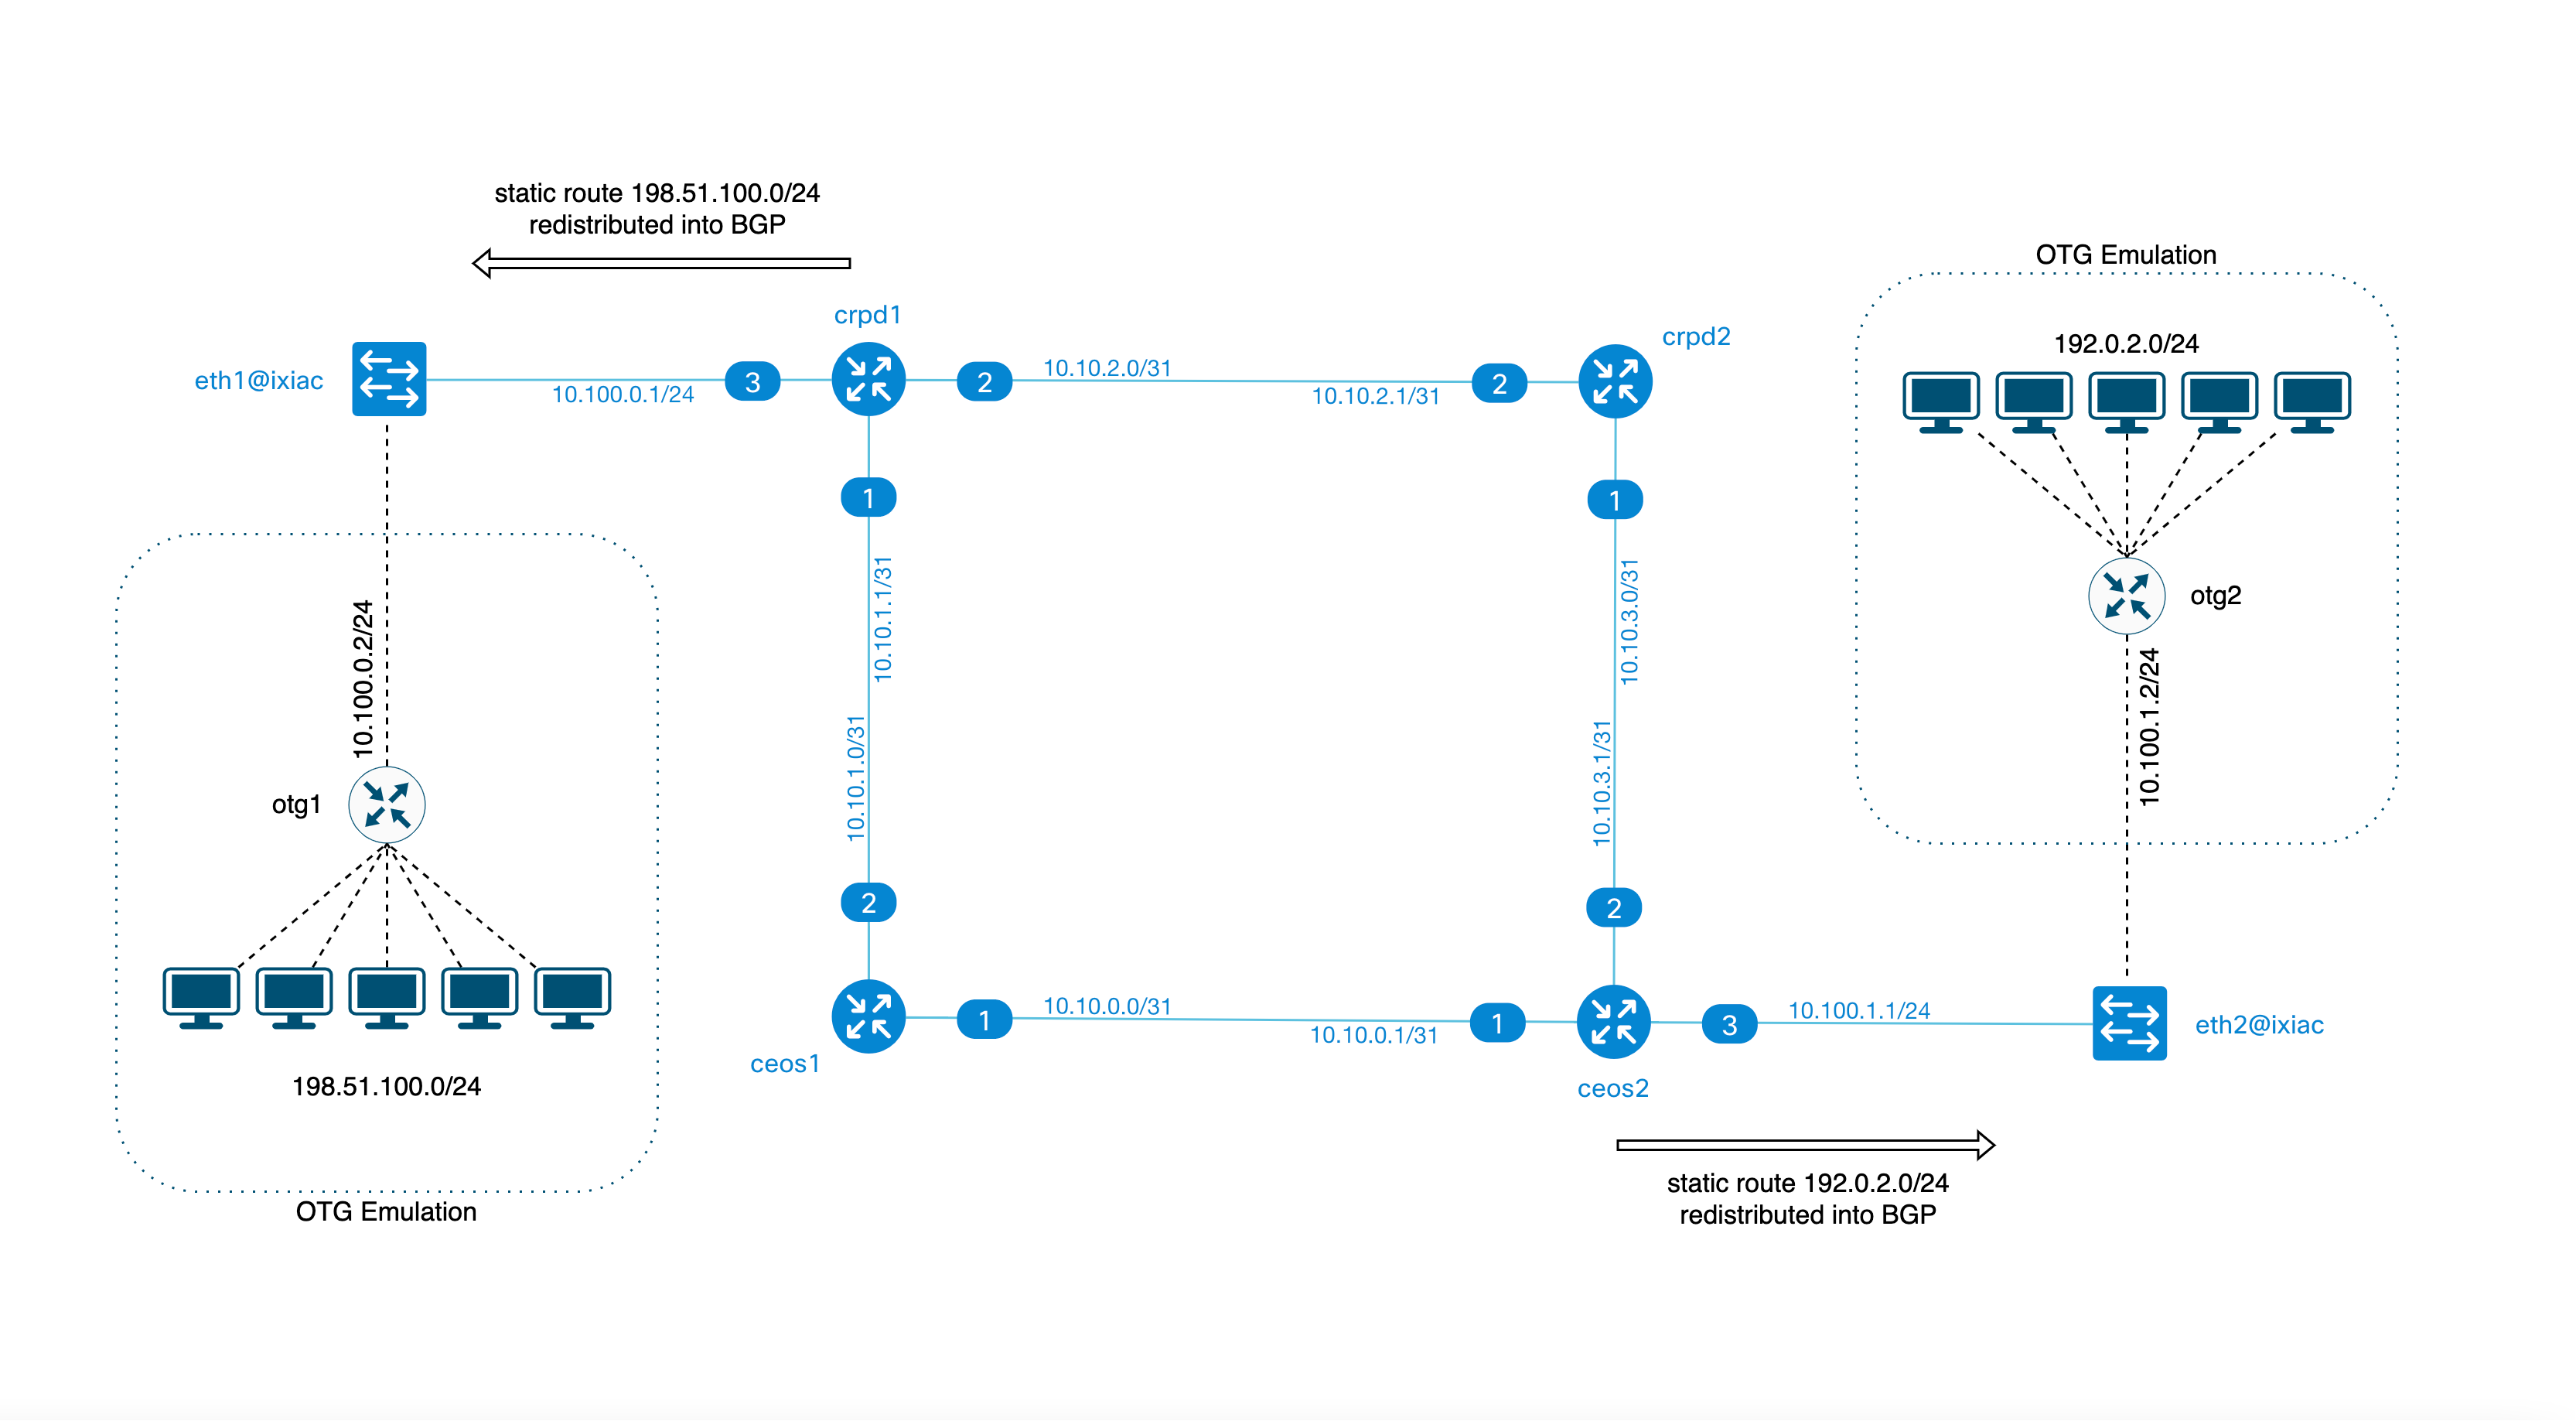
The lab uses Containerlab topology file nanog_clab_otg_202210.yml with ixia-c traffic generator node. This node has replaced host1 and host2 from the original NANOG-86 hackathon setup.
With ixia-c node added, it becomes possible to introduce emulated network devices and traffic endpoints behind ixia-c ports. Such emulation brings more realism to the setup and allows to perform validation of the lab configuration.
For example, we can add an emulated router with a /24 network behind each ixia-c port. A diagram of this configuration is shown below. To define such emulated network elements with ixia-c, a configuration file otg.yml has to be applied to it. The file has to follow Open Traffic Generator specification.
- Binaries needed
-
Linux host or VM with sudo permissions and Docker support
-
git- how to install depends on your Linux distro. NANOG Hackathon EC2 instance already hasgit -
jq- how to install depends on your Linux distro. For NANOG Hackathon EC2 instance:sudo apt install jq -y -
yq. For NANOG Hackathon EC2 instance:sudo snap install yq -
Docker. NANOG Hackathon EC2 instance already has Docker
-
Containerlab. If already installed, upgrade to the latest version
sudo clab version upgrade
-
otgen version 0.3.0 or later
curl -L "https://github.com/open-traffic-generator/otgen/releases/download/v0.3.0/otgen_0.3.0_$(uname -s)_$(uname -m).tar.gz" | tar xzv otgen
sudo mv otgen /usr/local/bin/otgen
sudo chmod +x /usr/local/bin/otgen
- Clone this repository:
git clone https://github.com/bortok/clab-nanog.git
CLABDIR=`pwd`/clab-nanog- Add cRPD license file to
./clab-nanog/files/junos_sfnt.lic. For AWS EC2 instance provided for NANOG Hackathon, use
ln -s /opt/clab/files/junos_sfnt.lic ${CLABDIR}/files/junos_sfnt.lic- If not already present, pull Docker images for Arista cEOSLab and Juniper cRPD and tag them as
ceos:latestandcrpd:latestrespectively. NANOG Hackathon EC2 instance already has these images.
- Use Containerlab to launch the topology
cd ${CLABDIR}
sudo -E clab dep -t nanog_clab_otg_202210.yml- Pull MAC addresses from the running topology. Here, to we're using an API call to the
graphitecontainer to collect live node data information, including MAC addresses, from the running nodes.
curl -s http://localhost:8081/collect/clab/nanog86_otg/nodes/ > node-data.json
DMAC1=`cat node-data.json | jq -r '.nodes[] | select(.hostname=="crpd1") | .interfaces["eth3"].mac_address'`
DMAC2=`cat node-data.json | jq -r '.nodes[] | select(.hostname=="ceos2") | .interfaces["Ethernet3"].mac_address'`
echo $DMAC1 $DMAC2- Initialize test parameters via ENV variables
OTG_API="https://clab-nanog86_otg-ixiac"
HOST1=10.100.0.2
HOST2=10.100.1.2
GW1=10.100.0.1
GW2=10.100.1.1

TESTIP1=198.51.100.1
TESTIP2=192.0.2.1- Use
otgentool to generateotg.ymlfile with the test parameters defined above:
otgen create device --name otg1 --ip $HOST1 --gw $GW1 --port p1 --location eth1 | \
otgen add device    --name otg2 --ip $HOST2 --gw $GW2 --port p2 --location eth2 | \
otgen add flow --name f1 --dmac $DMAC1 \
                  --src $TESTIP1 --dst $TESTIP2 \
                  --tx otg1 --rx otg2 | \
otgen add flow --name f2 --dmac $DMAC2 \
                  --src $TESTIP2 --dst $TESTIP1 \
                  --tx otg2 --rx otg1 \
> otg.yml- Take a look at the content of
otg.ymlyou just created. Use OTG Specification as a reference. Note, although we usedotgentool to create the file, this could be done in a variety of different ways. See more here.
- Run traffic test between emulated devices using test IPs. THIS TEST IS EXPECTED TO FAIL - you shall not see any RX counters increasing. The reason is the initial configuration of the lab doesn't include static routes to the
TESTIP1andTESTIP2.
cat otg.yml | \
otgen run --insecure --api $OTG_API \
          --metrics flow | \
otgen transform --metrics flow |
otgen display --mode table- Add static routes to test subnets to
cprd1andceos2routers asixia-ctest ports are connected to them. Redistribute static routes into BGP for remaining routers to learn them. Note, forceos2, you need to launch a CLI terminal session first, wait for the prompt, and only then paste the configuration commands.
sudo docker exec -it clab-nanog86_otg-crpd1 cli
configure
set routing-options static route 198.51.100.0/24 next-hop 10.100.0.2
set policy-options policy-statement BGP_OUT term REDIST from protocol static
commit
exit
exit
sudo docker exec -it clab-nanog86_otg-ceos2 Clienable
configure terminal
ip route 192.0.2.0/24 10.100.1.2
router bgp 65003
redistribute static
exit
exit
exit- Run traffic test again
cat otg.yml | \
otgen run --insecure --api $OTG_API \
          --metrics flow | \
otgen transform --metrics flow |
otgen display --mode table- In the previous steps we used
otgentool to applyotg.ymlconfiguration toixia-c, but any REST API client can be used for this instead. For example, let's usecurlas documented here
OTG_HOST="https://clab-nanog86_otg-ixiac"

cat otg.yml | yq -o=json '.' > otg.json

curl -k "${OTG_HOST}/config" \
    -H "Content-Type: application/json" \
    -d @otg.json

curl -k "${OTG_HOST}/control/transmit" \
    -H  "Content-Type: application/json" \
    -d '{"state": "start"}'

watch -n 1 "curl -sk \"${OTG_HOST}/results/metrics\" \
    -X POST \
    -H  'Content-Type: application/json' \
    -d '{ \"choice\": \"flow\" }'"
- Destroy the topology
sudo -E clab des -t nanog_clab_otg_202210.yml -c