Antivirus Automation for Azure Storage is an ARM template that sets resources in your environment in order to protect an Azure blob container from malware by scanning every blob that’s uploaded. The project consists of a function triggered when files are uploaded to or updated in a Blob storage container, and a Windows VM that utilizes Microsoft Defender Antivirus.
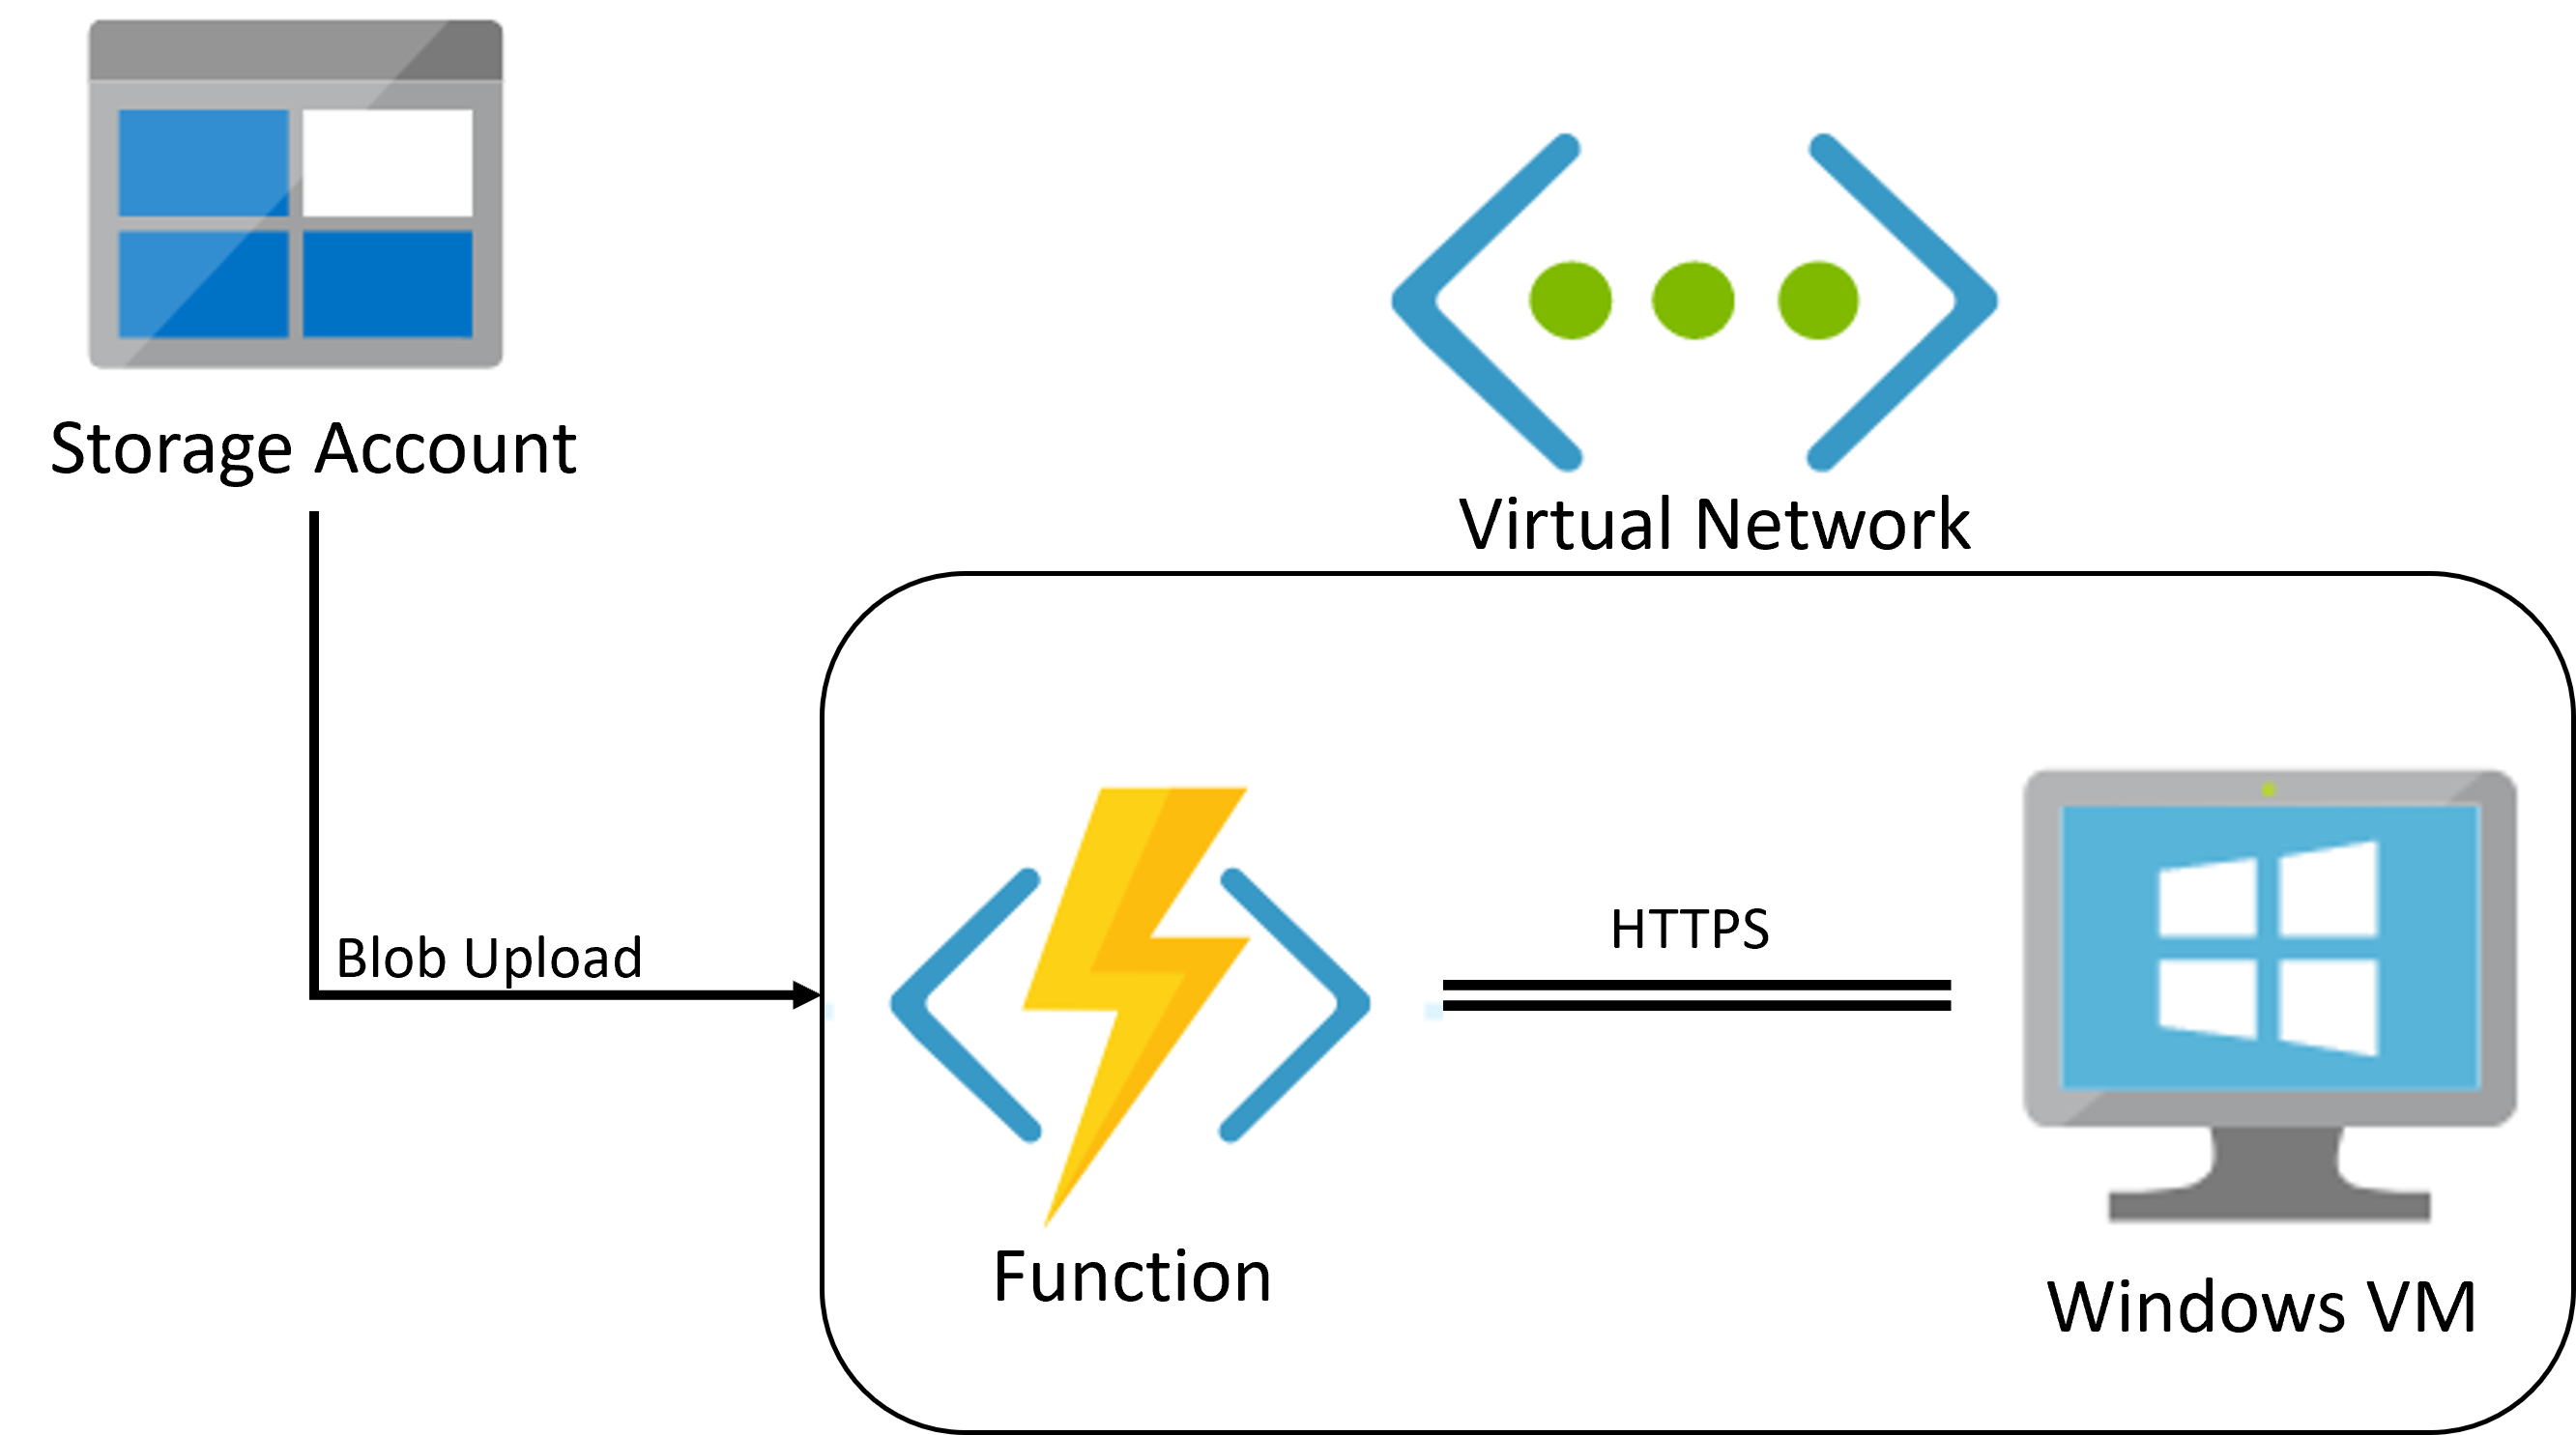
For each blob uploaded to the protected container, the function will send the blob to the VM for scanning and change the blob location according to the scan results:
- If the blob is clean, it’s moved to the clean-files container
- If it contains malware it’s moved to the quarantine container
The Azure function and the VM are connected through a virtual network and communicate using HTTPS requests.
The system:
- Supports parallel blob scanning
- Is designed for simple use for Dev and Non-Dev users
- Can be customized
List of created resource:
- Function App
- App Service Plan
- Virtual Network
- Network Security Group
- Storage Account - Host for the function app
- Virtual Machine
- Disk - Storage for the VM
- Network Interface - NIC for the VM
- Key Vault
- Stores connection string to the storage account to scan as a secret
- Optional: Public IP - Used to access the VM from public endpoint
- Azure Subscription
- General-purpose Azure Storage account with at least one blob container. This is the blob container that will be scanned on upload.
The Azure Blob storage trigger requires a general-purpose storage account. Storage V2 accounts with hierarchical namespaces are also supported. To use a blob-only account, or if your application has specialized needs, review the alternatives to using this trigger.
*Please note: If your storage account is protected by a Vnet – do not use this template.
Instead, follow the “Existing Vnet variation” section below which will help you configure your environment and then deploy this Antivirus Automation for a Storage Account protected by an existing Vnet.
- Use this link to deploy the ARM template
- Enter the necessary information for the deployment:
-
The empty mandatory fields are the only ones you need to complete. All other fields have default parameters that you can leave unmodified.
-
The “Region” field is determined by the subscription you choose to deploy these resources in. It is recommended you choose an existing subreption or create a new one in the same region your Storage Account is in, in order to avoid moving data between different regions.
-
Choose the VM size and the App Service Plan (SKU) to support your needs.
- The App Service Plan affects the throughput - the amount of data that can be scanned at a certain time.
- The VM size affects the maximal file size that you can scan.
You can modify the VM size and App Service Plan any time to support higher loads, the update will cause a few minutes downtime.
-
- (Optional): enable app insights for the function – to support understanding and debugging the process. You can export telemetry to various destinations, including Azure Monitor logs.
- (Optional): test, by uploading an EICAR. See instructions below
- (Optional): See the additional configurations below to support larger scale and custom response
- Blobs uploaded to the protected container are sent from the Function to VM through HTTPS request inside the Virtual Network.
- Files potentially containing malware are saved locally by the VM for scanning. They're deleted afterwards. So be aware that the VM might be compromised.
- The port number for the communication is hardcoded and can't be passed as parameter.
- The ARM template deployment can take up to 10 minutes so be patience.
- Monitoring the system:
- Function - you can configure Azure Application Insights resource to monitor the Function logs by going to your Function->Monitor->Configure Application Insight.
- Scan HTTP Server - logs kept inside the machine in /log/ScanHttpServer.log as a single file.
-
On your computer, create a text file using Notepad (or any other text editing program) and copy the following string into it: X5O!P%@AP[4\PZX54(P^)7CC)7}$EICAR-STANDARD-ANTIVIRUS-TEST-FILE!$H+H*
This is a malware test file, called EICAR (see more information), and should be regarded as malware by all antivirus software.
- In case your computer’s AV marked the file as malicious, you can exclude a dedicated folder from being scanned, and create the EICAR again inside that folder.
-
Upload the EICAR to the designated upload container (any upload method will work)
-
You can see the process of the AV by turning on the Monitor blade of the Azure Function, and see the events being logged
This section refers to the case in which your storage account can't be accessed through public endpoints but only through virtual network. This template deploys the scanning system to an existing virtual network to gain access to your storage account. Unlike the simple scenario this case requires some manual steps in order to complete the deployment using Azure portal:
- Open the storage account (the storage account to scan)
- Go to Networking section under Security + networking
- Under Virtual Networks click "Add existing virtual network"
- Inside the "Add network" form choose the virtual network used for the deployment and add the new subnets:
- functionSubnet
- VMSubnet
- Click "Add"
- Save the new configuration using the "Save" button
- Deploy the ARM template:
The two resources that need to be adjusted to support higher scale are the VM and the App Service (for the Function).
- The App Service Plan affects the throughput - the amount of data that can be scanned at a certain time.
- The VM size affects the maximal file size that you can scan.
You can start with the basic plans and later adjust them to your needs. You can modify the VM size and App Service Plan any time to support higher loads, the update will cause a few minutes downtime. This solution scales up, but not out, so this solution might be limited in supporting extremely heavy workloads. An approach that can work for certain cases would be to distribute your data across several storage accounts and set up several instances of this solution.
This part is for users that want to modify the code and make some changes.
- Azure Subscription
- Azure Storage Account with at least one blob container
- Azure Storage Account to host the code package (can be the same as the target Storage Account)
- .Net Core 3.1 SDK installed
- Azure CLI Tools installed - Install Azure CLI
- Knowledge of PowerShell scripting and Git
-
ScanUploadedBlobFunction - contain the Azure Function Blob Trigger source code.
-
ScanHttpServer - contains the HttpServer project that runs on the VM and waits for requests, the VM has in Init Script to start the ScanHttpServer. The script can be found in the same folder and can be modified too. The ScanHttpServer will be run with a simple script that restart the app if it crashes (/ScanHttpServer/runLoop.ps1)
-
Build and Deploy Script (BuildAndDeploy.ps1) - will prepare the project for deployment, upload the source code to a host storage account and deploy the arm template using the parameters in the script (the script overrides the ARM template parameters file).
-
Function Code - build, zipped and uploaded
- build command:
dotnet publish <csproj-file-location> -c Release -o <out-path>
-
ScanHttpServer Code - build, zipped and uploaded using this command:
dotnet publish -c Release -o <csproj-file-location>
-
The zip file must contain the ScanHttpServer binary files and runLoop.ps1 script to run the server on the VM.
-
Build and Deploy Script Parameters:
- sourceCodeStorageAccountName - Storage account name to store the source code, must be public access enabled.
- sourceCodeContainerName - Container name to store the source code, can be new or existing, if already exists must be with public access.
- subscriptionID - Storage account to scan subscription ID.
- targetResourceGroup - Storage account to scan resource group name.
- targetStorageAccountName - Name of the storage account to scan.
- targetContainerName - Name of the container to scan.
- deploymentResourceGroupName - Resource group to deploy the AV system to.
- deploymentResourceGroupLocation - Resource group Geo location.
- vmUserName - VM username
- vmPassword - VM password
-
- Use the following command to clone the repo
git clone https://github.com/Azure/azure-storage-av-automation.git - Modify the project
- Open Storage AV Automation/Scripts/BuildAndDeploy.ps1 and enter the necessary parameters
- Run the script. During the execution, you will be prompted to enter your Azure credentials.
- The script also deploys the ARM template.