
Blingbling is a graphical widget library for Awesome Windows Manager. The goal of the Blingbling library is to provide more fancy, customizable and easy to setup graphical widgets, popups or signals for Awesome WM.
Originally, I have written Blingbling for myself but I share it under the GNU GPL-v2 (http://www.gnu.org/licenses/old-licenses/gpl-2.0.html). Testers and feedbacks are welcome!
The current version is the v2.2 and it works with Awesome WM <= awesome v3.5.8 and Lua <= 5.3. Don't use the master branch of blingbling, this is an advice not an obligation. Some widgets may not work as expected because I am working on them. See the installation part below, in order to install the v2.2 version.
- line_graph
- progress_graph
- triangular_progress_graph
- value_text_box
- volume
- popups
- net
- task_warrior
- udisks_glue
- system
- clock
- tagslist
- text_box
- calendar
- extended_calendar
- grid
- transient
This part is an adaptation of some of the wlourf awesome stuff : http://wlourf.deviantart.com/art/widgets-for-awesome-wm-v1-3-269061228.
- wlourf circle
with $XDG_CONFIG_HOME usually ~/.config
-
With Git:
cd $XDG_CONFIG_HOME/awesome/ git clone git://github.com/cedlemo/blingbling.git cd blingbling git checkout v2.2
-
Download with command line tools
cd $XDG_CONFIG_HOME/awesome/ wget https://github.com/cedlemo/blingbling/archive/v2.2.zip unzip v2.2.zip blingbling -
Download with your browser go to : https://github.com/cedlemo/blingbling/tree/v2.2
In your rc.lua:
require("blingbling")
You can find a full documentation for each widgets in the doc directory, just open the index.html file.
Create a line graph and fill it with vicious for example (you can configure the widget with a table or with the related methods ):
cpu_graph = blingbling.line_graph({ height = 18,
                                        width = 200,
                                        show_text = true,
                                        label = "Load: $percent %",
                                        rounded_size = 0.3,
                                        graph_background_color = "#00000033"
                                      })
--cpu_graph:set_height(18)
--cpu_graph:set_width(200)
--cpu_graph:set_show_text(true)
--cpu_graph:set_label("Load: $percent %")
--cpu_graph:set_rounded_size(0.3)
--cpu_graph:set_graph_background_color("#00000033")
vicious.register(cpu_graph, vicious.widgets.cpu,'$1',2)Create some progress graphs :
cores_graph_conf ={height = 18, width = 8, rounded_size = 0.3}
cores_graphs = {}
for i=1,4 do
  cores_graphs[i] = blingbling.progress_graph( cores_graph_conf)
  vicious.register(cores_graphs[i], vicious.widgets.cpu, "$"..(i+1).."",1)
end
Add those widgets to your wibox:
for i=1,4 do
  left_layout:add(cores_graphs[i])
endCreate a value text box:
home_fs_usage=blingbling.value_text_box({height = 18, width = 40, v_margin = 4})
--home_fs_usage:set_height(16)
--home_fs_usage:set_width(40)
--home_fs_usage:set_v_margin(2)
home_fs_usage:set_text_background_color("#00000099")
home_fs_usage:set_values_text_color({{"#88aa00ff",0}, --all value > 0 will be displayed using this color
                          {"#d4aa00ff", 0.75},
                          {"#d45500ff",0.77}})
--There is no maximum number of color that users can set, just put the lower values at first.
home_fs_usage:set_text_color(beautiful.textbox_widget_as_label_font_color)
home_fs_usage:set_rounded_size(0.4)
home_fs_usage:set_font_size(8)
home_fs_usage:set_background_color("#00000044")
home_fs_usage:set_label("usage: $percent %")

vicious.register(home_fs_usage, vicious.widgets.fs, "${/home used_p}", 120 )Create a triangular progress graph (can be feed with vicious too):
triangular = blingbling.triangular_progressgraph({height = 18, width = 40, bar = true, v_margin = 2, h_margin = 2})
triangular:set_value(0.7)Create a volume widget (triangular progress bar with specific methods):
volume_master = blingbling.volume({height = 18, width = 40, bar =true, show_text = true, label ="$percent%", pulseaudio = true})
volume_master:update_master()
volume_master:set_master_control()Add popups to one or more widget with blinbling.popups module:
--Example with cpu_graph created previously with default color :
blingbling.popups.htop(cpu_graph, { terminal =  terminal })

--Example with custom colors:
blingbling.popups.htop(cpu_graph, { title_color = beautiful.notify_font_color_1 , user_color = beautiful.notify_font_color_2 , root_color = beautiful.notify_font_color_3 , terminal = terminal })Create a net widget with a popup that display connection informations:
netwidget = blingbling.net({interface = "eth0", show_text = true})
netwidget:set_ippopup()
Create a new task_warrior menu:
task_w = blingbling.task_warrior({ menu_icon = file_path, project_icon = file_path, task_icon = file_path ,task_done_icon = file_path, width})
task_w:set_project_icon(themes_dir .. "/test/titlebar/maximized_focus_active.png")Create a menu which displays mounted media with actions like mount/unmount/detach/eject. Must be used with .udisks-glue.conf that I created. ( The name of the variable containing the widget must be the same in your rc.lua and in the .udisks-glue.conf).
udisks_glue=blingbling.udisks_glue.new({ menu_icon = themes_dir .. "/test/titlebar/maximized_focus_active.png"})note: Added minor update to allow udisks_glue to insert a device without mounting it. See .udisks_glue.conf
Provide buttons with menu in order to reboot or shutdown the system. User can set icon for menu, accept and cancel actions.
shutdown=blingbling.system.shutdownmenu(beautiful.shutdown,
                                        beautiful.accept,
                                        beautiful.cancel)

reboot=blingbling.system.rebootmenu(beautiful.reboot,
                                    beautiful.accept,
                                    beautiful.cancel)
lock=blingbling.system.lockmenu() --icons have been set in theme via the theme.bligbling table
logout=blingbling.system.logoutmenu() --icons have been set in theme via the theme.blingbling tableThis part provides a clock which displays month, day of month and day of week in japanese (kanji form)
mytextclock = blingbling.clock.japanese(" %m、%d、%w、<span color=\"#999999\">%H<span color=\""..blingbling.helpers.rgb(20,31,82).."\">時</span>%M<span color=\""..blingbling.helpers.rgb(20,31,82).."\">分</span> </span>")The blingbling.text_box are widget like Awesome textbox but with more parameters.
- background_color the color used to fill the background
- text_background_color a background color that will be set between the background and the text
- h_margin v_margin margin between the text background and the wibox
- rounded_size the size for rounded corners : this can be a number that applies for all corners or a table of 4 values { upper left, upper right, lower right, lower left }
- text_color, font, font_size
This object is an adaptation of the taglist object from awesome. Tags are blingbling.text_box. Users can provide a style for the tags as the last argument. The style must be a table with the 4 keys corresponding to the states of a tag (normal, focus, urgent, occupied). Each value of this keys are tables with style paramaters of text_box widget. (width, height, h_margin, v_margin, background_color, text_background_color, rounded_size, text_color, font_size, font.
Just replace the line
mytaglist[s] = awful.widget.taglist(s, awful.widget.taglist.filter.all, mytaglist.buttons)with
mytag[s]=blingbling.tagslist(s, awful.widget.taglist.filter.all, mytaglist.buttons --[[, { normal = {}, focus ={}, urgent={}, occupied={} }--]])then add mytaglist[s] in the wibox :
left_layout:add(wibox.layout.margin(mytag[s],0,0,1,1))This widget is different from the calendar of the v2.2 version. It is just a simple grid displaying days of month, week numbers. There are 3 buttons on the first row of the grid that allow you to displays the previous and next month or to return to the current month. Unlike the previous version, it must be added to a wibox in order to be displayed.
You can test it with the file config_example/calendar_rc.lua and the simple theme config_example/calendar_tests/. If you want a calendar that offers the same functionnalities than the previous calendar widget, you should use the extended_calendar.
cal_box = wibox({height = 200, width = 240, ontop = true, x = 200, y = 200})
cal_box.visible = true
local blingbling = require("blingbling")

-- cal = blingbling.calendar({locale = 'fr_FR'})
cal = blingbling.calendar()
cal_box:set_widget(cal)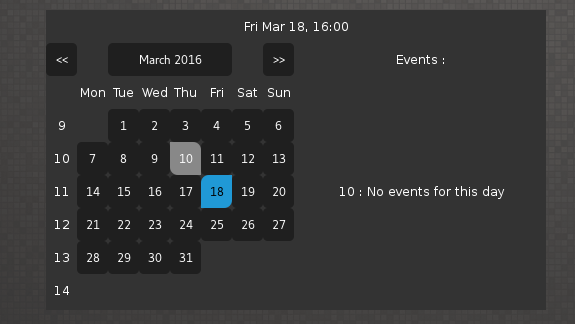
cal_box.visible = trueThis widget is the new version of the calendar module of blingbling v2.2. While the calendar widget is a grid that displays days of month with some little functionnalities, extended_calendar is a wibox that contains a calendar widget and other text_box widgets. It allow you to register callbacks so that when you hover your cursor on a day cell, it triggers you callback. A working example can be find here config_example/extended_calendar_rc.lua. (it needs the application remind and you should adapt the code with your remind configuration file)
-- The arguments of the callback should be vizualized as :
-- calendar_day_widget : the widget that we focus on (it is a blingbling.text_box)
-- month : a number for the month that is displayed by the calendar
-- year  : a number for the year that is displayed by the calendar
-- info_cell : the blingbling.text_box on the right of the extended_calendar grid
local function print_info_enter(calendar_day_widget, month, year, info_cell)
  local day = calendar_day_widget._layout.text
  local month = month
  local day = day
  local str = day .."/"..month.."/"..year.." : No events for this day"
  info_cell:set_text(str)
end

local function print_info_leave(widget, month, year, info_cell)
  info_cell:set_text("")
end

cal = blingbling.extended_calendar({height = 300, width = 500,
                                    ontop = true, x = 200, y = 200,
                                    days_mouse_enter = print_info_enter,
                                    days_mouse_leave = print_info_leave})
It is a layout/container widget. It allows you to add child in the same way of the GtkGrid. The best way to see is to try the config_example/grid_rc.lua.
texts = {}
for i=1,5 do
  c = tostring(i - 1)
  texts[i] = blingbling.text_box({text = tostring(i),
                            background_color = "#"..c..c..c..c..c..c,
                            rounded_size = 0,
                            h_margin = 0,
                            v_margin = 0})
end

grid:add_child(texts[1], 1, 1, 1, 1) -- child, left, top , width, height
grid:add_child(texts[2], 2, 1, 1, 1)
grid:add_child(texts[3], 1, 2, 2, 2)
grid:add_child(texts[4], 3, 2, 2, 2)
grid:add_child(texts[5], 3, 1, 2, 1)

grid_box:set_widget(grid)It is a wibox that can be displayed for a short amount of time. ( TODO : usage example)
This is the circle graph of wlourf that you can feed with vicious.
circle = blingbling.wlourf_circle_graph({radius= 5, height = 18, width = 36, show_text = true, label = "cpu", h_margin = 2, v_margin = 0 --[[, font = {family = "Times New Roman", slang = "italic", weight = "bold"}]]})
circle:set_graph_colors({{"#88aa00ff",0}, --all value > 0 will be displayed using this color
                       {"#d4aa00ff", 0.5},
                       {"#d45500ff",0.77}})
--set the value directly
--circle:add_value(0.5)
--or use vicious
vicious.register(circle, vicious.widgets.cpu,'$1',2)You can provide default theme for blingbling instead of configuring colors for each widgets. You just need to create a blingbling table in your theme.lua file and override values that can be find in superproperties.lua:
theme.blingbling = {
  htop_title_color = "#ff0000",
  htop_user_color = "#00ff00"
}
Caution If you want that your values in the theme are used you have two possibilities:
- use
require('blingbling')after the line containingbeautiful.init(the_theme_path).
.. in you rc.lua
...
local beautiful = require('beautiful')
beautiful.init(the_theme_path)
..
local blingbling = require('blingbling')
mygraph = blingbling.line_graph()
..- or if you set the
require('blingbling')before you must use this statement :blingbling.superproperties(the_theme_path)before using any widget.
.. in you rc.lua
local blingbling = require('blingbling')
...
local beautiful = require('beautiful')
beautiful.init(the_theme_path)
..
blingbling.superproperties.init('the_theme_path')
mygraph = blingbling.line_graph()
..
Values that can be modified are:
Theme values for graphs or value_text_box objects:
- h_margin
- v_margin
- background_border
- background_color
- graph_background_color
- graph_background_border
- rounded_size
- graph_color
- graph_line_color
- text_color
- value_format
- font_size
- text_background_color
Theme values for popups module:
- htop_title_color
- htop_user_color
- htop_root_color
- netstat_title_color
- nestat_established_color
- netstat_listen_color
Theme value for taskwarrior:
- menu_width
Theme values for system (icons):
- shutdown
- reboot
- lock
- logout
Theme values for tagslist:
- tagslist.normal
- tagslist.focus
- tagslist.urgent
- tagslist.occupied
Theme values for calendar:
- calendar.prev_next_widget_style
- calendar.current_date_widget_style
- calendar.days_of_week_widget_style
- calendar.days_of_month_widget_style
- calendar.weeks_number_widget_style
- calendar.corner_widget_style
- calendar.current_day_widget_style
- calendar.focus_widget_style
- calendar.info_cell_style
Blingbling v1.0 works for awesome 3.4.10 and 3.4.11.
- Value text box
- Classical graph
- Tiled graph
- Progress graph
- Progress bar
- Volume graph
- Mpd widget
- Net widget
- Top popup
- Netstat popup
- System shutdown/Reboot button
- Udisks-glue widget menu
- Menu widget
- Task warrior widget
- Table widget layout
- Calendar
Blingbling require oocairo. The address of the website of the project is : http://oocairo.naquadah.org.
Check your package manager to see if you can install an already packaged version of oocairo for your system.
($XDG_CONFIG_HOME usually ~/.config)
cd $XDG_CONFIG_HOME/awesome/
git clone git://github.com/cedlemo/blingbling.git
cd blingbling
git checkout v1.0
Cédric Le Moigne cedlemo contact: cedlemo at gmx dot com