


SCRIMMAGE is a multi-agent simulator for robotics research. It has been used to conduct studies in multi-agent task assignment, differential game theory, novel controllers, and reinforcement learning.
SCRIMMAGE developers and users may use multiple scrimmage-related projects and repositories. Thus, it is recommended to group your scrimmage-related projects under a single directory, but it is not necessary. To create a directory to hold your scrimmage projects and clone this scrimmage repo, run the following commands:
$ mkdir -p ~/scrimmage && cd ~/scrimmage
$ git clone https://github.com/gtri/scrimmage.git
A list of the Ubuntu packages required is provided in ./setup/install-binaries.sh in the "DEPS_DPKG" array. Run our automated installer to install the required packages:
$ cd scrimmage
$ sudo ./setup/install-binaries.sh -e 1 -p 3
The first argument -e 1 says to install all dependencies for all features in
SCRIMMAGE (you would use -e 0 if you wanted to run SCRIMMAGE as part of an
embedded system). The second argument -p 3 says to install python3
dependencies (use -p a for both python2 and 3 or -p 2 for just python2
dependencies).
Some of SCRIMMAGE's dependencies have to be custom built from source. We provide deb package binaries via the SCRIMMAGE PPA on Launchpad for these custom built packages. First, add the PPA to your apt-get sources:
$ sudo add-apt-repository ppa:kevin-demarco/scrimmage
$ sudo apt-get update
Now, install the SCRIMMAGE custom built binary dependencies:
$ sudo apt-get install scrimmage-dependencies
Run the SCRIMMAGE setup script, which adds the ~/.scrimmage directory to your local system and sets up some environment variables:
$ source /opt/scrimmage/setup.sh
Note: If you need to build the dependencies from source or generate binary packages, see Build Dependencies from Source
$ mkdir build && cd build
$ source ~/.scrimmage/setup.bash
$ cmake ..
$ make
Whenever, you want to use scrimmage, you need to source the ~/.scrimmage/setup.bash file or you can place a line in your ~/.bashrc file to source it automatically:
$ echo "source ~/.scrimmage/setup.bash" >> ~/.bashrc
Open a new terminal, change to the scrimmage directory, and execute a mission.
$ cd scrimmage
$ scrimmage ./missions/straight.xml
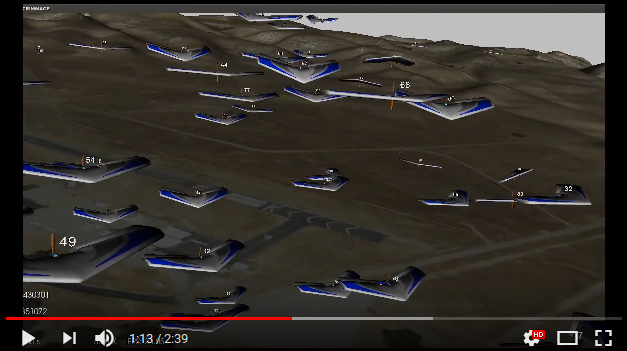
You should see the visualization GUI open up and display the simulation.
The GUI responds to the following input keys:
'q'                     : Quit the simulation
'b'                     : (Break) Pauses and unpauses the simulation.
'space bar'             : When paused, take a single simulation step.
'a'                     : Rotate through the camera views
'right/left arrows'     : Change the aircraft to follow
'['                     : Decrease simulation warp speed
']'                     : Increase simulation warp speed
'+'                     : Increase visual scale of all entities
'-'                     : Decrease visual scale of all entities
'r'                     : Reset visual scale and reset camera position
'z'                     : Zoom out from entity
'Z'                     : Zoom in to entity (z+shift)
'w'                     : Display wireframe
's'                     : Display solids (vs. wireframe)
'CTRL + Left Click'     : Rotate world
'SHIFT + Left Click'    : Translate camera through world
The GUI's camera can operate in three modes (cycle with 'a' key):
- Follow the entity and point towards the entity's heading
- Free floating camera
- Follow the entity from a fixed viewpoint
Note: If all of the terrain data does not appear, click on the GUI window with your mouse.
SCRIMMAGE's Python bindings depend on protobuf, GRPC, and pandas. Install the appropriate versions of grpc and protobuf:
$ sudo pip install protobuf==3.3.0 grpcio==1.2.1
You can specify a minimum Python version in SCRIMMAGE core by setting the PYTHON_MIN_VERSION cmake variable. For example, to specify a minimum Python 3.0 version, first clear the cmake cache file and rerun cmake:
$ rm CMakeCache.txt
$ cmake .. -DPYTHON_MIN_VERSION=3.0
Otherwise, cmake will choose Python on it's own. CMake seems to find the
minimum version of Python specified. It should be noted that
interactive_plots.py uses wxPython which is only compatible with python2.
To install scrimmage's python bindings:
$ cd /path/to/scrimmage/python
$ sudo pip install -e .
$ cd build
$ cmake .. -DBUILD_DOCS=ON
$ make docs
$ firefox ./docs/doxygen/html/index.html
$ firefox ./docs/sphinx/html/index.html
The scrimmage source code can be cleaned with the standard clean command:
$ make clean
However, if you want to clean everything, you can remove your build directory:
$ cd /path/to/scrimmage && rm -rf build
To build SCRIMMAGE's ROS plugins, you must have ROS installed and the BUILD_ROS_PLUGINS cmake variable must be set:
$ cmake .. -DBUILD_ROS_PLUGINS=ON
An example of using SCRIMMAGE to simulate robots running the ROS 2D Navigation stack can be found in the scrimmage_ros package.
If you want to use MOOS with SCRIMMAGE, you will first need to download and build MOOS/MOOS-IVP according to the instructions at: http://oceanai.mit.edu/moos-ivp/pmwiki/pmwiki.php?n=Site.Download
The MOOSAutonomy plugin interacts with the MOOSDB to synchronize time, exchange contact information, and receive desired state from the IvP Helm. To build MOOSAutonomy, you have to provide cmake with the path to the moos-ivp source tree:
cmake .. -DMOOSIVP_SOURCE_TREE_BASE=/path/to/moos-ivp
The SCRIMMAGE docker image is pushed to a public repository after a successful build on Travis. If docker is installed on your machine, you can obtain the SCRIMMAGE docker image by running the following command:
$ docker pull syllogismrxs/scrimmage:latest
Now you can run an instance of the SCRIMMAGE docker image and run SCRIMMAGE in headless mode:
$ docker run -it syllogismrxs/scrimmage:latest /bin/bash
$ source ~/.scrimmage/setup.bash
$ scrimmage ./missions/straight-no-gui.xml
Instructions modified from: https://scidom.wordpress.com/2012/01/18/sge-on-single-pc/ http://www.bu.edu/tech/support/research/system-usage/running-jobs/tracking-jobs/
Install Grid Engine:
$ sudo apt-get install gridengine-master gridengine-exec \
  gridengine-common gridengine-qmon gridengine-client
Note that you can configure how qsub is called with a .sge_request in your
home directory. Further, you can set the number of available slots (cores
available) when running grid engine under the Queue Control tab.
There are some OpenGL issues with VTK6 in Virtualbox. To run SCRIMMAGE in VirtualBox with VTK5, run the following commands:
$ sudo apt-get install libvtk5-dev
$ cd ~/scrimmage/scrimmage/build      # Note: Path may vary
$ cmake ..
At this point, cmake should output a message about finding VTK Version 5. Now, you have to rebuild SCRIMMAGE:
$ make
Make sure that when you run the cmake command it is using the version of python that you want to use with the following:
$ cmake -DPYTHON_EXECUTABLE:FILEPATH=/usr/bin/python      \  # adjust path to your needs
        -DPYTHON_INCLUDE_DIR:PATH=/usr/include/python2.7  \  # adjust path to your needs
        -DPYTHON_LIBRARY:FILEPATH=/usr/lib/libpython2.7.so   # adjust path to your needs
When running cmake, the user gets the cmake warning:
-- The imported target "vtkRenderingPythonTkWidgets" references the file
"/usr/lib/x86_64-linux-gnu/libvtkRenderingPythonTkWidgets.so"
but this file does not exist.  Possible reasons include:
* The file was deleted, renamed, or moved to another location.
* An install or uninstall procedure did not complete successfully.
* The installation package was faulty and contained
"/usr/lib/cmake/vtk-6.2/VTKTargets.cmake"
but not all the files it references.
This is a VTK6 Ubuntu package bug. It can be ignored.
Docker can have DNS issues. If you can ping a public ip address within a docker image (such as 8.8.8.8), but you can't ping archive.ubuntu.com, create the file /etc/docker/daemon.json with the following contents:
{
    "dns": ["<DNS-IP>", "8.8.8.8"]
}
Where is the first DNS IP address and is a network interface with internet access from the commands:
$ nmcli dev list | grep 'IP4.DNS'                    # Ubuntu <= 14
$ nmcli device show <interfacename> | grep IP4.DNS   # Ubuntu >= 15
Restart docker:
$ sudo service docker restart