npx create-expo-app AwesomeProject

cd AwesomeProject
npx expo start- In order to preview the app you need to install the Expo Go app on your phone.
- Then scan the qr code generated in the cli with your camera in order to view the app.
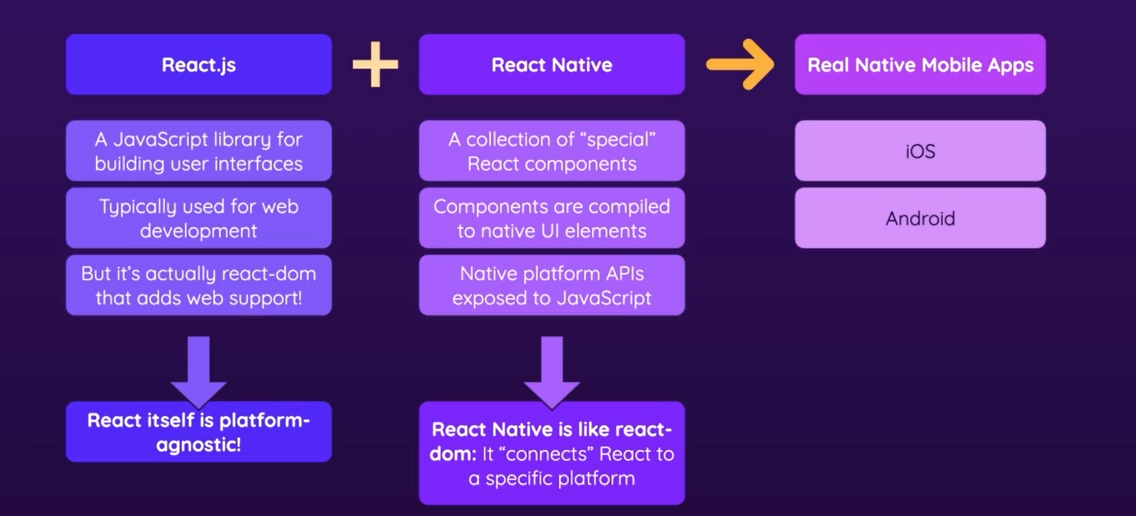
- In normal React we have the DOM in the browser which supports html elements like a
<div/>... The native components for android and IOS do not support html elements...
-
There also are not any css files... you can style components with inline styles or stylesheet objets.
-
This is written in Javascript and mimics css syntax but only suports a subset of the properties and features of css.
-
In normal react for html, text between elements is ok... i.e.
<div>This is some text </div>, however, this will not work in React Native... text must go inside of a<Text>Hello World!!!!</Text>element. -
The
<View>component is a container component... similar to a div.
The most fundamental component for building a UI,AViewAis a container that supports layout withAflexbox,Astyle,Asome touch handling, andAaccessibilityAcontrols.AViewAmaps directly to the native view equivalent on whatever platform React Native is running on, whether that is aAUIView,A<div>,Aandroid.view, etc.
ViewAis designed to be nested inside other views and can have 0 to many children of any type.
- When using html elements in react you don't need to import anything... in react native you need to import all of the components...i.e.
import { StyleSheet, Text, View, Button } from "react-native";
export default function App() {
  return (
    <View style={styles.container}>
      <View>
        <Text>Another piece of text</Text>
      </View>
      <Text>Hello World!!!!</Text>
      <Button></Button>
    </View>
  );
}- In react native you don't put the text for a button between button tags... instead you write it like this:
<Button title="Press me!!" />- To style prop is not supported on all React Native elements but it is supported on the view element.
Inline Styling
import { StyleSheet, Text, View, Button } from "react-native";

export default function App() {
  return (
    <View style={styles.container}>
      <View>
        <Text>Another piece of text</Text>
      </View>
      <Text>Hello World!!!!</Text>
      <Text style={{ margin: 100 }}>Part 2</Text>
      <Button title="Press me!!" />
    </View>
  );
}- This is how style objects are created:
const styles = StyleSheet.create({
  container: {
    flex: 1,
    backgroundColor: "#fff",
    alignItems: "center",
    justifyContent: "center",
  },
  text: {
    margin: 16,
    borderWidth: 2,
    borderColor: "blue",
    padding: 16,
  },
});- You can just create an object without using the StyleSheet.create function but then this deprives you of error catching and auto complete functionalities.
Flexbox
- A set of styling properties that define how elements are positioned inside of containers.
Flexbox works the same way in React Native as it does in CSS on the web, with a few exceptions. The defaults are different, with flexDirection defaulting to column instead of row, alignContent defaulting to flex-start instead of stretch, flexShrink defaulting to 0 instead of 1, the flex parameter only supporting a single number.
-
Unlike in normal react web development, in React Native every view defaults to flex box positioning.
-
For
rowthe main axis is from left to right, forrow-reversethe main axis is right to left forcolumnit is top to bottom and forcolumn-reverseit is bottom to top. -
We can use
justifyContentto organize elements along the main axis andalignItemsto organize elements along the cross axis.
import { useState } from "react";
import { StyleSheet, Text, View, Button, TextInput } from "react-native";

export default function App() {
  const [enteredGoalText, setEnteredGoalText] = useState("");
  const [courseGoals, setCourseGoals] = useState([]);

  function goalInputHandler(enteredText) {
    setEnteredGoalText(enteredText);
  }

  function addGoalHandler() {
    setCourseGoals((currentCourseGoals) => [...courseGoals, enteredGoalText]);
  }

  return (
    <View style={styles.appContainer}>
      <View style={styles.inputContainer}>
        <TextInput style={styles.textInput} placeholder="Your course goal" onChangeText={goalInputHandler} />
        <Button title="Add Goal" onPress={addGoalHandler} />
      </View>
      <View style={styles.goalsContainer}>
        {courseGoals.map((goal) => {
          return (
            <View style={styles.goalItem} key={goal}>
              <Text>{goal}</Text>
            </View>
          );
        })}
      </View>
    </View>
  );
}

const styles = StyleSheet.create({
  appContainer: {
    flex: 1,
    paddingTop: 50,
    paddingHorizontal: 16
  },
  inputContainer: {
    flex: 1,
    flexDirection: "row",
    justifyContent: "space-between",
    alignItems: "center",
    marginBottom: 24,
    borderBottomWidth: 1,
    borderBottomColor: "#cccccc"
  },
  textInput: {
    borderWidth: 1,
    borderColor: "#cccccc",
    width: "70%",
    marginRight: 8,
    padding: 8
  },
  goalsContainer: {
    flex: 5
  },
  goalItem: {
    margin: 8,
    padding: 8,
    borderRadius: 6,
    backgroundColor: "#5e0acc",
    color: "white"
  }
});-
In the example above the goal item
<Text>component had to be wrapped in a<View>component because IOS does not support border radius on the native UI component that<Text>compiles to. -
Styling in React Native is not cascading like CSS, in other words, child elelements do not inherit the styling of their parents.

