This integration utilizes the MODBUS interface of a Solark All-in-One inverter to allow local read-only access to inverter variables. The integration does a direct MODBUS interface with your inverter. I have tested with my own 12K Outdoor model but it should work with the other models (15k, 12k indoor, 8k and 5k) as well. This connection method does not use the connector used by SolArk's Inverter Control/Data collection dongle and does not interfere with it. This method is independent of that one and can be used to collect data locally without any need for an internet connection and does not require you to surrender control of your inverter and data to an unknown foreign website. It can provide update rates at least as fast as once every 7 seconds. This integration provide read access to your inverter, no writing is provided.
Your SolArk inverter has a connector for RS-485 connection. The exact details of the wiring depends on your model. I have the 12K Outdoor model and there is an application note which hints at the pinout of the connector in the user manual. SolArk now has an application guide on their website that provides details on this subject. On my inverter this connector is labeled "CANBus" and contains both these RS-485 pins and the CAN bus pins. I use pins 6,7&8 per my manual.
I am using the DSD TECH SH-U11F USB-RS485 converter. This is available from multiple sources for about $30. The reasons I recommend this one:
- SH-U11F provides isolation which will lower your risk of damaging any circuits.
- SH-U11F includes termination resistors which are recommended for reliable communications.
- SH-U11F includes a ground connection terminal recommended by Sol-Ark in the document.
If you have another USB-RS485 converter model that can provide the same features it may work as well. But I do not recommend that you skimp on a converter because reliablility is important as is minimizing the risk to your inverter. If you are able to plug the converter directly into your HA computer that will work great and requires the fewest number of parts in your system. In my case my SolArk is remote from my HA box so I used an old OpenWRT capabile router with a USB connector on the back installed near my inverter loaded with the excellect mbusd package (https://github.com/3cky/mbusd). This forms a Modbus TCP/IP gateway which I can access from my HA box and works very well. There are many other methods to create a Modbus TCP/IP gateway which will work.
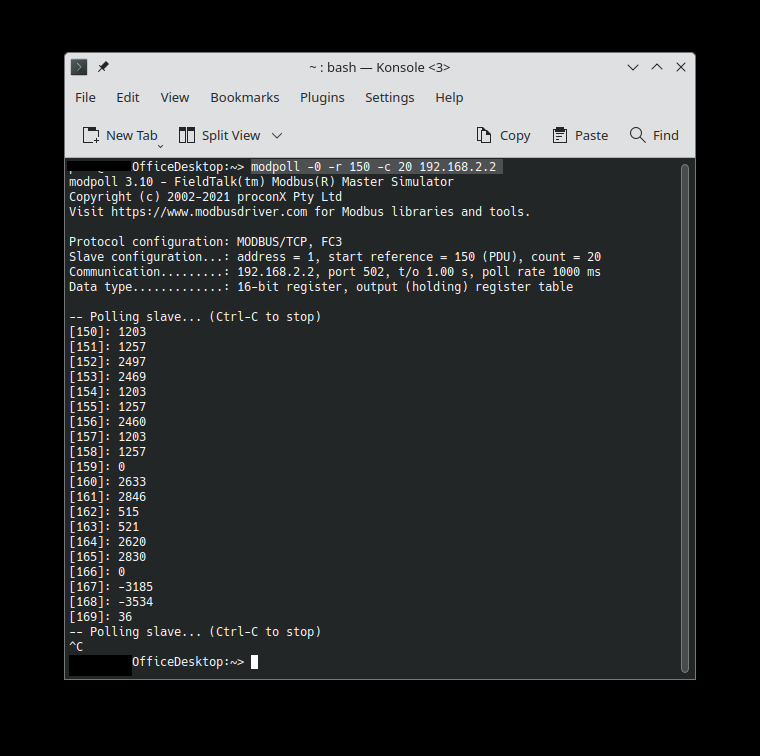
Before you spend any time working with Home Assistant it is important to unit test your connection. The best way to do this is with the excellent free modpoll utility you can find here: https://www.modbusdriver.com/modpoll.html. Download the executable and test reading data from your inverter. The screenshot below shows a successful result. Let the command run for awhile and try different update rates to ensure you have a robust connection. SolArk has published a modbus map of the available registers. YOu can download this from their website.
This is a HACS integration. First get HACS up and running on your system https://hacs.xyz/docs/configuration/basic. Then go to the HACS page and yes you must wait for the HACS install to complete. Then HACS->Integrations and select the three dots in the upper right and then "custom repositories". At the bottom of the next "custom repositories list" enter https://github.com/pbix/HA-solark-PV and select "Integration" and finally "Add". The new repository will appear on the HACS page, select install on the card and restart.
Finally head over to Configurations->Integrations->Add Integration and search for SolArk and setup.
In the configuration dialog you specify a name, a host and an update rate. The name is the name the integration will be known by in your home assistant. The default is fine until you have more than one inverter in which case you need to assign unique names to each. The host field is the target address needed to connect to your inverter. For example 192.168.2.2 would use port 502 to connect to a Modbus TCP bridge which is connected serially to your SolArk. For a non-standard port you can use port notation, 192.168.2.2:510 for example. You can enter either a IP address or a hostname. To connect via serial port directly you can also enter the name of your serial port device such as /dev/ttyUSB0 or COM1. The update rate by default is 20 seconds. You can change it to something lower but I have no idea what type of load this puts on your inverter, how fast you can go or what happens when you exceed the limit. When using mbusd in TCP/IP gateway mode, ensure your mbusd.conf contains a timeout value which is greater than the update rate configured for this integration. When values are equal or timeout is lower than the update rate, you may get Inverter is unreachable faults.
When you complete the configuration pages one device will be installed with many entities attached. The entities map directly to registers in the inverter. I have made the ones I feel are the most useful enabled by default.
In the future I hope others will help me to enhance this page to provide more details on the wiring and alternate methods to get your modbus traffic into your Home Assistant.