
This wrapper requires a valid license of PSPDFKit. Licenses are per platform. You can request a trial license here.
- Announcement blog post
- React Native UI Component for iOS (See iOS)
- React Native UI Component for Android (See Android)
- PSPDFKit for Windows UWP with React Native (See Windows UWP)
- How to Extend React Native APIs
- Advanced Techniques for React Native UI Components
The PSPDFKit SDK is a framework that allows you to view, annotate, sign, and fill PDF forms on iOS, Android, Windows, macOS, and Web.
PSPDFKit Instant adds real-time collaboration features to seamlessly share, edit, and annotate PDF documents.
- Xcode 10.1
- PSPDFKit 8.1.3 for iOS or later
- react-native >= 0.57.8
Note: If you want to integrate PSPDFKit using CocoaPods, use these instructions instead.
Let's create a simple app that integrates PSPDFKit and uses the react-native-pspdfkit module.
- Make sure
react-native-cliis installed:yarn global add react-native-cli - Create the app with
react-native init YourApp. - Step into your newly created app folder:
cd YourApp - Install
react-native-pspdfkitfrom GitHub:yarn add github:PSPDFKit/react-native - Install all the dependencies for the project:
yarn install. (Because of a bug you may need to cleanyarn's cache withyarn cache cleanbefore.) - Link module
react-native-pspdfkit:react-native link react-native-pspdfkit. - Create the folder
ios/PSPDFKitand copyPSPDFKit.frameworkandPSPDFKitUI.frameworkinto it. - Open
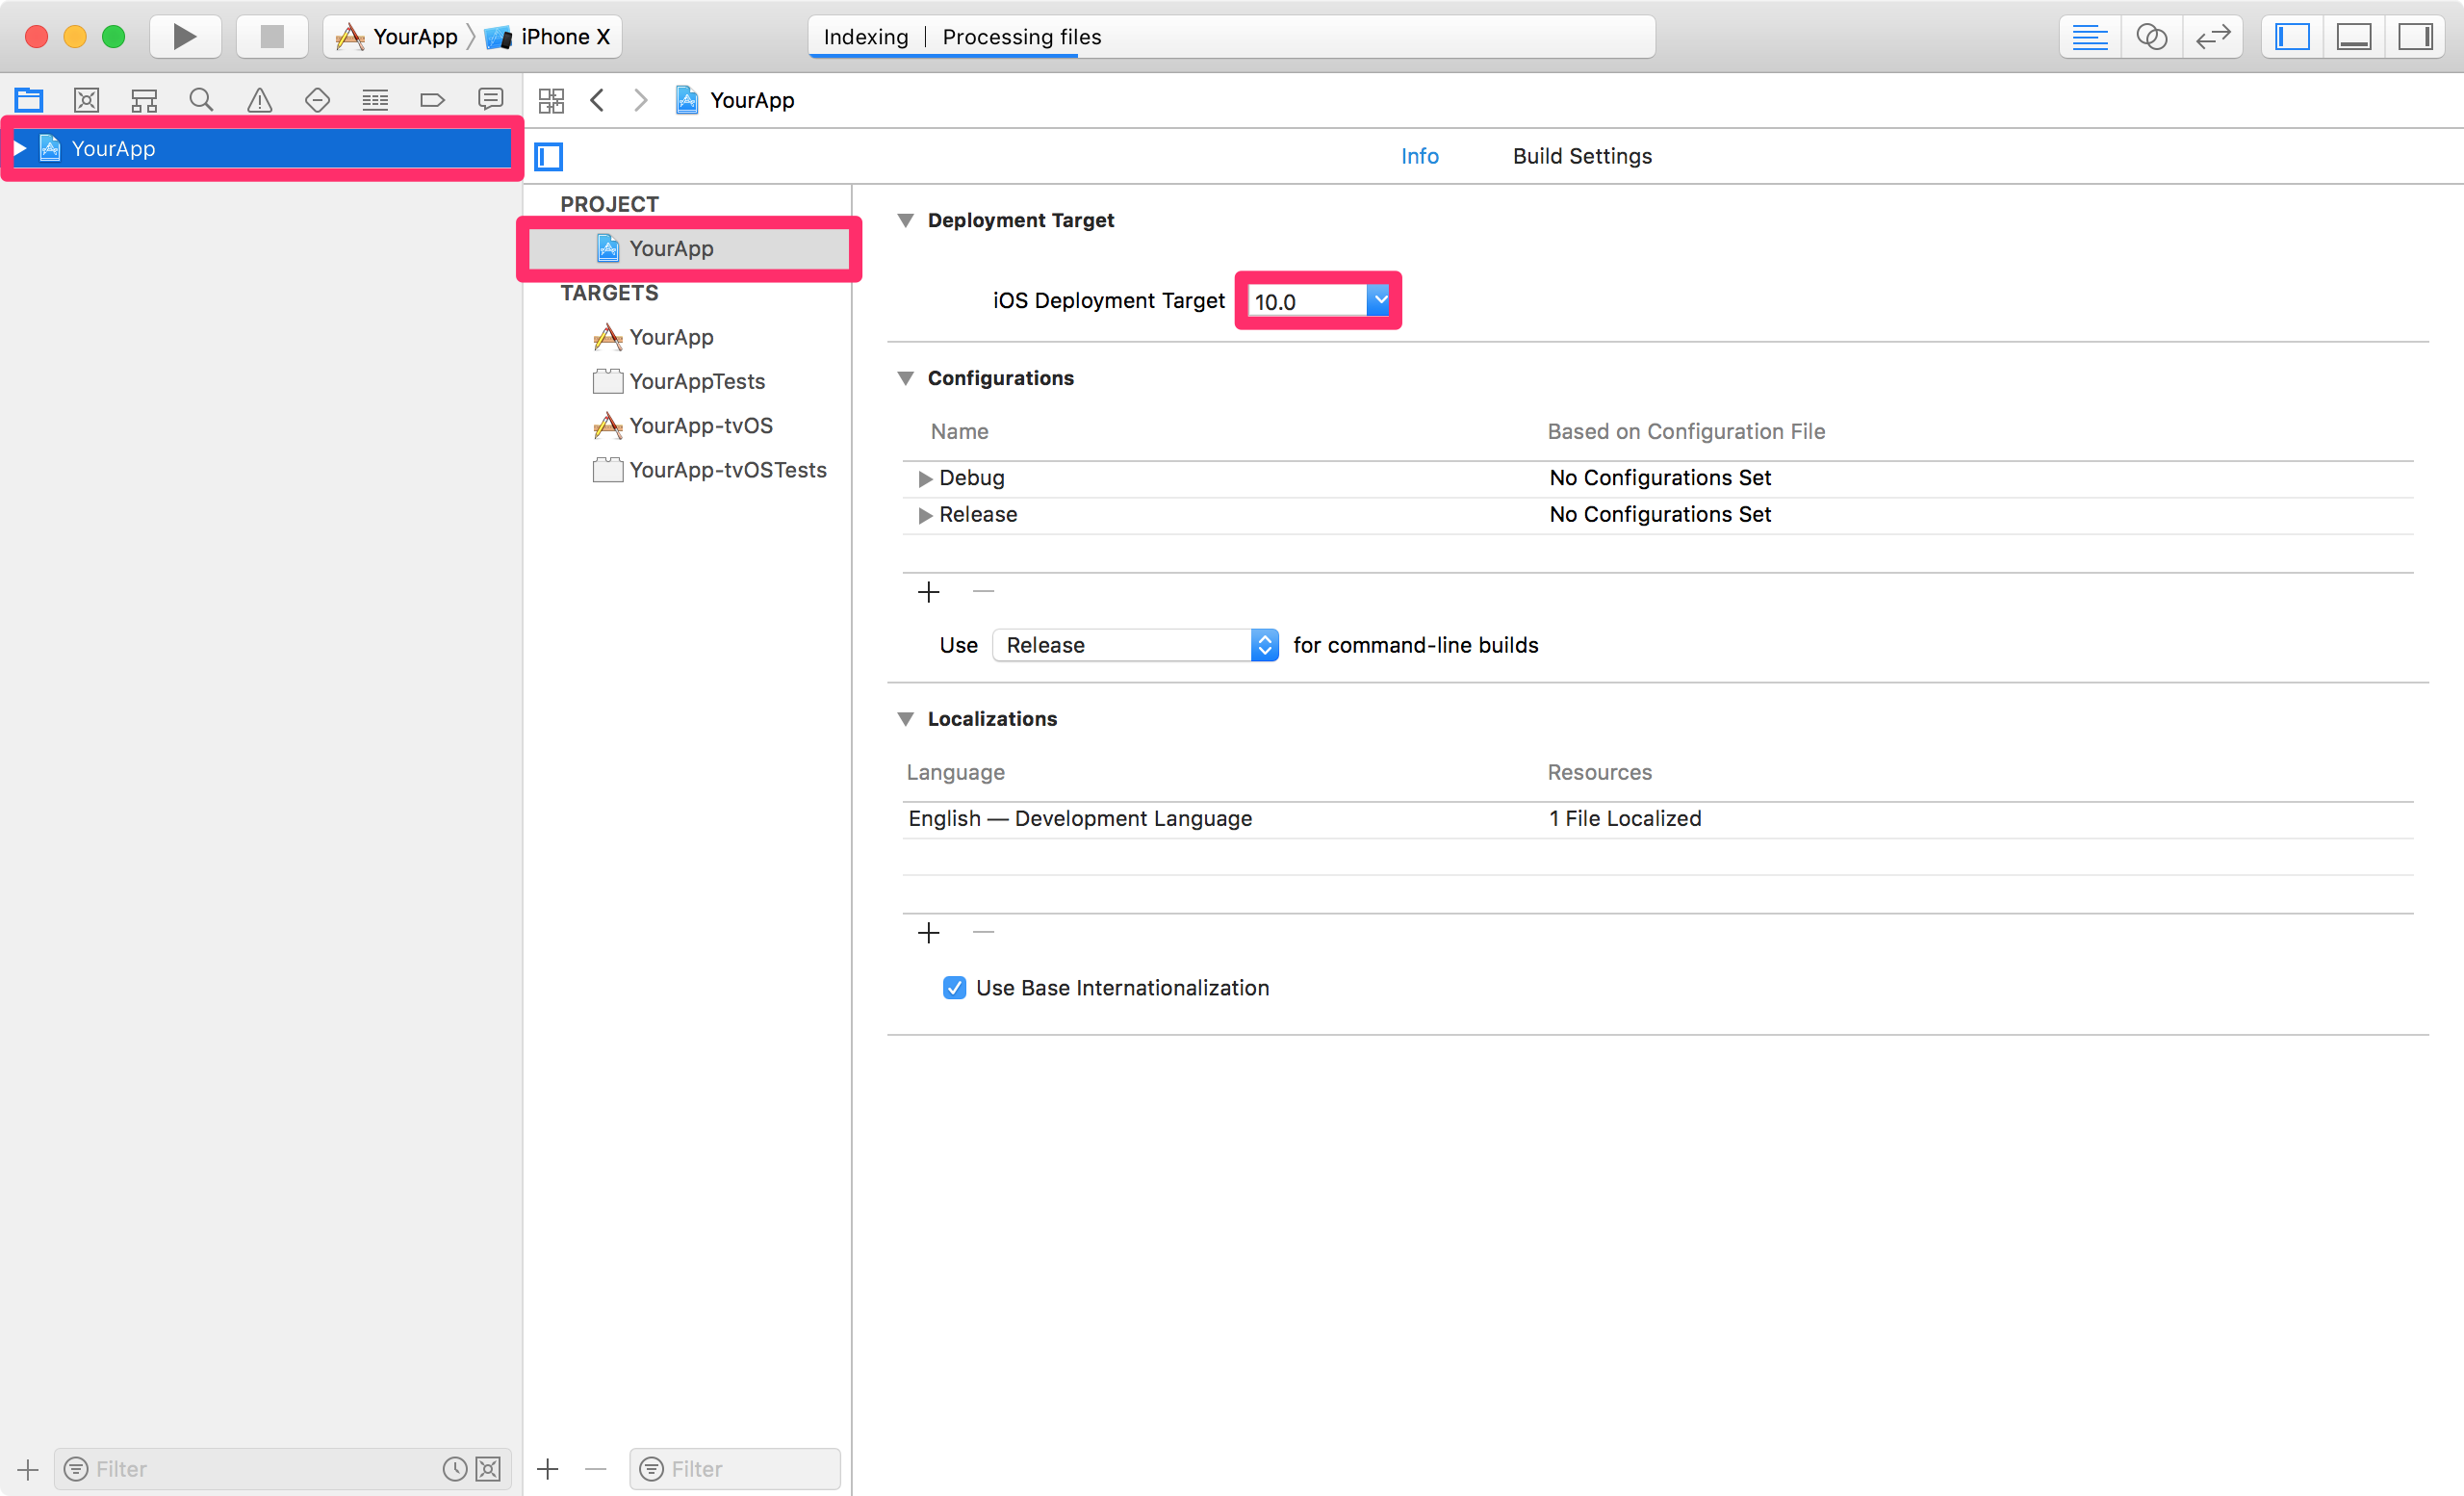
ios/YourApp.xcodeprojin Xcode:open ios/YourApp.xcodeproj - Make sure the deployment target is set to 10.0 or higher:
- Change "View controller-based status bar appearance" to
YESinInfo.plist:
- Link with the
libRCTPSPDFKit.astatic library (iflibRCTPSPDFKit.ais already there but greyed out, delete it and link it again):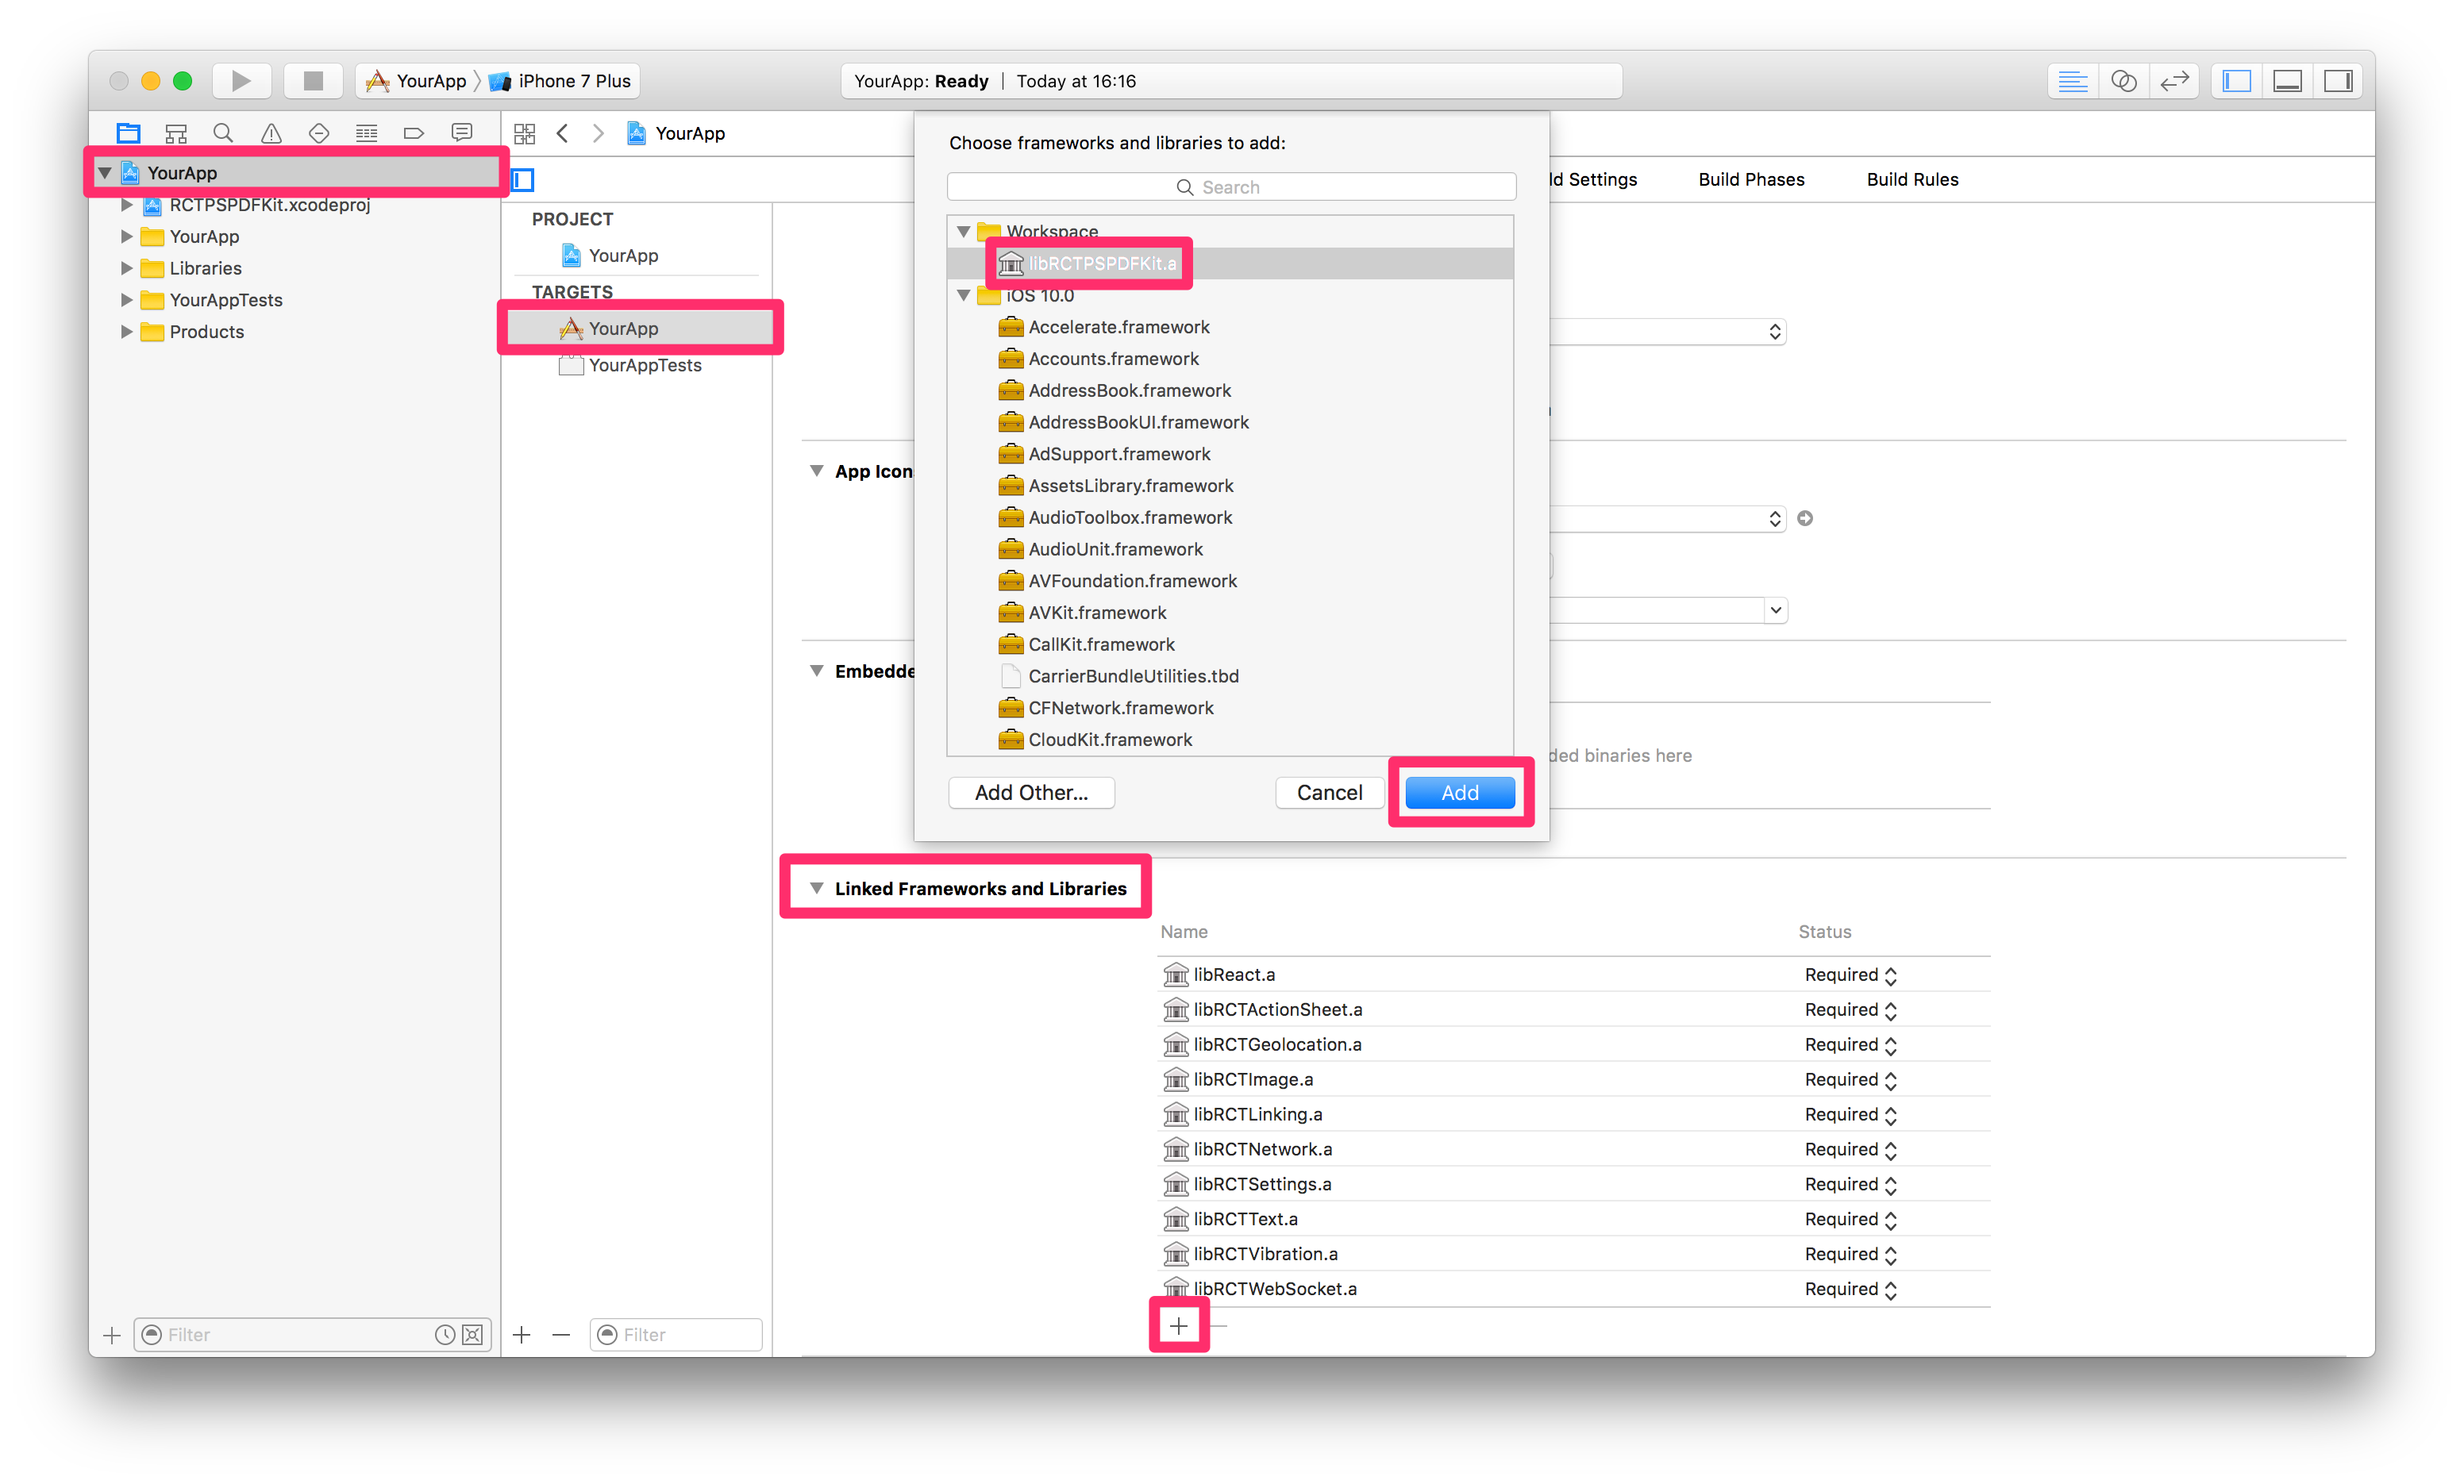
- Embed
PSPDFKit.frameworkandPSPDFKitUI.frameworkby drag and dropping it into the "Embedded Binaries" section of the "YourApp" target (Select "Create groups"). This will also add it to the "Linked Framworks and Libraries" section: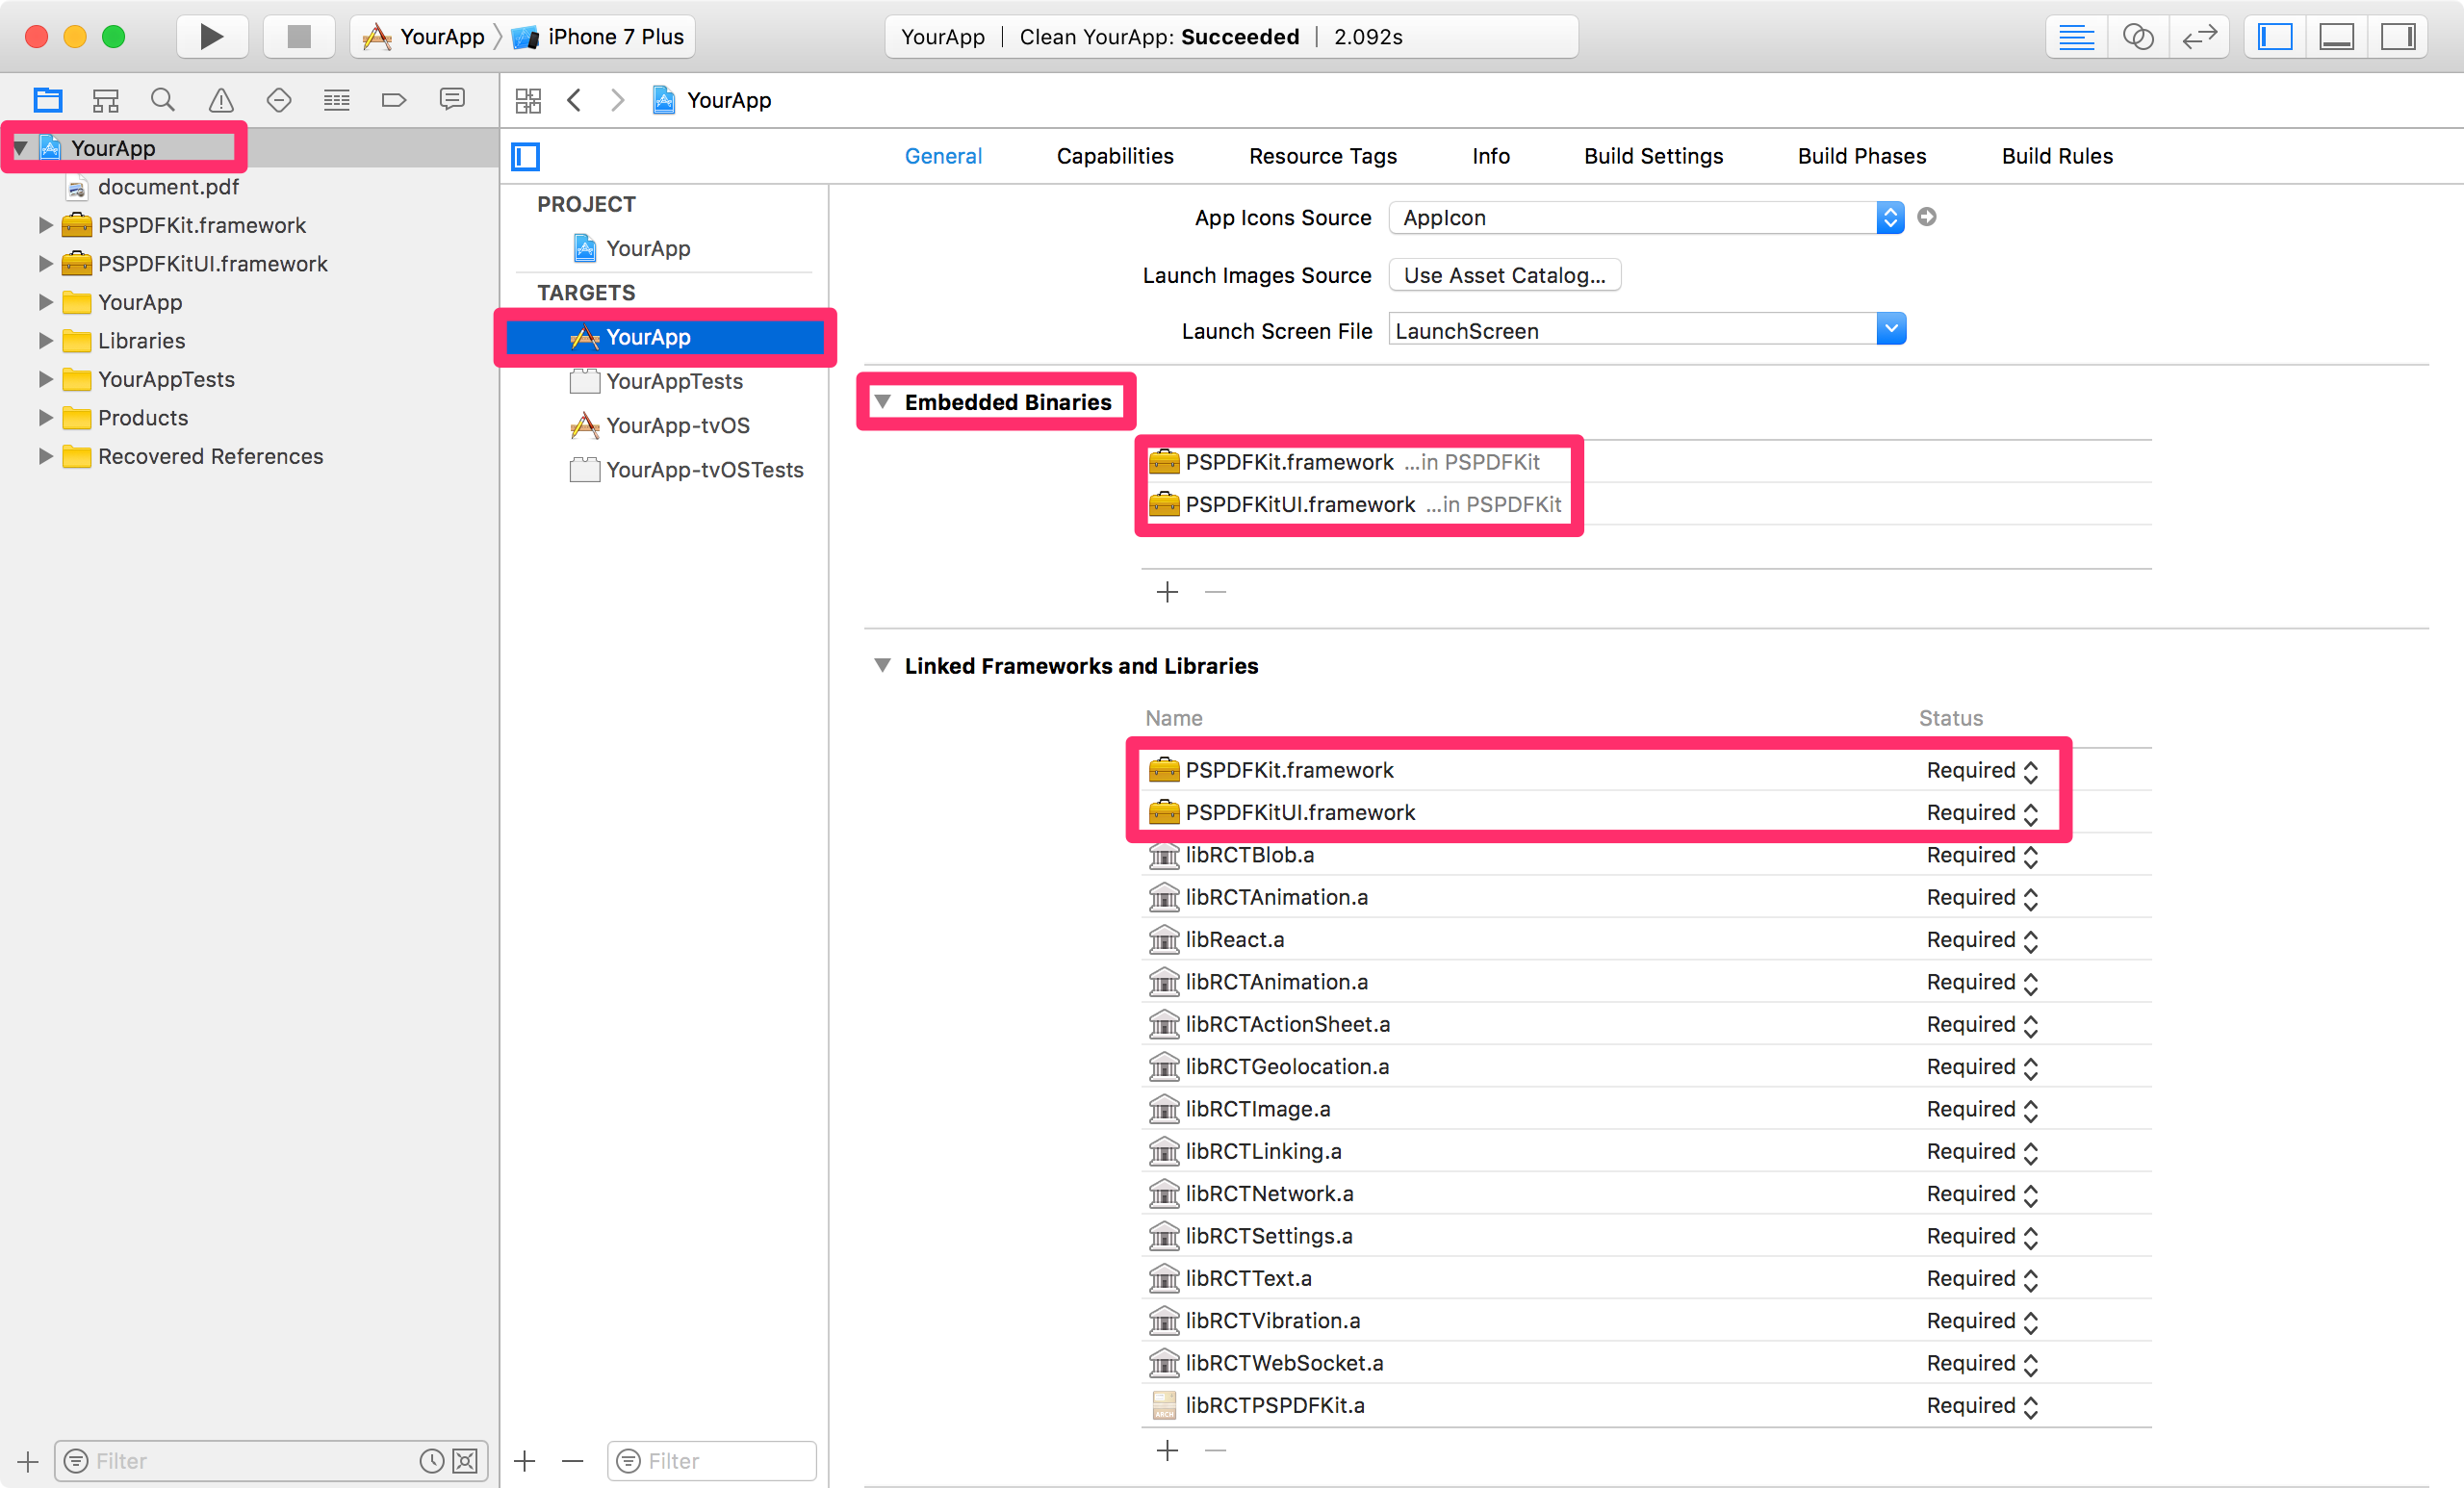
- Add a new
Run Script Phasein your target’sBuild Phases. IMPORTANT: Make sure thisRun Script Phaseis below theEmbed Frameworksbuild phase.
You can drag and drop build phases to rearrange them.
Paste the following line in the script text field ofRun Script Phase:


bash "$BUILT_PRODUCTS_DIR/$FRAMEWORKS_FOLDER_PATH/PSPDFKit.framework/strip-framework.sh"
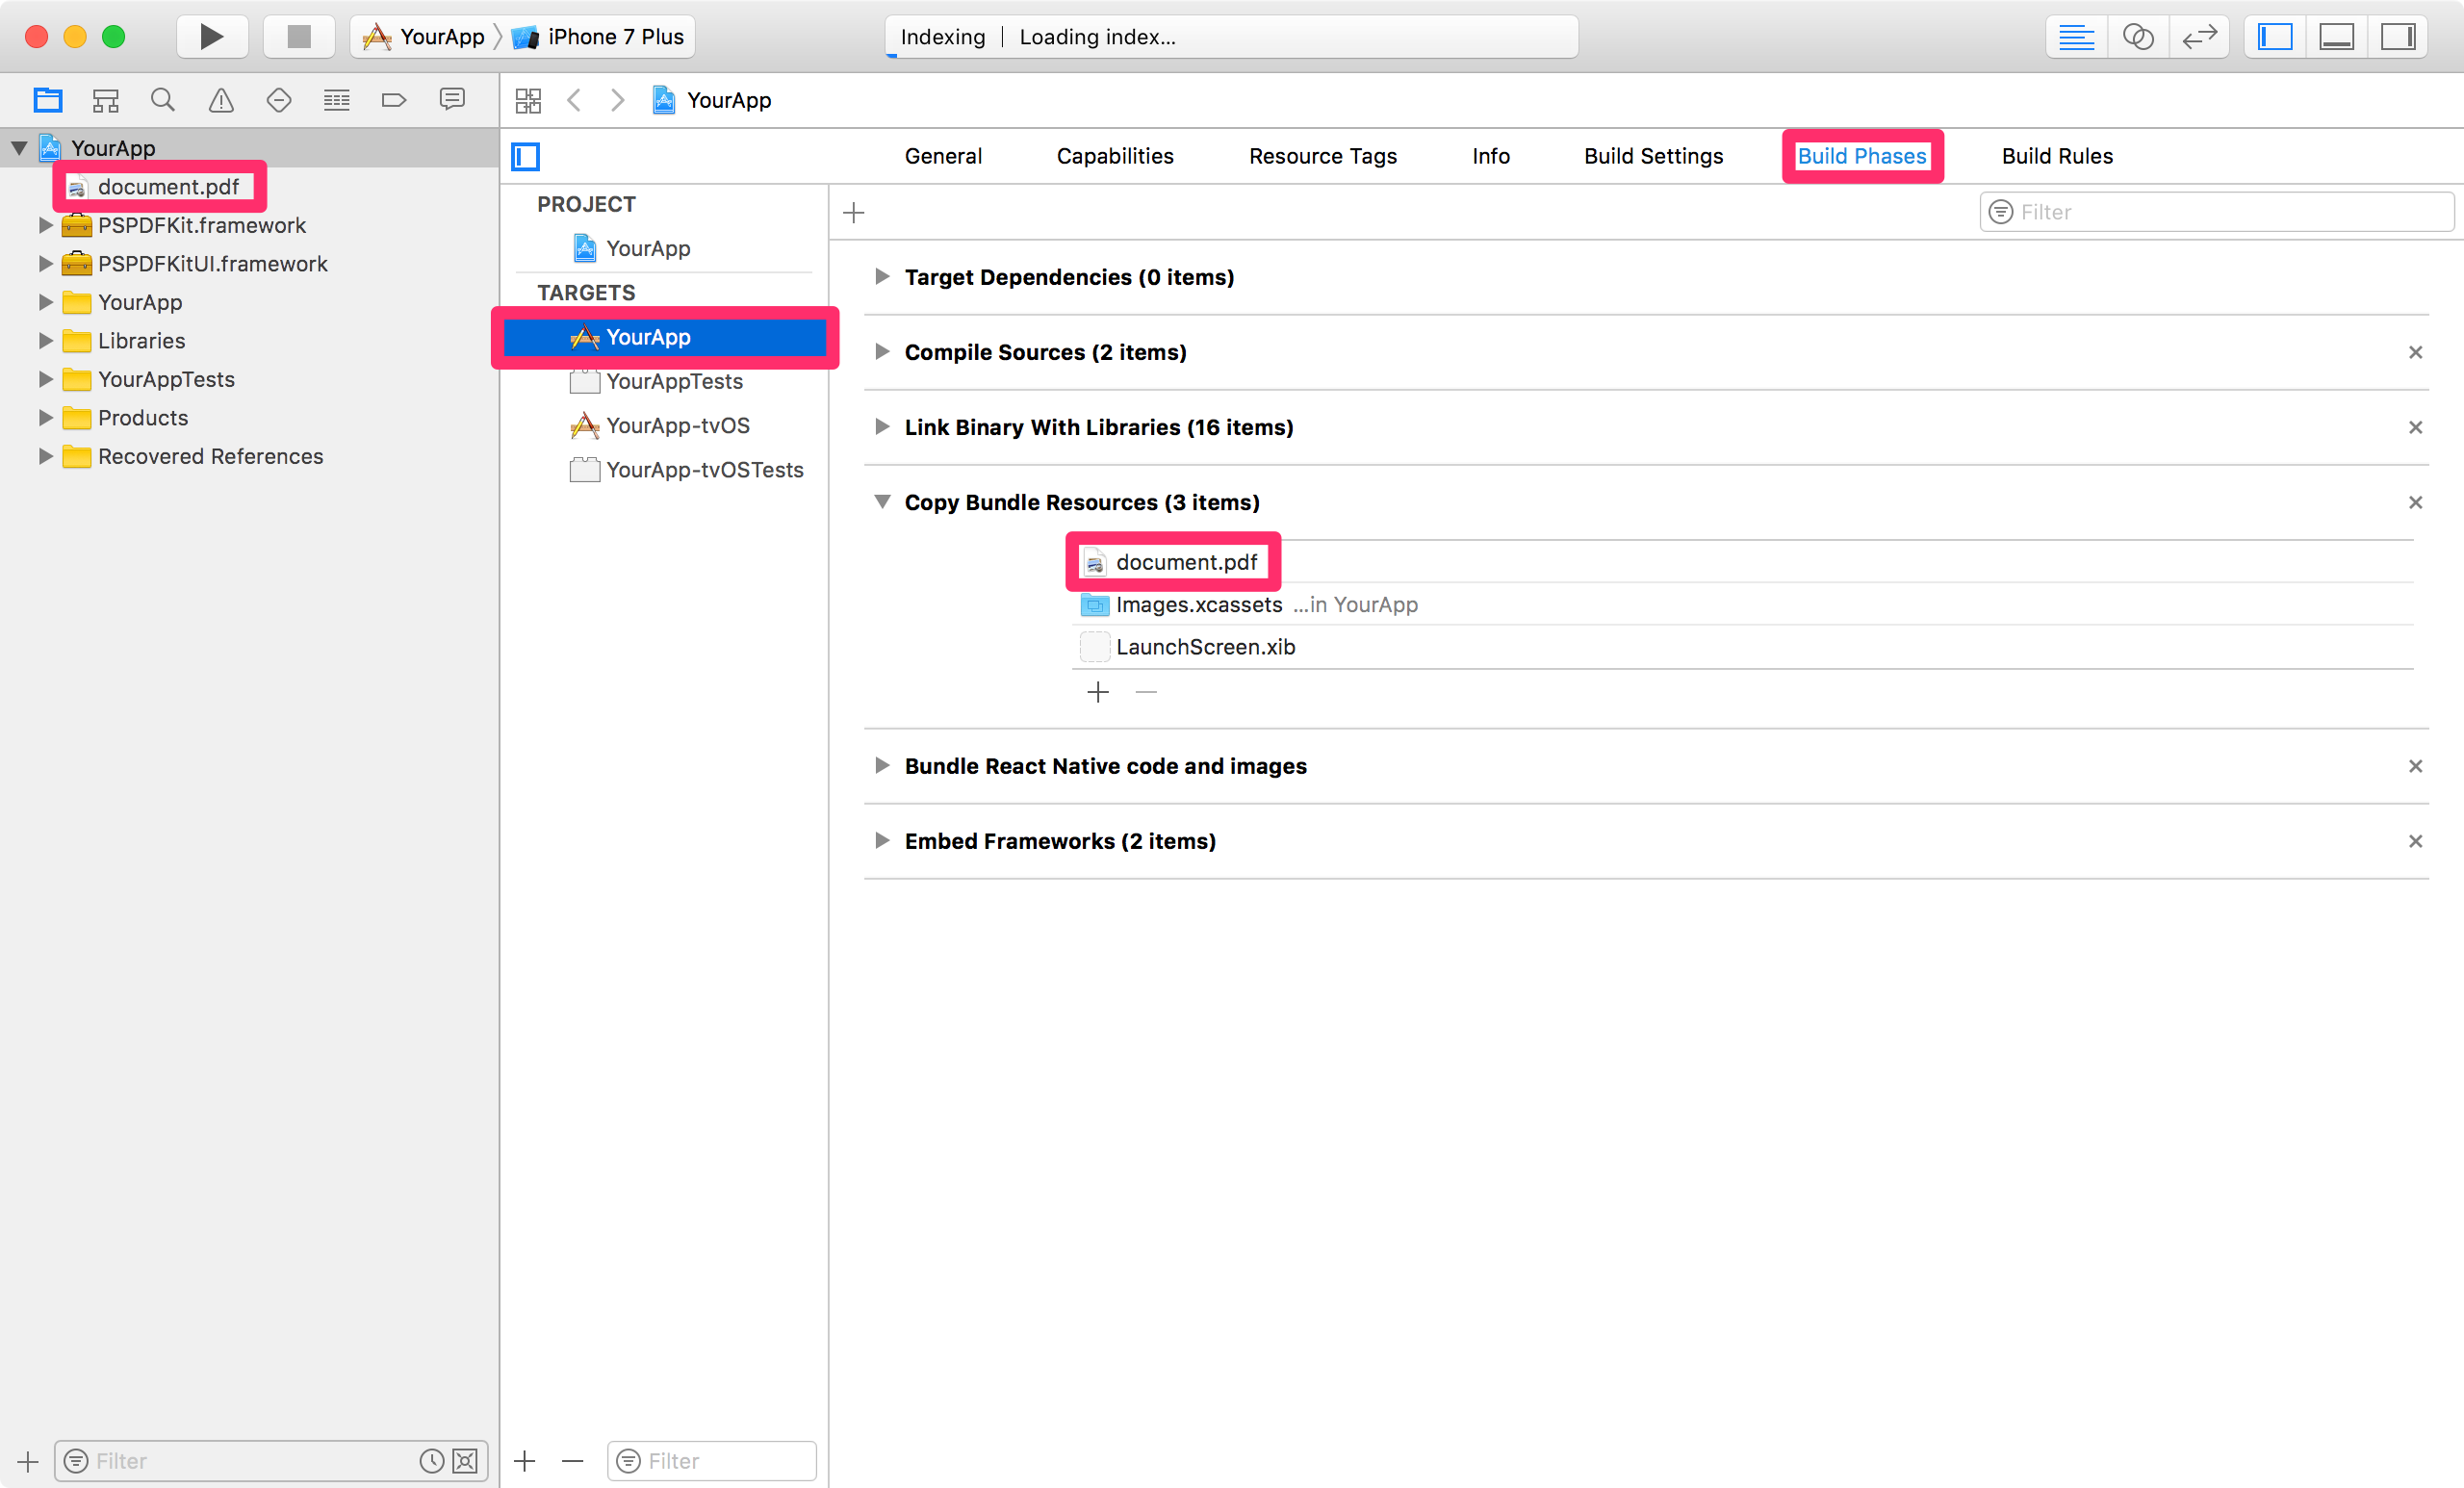
- Add a PDF by drag and dropping it into your Xcode project (Select "Create groups" and add to target "YourApp"). This will add the document to the "Copy Bundle Resources" build phase:
- Replace the default component from
App.jswith a simple touch area to present the bundled PDF. (Note that you can also use a Native UI Component to show a PDF.)

import React, { Component } from "react";
import {
  AppRegistry,
  StyleSheet,
  NativeModules,
  Text,
  TouchableHighlight,
  View
} from "react-native";

var PSPDFKit = NativeModules.PSPDFKit;
PSPDFKit.setLicenseKey("YOUR_LICENSE_KEY_GOES_HERE");

export default class App extends Component<{}> {
  _onPressButton() {
    PSPDFKit.present("document.pdf", {
      pageTransition: "scrollContinuous",
      scrollDirection: "vertical",
      documentLabelEnabled: true
    });
  }

  render() {
    return (
      <View style={styles.container}>
        <TouchableHighlight onPress={this._onPressButton}>
          <Text style={styles.text}>Tap to Open Document</Text>
        </TouchableHighlight>
      </View>
    );
  }
}

const styles = StyleSheet.create({
  container: {
    flex: 1,
    justifyContent: "center",
    alignItems: "center",
    backgroundColor: "#F5FCFF"
  },
  welcome: {
    fontSize: 20,
    textAlign: "center",
    margin: 10
  },
  instructions: {
    textAlign: "center",
    color: "#333333",
    marginBottom: 5
  }
});
Your app is now ready to launch. Run the app in Xcode or type react-native run-ios in the terminal.
There are 2 different ways on how to use the PSPDFKit React Native wrapper on iOS.
- Present a document via a Native Module modally.
- Show a PSPDFKit view via a Native UI component.
Depending on your needs you might want to use one or the other.
Using the Native Module (PSPDFKit.present()), you can present a document with PSPDFKit modally in fullscreen.
You can specify the path to the document you want to present, and configuration options.
import React, { Component } from "react";
import { NativeModules, Text, TouchableHighlight, View } from "react-native";

var PSPDFKit = NativeModules.PSPDFKit;
PSPDFKit.setLicenseKey("YOUR_LICENSE_KEY_GOES_HERE");

export default class App extends Component<{}> {
  _onPressButton() {
    PSPDFKit.present("document.pdf", {
      pageTransition: "scrollContinuous",
      scrollDirection: "vertical",
      documentLabelEnabled: true
    });
  }

  render() {
    return (
      <View style={styles.container}>
        <TouchableHighlight onPress={this._onPressButton}>
          <Text style={styles.text}>Tap to Open Document</Text>
        </TouchableHighlight>
      </View>
    );
  }
}With PSPDFKitView you can use PSPDFKit like any other React component in your app.
Using this approach, you have more flexibility over how a document is presented and displayed.
The layout is completely flexible, and can be adjust with flexbox. Note that you still need to set your license key with the Native Module.
For all the props that you can pass to PSPDFKitView, have a look at the source documentation
This is how you would show a PDF as a React component:
import React, { Component } from "react";
import { NativeModules } from "react-native";
import PSPDFKitView from "react-native-pspdfkit";

var PSPDFKit = NativeModules.PSPDFKit;
PSPDFKit.setLicenseKey("YOUR_LICENSE_KEY_GOES_HERE");

export default class App extends Component<{}> {
  render() {
    return (
      <PSPDFKitView
        document={"document.pdf"}
        configuration={{
          pageTransition: "scrollContinuous",
          scrollDirection: "vertical",
          documentLabelEnabled: true
        }}
        style={{ flex: 1, color: "#267AD4" }}
      />
    );
  }
}You can configure the presentation with a configuration dictionary which is a mirror of the PSPDFConfiguration class.
Example - Native Module:
PSPDFKit.present("document.pdf", {
  thumbnailBarMode: "scrollable",
  pageTransition: "scrollContinuous",
  scrollDirection: "vertical"
});
Example - Native UI Component:
<PSPDFKitView
  document={"document.pdf"}
  configuration={{
    thumbnailBarMode: "scrollable",
    pageTransition: "scrollContinuous",
    scrollDirection: "vertical"
  }}
/>- Copy
PSPDFKit.frameworkandPSPDFKitUI.frameworkinto thePSPDFKitdirectory. - Install dependencies:
yarn installinsamples/Catalogdirectory. (Because of a bug you may need to cleanyarn's cache withyarn cache cleanbefore.) - Run the app with
react-native-cli:react-native run-ios - If you get an error about
config.hnot being found check out this blog post for information on how to fix it.
The PSPDFKit React Native iOS Wrapper maps most configuration options available in PSPDFConfiguration from JSON. Please refer to RCTConvert+PSPDFConfiguration.m for the complete list and for the exact naming of enum values.
Annotations are mapped based on their type name. This is case sensitive. For example, to limit annotation types to ink and highlight, use this:
editableAnnotationTypes: ["Ink", "Highlight"];The PSPDFKit React Native iOS Wrapper allows you to specify a custom grouping for the annotation creation toolbar. Please refer to RCTConvert+PSPDFAnnotationToolbarConfiguration.m for the complete list of menu items. To set them just specify the menuItemGrouping prop on the PSPDFKitView. The format used is as follows:
[
  menuItem,
  { key: menuItem, items: [subItem, subItem]},
  ...
]
- Android SDK
- Android Build Tools 23.0.1 (React Native)
- Android Build Tools 28.0.3 (PSPDFKit module)
- Android Gradle plugin >= 3.2.1
- PSPDFKit >= 5.0.1
- react-native >= 0.57.8
Let's create a simple app that integrates PSPDFKit and uses the react-native-pspdfkit module.
- Make sure
react-native-cliis installed:yarn global add react-native-cli - Create the app with
react-native init YourApp. - Step into your newly created app folder:
cd YourApp. - Add
react-native-pspdfkitmodule from GitHub:yarn add github:PSPDFKit/react-native. - Install all the dependencies for the project:
yarn install. (Because of a bug you may need to cleanyarn's cache withyarn cache cleanbefore.) - Link module
react-native-pspdfkit:react-native link react-native-pspdfkit. - Add PSPDFKit repository to
YourApp/android/build.gradleso PSPDFKit library can be downloaded:
 allprojects {
     repositories {
         mavenLocal()
         google()
         jcenter()
+        maven {
+            url 'https://customers.pspdfkit.com/maven/'
+            credentials {
+                username 'pspdfkit'
+                password 'YOUR_MAVEN_KEY_GOES_HERE'
+            }
+        }
         maven {
             // All of React Native (JS, Obj-C sources, Android binaries) is installed from npm
             url "$rootDir/../node_modules/react-native/android"
         }
     }
}- PSPDFKit targets modern platforms, so you'll have to set the
minSdkVersionto 19. InYourApp/android/build.gradle(note two places to edit):
...
  ext {
-     buildToolsVersion = "28.0.2"
+     buildToolsVersion = "28.0.3"
-     minSdkVersion = 16
+     minSdkVersion = 19
      compileSdkVersion = 28
      targetSdkVersion = 27
      supportLibVersion = "28.0.0"
  }
...- We will also need to enable MultiDex and Java 8 support. In
YourApp/android/app/build.gradle(note two places to edit):
  defaultConfig {
      applicationId "com.yourapp"
      minSdkVersion rootProject.ext.minSdkVersion
      targetSdkVersion rootProject.ext.targetSdkVersion
      versionCode 1
      versionName "1.0"
+     multiDexEnabled true
  }

+ compileOptions {
+     sourceCompatibility JavaVersion.VERSION_1_8
+     targetCompatibility JavaVersion.VERSION_1_8
+ }
... <application>
...
+ <meta-data
+ android:name="pspdfkit_license_key"
+ android:value="YOUR_LICENSE_KEY_GOES_HERE"/>
</application>- Set primary color. In
YourApp/android/app/src/main/res/values/styles.xmlreplace
<!-- Customize your theme here. -->with
<item name="colorPrimary">#3C97C9</item>- Replace the default component from
YourApp/App.jswith a simple touch area to present a PDF document from the local device filesystem:
import React, { Component } from "react";
import {
  AppRegistry,
  StyleSheet,
  NativeModules,
  Text,
  TouchableHighlight,
  View,
  PermissionsAndroid
} from "react-native";

var PSPDFKit = NativeModules.PSPDFKit;

const DOCUMENT = "file:///sdcard/document.pdf";
const CONFIGURATION = {
  scrollContinuously: false,
  showPageNumberOverlay: true,
  pageScrollDirection: "vertical"
};

// Change 'YourApp' to your app's name.
export default class YourApp extends Component<{}> {
  _onPressButton() {
    requestExternalStoragePermission();
  }

  render() {
    return (
      <View style={styles.container}>
        <Text>{PSPDFKit.versionString}</Text>
        <TouchableHighlight onPress={this._onPressButton}>
          <Text style={styles.text}>Tap to Open Document</Text>
        </TouchableHighlight>
      </View>
    );
  }
}

async function requestExternalStoragePermission() {
  try {
    const granted = await PermissionsAndroid.request(
      PermissionsAndroid.PERMISSIONS.WRITE_EXTERNAL_STORAGE
    );
    if (granted === PermissionsAndroid.RESULTS.GRANTED) {
      console.log("Write external storage permission granted");
      PSPDFKit.present(DOCUMENT, CONFIGURATION);
    } else {
      console.log("Write external storage permission denied");
    }
  } catch (err) {
    console.warn(err);
  }
}

const styles = StyleSheet.create({
  container: {
    flex: 1,
    justifyContent: "center",
    alignItems: "center",
    backgroundColor: "#F5FCFF"
  },
  text: {
    fontSize: 20,
    textAlign: "center",
    margin: 10
  }
});-
Before launching the app you need to copy a PDF document onto your development device or emulator.
adb push /path/to/your/document.pdf /sdcard/document.pdf
-
Your app is now ready to launch. From
YourAppdirectory runreact-native run-android.react-native run-android
- Clone the repository.
git clone https://github.com/PSPDFKit/react-native.git. - Install dependencies: run
yarn installfromsamples/Catalogdirectory. (Because of a bug you may need to cleanyarn's cache withyarn cache cleanbefore.) - Add your customer portal password to
samples/Catalog/android/build.gradle:
      maven {
          url 'https://customers.pspdfkit.com/maven/'

          credentials {
              username 'pspdfkit'
              password 'YOUR_MAVEN_PASSWORD_GOES_HERE'
          }
}- Update license key in
samples/Catalog/android/app/src/main/AndroidManifest.xml:
   <application>
      ...

      <meta-data
          android:name="pspdfkit_license_key"
          android:value="YOUR_LICENSE_KEY_GOES_HERE"/>

</application>- Catalog app is now ready to launch. From
samples/Catalogdirectory runreact-native run-android.
To copy a pdf document to your local device storage:
adb push "document.pdf" "/sdcard/document.pdf"To bundle a pdf document in the Android app, simply copy it the Android assets folder, for the Catalog app is samples/PDFs.
You can configure the builder with a dictionary representation of the PSPDFConfiguration object. Check ConfigurationAdapter.java for all the parameters available.
const CONFIGURATION = {
  startPage: 3,
  scrollContinuously: false,
  showPageNumberOverlay: true,
  grayScale: true,
  showPageLabels: false,
  pageScrollDirection: "vertical"
};Just like on iOS we also support integrating PSPDFKit directly into the react-native view hierarchy. There are a few thing you need to consider when using this approach:
- Your activity hosting the react component needs to extend from
ReactFragmentActivity. - Because of issues in react-native our
PdfViewneeds to calllayoutanddispatchOnGlobalLayouton every frame, this might negatively affect your apps performance or even cause it to misbehave. PSPDFKitViewdoesn't yet support all the features (outline, bookmarks, thubmnail grid, view settings) usingPSPDFKit.presentprovides.
The PSPDFKit React Native Android Wrapper allows you to specify a custom grouping for the annotation creation toolbar. Please refer to ReactGroupingRule.java for the complete list of menu items. To set them just specify the menuItemGrouping prop on the PSPDFKitView. The format used is as follows:
[
  menuItem,
  { key: menuItem, items: [subItem, subItem]},
  ...
]
Upgrading yarn's lock file is required in order to update react-native-pspdfkit module in a project that has been already setup following the steps in Getting Started section.
From root project folder (e.g.YourApp for upgrading example project) launch yarn upgrade.
After launching yarn upgrade, apply step 7, step 10 and step 12 from Getting Started section.
Enable MultiDex in YourApp/android/app/build.gradle (note one place to edit):
...
android {
    compileSdkVersion 25
    buildToolsVersion "25.0.2"

defaultConfig {
    applicationId "com.yourapp"
+   multiDexEnabled true
    minSdkVersion 16
    targetSdkVersion 25
    versionCode 1
    versionName "1.0"
    ndk {
        abiFilters "armeabi-v7a", "x86"
    }
}
...
Remove pspdfkit-lib folder in YourApp/android/.
In YourApp/android/settings.gradle remove the old reference to pspdfkit-lib (note one place to edit):
 project(':react-native-pspdfkit').projectDir = new File(rootProject.projectDir, '../node_modules/react-native-pspdfkit/android')
 include ':app'
-include ':pspdfkit-lib'After launching yarn upgrade, apply step 6, step 8 and step 10 from Getting Started section.
Enable MultiDex in YourApp/android/app/build.gradle (note four place to edit):
...
android {
-   compileSdkVersion 25
+   compileSdkVersion 26
-   buildToolsVersion "25.0.2"
+   buildToolsVersion "26.0.1"

defaultConfig {
    applicationId "com.yourapp"
    multiDexEnabled true
-   minSdkVersion 16
+   minSdkVersion 19
-   targetSdkVersion 25
+   targetSdkVersion 26
    versionCode 1
    versionName "1.0"
    ndk {
        abiFilters "armeabi-v7a", "x86"
    }
}
...The following constants are available on the PSPDFKit export:
versionString(String) PSPDFKit version number.
Shows the pdf document from the local device filesystem, or your app's assets.
file:///sdcard/document.pdfwill open the document from local device filesystem.file:///android_asset/document.pdfwill open the document from your app's assets.
configuration can be empty {}.
- Visual Studio Community 2017 or greater
- git
- cmake
- yarn
- PSPDFKit for Windows.vsix (installed)
- PowerShell
Let's create a simple app that integrates PSPDFKit and uses the react-native-pspdfkit module.
- Open
PowerShellas administrator. - Make sure
react-native-cliis installed:yarn global add react-native-cli. - Install Windows Tool for React Native:
yarn add global windows-build-tools. - Open
x64 Native Tools Command Prompt for VS 2017program. - Create the app with
react-native init --version=0.55.4 YourAppin a location of your choice. - Step into your newly created app folder:
cd YourApp. - Install the Windows helper plugin:
yarn add --dev rnpm-plugin-windows. - Install
react-native-pspdfkitfrom GitHub:yarn add github:PSPDFKit/react-native. - Install
react-native-fsfrom GitHub:yarn add react-native-fs. - Install all modules for Windows:
yarn install. (Because of a bug you may need to cleanyarn's cache withyarn cache cleanbefore.) - Initialize the windows project:
react-native windows. - Link module
react-native-pspdfkit:react-native link react-native-pspdfkit. - Open the Visual Studio solution in
react-native\YourApp\windows. - Accept and install any required extensions when prompted.
- If the settings window opens, click on
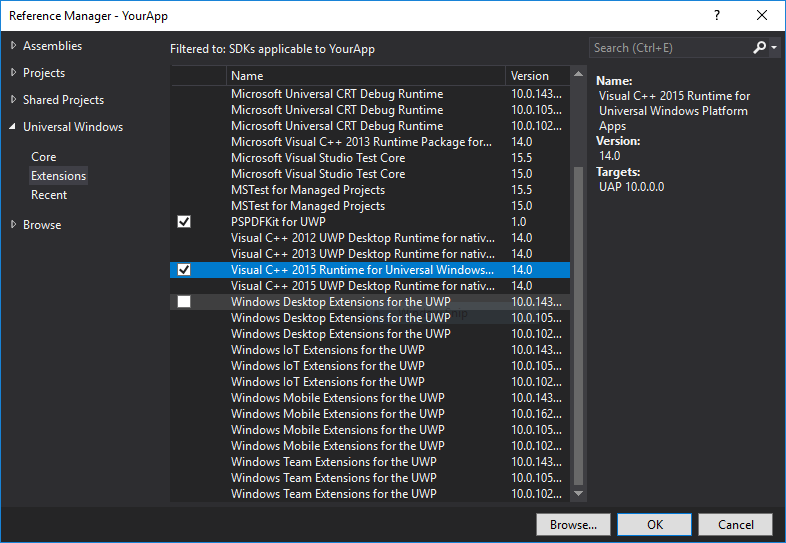
Developerand selectyes. - Mark
PSPDFKit SDKandVisual C++ Runtimeas dependencies forYourApp: Right click onYourApp-> Add -> Refererece... Click on Projects and tickReactNativePSPDFKit. Click on Universal Windows -> Extensions and tickPSPDFKit for UWPandVisual C++ 2015 Runtime for Universal Windows Platform Appsthen click ok.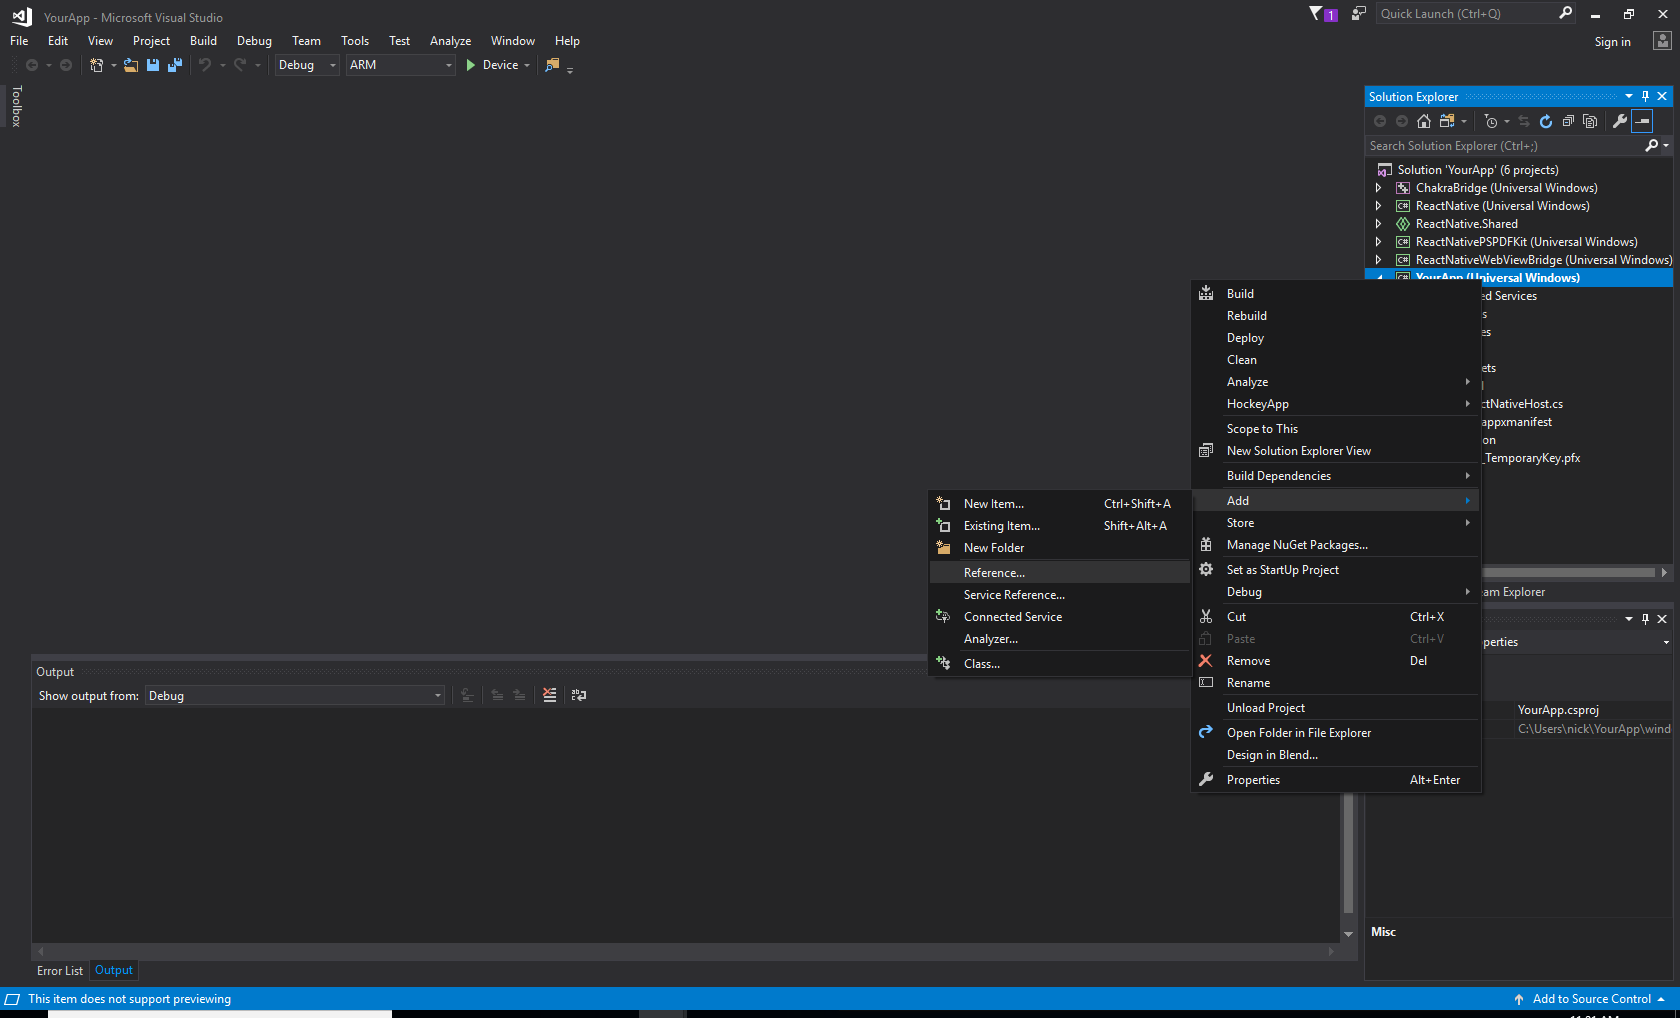
- Add an application resource to your
Appl.xamlto reference your License key.


<rn:ReactApplication
    x:Class="Catalog.App"
    xmlns="http://schemas.microsoft.com/winfx/2006/xaml/presentation"
    xmlns:x="http://schemas.microsoft.com/winfx/2006/xaml"
    xmlns:rn="using:ReactNative"
    RequestedTheme="Light">

+	<Application.Resources>
+		<ResourceDictionary>
+			<ResourceDictionary.MergedDictionaries>
+				<ResourceDictionary Source="License.xaml"/>
+			</ResourceDictionary.MergedDictionaries>
+		</ResourceDictionary>
+	</Application.Resources>

</rn:ReactApplication>- Create a new file resource called
License.xamlwith your PSPDFKit license key at the top level of the project. (ReplaceENTER LICENSE KEY HEREwith your key)
<ResourceDictionary
	xmlns="http://schemas.microsoft.com/winfx/2006/xaml/presentation"
	xmlns:x="http://schemas.microsoft.com/winfx/2006/xaml">

	<x:String x:Key="PSPDFKitLicense">ENTER LICENSE KEY HERE</x:String>

</ResourceDictionary>- Change the target SDK of YourApp to >= 10.0.16299 and Min Version to >= 10.0.15063 : Right Click on YourApp -> Properties. Go to
Application and change Target Version to >= 10.0.16299 and change Min Version to >= 10.0.15063.
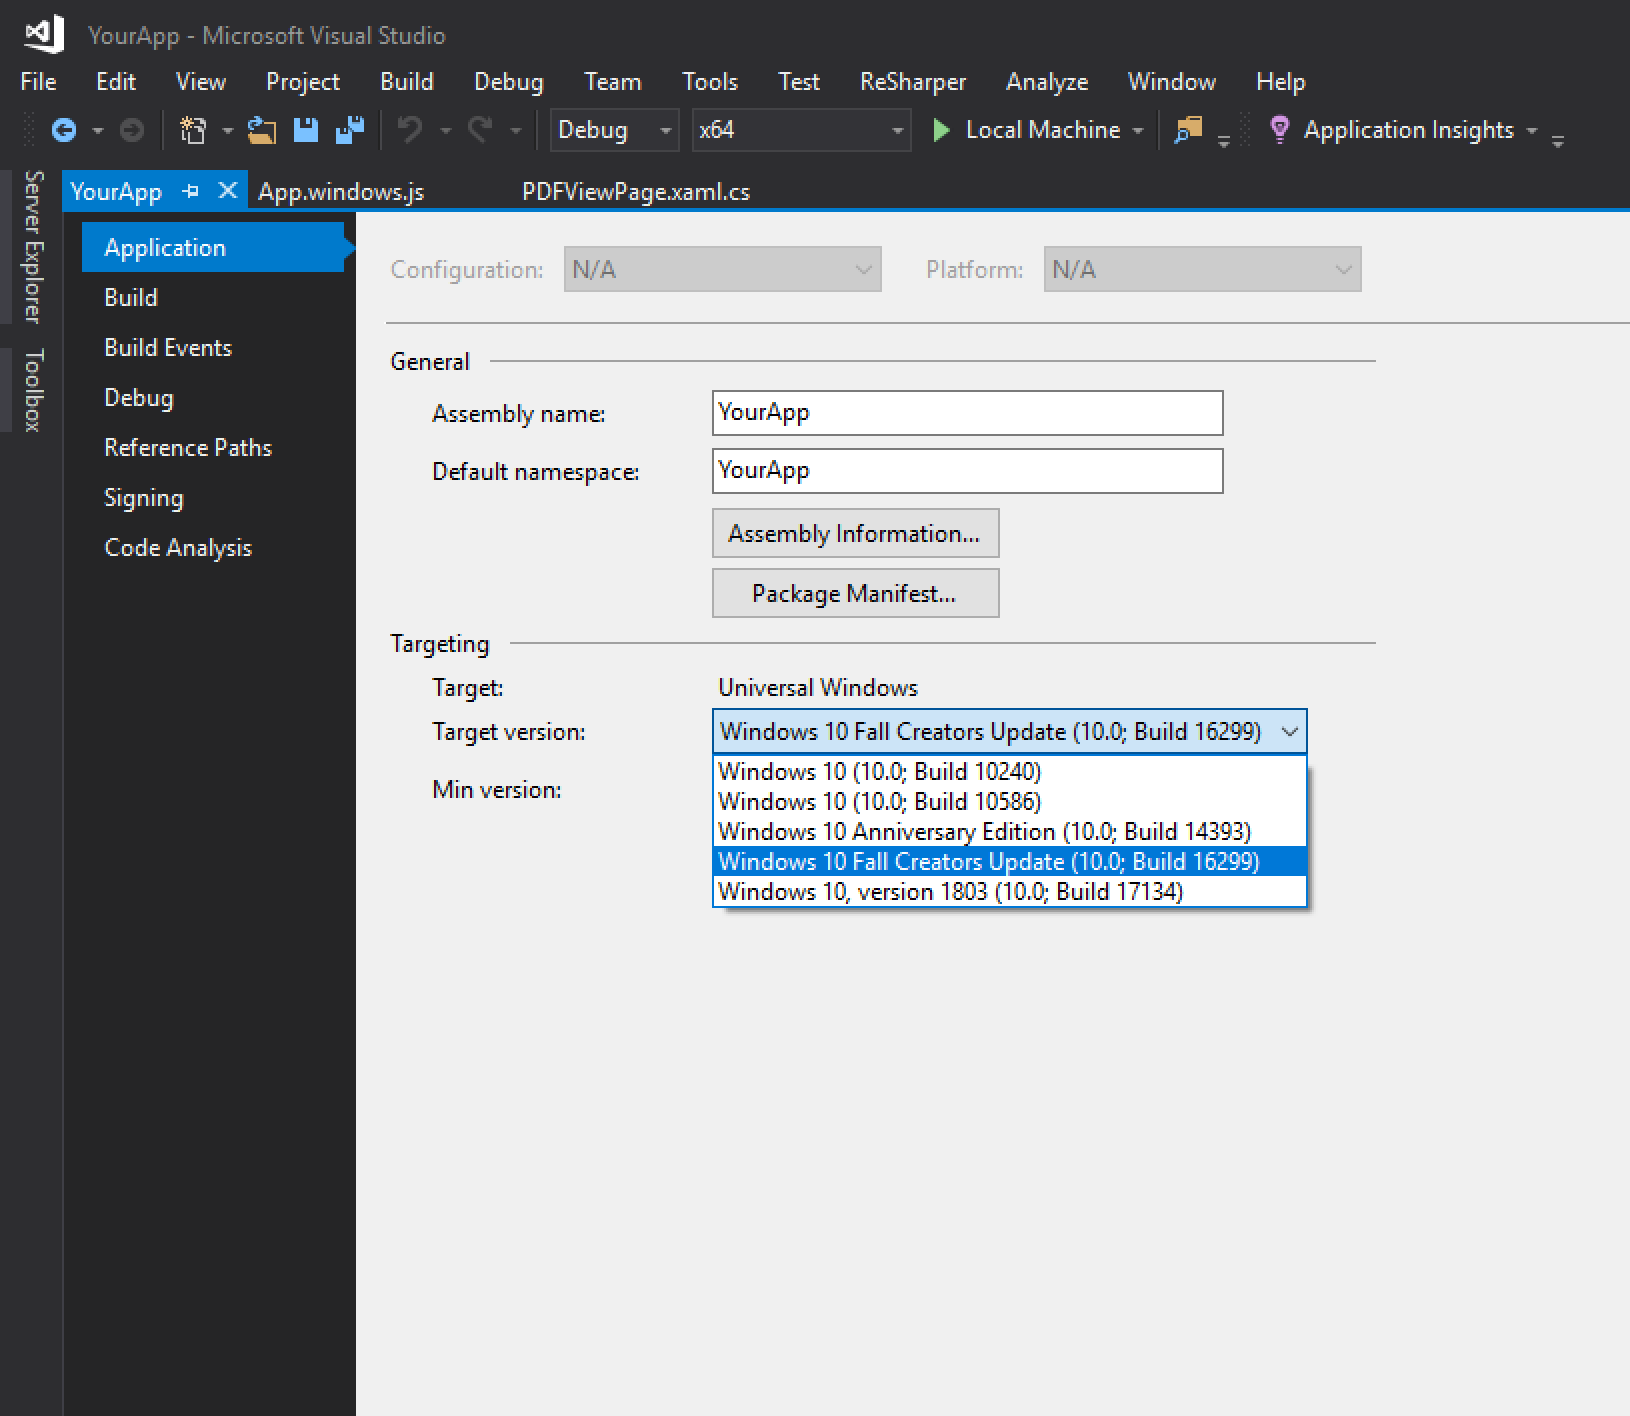
- Save Changes: File -> Save All
- Add the
PSPDFKitViewandPSPDFKitmodule into yourApp.windows.jsfile, and add a open button to allow the user to navigate the file system.

import React, { Component } from "react";
import {
  AppRegistry,
  StyleSheet,
  View,
  Text,
  NativeModules,
  Button
} from "react-native";

var PSPDFKitView = require("react-native-pspdfkit");
var PSPDFKit = NativeModules.ReactPSPDFKit;

export default class Catalog extends Component<{}> {
  constructor(props) {
    super(props);
  }

  render() {
    return (
      <View style={styles.page}>
        <PSPDFKitView ref="pdfView" style={styles.pdfView} />
        <View style={styles.footer}>
          <View style={styles.button}>
            <Button onPress={() => PSPDFKit.OpenFilePicker()} title="Open" />
          </View>
          <Text style={styles.version}>
            SDK Version : {PSPDFKit.versionString}
          </Text>
        </View>
      </View>
    );
  }
}

var styles = StyleSheet.create({
  page: {
    flex: 1,
    alignItems: "stretch",
    backgroundColor: "#eee"
  },
  pdfView: {
    flex: 1
  },
  button: {
    width: 100,
    margin: 20
  },
  footer: {
    flexDirection: "row",
    justifyContent: "space-between",
    alignItems: "center"
  },
  version: {
    color: "#666666",
    margin: 20
  }
});- Now run the application on the command line:
react-native run-windows. - Press Yes when PowerShell wants to run.
- Type 'y' when asking if you want to install the certificate.
- Clone the repository.
git clone https://github.com/PSPDFKit/react-native.git. - From the command promt
cd react-native\samples\Catalog. - Make sure
react-native-cliis installed:yarn global add react-native-cli. - run
yarn install. (Because of a bug you may need to cleanyarn's cache withyarn cache cleanbefore.) - Open the UWP catalog solution in
react-native\samples\Catalog\windows. - Accept and install any required extensions when prompted.
- If the settings windows opens, click on
Developerand selectedyes. - Create a new file resouce called
License.xamlwith your PSPDFKit license key at the top level of the project. (ReplaceENTER LICENSE KEY HEREwith your key)
	<ResourceDictionary
		xmlns="http://schemas.microsoft.com/winfx/2006/xaml/presentation"
		xmlns:x="http://schemas.microsoft.com/winfx/2006/xaml">

	  <x:String x:Key="PSPDFKitLicense">ENTER LICENSE KEY HERE</x:String>

</ResourceDictionary>- From the command prompt run
react-native run-windows. - Enter
yto accept the certificate when prompted and allow socket access for reactive when prompted. (Note: On windows yarn does not link correctly, therefore any changes made in the ReactNativePSPDFKit project will have to be manually copied to thewindowsfolder at the base of the repo in order to commit changes.)
The following constants are available on the PSPDFKit export:
versionString(String) PSPDFKit version number.
Opens a file picker for the user to select a pdf from. When the user selects an item it will be displayed in the <PSPDFKitView>.
Opens a document in the available <PSPDFKitView>. If the element is not displayed Present will fail. The document has to be accessible by the application, for example needs to be located in the application assets.
PSPDFKit.Present("ms-appx:///Assets/pdf/Business Report.pdf");This project can be used for evaluation or if you have a valid PSPDFKit license.
All items and source code Copyright © 2010-2019 PSPDFKit GmbH.
See LICENSE for details.
Please ensure you signed our CLA so we can accept your contributions.